This is a quickstart guide for creating an ArcGIS Online Story Map Tour. It took me quite awhile to get this running, so this guide specific to creating the Tour with a REST service on your ArcGIS server.
- Create the Feature Layer in ArcMap with the following attributes (the names must match!) We hosted our images on our web server.
- Name ( type: esriFieldTypeString , alias: Name , length: 75 )
- Description ( type: esriFieldTypeString , alias: Description , length: 254 )
- icon_color ( type: esriFieldTypeString , alias: Icon color , length: 50 )
- pic_url ( type: esriFieldTypeString , alias: pic_url , length: 120 )
- thumb_url ( type: esriFieldTypeString , alias: thumb_url , length: 120 )
- Share that map as a service (Example Service)
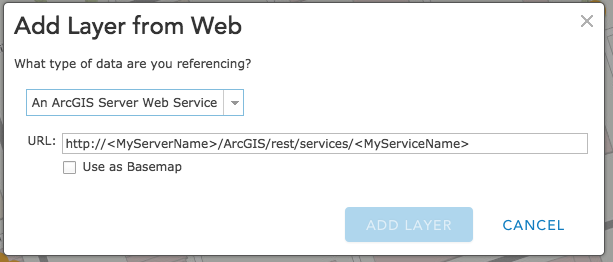
- Create a map in ArcGIS Online using the Add Layer from Web option, choosing your service created in step 2
- Save the map. This will be the source for your story map.
- Click the share button at the top of the map

- Choose to share with Everyone, then click "Make a Web Application"
- Under the Configurable Apps tab, browse until you find "Story Map Tour"
- From there, it will create an application that you can organize the order of the stops on the tour and adjust other options.
- Save your application and share it with the world!