Updating Editor Tracking Data in a Hosted Feature Service (Online)

3021
10
03-21-2019 09:38 AM
ScottMoore__Olympia_
Esri Contributor
12 10 3,021

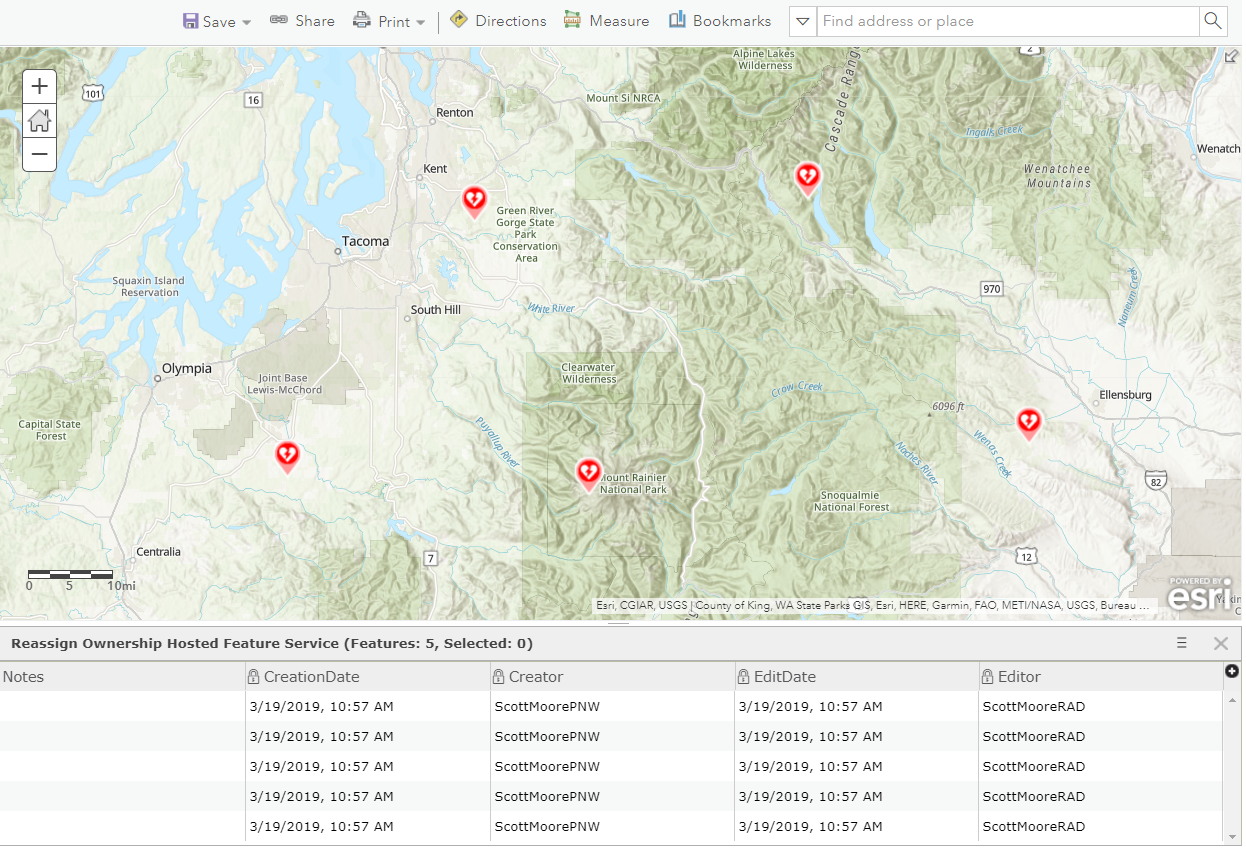
With the 3/19/19 release of ArcGIS Online, some changes were made to the admin API for hosted feature services (ArcGIS Online only) that make it possible to update editor tracking data as an administrator in ArcGIS Online.  Why would you need to do this?  Well, the way editor tracking (also known as Keep track of who created and last updated features) works, is that when a new feature is created in a hosted feature service, 4 fields are automatically populated with data about who created and last edited a feature and when those operations happened.  Those fields look like this:

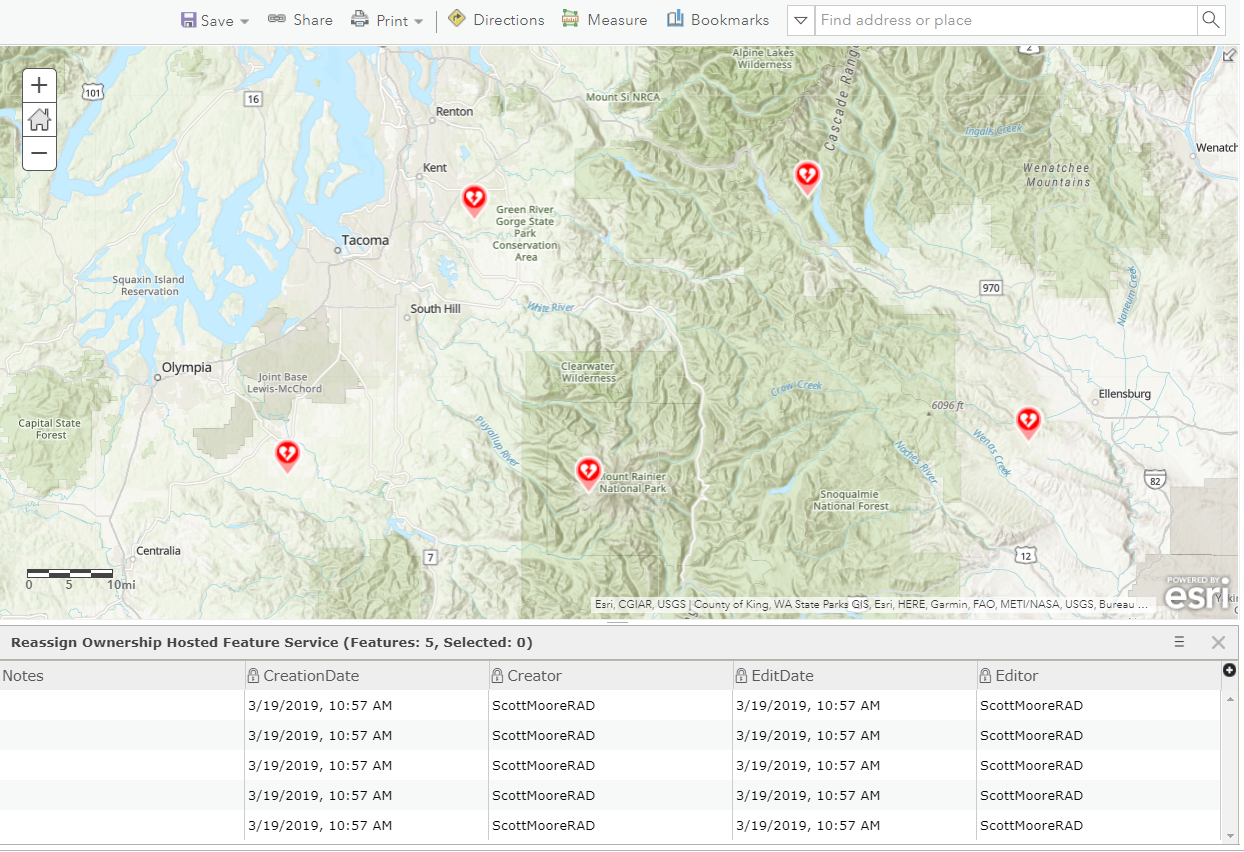
As you can see, I have 5 features that are "owned" by ScottMooreRAD meaning that the ArcGIS Online user ScottMooreRAD initially created the feature on 3/19/2019 at 10:57AM.  Notice that the Editor and EditDate fields are also populated when the feature is first created.

Now, what happens if ScottMooreRAD no longer works at my agency?  We need to be able to reassign ownership of ScottMooreRAD's features, especially when we have OBAC (ownership based access control) enabled.  NOTE: Feature Service owners (and certain others) can edit all features in the Map Viewer when they Add layer to new map with full editing control, but this does not affect the Creator attribute.

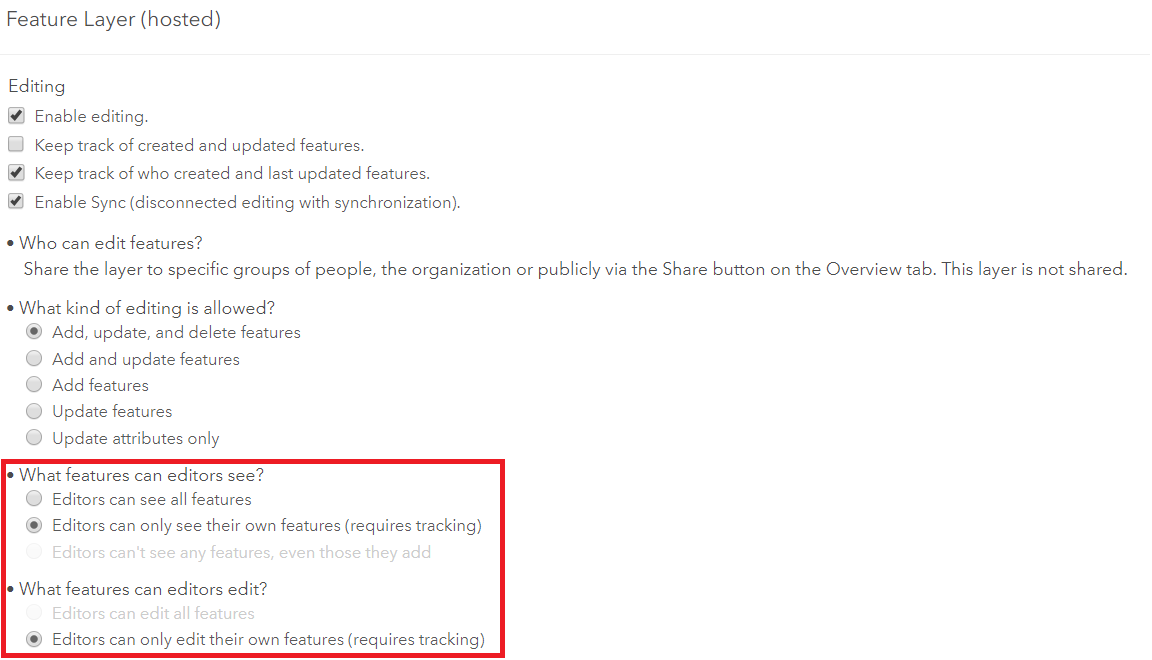
If we have the feature service set to only allow editors to edit their own features, and the user that owns the feature no longer exists, then we would be stuck in terms of being able to edit those features.  So, how can we update these system managed fields so we assign the features to a new user?  Let's run a simple ArcGIS API for Python script!

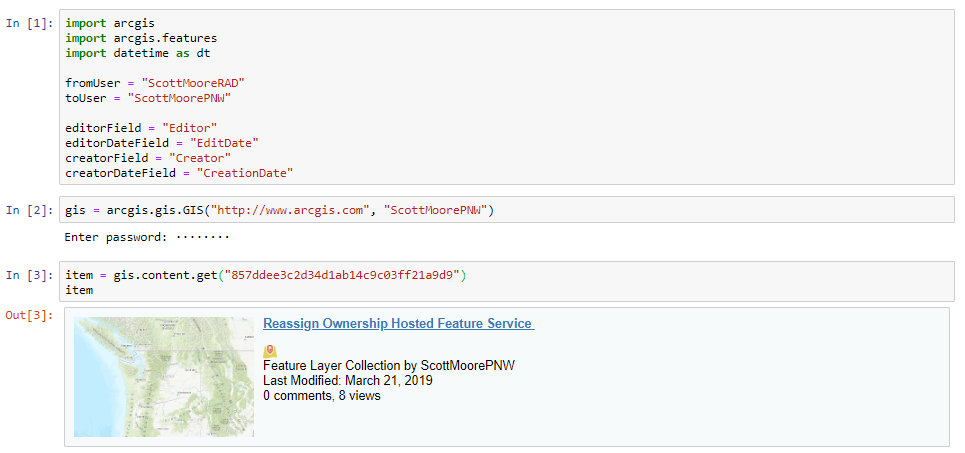
The first step is to connect to ArcGIS Online using the ArcGIS API for Python and get access to the feature service.  You should connect as the owner of the feature service.  Notice that we have also setup 2 variables for the current owner (fromUser) and the owner we would like to take over ownership of features (toUser).  We also have 4 variables for the field names that are used for the editor tracking fields.  In some cases, your field names may be different and this makes it easy for us to change.

Now, the real work begins.  We need to disable editor tracking:

Next, we need to make the editor tracking fields editable.

Now that they are editable, we can run a calculate expression to update the fromUser (ScottMooreRAD) to the toUser (ScottMoorePNW).  

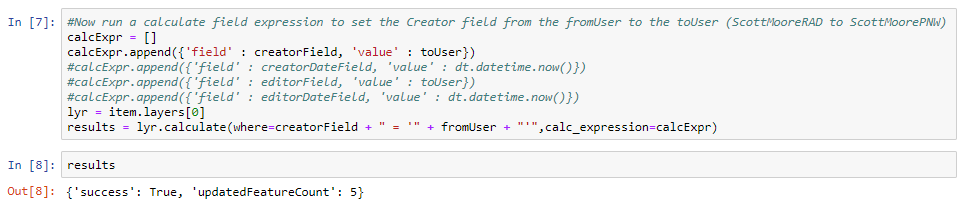
Notice in the python code above that I have 3 commented out fields.  If you would like to update the other editor tracking fields for some reason, you can also update the creation and last edit dates as well as the last editor.  Simply uncomment those lines and put in your own logic.

The final step we need to take is to make the editor tracking fields read-only (editable: False), and to turn editor tracking back on.

Now, let's validate that the Creator is set to our new user.  As we can see, the features that were owned by ScottMooreRAD are now owned by ScottMoorePNW.

Attached, you will find a python notebook that you can start from.  Let me know in the comments if you have any questions!

10 Comments
PeteAtwood
New Contributor II

@ScottMoore__Olympia_  I am trying to do this process on a table and getting an error on step 6 when trying to make the editor tracking fields editable.  Its throwing a list index out of range, so I assume the fm = arcgis.features.managers.FeatureLayerManager.fromitem(item, layer_id=0) isn't setting the layer correctly.  Any ideas what would allow me to set that table layer?


sirws
by
New Contributor

@PeteAtwood Is the ID of the table 0 when you look at it in the service directory?  I never tested this on a table, but I would expect it to work.


sirws_0-1645584077704.png


PeteAtwood
New Contributor II

@sirwsThat is a great thought, when checking I notice the index is at (2) for that table.  However, after changing the index to:  ...(item, layer_id=2) still getting the same result with index out of range.  I suspect "arcgis.features.managers.FeatureLayerManager.fromitem" might not be the correct code to set that table but I don't code enough to be able to figure this out.

error.PNG

PeteAtwood
New Contributor II

Update:

Found a workaround for this, if you go into the layers data tab - fields view (online), you can click on the Creator field and set the Editable to Yes.  It will then allow you to bring the table into ArcPro, calc the Creator field, then go back to the data tab and reset Editable to No.  I then ran the last line of code to re-enable editor tracking and everything is working as intended.  Kind of a pain but it works.

error.PNG

TrebinMT
New Contributor II

Thanks Scott.  I was at a loss how to transfer creator/editor data to a new layer that I had locked down Survey123 editing privileges to only submissions they had entered as well as keep track original creation dates and editing dates... rather than stamp my user and time on those fields during migration.

Worked like a charm.   I did end up iterating through a Pandas data frame (harvested from the original layer) to stamp original creator/editor values back to the new layer.     

Thanks!

For anyone else interested, after creating the data frame of the old data, this is what I did:

for index, row in df_nop.iterrows():
    print(row['grant_application'], row['Creator'])
    calcExpr = []
    calcExpr.append({'field' : creatorField, 'value' : row['Creator']})
    calcExpr.append({'field' : creatorDateField, 'value' : row['CreationDate']})
    calcExpr.append({'field' : editorField, 'value' : row['Editor']})
    calcExpr.append({'field' : editorDateField, 'value' :  row['EditDate']})
       
    results = lyr.calculate(where=granteeField + " = '" + row['grant_application'] + "'",calc_expression=calcExpr)
LLyons
by
New Contributor III

Hi @PeteAtwood 

When I'm on the screen that you are showing, there is no option for where to make Creator editable. It just shoes "no". Am I missing something? Thanks!

ScottMoore__Olympia_
Esri Contributor

Here is some updated code that works with tables:

from arcgis.gis import GIS
import arcgis.features
import datetime as dt

fromUser = "scot5141@esri.com_government_admin"
toUser = "ScottMoorePNW"

editorField = "Editor"
editorDateField = "EditDate"
creatorField = "Creator"
creatorDateField = "CreationDate"

gis = GIS("home")

item = gis.content.get("4f286c8ed2a34c26b244e26c3a60b376")

f = arcgis.features.FeatureLayerCollection.fromitem(item)
f.manager.update_definition({"editorTrackingInfo" : {"enableEditorTracking" : False}})

#Let's make the editor tracking field editable
editFlag = True
fm = item.tables[0].manager
fm.update_definition({"fields":[{"name":editorField,"editable":editFlag},{"name":editorDateField,"editable":editFlag}, \
{"name":creatorField,"editable":editFlag},{"name":creatorDateField,"editable":editFlag}]})

#Now run a calculate field expression to set the Creator field from the fromUser to the toUser (ScottMooreRAD to ScottMoorePNW)
calcExpr = []
calcExpr.append({'field' : creatorField, 'value' : toUser})
#calcExpr.append({'field' : creatorDateField, 'value' : dt.datetime.now()})
#calcExpr.append({'field' : editorField, 'value' : toUser})
#calcExpr.append({'field' : editorDateField, 'value' : dt.datetime.now()})
lyr = item.tables[0]
results = lyr.calculate(where=creatorField + " = '" + fromUser + "'",calc_expression=calcExpr)

print(results)

editFlag = False
fm.update_definition({"fields":[{"name":editorField,"editable":editFlag},{"name":editorDateField,"editable":editFlag}, \
{"name":creatorField,"editable":editFlag},{"name":creatorDateField,"editable":editFlag}]})

f.manager.update_definition({"editorTrackingInfo" : {"enableEditorTracking" : True}})
ScottMoore__Olympia_
Esri Contributor

@LLyons If you want to make the field editable in the UI, you would have to run the code above down through line 24.  That turns off editor tracking and makes the edit tracking fields editable.


LLyons
by
New Contributor III

@ScottMoore__Olympia_ thank you! Now any chance you have instructions on how to do that from a beginners' perspective? I've never done any code work...

ScottMoore__Olympia_
Esri Contributor

@LLyons I would start by taking a look at this link to the help documentation.  You should be able to open this in ArcGIS Online and "Save As" a notebook in your ArcGIS Online org.  You can then modify it to point to your layer.  There are a hundreds of great samples and videos on youtube that show how to get started as well.