- Home
- :
- All Communities
- :
- Products
- :
- ArcGIS CityEngine
- :
- ArcGIS CityEngine Questions
- :
- Esri Complete Street Rule Discussion-Feedback?
- Subscribe to RSS Feed
- Mark Topic as New
- Mark Topic as Read
- Float this Topic for Current User
- Bookmark
- Subscribe
- Mute
- Printer Friendly Page
Esri Complete Street Rule Discussion-Feedback?
- Mark as New
- Bookmark
- Subscribe
- Mute
- Subscribe to RSS Feed
- Permalink
- Report Inappropriate Content
Hi All,
My name is David Wasserman, the urban planner/programmer that wrote Complete_Street.cga that is featured in the Complete Street Example. I was hoping that if anyone had any comments on the rule or suggestions for changes/features/bug fixes I wanted to provide a forum for that on Geonet. So say what ever comes to your mind, but I would prefer constructive feedback. This could be a forum where everyone could provide input, discussion, and hopefully create a better rule. If you want to discuss transportation/parking/urban planning rules generally for CityEngine consider hitting this thread first.
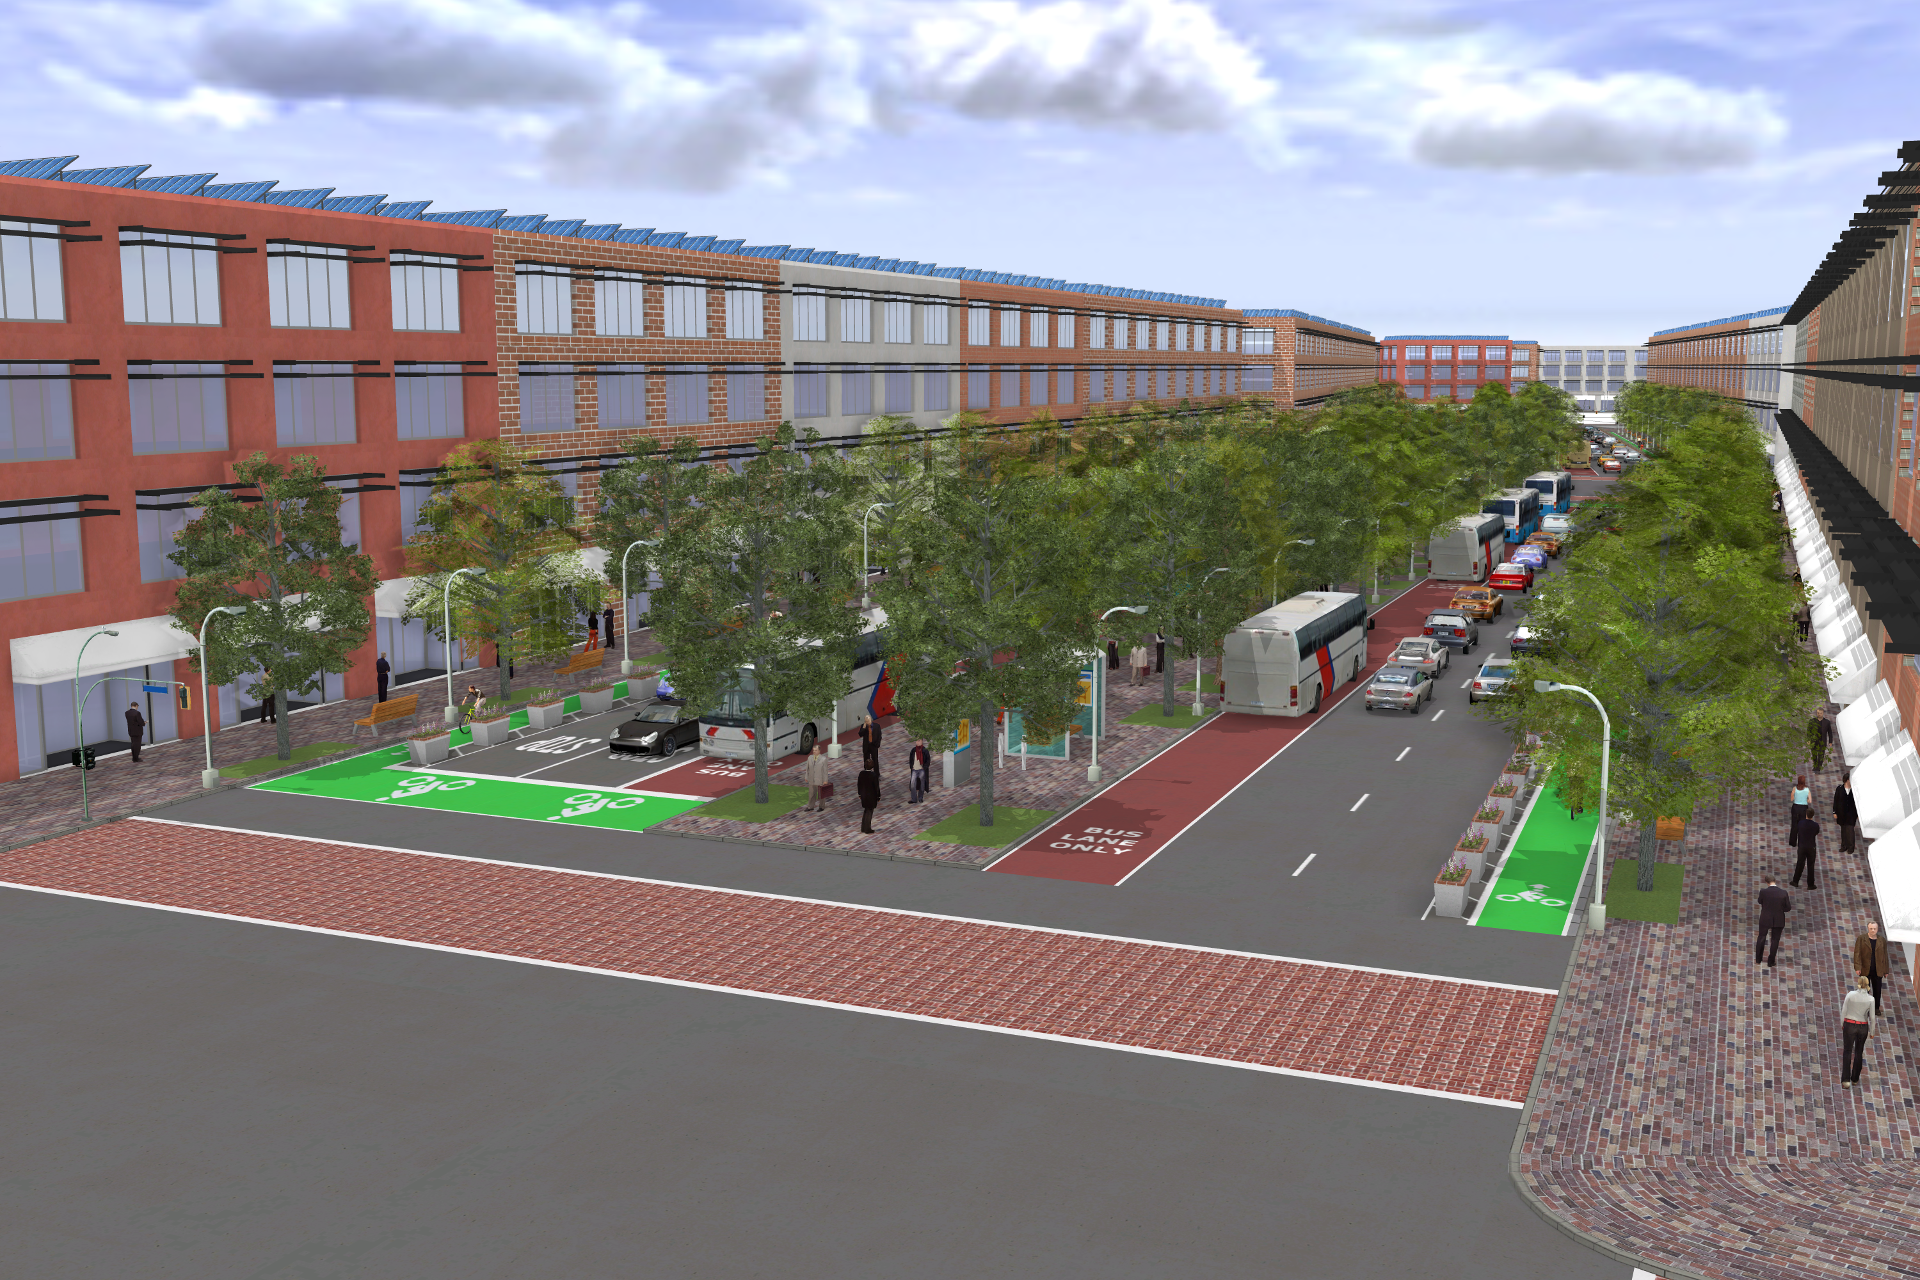
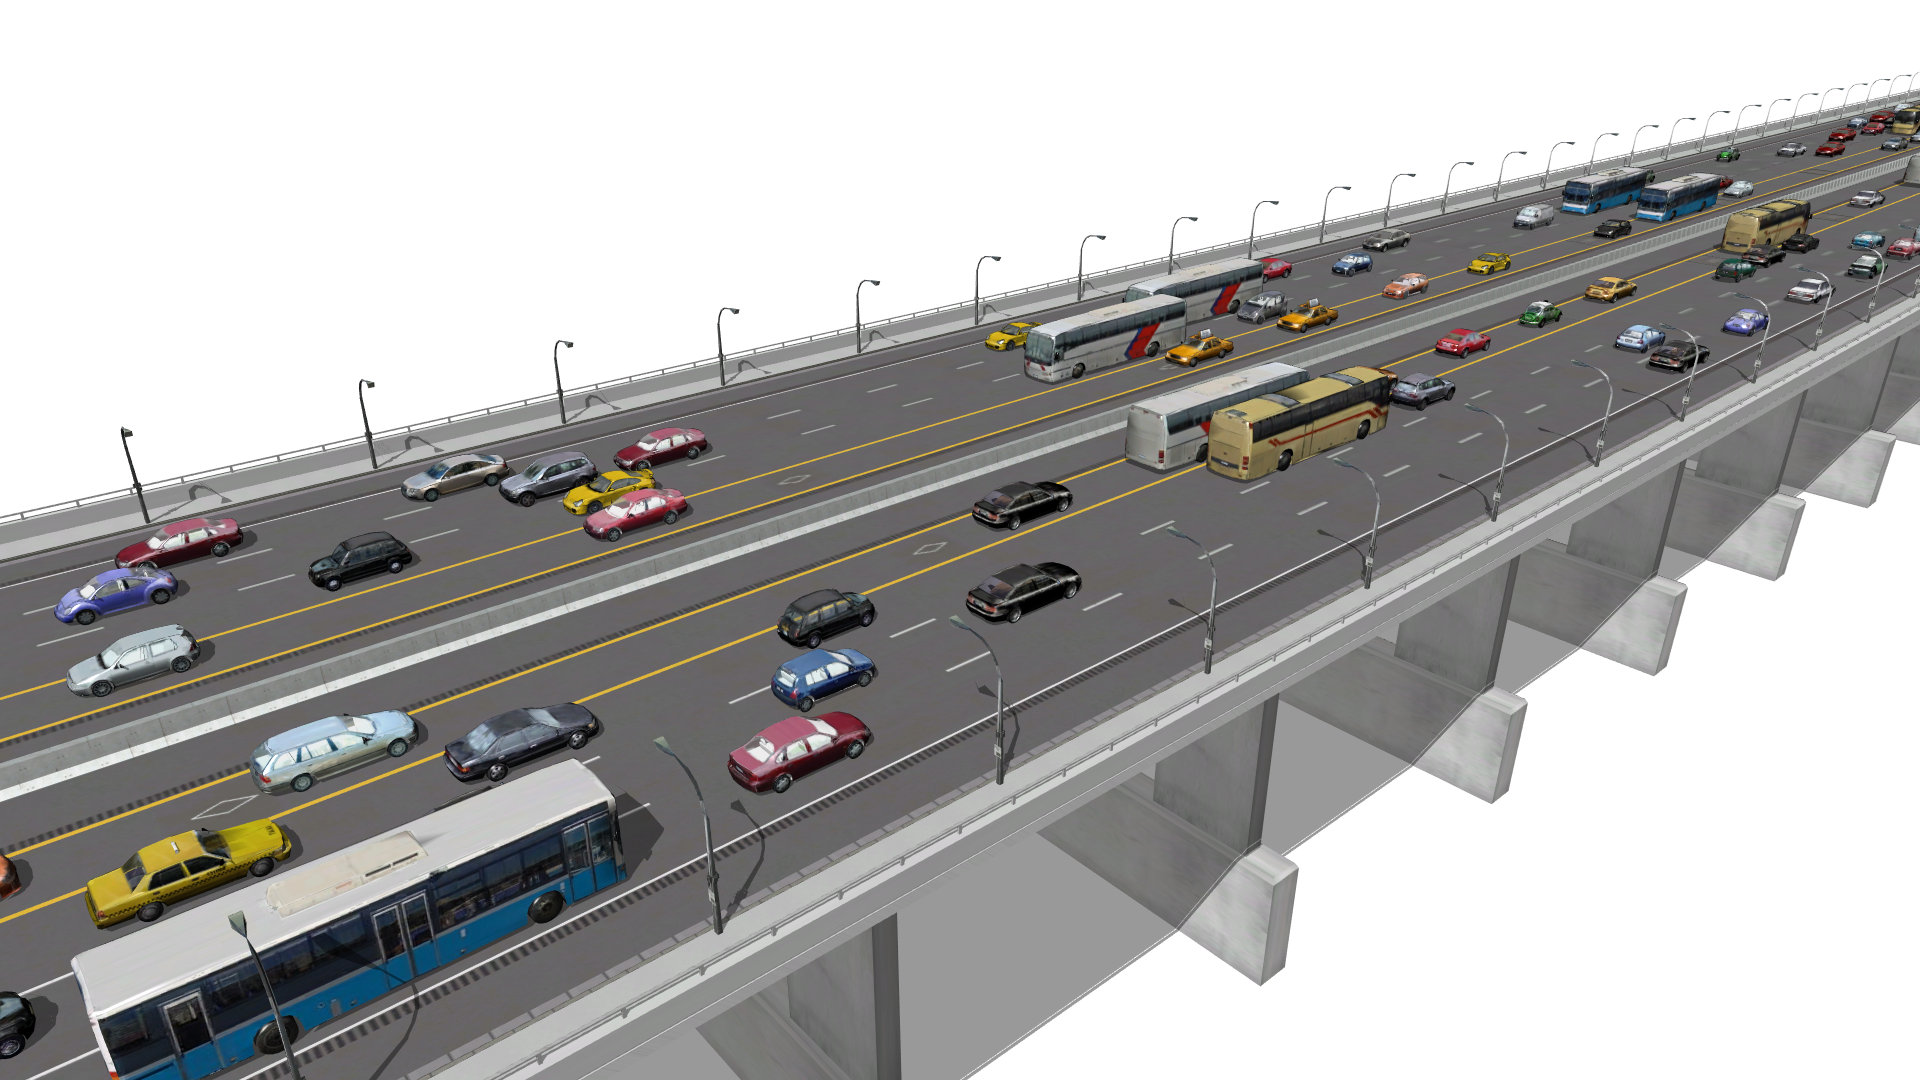
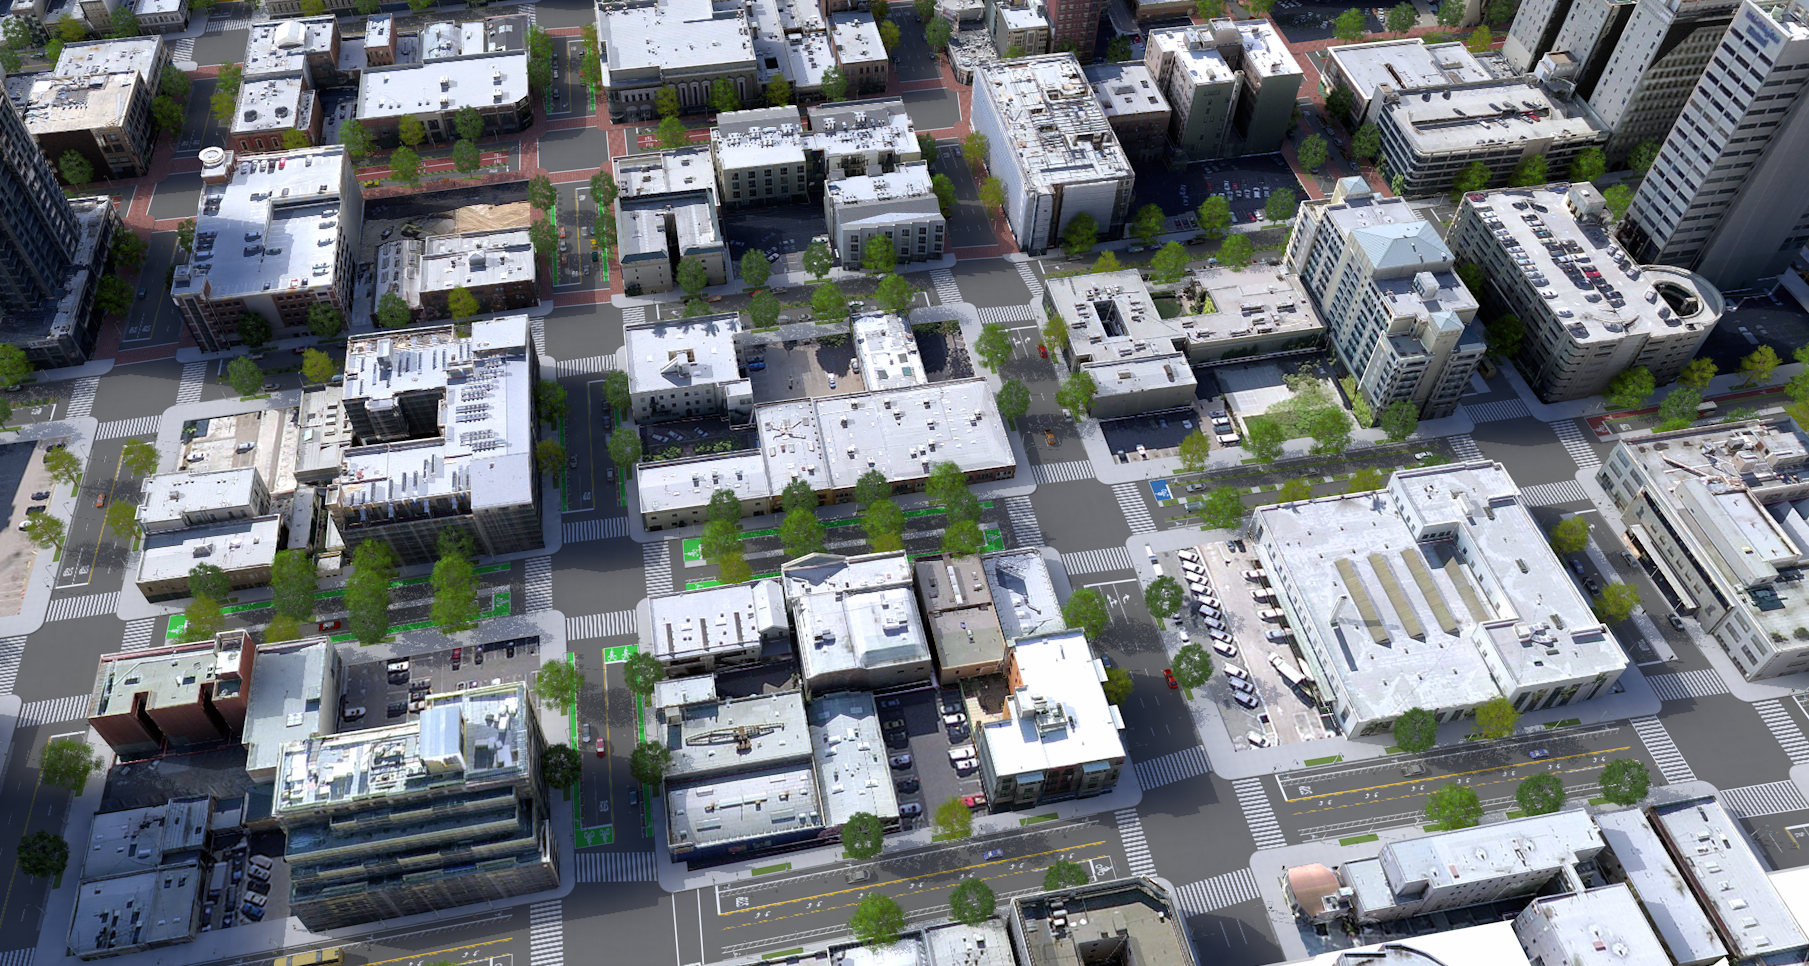
I have attached some example renderings for those unfamiliar with the rule and its capabilities. In addition, there is now documentation for the rule available for download here. It is still pretty rough, so feedback is appreciated. In addition to the documentation, there is a new version of the rule posted about here, feedback would be appreciated.
In addition, this is also an ok forum if you are having problems with the rule. If you comment on here, I get buzzed. In the numbered section below I will recount a short summary of problems discussed in this thread.
Kind Regards,
David Wasserman
PS: If you do anything with the rule or want to share a rendering you made (a nice one), feel free to share your images/experience.
Discovery 1: Webscene issues that were worked out pretty easily, small webscenes work typically better.
Discovery 2: Street rule is not compatible with CE 2013. Its Crosswalks Depend on 2014 UVSpace options, and there is not an ESRI.lib file for 2013. Rule is designed for and works best with the most recent version of CE (2014).
Discovery 3: For road segments to snap, you must make sure they are apart of the same layer. Merge layers if you have snapping problems.
Discovery 4: Short road segments are hard for the street rule to handle at times. A few work around with short segments include: Change crosswalks and stop types to none, making the CrosswalkBegin/End attributes a negative number, manipulating nodes to be longer, or deleting unnecessary nodes to create longer street segments (use simplify graph tool) (Thanks Steve).
Discovery 5: A discussion about curb extensions and how to make them albeit an unorthodox way is both below and on this thread.
Discovery 6: Bridges have a minimum height requirement to generate (structure just does not make sense below a certain height). Also if you want Piers to appear regardless of Occlusion settings use On, Show All Piers. If it still does not work try: Making a new segment to test the rule one, restarting CE, or re-importing the road layer and starting again.
Discovery 7: When cropping or re-sizing your aerial for your CE project chances are you will need to georeference the image to your geography or another aerial. Georeferencing an aerial in ArcMAP will take on the ArcMAP scene projection but that is not enough. Be sure to use the "Project Raster" in the Toolbox and this will ensure proper scale and placement for your CE scene.
Discovery 8: Mapped Attributes: IF you map the streetWidth or sidewalk street parameters, and you want to adjust them after the fact you must change both the mapped object attribute AND the shape parameter. See responses below for details.
Discovery 9: Handles - Recent editions to the rule in 2017 have started to support handles for traffic lights and streetlights for more custom edits that were typically reserved for photoshop. If you have any suggestions for handles please add a comment.
_________________________________________________________________________________________________________________
Notice: 1: There is a 2015 Version of the Complete Street rule. There was a bug in the street rule that did not make it work in 2015, and in this version of the rule the bug is fixed. It should work in 2014 as well as 2015 versions of CE.
- Mark as New
- Bookmark
- Subscribe
- Mute
- Subscribe to RSS Feed
- Permalink
- Report Inappropriate Content
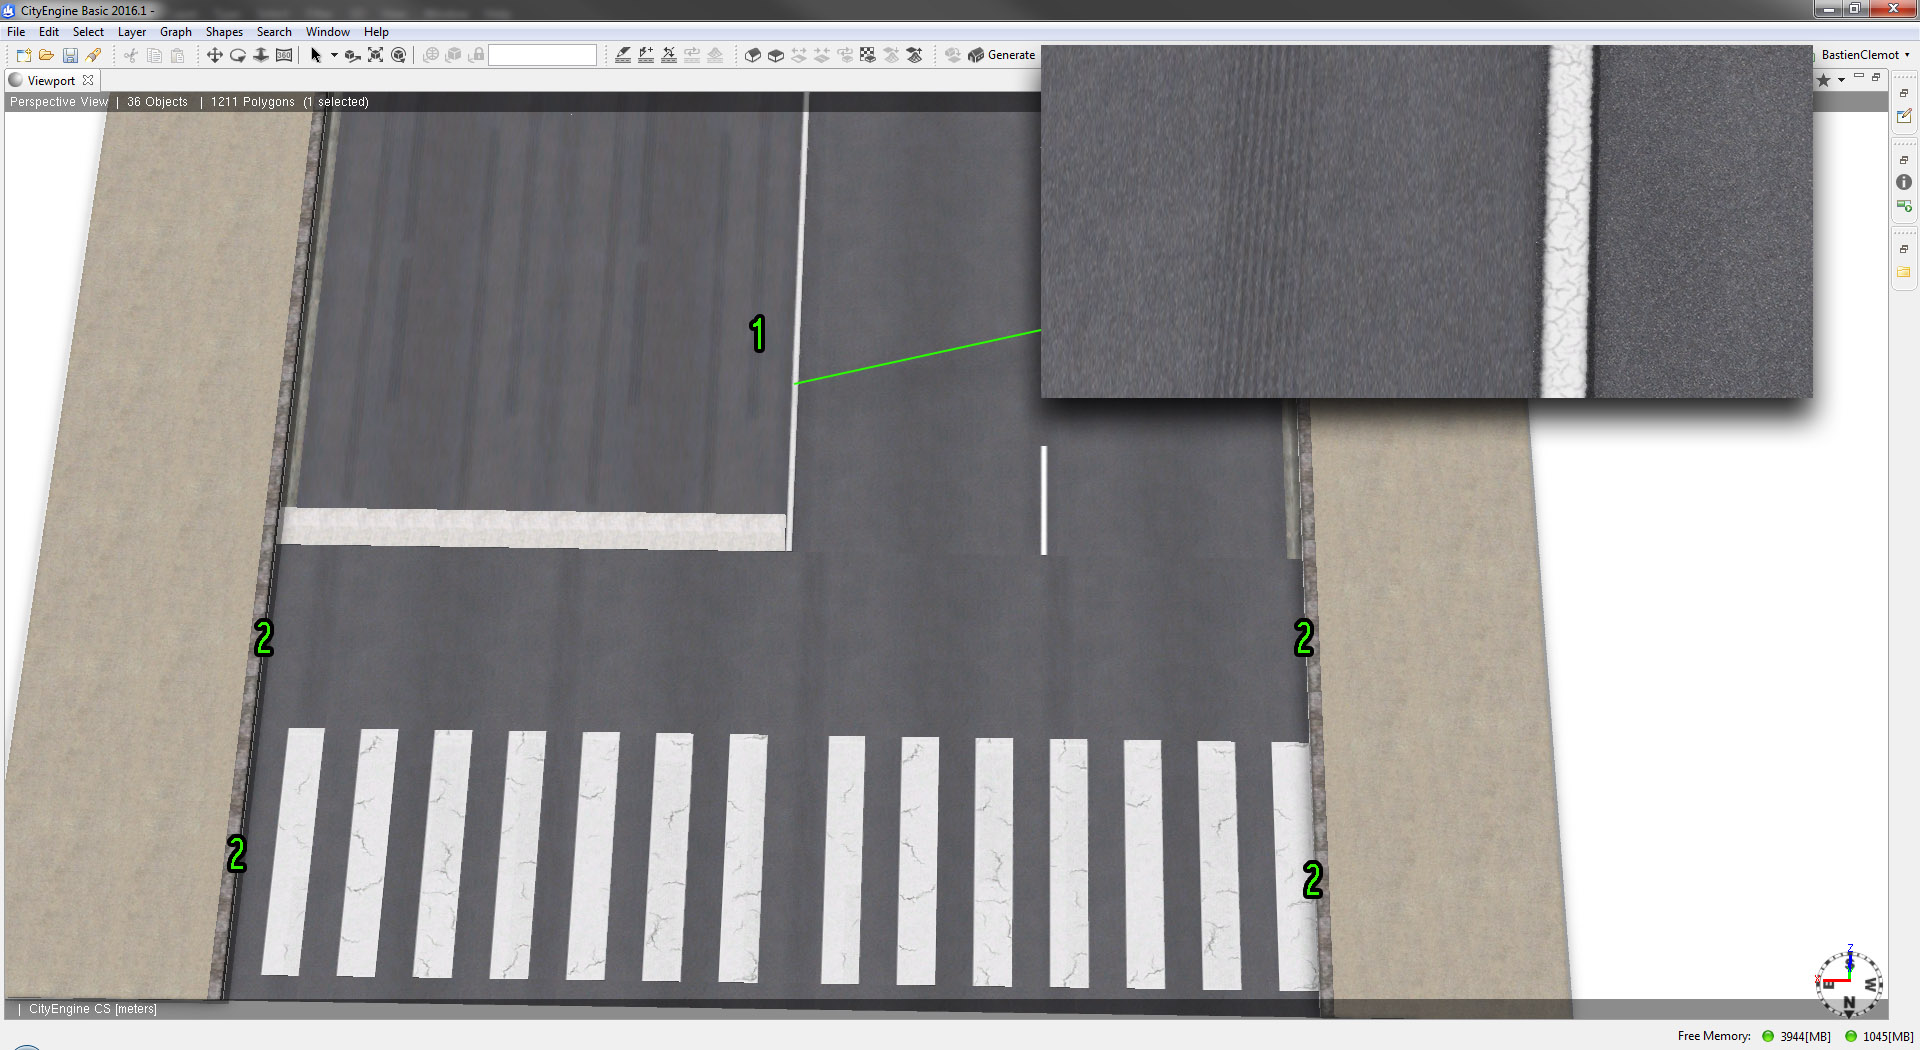
Ok thank you, it's the idea. See the picture below I think i used your code correctly.

Now to complete :
1) is it possible to reduce the Width of the previous centerline space (in light blue on the picture above) ? I need it with asphalt or at least less width to be covered by the center white line (at 2cm up).
2) Is it possible to have the same thing on the 2 edges (green arow) to make the same thing with dotted lines (I'll use a own correct map to texture theses shape after ; first, my priority is to have shape along the road, between ways and above the asphalt) ?
Ps : I can't find if is it possible in City engine to clone a shape (then translate it above, on the right way, on the left way etc.)
Thank you David
- Mark as New
- Bookmark
- Subscribe
- Mute
- Subscribe to RSS Feed
- Permalink
- Report Inappropriate Content
Hi Bastien,
Questions in order:
1. Yes. For other parameters it is adjusted based on the Center_Width parameter, but for the center line you need to adjust the constant set by the 'else:PaintLineWidth*4':
const _centerWidth = case oneWay: 0
case Center_Type=="Barrier":.98
case Center_Type=="Barrier & Shoulder":Center_Width
case Center_Type != "None": Center_Width
else:PaintLineWidth*42. Yes, but this is more difficult, and I can really only give you psuedo-code rather than specifics (I don't have access on CE right now-long story). The rules you are interested in is the "ConventionalLane" rule:
LaneReporting(dir,lanestotal,lanenumber,stopType,laneType)-->
report("Lane Width.Actual Lane Width (ft)",geometry.dv(0,unitSpace)*Feet) #Used to provide lane widths in feet
ConventionalLane(dir,lanestotal,lanenumber,stopType) <---This ruleBut more importantly, the rule that it calls to create those striping cases:
MainLaneMarkings(dir,lanenumber,"_stripes_white") - for the lane paint not near the intersection
and
LaneMarkings(dir,lanenumber,_stopTex(stopType,lanenumber,lanestotal)) - for the approaches specifically
You will need to inspect these rules and replace them with Asphalt() and AsphaltPainted() rules.
For example for MainLaneMarkings- the code might look like this:
MainLaneMarkings(dir,lanenumber,markings)-->
split(v,unitSpace,0){
~(Lane_Width-PaintLineWidth):Asphalt(true,1,"Auto")| #Might need to flip this
Paint_Line_width:AsphaltPainted("white",1,"Auto") # In the case of those with dashed lines see below.
}
# For Dashed lines another rule like:
# Rule--> split(u,unitSpace,0) {~3:Asphalt(true,1,"Auto")|~3 AsphaltPainted("white",1,"Auto")}*
#NOTE: I HAVE NO Access to CityEngine at this time, this code is not tested and is from memory. 3(ps): Yes. You have to call a rule twice on the shape where it called.
It would look this this:
CenterSpace -->
case Center_Type =="Median":
Raised_Curb("Median",1)# IF a median, and this will be use dto make a different rule
...
...
else:
CenterLineMarkings("double_"+ Centerline_Color )
CenterLineMarkingsModified("double_"+ Centerline_Color )# This one moves it up. Question for you:
What is the use case for it? Why is it important? I am trying to understand this, and I have some ideas why it might useful, but I don't entirely understand.
Disclaimer:
I have not access to CityEngine, I don't know how much of this code will work and I am going entirely from memory. Just treat it as a sketch.
- Mark as New
- Bookmark
- Subscribe
- Mute
- Subscribe to RSS Feed
- Permalink
- Report Inappropriate Content
Thank you,
I'll try this. I'm a beginner in CE but I'll try my best.
I need this for roadmark because of the realtime engine used. Far distant roadmark appear blurry when they are in the road texture.
- Mark as New
- Bookmark
- Subscribe
- Mute
- Subscribe to RSS Feed
- Permalink
- Report Inappropriate Content
Hi Bastien,
Let me know if I can provide more help. I might be of more use when I have access to CityEngine again.
This makes a lot of sense...Actually it is an issue I have noticed generally in my renderings. My concern is introducing even more geometry splits into the rule. I will consider implementing this for a high definition setting for this use case.
Why do they need to be raised? That was something I am not sure I understand.
David
- Mark as New
- Bookmark
- Subscribe
- Mute
- Subscribe to RSS Feed
- Permalink
- Report Inappropriate Content
Why do they need to be raised? That was something I am not sure I understand.
I texture the road with a nice asphalt texture. Then, I have poly above the road textured with just the white painting and transparency on border.
Concerning the rules you gave me :
1) When I adjust "else:PaintLineWidth*4" it's change the width of the red line too  I just want to reduce the width of the shape above
2) not tested yet
3) I'm trying actually (with just a cube on a test scene) but sorry I think I d'ont understand. Is it possible to have a simple example ?
NEW question 4 is it possible to make something like this :
Street -->
primitiveQuad(0.20, u of the street*)
translate(rel, object, 0, 2, 0)
*how to make an independant shape 0.20cm width and along the street length. Then translate 2cm above the street
Thank for your help again
- Mark as New
- Bookmark
- Subscribe
- Mute
- Subscribe to RSS Feed
- Permalink
- Report Inappropriate Content
Hi Bastien,
Understood. Thanks.
1) Ah, I thought you wanted to just resize it. You could make a separate rule that copies the same code and at the beginning of it just make it smaller by splitting it first.
MakeShorter-->
split(v,unitSpace,0) {.05:NIL |~1:CenterlineRule|.05:NIL} #Example idea.
To make it larger than the center line is now you need start testing things like the offset function or re-scopeing the center line (but I am not sure how re-scoping would work on curves). See here for details.
2. Ok.
3. Sorry about that. A simple example would be a flat polygon. Lets say I want to have two extrusions inhabit the same space.
Lot-->
GeometryRule(0)
GeometryRule(10)
GeometryRule(translation)-->
t(0,translation,0)
extrude(2)
color(rand(0,1),rand(0,1),rand(0,1))
Because you call the Geometry Rule twice, you have two different branches in the shape hierarchy that are both working on the same origin shape. In this case you should see one 2 M extrusion at lot level and another one 10 m above the lot shape. They are both operating from the same shape.
Disclaimer: Again, I don't have CityEngine, I might have to check this code later.
4. This is definitely a question I want CE to test...I can say I have moved options based on the geometry of the street. Generally, I believe the answer is yes, but I am not sure how curved streets would look if you are not using the original street shapes as a base (inserted disks vs. extruded or translated splits).
- Mark as New
- Bookmark
- Subscribe
- Mute
- Subscribe to RSS Feed
- Permalink
- Report Inappropriate Content
Hi David,
Here are my progress. (see picture attached)
1) first I can't reduce the A roadmark line width without reduce the B one. So i think i'll use a simple tiled asphalt texture to make it "invisible". If you have another idea
const _centerWidth = case oneWay: 0
(...)
else:PaintLineWidth*4 #change both A and B line widthCenterSpace -->
case Center_Type =="Median":
(...)
else:
CenterLineMarkings("double_"+ Centerline_Color )
CenterLineMarkingsUp("double_"+ Centerline_Color )CenterLineMarkingsUp(tex) -->
translate(rel, object, 0, 0.15, 0)(...)
2) Then for the dotline roadmark. Can you tell me the name of the rule where the left/right lane are build ? Can't find it. And i want to use au split then somthing like this :
Street -->
color(noir)
StreetGeometry. # Original shape
Dotedline # shape duplicated!
Dotedline -->
split(u, uvSpace, 0) { 0.5 : PlacementStrip }*
PlacementStrip -->
split(u,unitSpace,0) {objectDist: NIL | placementWidth : PlacementPoint }*PlacementPoint -->
alignScopeToGeometry(yUp, 0)
primitiveQuad(1.50,0.20)
t(0,0.15,0)
center(xz)
color(jaune)
Thanks
Bastien

- Mark as New
- Bookmark
- Subscribe
- Mute
- Subscribe to RSS Feed
- Permalink
- Report Inappropriate Content
Hi Bastien,
I am at working looking at CE.
1. It seems you have the centerline figured out for the most part. You could replace the texture with another rule that does a split(v,unitSpace,0) {PaintLineWidth: AsphaltPainted("yellow"....| PaintLineWidth: Asphalt(...| PaintLineWidth: AsphaltPainted("yellow...}
2. For this rule you need to alter the "ELSE" in this rule: ConventionalLane(dir,lanestotal,lanenumber,stopType)-->
My Implementation looks like this:
Text Below:
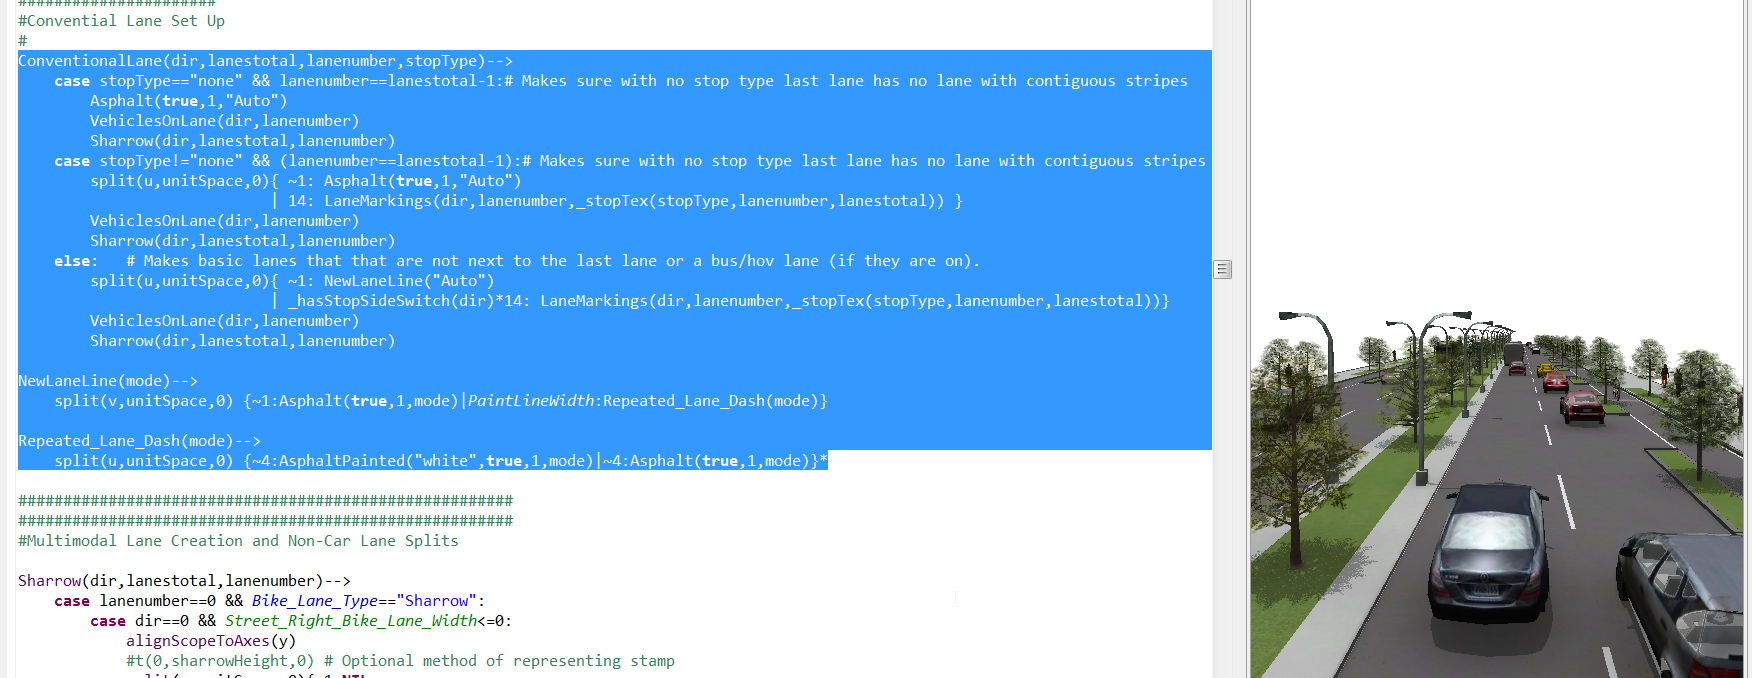
ConventionalLane(dir,lanestotal,lanenumber,stopType)-->
case stopType=="none" && lanenumber==lanestotal-1:# Makes sure with no stop type last lane has no lane with contiguous stripes
Asphalt(true,1,"Auto")
VehiclesOnLane(dir,lanenumber)
Sharrow(dir,lanestotal,lanenumber)
case stopType!="none" && (lanenumber==lanestotal-1):# Makes sure with no stop type last lane has no lane with contiguous stripes
split(u,unitSpace,0){ ~1: Asphalt(true,1,"Auto")
| 14: LaneMarkings(dir,lanenumber,_stopTex(stopType,lanenumber,lanestotal)) }
VehiclesOnLane(dir,lanenumber)
Sharrow(dir,lanestotal,lanenumber)
else: # Makes basic lanes that that are not next to the last lane or a bus/hov lane (if they are on).
split(u,unitSpace,0){ ~1: NewLaneLine("Auto")
| _hasStopSideSwitch(dir)*14: LaneMarkings(dir,lanenumber,_stopTex(stopType,lanenumber,lanestotal))}
VehiclesOnLane(dir,lanenumber)
Sharrow(dir,lanestotal,lanenumber)
NewLaneLine(mode)-->
split(v,unitSpace,0) {~1:Asphalt(true,1,mode)|PaintLineWidth:Repeated_Lane_Dash(mode)}
Repeated_Lane_Dash(mode)-->
split(u,unitSpace,0) {~4:AsphaltPainted("white",true,1,mode)|~4:Asphalt(true,1,mode)}*
Thanks,
David
PS: Bastien: I might make this a feature of the rule down the line, but for now you might have to work with what is here. I would likely make it appear when set to anything by adding a "Very High" LOD setting and using splits like this on High or Very High, and only add vehicles on Very High. My first rendering with this really made it clear this could make outputs just a little bit more crisp, thus worth the effort. Thanks for bringing this to my attention.
- Mark as New
- Bookmark
- Subscribe
- Mute
- Subscribe to RSS Feed
- Permalink
- Report Inappropriate Content
Hi David.
First Thank you very much. It vas very helpful !!!
All my roadmarks are duplicated and translated 1-2cm above asphalt
I have just some issues :
1] I modified "lanes_4_stop_word_14x14m.jpg" in photohop... but it's wraped and do not match with the other asphalt textured modified. I keep the resolution on every map. I tried to change UV in LaneMarkings(dir,lanenumber,markings) --> but doesn't work I think there is UV scale/tile problem but can't solve it
2] I added drain (caniveau in fr) between road and sidewalk with :
Lanes(dir,stopType) -->
split(v,unitSpace,0){0.2:caniveau | {~_Actual_Lane_Width : LaneReporting(dir,split.total,split.index,stopType,"MainLanes")}*}caniveau -->
setupProjection(0,scope.xy,~2,'1)
texture("assets/Complete_Streets/Lanes/CITY_TIL_ground_caniveau.jpg")
tileUV(0,3.5,0.2)
deleteUV(_Texture_Switch)
But I can't find where I can add them at the crosswalk and between crosswalk and stop line ("2" on the pictures)
Thanks again for helping on these two points.
regards
Bastien
- Mark as New
- Bookmark
- Subscribe
- Mute
- Subscribe to RSS Feed
- Permalink
- Report Inappropriate Content
Hi Bastien,
Wow I really like those dirt maps for the crosswalks...Can you share those? Or are the textures just modified in PS? I have been wanting something like this for a while as a high detailed setting. Not sure if you can share those though.
1. This is getting to the point where I need to see the texture and code in question. If you are not using a texture, then I think you are right, the actual texture dimensions need to change from what they were. Is there any reason you are not using the actual asphalt rules? You could do something similar to the center line/ dashed line splits.
2. That code is not located anywhere near the lanes, and it is not super intuitive. These elements are defined at the very beginning of the rule. If you notice, it starts with u direction (along the street not across it) separating these features from EVERYTHING ELSE in the street rule (most of the code is actually dedicated to space outside of this section). You will have to add some split(v,uvSpace/unitSpace,1) splits to get something like this to work earlier in the rule (like in the sections below). I have not tried this in a while honestly, the 3D team ultimately did not want to try to add it as a feature (neither did I).
@StartRule
# split away the crosswalks at the beginning (if any) using the special UVSET 1
Street --> #DeleteUV if texturing is off
case _uScale==1: #IF the Street is long enough continue normally.
report("Modal Preference (0 to 1).Bicycle", _BikeRank)
report("Modal Preference (0 to 1).Pedestrian", _PedRank)
report("Modal Preference (0 to 1).Transit", _TransitRank)
report("Modal Preference (0 to 1).Auto", _AutoRank)
report("Speed.Braking Distance (ft)",Braking_Dist)#Assumes Level elevation
report("Speed.Braking Reaction Distance (ft)",Brake_Reaction_Dist)#Assumes Level elevation
report("Speed.Stopping Sight Distance (ft)",Stopping_Sight_Dist)#Design Value is rounded to nearest 5 feet,Assumes Level elevation
BridgeMain
split(u,uvSpace,1){_crosswalkBeginWidth/10: Asphalt(true,1,"Auto")
| _crosswalkBeginWidth : Crosswalk( Crosswalk_Begin ,1)
| ~1 : StreetWithCrosswalkEnd }
else: #If the street is too short no stop lines, no bike boxes.
report("Modal Preference (0 to 1).Bicycle", _BikeRank)
report("Modal Preference (0 to 1).Pedestrian", _PedRank)
report("Modal Preference (0 to 1).Transit", _TransitRank)
report("Modal Preference (0 to 1).Auto", _AutoRank)
report("Speed.Braking Distance (ft)",Braking_Dist)
report("Speed.Braking Reaction Distance (ft)",Brake_Reaction_Dist)
report("Speed.Stopping Sight Distance (ft)",Stopping_Sight_Dist)
BridgeMain
set( Right_Bike_Box ,"false")
set( Left_Bike_Box ,"false")
set( Stop_Begin ,"none")
set( Stop_End ,"none")
StreetWithEntries
# split away the crosswalks at the end (if any) using the special UVSET 2
StreetWithCrosswalkEnd -->
#print("DirLane "+str(DirLaneTotal))
split(u,uvSpace,2){ _crosswalkEndWidth/10: Asphalt(true,1,"Auto")
| _crosswalkEndWidth : Crosswalk( Crosswalk_End ,2)
| ~1 : CrossWalkGap}
CrossWalkGap-->
#This solution while imperfect and vulnerable to distortion prevents UVspace/UnitSpace conflicts from cutting geometry. User can adjust relative gaps to compensate.
split(u,unitSpace,0) {( Begin_Crosswalk_To_Stop_Bar ):Asphalt(true,1,"Auto")
|~1:StreetWithEntries
|( End_Crosswalk_To_Stop_Bar ):Asphalt(true,1,"Auto")}