The One Widget (Part 2)
- Subscribe to RSS Feed
- Mark as New
- Mark as Read
- Bookmark
- Subscribe
- Printer Friendly Page
In part 1 of the series, we used TSDX to create a TypeScript+React Component, installed it into the Experience Builder client folder, and included the Component in a custom widget. The widget did not actually do anything though. In this post, we'll go through how to using ArcGIS API for JavaScript within the component, how to interact with the Map object, and how to pass in configuration settings from Experience Builder.
Create a Map in the TSDX Example Page
Right now, the Example App (what shows when you run npm start in the example folder) is totally empty except for your widget. In an Experience Builder app, your widget will most likely be interacting with other widgets like the Map widget. To mirror this situation in the Example App, we need to include the ArcGIS API for JavaScript directly and create a map object on the page.
Lets start in the example directory of your TSDX project. Within there, the structure of components will be:
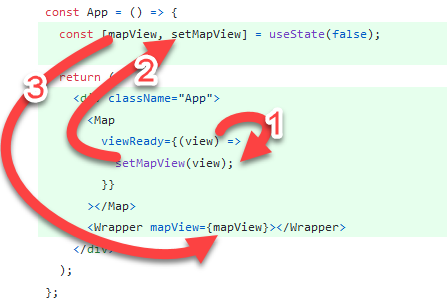
/exampleindex.tsx- already existing main file. We'll update this to contain theMapandWrapper(below)./componentsMap.js- a React component responsible for creating and displaying the ArcGIS API for JavaScript Map object. Pass in a function (viewReady) to be called when the map is ready and can pass a reference to the View back up toindex.tsx.Wrapper.js- The equivalent to our custom Experience Builder widget, in that it "wraps" our custom component.index.tsxpasses a reference to the mapView that it gets fromMap.js.
Map.js
To include the ArcGIS API for JavaScript map on the page, we will use the esri-loader and esri-loader-hooks packages. To install these dependencies, browse to the example directory in your terminal then run: npm install --save esri-loader esri-loader-hooks
The entire contents of Map.js can be found here. At a high level, we're creating a DOM Node Reference, passing it to useMap (from the esri-loader-hooks library) to create the map, and using useWatch (also from the esri-loader-hooks library). Within the onUpdateChange function, the line const [FeatureLayer] = await loadModules(... is loading the FeatureLayer module from the ArcGIS API for JavaScript so we can use it to create a layer and add to the map.
Finally, at the end of the useWatch function, we call viewReady(view) as a "callback" to the parent component to give it a reference to the MapView (view variable) that we created here in this component.
index.tsx
In index.tsx, we're importing the two components Map and Wrapper and including them in the JSX. The mapView is passed from the Map component to the Wrapper component via React state (see the setMapView call in the function that is passed as a prop to the Map component).

Also in index.tsx, we've created a CSS file and are importing it - basically making the map the full size of the page and hovering the widget over the top of it.
Wrapper.js
Wrapper.js is the equivalent of the custom Experience Builder wrapper widget that we will build. It is a light-weight "wrapper" and includes our component directly.
The first prop that we pass into our component is the mapView - that comes directly from the parent component, index.tsx.
We will use the Experience Builder infrastructure to load any ArcGIS API for JavaScript modules we need to use, so this widget should mirror that. To do this, we use the loadModules module from esri-loader and load whatever we want and pass it into our component as the second prop, modules.
Our widget is going to operate on a Feature Layer, so the third prop is the string ID of the Feature Layer we're working with. In this example app we know it because we created the Feature Layer ourselves in Map.js, but in Experience Builder that will be configured in the Builder interface and will be passed into our component from the config.
package.json
One last step is to include the browserslist property in your package.json file. This fixes an error that happens because the app is trying to support older browsers.
All the changes for this step are summarized here.
Update the Component
Since we'll be using the ArcGIS API for JavaScript, first we setup our component to use the type definitions. First run:
npm install --saveDev @types/arcgis-js-apiThen add this as the first line to src/index.tsx:
/// <reference types="@types/arcgis-js-api" />This tells the TypeScript compiler to use these types, and now you can use the variable __esri to refer to any types in the ArcGIS API for JavaScript.
Next, build out the new functionality for your widget. This is where your widget will deviate from our example. In our example, we're creating a Sketch widget and doing a query against the Feature Layer to find the number of intersecting features after each drawing. Full code is here.
Update the Experience Builder Widget
In part 1, we created a basic wrapper around the component, which did not take any props as input. In this part 2, the component will now take three props: the MapView, the modules, and the Feature Layer ID. We added these to the Example App above, and similarly they must be added to the Experience Builder widget.
Unlike the Example app above where we had to install and import esri-loader (to get access to the ArcGIS API for JavaScript) and create a map, in Experience Builder we already have those - you can simply drag the Map object into the Experience. We do have to configure the custom widget to know which map widget it should operate on, so that's what we'll do first.
Start up Experience Builder and setup your custom widget per the instructions in part 1.
Then, in your Experience, add a Map widget. You probably want to choose a web map that contains the layer you're using in the Example App, but not totally necessary.
Next, create a Settings panel to allow the Experience Author to choose the Map and LayerID. To do this, create src/settings/settings.tsx and other required files, and use the JimuMapViewSelector and the JimuLayerViewSelector. Full code is here.

Next, update the widget code (src/runtime/widget.tsx) to pass in the props to the component. I'll go through each of the three props below.
1. MapView
When the user chooses a Map in the Settings panel that we created above, the config useMapWidgetIds gets set. To use this to get the MapView in the widget, use the JimuMapViewComponent to put the jimuMapView into state it can be used.
{this.props.hasOwnProperty("useMapWidgetIds") &&
this.props.useMapWidgetIds &&
this.props.useMapWidgetIds.length === 1 && (
<JimuMapViewComponent
useMapWidgetIds={this.props.useMapWidgetIds}
onActiveViewChange={(jmv: JimuMapView) => {
if (jmv && jmv.view) {
this.setState({
jimuMapView: jmv,
});
}
}}
/>
)}After that is set, we can update the component, passing in this state:
<MyWidget
mapView={this.state.jimuMapView ? this.state.jimuMapView.view : false}2. featureLayerId
Similar to above, the Feature Layer ID gets set in the Settings. This one is simpler than JimuMapView though since it's just a string, all that is needed is to update the JSX:
<MyWidget
mapView={this.state.jimuMapView ? this.state.jimuMapView.view : false}
featureLayerId={this.props.config.layerId}3. modules
To instruct Experience Builder to load the ArcGIS API for JavaScript for us, update the widget's manifest.json file to include a dependency property:
"dependency": ["jimu-arcgis"]This allows the inclusion of modules directly in our widget like this:
const Sketch = require("esri/widgets/Sketch");... and then just pass these imports as an array in the JSX, so our final component in our widget JSX will look like:
<MyWidget
mapView={this.state.jimuMapView ? this.state.jimuMapView.view : false}
featureLayerId={this.props.config.layerId}
modules={[Sketch]}
></MyWidget>Completed Component and Widget
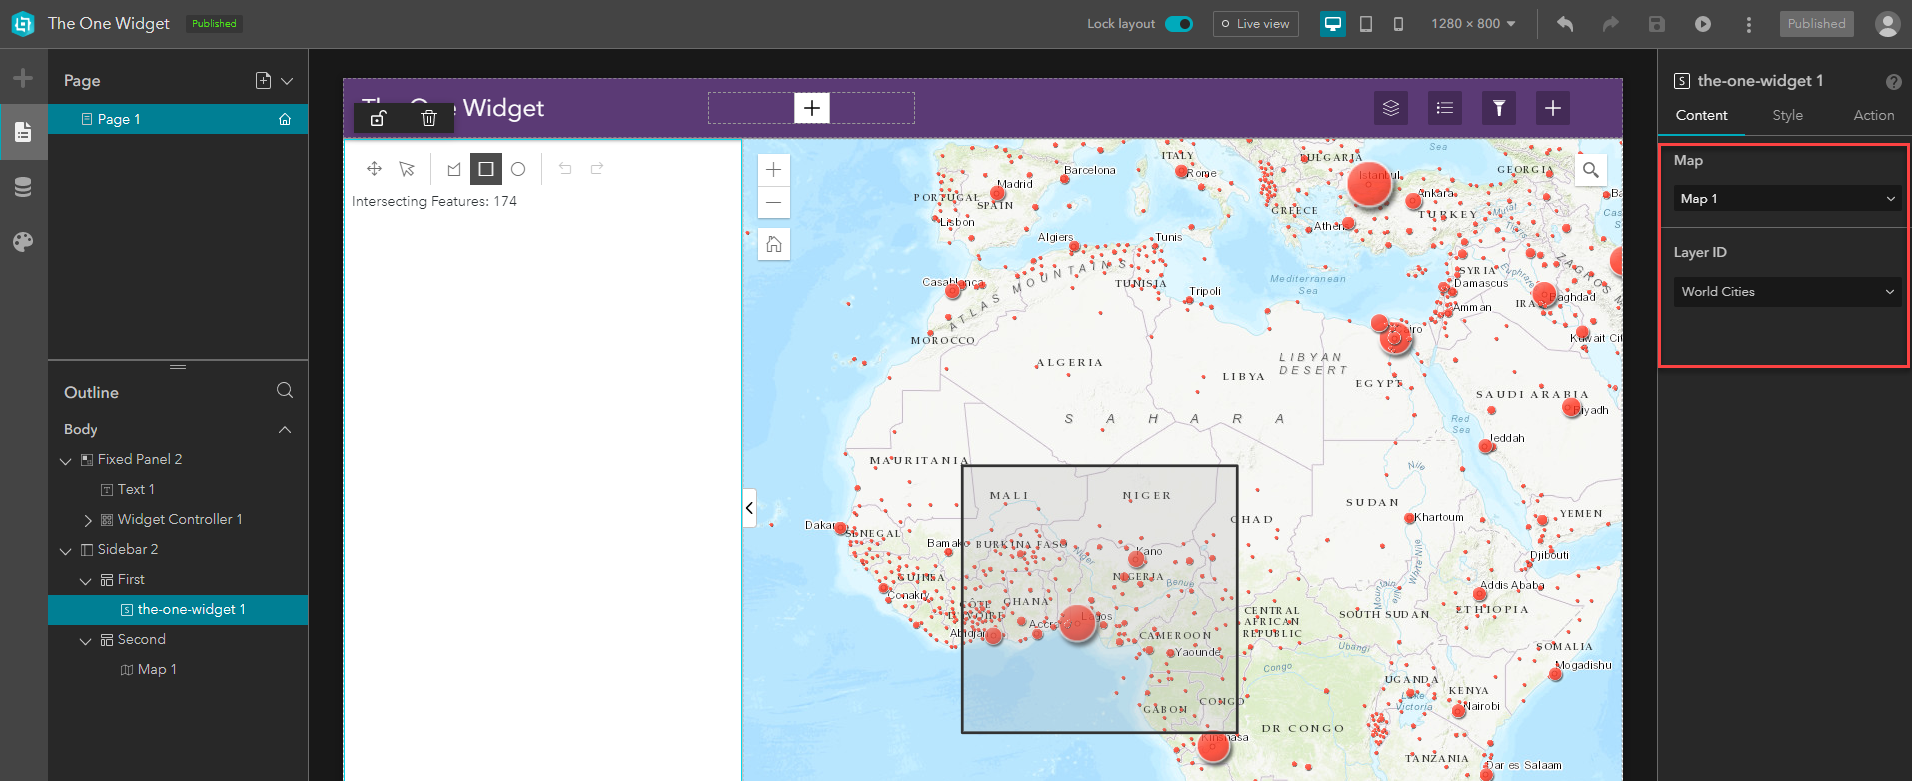
When complete, you can include your widget with an Experience to get something like this, all while still able to use your component in a React app like this.
The full, completed code for this tutorial can be found here (component) and here (Experience Builder widget wrapper). Thanks for reading, and use the comments for questions, discussion, and links to the widgets you've built.
You must be a registered user to add a comment. If you've already registered, sign in. Otherwise, register and sign in.