国際的な顧客からよく寄せられる質問の一つに、Esriが異なる言語に翻訳されたUtility Network Foundationsのバージョンを提供しているかどうかがあります。簡単に言うと、solutions.arcgis.comで利用可能なすべてのUtility Network Foundationsは英語(米国)版のみ提供されています。ただし、これらのモデルを翻訳するためのツールはファウンデーションに含まれており、顧客やビジネスパートナーが「資産パッケージ内のアイテムの名前変更」記事で説明されている手法を使って簡単に翻訳できます。

この記事の目的は、資産パッケージの内容を迅速に翻訳するプロセスの概要を提供することです。このアプローチにはいくつかの利点があります:
- 名前変更テーブルは基盤となるテーブル名、フィールド名、またはデータベース値を変更しません。つまり、このデータモデルから特定の値を期待するソリューションはエイリアスによって影響を受けません。
- このプロセスは展開プロセスの一部としてエイリアスが変更されるため、繰り返しやすくなっています。
基盤となるテーブル名、フィールド名、およびデータベースに保存されている値を変更したい場合、この方法ではそれを実現できません。
名前変更テーブルの作成
このプロセスの最初のステップは、資産パッケージ内に名前変更テーブルを作成し、内容を入力することです。このプロセスについて詳しくは「資産パッケージ内のアイテムの名前変更」記事で説明されていますが、本記事では簡単に説明します。
1. Create Rename Table ツールをUtility Data Management Supportツールボックスから実行します。
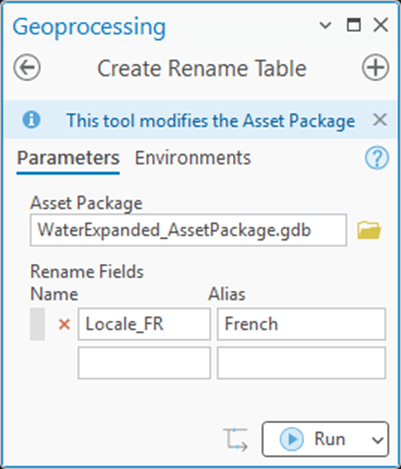
使用したい新しいエイリアスを表す1つ以上のRename Fieldsを追加します。
2. 実行
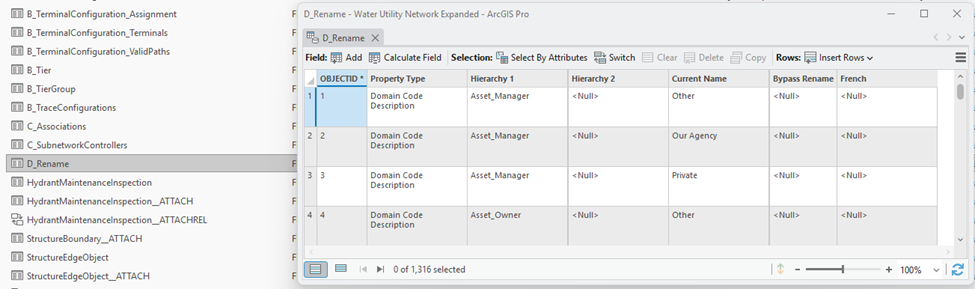
ツールが完了すると、資産パッケージにはモデル内の任意の説明/エイリアスを名前変更できるD_Renameテーブルが含まれます。
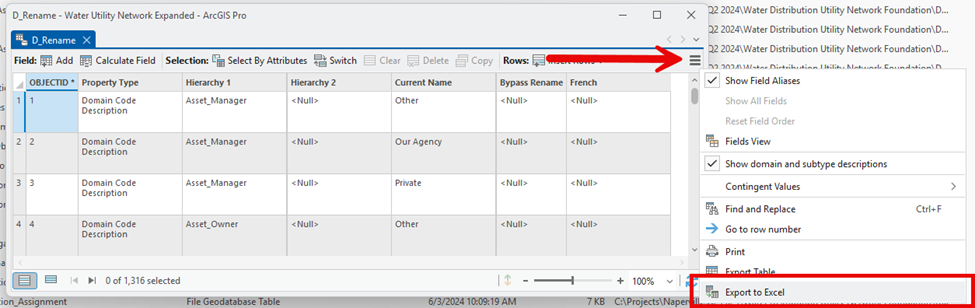
次のステップは、この情報をArcGIS Proから取り出し、翻訳とレビューに送ることができる形式に変換することです。便利な方法として、属性テーブル上でショートカットがあるExport to Excel Geoprocessingツールを使用できます。
3. D_Renameテーブル上のバーガーボタンを使ってコンテキストメニューを表示し、その内容をExcelにエクスポートします。
Excelファイルを使いたくない場合は、テーブル内のすべての行を選択してCopy Selectionコマンドでコピーし、お好みのドキュメントに貼り付けることもできます。
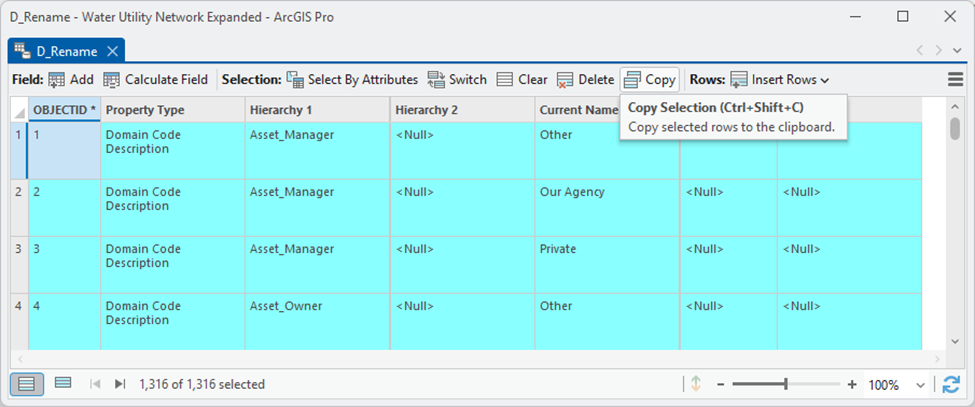
この例では、内容が基本的なテキストエディタに貼り付けられています。

4. Current Name列内のすべての値を新しい値に翻訳します。
この翻訳は手動で行うか、さまざまな無料または有料サービスを利用して行うことができます。以下に注意してください:
- 値を再インポートするには、それぞれのObjectIDを覚えておく必要があります。これは次節で説明します。
- 特定のプロパティには長さや特殊文字に制限があります。
- 新しいデータベースを展開した後、一部の値を調整する必要が生じるかもしれません。
これらすべての考慮事項から、この作業は反復的なプロセスになることがわかります。アプリケーションやデータモデルの文脈内で値を手動でレビューし調整する必要があります。
名前変更された値のインポート
新しい値が含まれるドキュメントができたら、それらで資産パッケージ内D_Renameテーブルの名前変更設定列を更新する必要があります。一番簡単なのはコピー&ペーストですが、そのためには資産パッケージとコピー元ドキュメント内で行順序が同一である必要があります。そのためドキュメントには元々資産パッケージから取得したオリジナルObjectIDが含まれていることが重要です。
手順は以下の通りです:
1. 使用したい新しい説明が含まれる列(列ヘッダーは選択しない)を選択します。
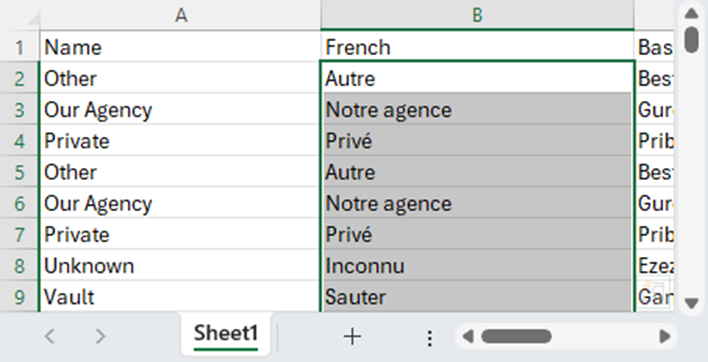
2. 選択範囲をクリップボードにコピーします。
3. D_Renameテーブル内の新しい列にカーソルを置きます。
翻訳済みドキュメントから部分的な値だけ貼り付ける場合は、カーソルが正しい行に置かれている必要があります。テーブルビューは現在選択中でもフィルターされていても無視します。
4. 選択範囲をテーブルに貼り付けます。
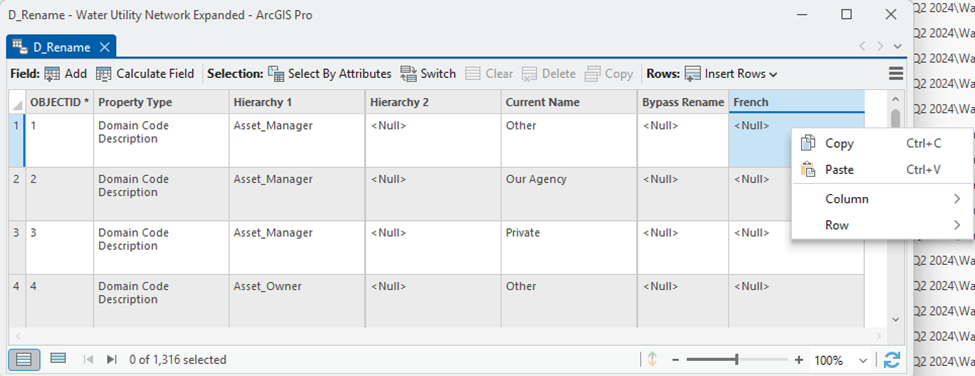
キーボードショートカットやコンテキストメニュー上の貼り付けコマンドで正しい場所に貼り付けていることを確認できます。
ArcGIS Proは貼り付けた行を自動的に新しい列へ解析します。もし正しくデータが反映されない場合は、ソースドキュメント内アイテム順序が異なるか、コピー元アプリケーションがクリップボード上で正しくフォーマットしていない可能性があります。
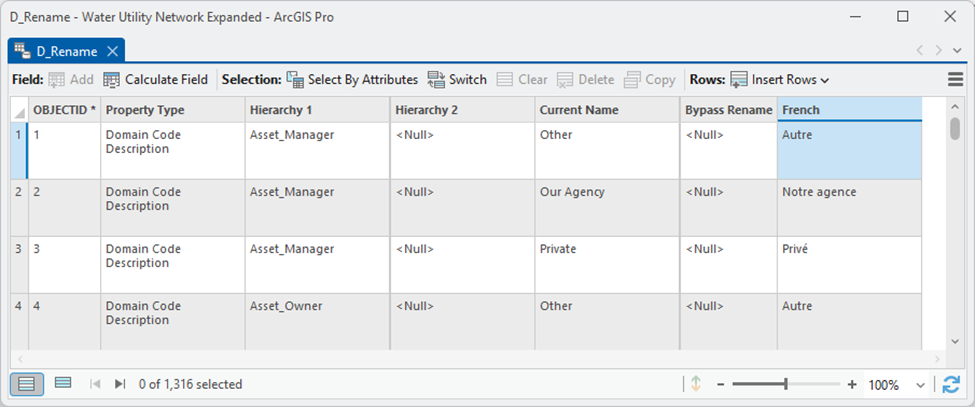
5. 編集内容を保存します。
D_Renameテーブルへの入力が完了したので結果を検証しましょう。
翻訳されたファウンデーションの展開
D_Renameテーブルへの入力後、資産パッケージを展開して翻訳された説明を見る必要があります。一番簡単なのは「Asset Package to Geodatabase」ツールを使って名前変更テーブル内説明付きでローカルジオデータベースを作成する方法です。この手順にはまず「UN Package Tools」 をArcGIS Proインストール環境へ導入しておく必要があります。
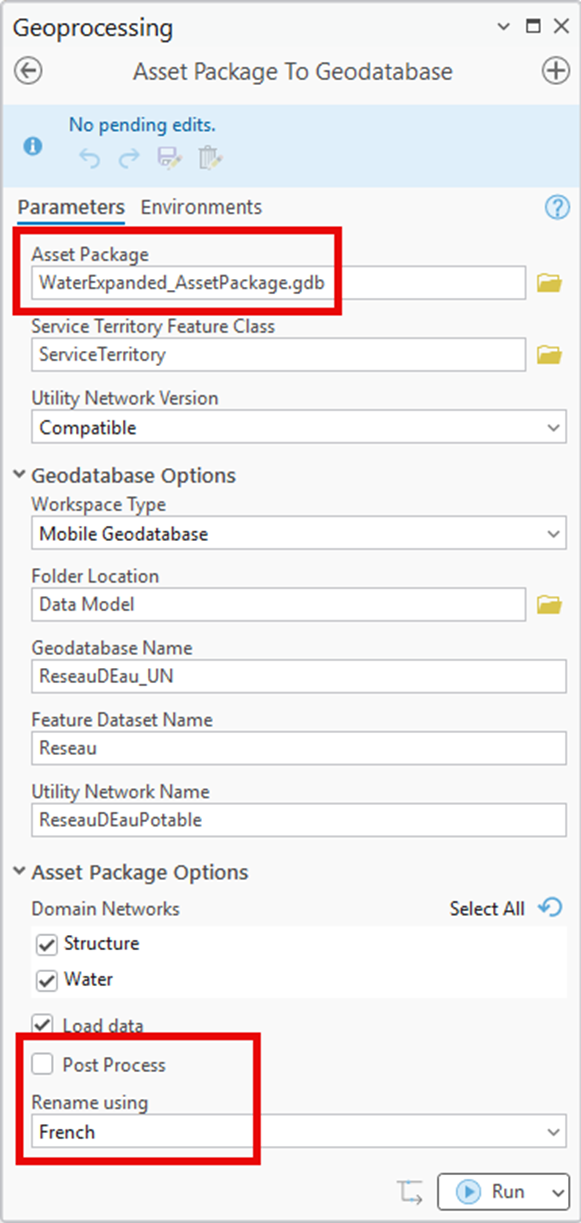
1. 「Asset Package to Geodatabase」ツールを開きます。
2. 名前変更済みD_Renameテーブルが含まれる「Asset Package that has the populated D_Rename table
3. Expand Asset Package Options
- Leave the box next to Load data checked if you want to review the coded value descriptions.
- Uncheck the box next to Post Process, this will make the process run faster without affecting your ability to review the results.
- Select your new descriptions for the Rename using parameter.
4. You may also want to adjust several other parameters, depending on your situation.
• Folder Location
• Geodatabase name
• Feature Dataset Name
• Utility Network Name
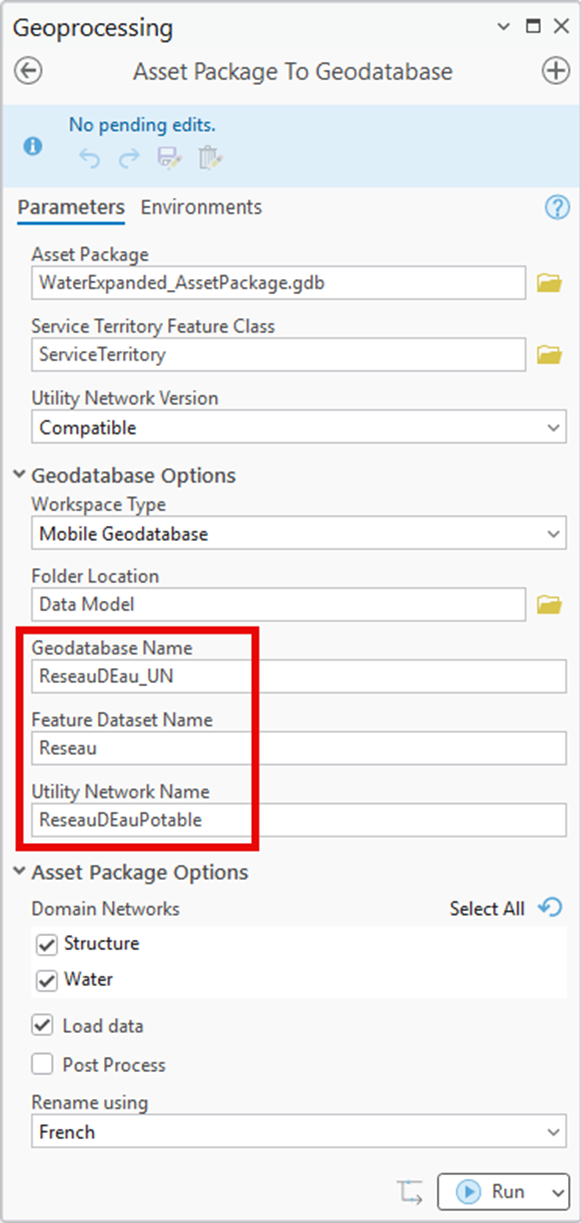
5. Click Run.
6. Review and resolve any errors reported with the D_Rename table.
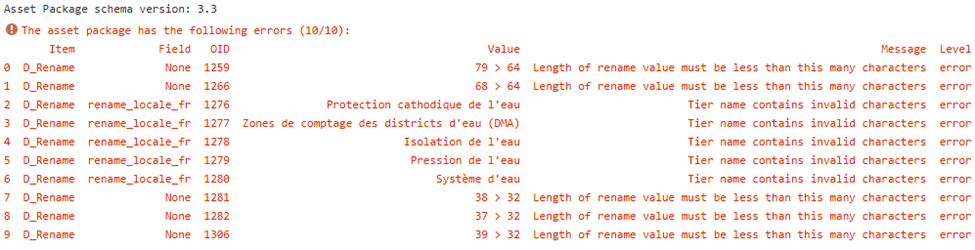
If this is your first time using these descriptions, you may see errors in the D_Rename table about values being too long or containing invalid characters. Review each of these errors and make the requested changes. Repeat this process until the asset package deploys without any errors.
7. Once the tool successfully runs, review the results in ArcGIS Pro.
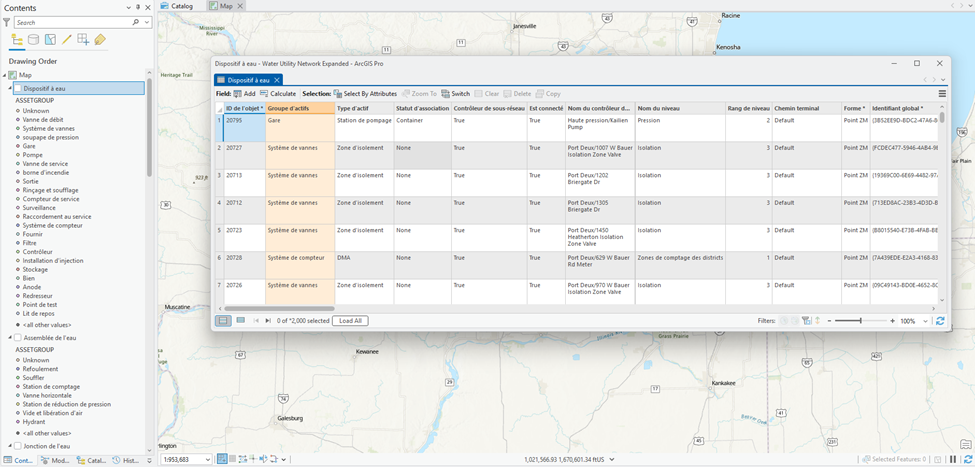
The easiest way to do this is to add the data in the newly staged geodatabase to a new map. If you open an existing map, you may still see the original field aliases on layers and the original coded value descriptions in your contents pane.
Conclusion
You’ve learned how to effectively use the D_Rename table to customize the aliases in your utility network foundation. You learned several techniques you can use to export and import the values in this table for translation purposes. You also learned about some of the considerations for the length of translated values and special characters you will need to consider when performing translation.
Now that you’ve read this article you are well equipped to begin translating your own data models, whether they use a utility network foundation or another industry standard data model provided by an Esri business partner.
Before you spend too much time creating your own model, you should always check with the Esri Distributor in your region to see if they, or another business partner, have already created a localized version of the data model you’re interested in. Localizing a data model is more than just translating values from one language to another, it also considers regional or local standards or regulations and norms. If there is already a localized version of the model that takes this into account this can save you a lot of time and effort.