- Home
- :
- All Communities
- :
- Developers
- :
- Python
- :
- Python Blog
- :
- Working with 3D and M-aware geometries in Arcpy
Working with 3D and M-aware geometries in Arcpy
- Subscribe to RSS Feed
- Mark as New
- Mark as Read
- Bookmark
- Subscribe
- Printer Friendly Page
With Arcpy you can construct 3D and M-aware geometries. It is very similar to creating 2D geometries, but there are a view things to bear in mind.
Creating a 3D point and point geometry
Take a look at the script below:
import arcpy
import os

# create spatial reference (WGS_1984_Web_Mercator_Auxiliary_Sphere)
sr = arcpy.SpatialReference(3857)

# create a point at Esri HQ redlands
x = -13046164
y = 4036336
z = 365
m = 10.123
pnt = arcpy.Point(x, y, z, m)

# create the point geometry
pntg = arcpy.PointGeometry(pnt, sr)
print (pntg.firstPoint)
The result will be printing the point (first point of PointGeometry):
# >>> -13046164 4036336 NaN NaN
As you can see there are two properties (Z y M) which do not have any data. The reason is that we did not specify the has_z and has_m parameters when creating the PointGeometry. If you take a look at the help page:
PointGeometry—Help | ArcGIS for Desktop
… you will see this:
arcpy.PointGeometry(inputs, {spatial_reference}, {has_z}, {has_m})
has_z and has_m are Booleans that indicate if the PointGeometry will have Z and/or M values.
See below what happens when you specify has_z:
# create the point geometry
pntg = arcpy.PointGeometry(pnt, sr, True)
print (pntg.firstPoint)
This will print:
>>> -13046164 4036336 365 NaN
This is what happens when you set the has_m to True
# create the point geometry
pntg = arcpy.PointGeometry(pnt, sr, None, True)
print (pntg.firstPoint)
The geometry will have the M value, but not the Z value (it was omitted and set to False by default):
>>> -13046164 4036336 NaN 10,123
When you set them both to True:
# create the point geometry
pntg = arcpy.PointGeometry(pnt, sr, True, True)
print (pntg.firstPoint)
It will print:
>>> -13046164 4036336 365 10,123
To store this PointGeometry in a new featureclass you can use this simple snippet
# workspace and name for the output featureclass
ws = r'D:\Test\data.gdb'
fc_name = 'point_zm'
fc = os.path.join(ws, fc_name)

# create a featureclass with the Point ZM geometry
arcpy.CopyFeatures_management([pntg], fc)
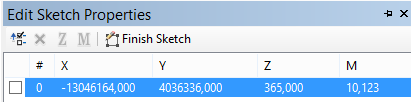
The result is a featureclass that has “Point ZM” as geometry:

Revising the geometry during an edit session reveals that the Z and M value were stored correctly:
Normally you will want to store information in additional fields. The CopyFeatures_management tool does not provide method to do that, so you will have to create the featureclass first and use an insert cursor to store the information.
The CreateFeatureclass_management tool allows the creation of Z- and M enabled featureclass. If you look at the Help page: Create Feature Class—Help | ArcGIS for Desktop
… you will find the same “has_z” and “has_m” parameters:
arcpy.CreateFeatureclass_management(out_path, out_name, {geometry_type}, {template}, {has_m}, {has_z}, {spatial_reference}, {config_keyword}, {spatial_grid_1}, {spatial_grid_2}, {spatial_grid_3})
There are some large differences though. Please notice that in this tool the “has_m” comes before “has_z” while in the creation of the PointGeometry “has_z” needs to be specified before “has_m”. The other bigger difference is that the parameters in the CreateFeatureclass_management tool are not of type Boolean, but strings (text), since there are 3 possibilities “DISABLED”, “ENABLED” and “SAME_AS_TEMPLATE”.
To create the featureclass with both Z and M enabled, you can use this snippet.
# workspace and name for the output featureclass
ws = r'D:\Test\data.gdb'
fc_name = 'point_zm'
fc = os.path.join(ws, fc_name)

# create a featureclass with Z and M enabled
arcpy.CreateFeatureclass_management(ws, fc_name, "POINT", None, "ENABLED", "ENABLED", sr)
To insert the PointGeometry (just the geometry, no additional fields in this case) you can simply do this:
with arcpy.da.InsertCursor(fc, ('SHAPE@')) as curs:
    row = (pntg, )
    curs.insertRow(row)
Creating 3D lines and polygons
Creating 3D lines and polygons is not very different. Instead of providing a single point you will provide an array created from a list of points. Consider the script below:
import arcpy
import os

arcpy.env.overwriteOutput = True

# create spatial reference (WGS_1984_Web_Mercator_Auxiliary_Sphere)
sr = arcpy.SpatialReference(3857)

# list of x, y, z tuples with coordinates of points
lst_crds = [(0, 0, 0), (1000, 0, 0),
            (1000, 0, 1000), (0, 0, 1000),
            (0, 1000, 1000), (1000, 1000, 1000),
            (1000, 1000, 0), (0, 1000, 0)]

# create a point for each x, y, z tuple in the list and append it to the list of points
lst_pnts = []
for crds in lst_crds:
    pnt = arcpy.Point(crds[0], crds[1], crds[2])
    lst_pnts.append(pnt)

# create polyline with Z, but without M
polyline = arcpy.Polyline(arcpy.Array(lst_pnts), sr, True, False)

# create a featureclass with the Polyline Z geometry
ws = r'D:\Test\data.gdb'
fc_name = 'polyline_z'
fc = os.path.join(ws, fc_name)
arcpy.CopyFeatures_management([polyline], fc)
When you visualize the line 3D you will see something like this:

To create a polygon is very similar to creating a polyline. They both require an array created from a list of points (not PointGeometries). The difference is that for a polygon you repeat the first point as last point to close the polygon.
Observe the snippet below:
import arcpy
import os

arcpy.env.overwriteOutput = True

# create spatial reference (WGS_1984_Web_Mercator_Auxiliary_Sphere)
sr = arcpy.SpatialReference(3857)

# list of x, y, z tuples with coordinates
lst_crds = [(0, 0, 0), (1000, 0, 0),
            (1000, 1000, 1000),(0, 1000, 1000),
            (0, 0, 0)]

# create a point for each x, y, z tuple in the list and append it to the list of points
lst_pnts = []
for crds in lst_crds:
    pnt = arcpy.Point(crds[0], crds[1], crds[2])
    lst_pnts.append(pnt)

# create polygon with Z, but without M
polygon = arcpy.Polygon(arcpy.Array(lst_pnts), sr, True, False)

# create a featureclass with the polygon Z geometry
ws = r'D:\Test\data.gdb'
fc_name = 'polygon_z'
fc = os.path.join(ws, fc_name)
arcpy.CopyFeatures_management([polygon], fc)
Which will create a tilted rectangle:

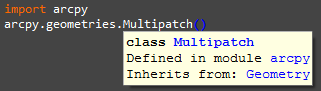
So what about Multipatches in Arcpy?
When exploring the objects present in the arcpy.geometries module, I discovered that there is a Multipatch class, which inherits from the Geometry:
Looking at the latest documentation of Arcpy inside ArcMap and ArcGIS Pro shows no sign of Multipatches. So
Geometry—ArcPy Classes | ArcGIS for Desktop (Pro) and Geometry—Help | ArcGIS for Desktop (ArcMap)
both show this:
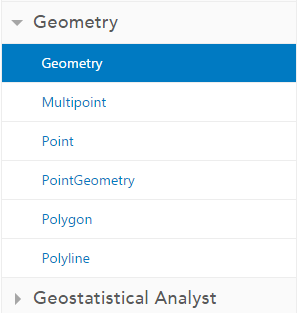
… and searching for it does not return any results:

Trying to create a Multipatch object with the same points we used for the simple 3D polygon, results in:

Exploring the definition of the Multipatch in this whitepaper:
https://www.esri.com/library/whitepapers/pdfs/multipatch-geometry-type.pdf
… learns us that the Multipatch object (in ArcObjects) is created from TriangleStrips, TriangleFans, Triangles and/or Rings:
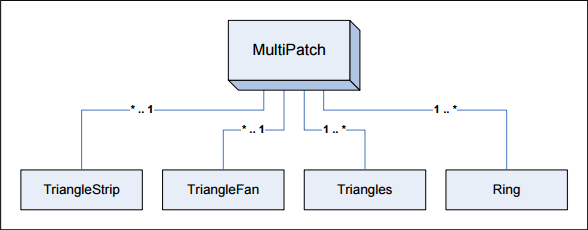
None of which are present in the arcpy.geometries module.
I would like to see (better) support for Multipatches in Arcpy. I guess it's time to post or up vote an idea...
Next up: How to create a 3D tree geometry that will allow us to perform 3D analysis.
You must be a registered user to add a comment. If you've already registered, sign in. Otherwise, register and sign in.