<\/HEAD>
To get the most out of GeoNet, we recommend following the steps below. Each step is also described in detail individually on the GeoNet Resource Hub.<\/SPAN><\/P><\/P>Step 1 - Follow the ArcGIS Content GeoNet space<\/STRONG><\/SPAN><\/P>To get started in the GeoNet community, an account is required. Click here to create an account. If you already have an account, you can skip this step.<\/SPAN><\/P><\/LI>We recommend reviewing the community guidelines. These describe the purpose of the ArcGIS Content GeoNet space and how you can ensure that you make a valuable contribution to the community.<\/SPAN><\/LI>Follow the ArcGIS Content GeoNet space. By following this space, updates will appear in your news feed. Additionally, it is possible to specify separately whether or not you want to receive messages in your (GeoNet) inbox.<\/SPAN><\/LI><\/UL>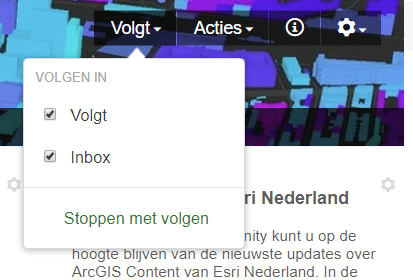 <\/SPAN><\/P><\/P>Step 2 - Complete your profile on<\/STRONG><\/SPAN><\/P>Your profile is a quick way for other users to get to know you. If you have already completed this, proceed to step 3.<\/SPAN><\/P><\/LI>You can update your profile by clicking on the avatar at the top right .<\/SPAN> Through the "Profile Information" tab, it is possible to fill in a biography or refer to a website.<\/LI><\/UL>
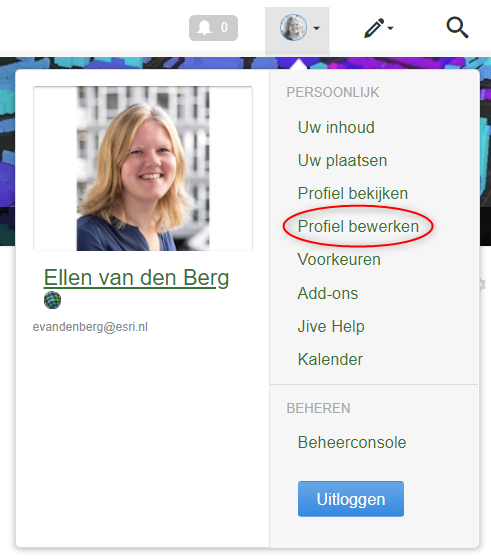 <\/P><\/P>In the "Privacy" tab, it is possible to specify who may view which information. For example, you can hide your email address or indicate whether others can see when you last logged in.<\/SPAN><\/P><\/LI>A profile picture can be uploaded via the "Avatar" tab. You do this by clicking on "Add another Avatar". For best quality, it is recommended to use an image of 400 by 400 pixels. The image may be up to 20 MB.<\/SPAN><\/P><\/LI>In the "Photos" tab, it is possible to add multiple photos. These could be screenshots of projects you have worked on, but also other photos.<\/SPAN><\/LI>Click "Done" at the bottom of the page to apply changes.<\/SPAN><\/LI><\/UL><\/P>Step 3 - Set your preferences correctly<\/STRONG>
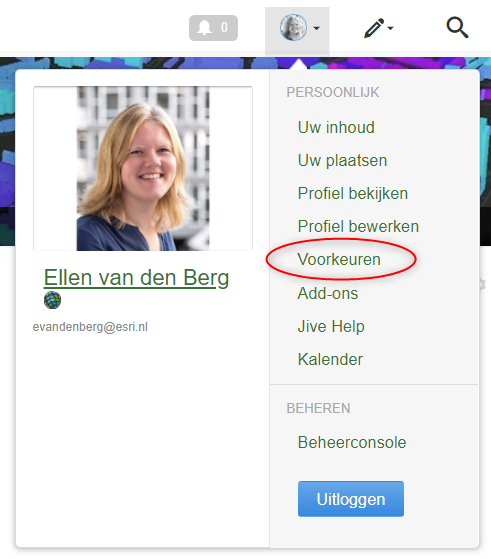
- If you want to stay well informed about content updates and the spaces you follow, you might want to adjust your email preferences. This can again be done by clicking on the avatar and then choosing "Preferences".<\/LI>
- For a news overview of the spaces you follow, it is possible to receive an email for all activity or to receive a daily, weekly, or biweekly summary in your GeoNet inbox or via email.<\/SPAN >
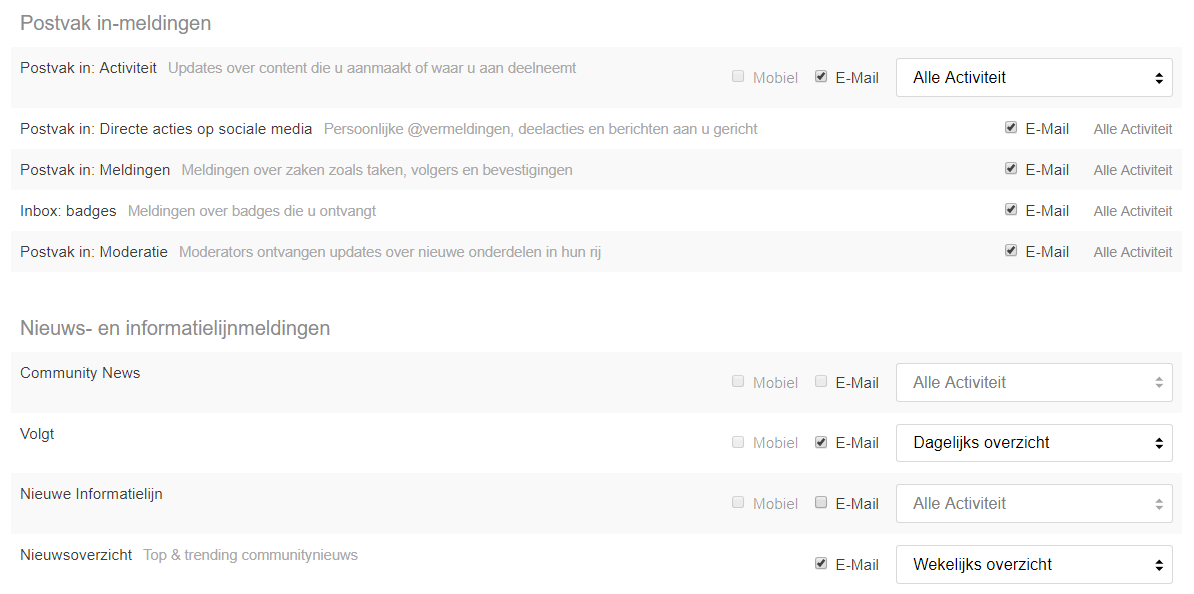 <\ / LI >< LI >< SPAN style = "color:#3d3d3d;border:none windowtext 1.0pt;padding :0cm ;">It is also possible here to adjust other settings, such as setting the language and time zone.<\ / SPAN ><\ / LI >< LI >< SPAN style = "color:#3d3d3d;border:none windowtext 1.0pt;padding :0cm ;">If you choose to receive a daily summary of the spaces you follow, you will receive an email every day at 11 o'clock. If you prefer to receive this email at another time, you could adjust the time zone.<\ / SPAN ><\ / LI ><\ / UL >< P ><\ / P >< P >< STRONG > Step 4 - Post a message <\ / STRONG ><\ / P >< UL >< LI > It is possible to post something on GeoNet via the pencil icon at the top right.<\ / LI ><\ / UL >< P >< IMG __jive_id = "421822" class = "jive-image image-4" height = "126" src = "https://us.v-cdn.net/6038851/uploads/legacyfs/online/421822_pastedImage_13.png" width = "491" \/ ><\ / P >< P style = "padding-left :60px ;">- Ask a question<\ / STRONG>. With a question, you seek an answer about a specific topic or problem. Answers can be given, where the author or a community manager can mark an answer as correct.<\ / P >< P style = "padding-left :60px ;">- Start a discussion<\ / STRONG>. <\ / SP an > Here, you want to discuss an issue where different viewpoints can be shared. There is no fixed answer to the problem.<\ / P >< UL style = "list-style-type :disc ;">It is also possible to respond to existing questions and discussions using the comment button.<\ / LI ><\ / UL >< P >< IMG __jive_id = "421823" class = "image-5 jive-image" src = "https://us.v-cdn.net/6038851/uploads/legacyfs/online/421823_pastedImage_14.png" style = "border :0px ; margin :2px 20px 0px ;" \/ ><\ / P >< P ><\ / P >< P >< SPAN style = "background-color :#ffffff ;">All steps are also described in detail individually on the <\ / SP an > < A _jive_internal = "true" href = "https://community.esri.com/community/help-and-feedback/pages/geonet-tools-resources" style = "color :#2989c5 ; background-color :#ffffff ; text-decoration :none ;">GeoNet Resource Hub<\ / A > . For example, more about < A _jive_internal = "true" href = "https://community.esri.com/docs/DOC-6216">logging in<\ / A > , how best to < A _jive_internal = "true" href = "https://community.esri.com/docs/DOC-1953">search<\ / A > , embedding maps < A _jive_internal = "true" href = "https://community.esri.com/docs/DOC-9011-embed-arcgis-map-into-geonet">and many other tips about using GeoNet are available here.<\ / P ><\ / BODY ><\ / HTML >