Question | Answer |
Why do I only see "Configured group is invalid or no items have been shared with this group yet." on my Reporter application? | This has to do with the fact that the configured group does not contain at least one map with at least one editable layer that is accessible to the current user. If the group does contain an editable map with an editable layer, then check the sharing. It may be that you haven't updated the sharing of the group or if you have, perhaps you are not Signing In with the proper account -- Sign in with ArcGIS if it isn't shared publicly. I kept trying to sign-in as Guest longer than I care to admit. |
Why can't I see the image tab on a selected report in the Citizen Problem Manager? | This tab is only visible when the selected report contains at least one image attachment, or images and charts defined as part of the popup configuration. |
Why can't the user attach photos to reports? | Attachments aren't enabled. When you do this process automatically, the layers are automatically uploaded to AGO. The attachment section of the form where photos and other supporting files can be added to the report is only available when attachments are enabled on the layer. This can be easily done by going to the feature layer in AGO and clicking "Enable Attachments". 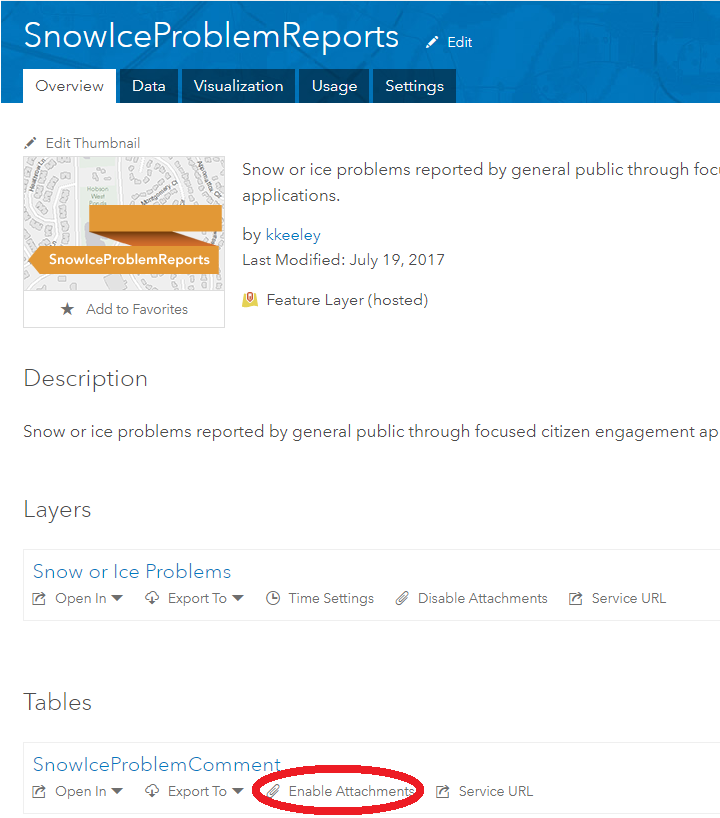
|
How do I add fields in the form of the Reporter? | - Open ArcGIS Pro.
- Go to the Share tab and click on the ArcGIS Solutions button.
- The Task Pane will open. Click Configure an ArcGIS Solution.
- The first step is Adding Fields (note: you can skip this step).
- For Input Table, navigate to My Content and click the published feature layer that you want to add the field to. You have the option to select the Report Layer or the Comment Table for the this. Which form are you editing? What the person reporting sees (Report Layer) or what the person commenting on the report sees (Comment Table)?
- Give it a Field Name, define the Field Type, and Field Alias.
- Check if you want it to be required.
- The Field Domains field is for if you already have domains created.
If you want to create domains, that is in the next step. - Click Run.
- Once the Run finishes, you may continue adding fields, or move on to
the Next Step. - Here you can Modify Domains. If you want a field to be a drop down menu, configure some Field Domains! If you don't want it to be drop down (and, instead, just a field) Skip this part.
- Now navigate to the map on AGO the feature layer is on (for example the Snow/Ice feature layer will be on the Snow/Ice Problems Web Map)
- Click on the three dots next to the layer of the form you want to edit and click on Configure Pop-up (for example, if you want to edit the form that commenters see, do this for the Snow/Ice Complaint Comments Table
- Then ensure that the Display and Edit check boxes are checked for the fields you want to display and edit. Here you can also change its alias, change the order of it, and format it.
|
How do I delete fields in the form of the Reporter? | Open ArcGIS Pro. Add the Report Layer or Comment Table that the field is located in
to the map and open its attribute table. Right click the field you want
to remove. Click delete. |
How do I turn off fields in the form of the Reporter? | If you don't want to display a field, but you aren't ready to delete it, go to the AGO web map that the layer is on. Go to Configure Pop-Up and then click Configure Attributes and just uncheck the Display. |
Why can't the user edit the fields in the form? | First, when you are creating the field in the Configuration Task via ArcGIS Solutions, it's vital that you give the field a Field Length. The other issue may be that editing isn't enabled on the layer or in the pop-up. When you are in the AGO web map, Configure Pop-Up and then click Configure Attributes and ensure that the Editing box is checked in addition to the Display check box. |
How can manipulate how every report/comment looks? | As far as I can't tell, you can't change the look of the form itself. However, once the report/comment is posted, you can change how this looks. This again happens in the AGO Web Map layer pop-up. When you go to Configure Pop-Up you have a few options. Under Pop-up Contents --> Display dropdown, change it to A custom attribute display --> then CONFIGURE. Here, you can add your own text and pull information from the report/comment fields (by clicking the + box; see image below). Scroll to the bottom where it says Pop-up Media. Here you can add a standard image/chart to all of the posted reports/comments. |
How do I change colors and text in the Reporter? IMPORTANT NOTE: it is highly recommended that when these changes are made to Reporter maps/layers/applications, they are also made to the respective maps/layers/applications in the Manager for consistency and clarity purposes. | 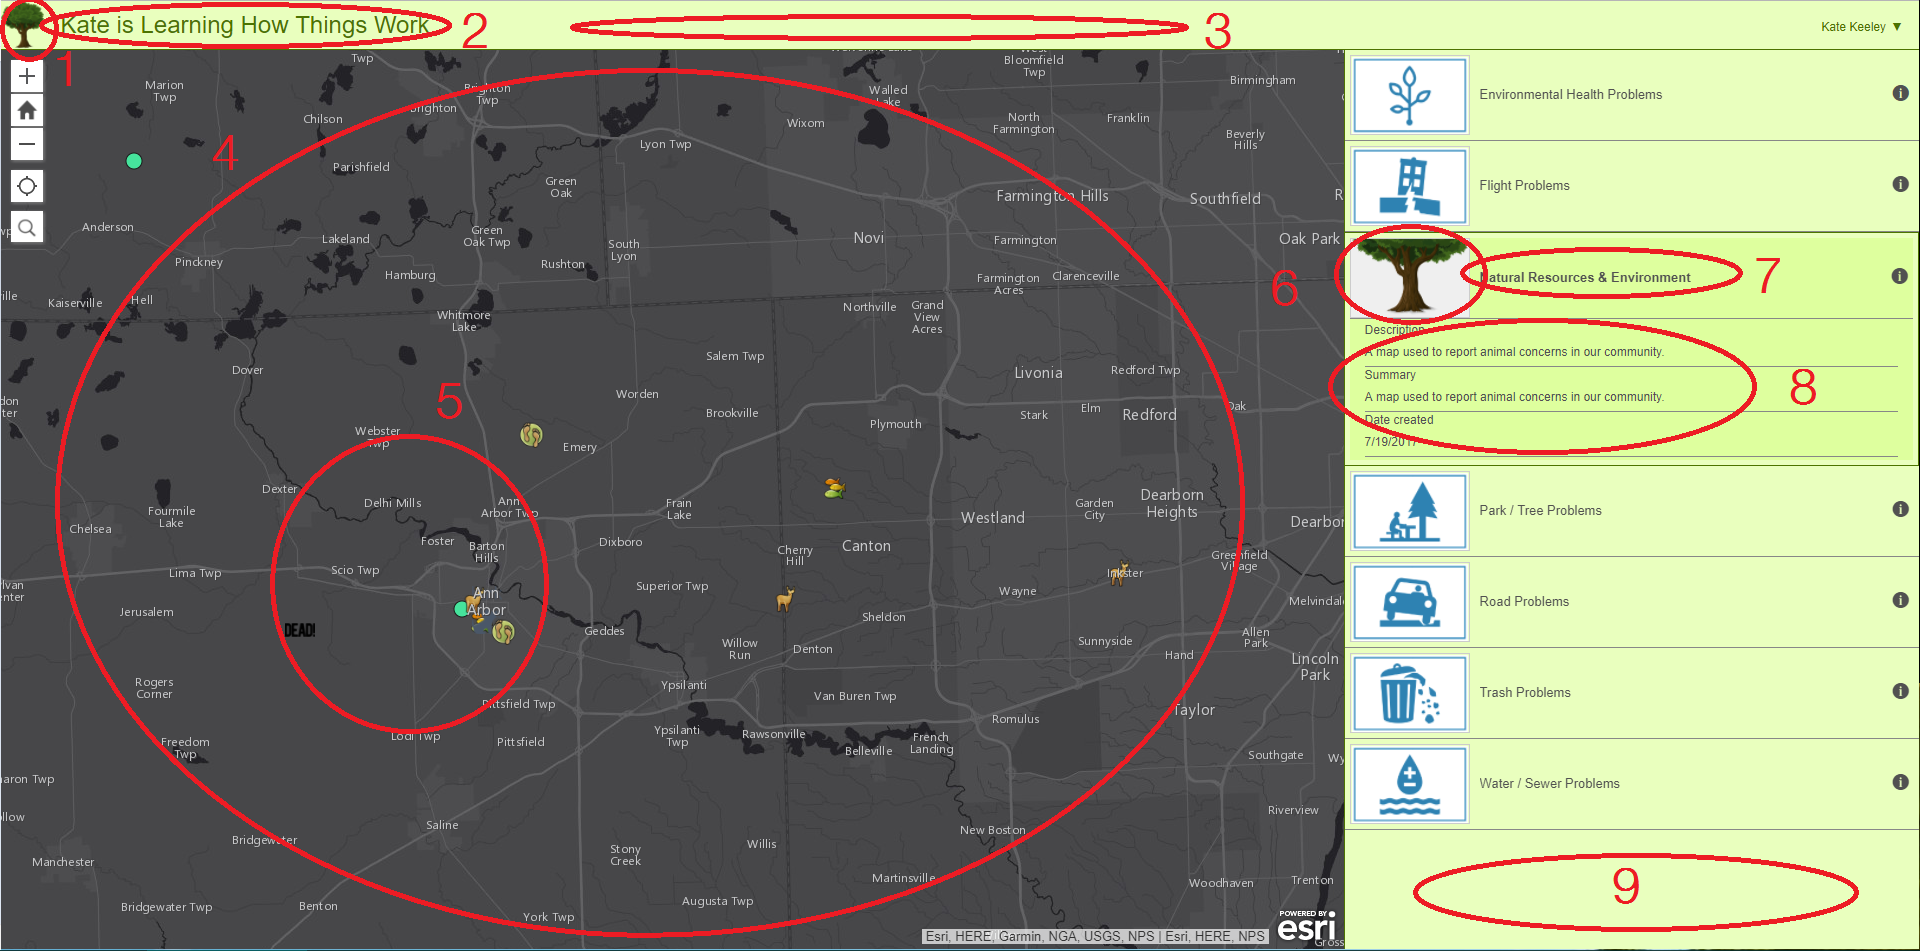
# In Pic Above | Description | Website to go to | Thing to change | 1 | Application Logo | Configure the Reporter Web App | Theme tab --> Application logo --> Paste link here | 2 | Application Title | Configure the Reporter Web App | General tab --> Application title
Theme tab --> Header text color | 3 | Header Color | Configure the Reporter Web App | Theme tab --> Header background color | 4 | Basemap | Configure the specific AGO Web Map for the issue category (in this case you are configuring the Animal Control Problems map; it's the first map that pops on the Reporter). | You can also add any layers you want and they'll show up. | 5 | Symbology | Configure the AGO Web Map for the issue category | --> You can have one symbol for all the reports in the issue category, or have a different one for each type of problem (change this in the Style window Choose an attribute to show; either show location only or choose an attribute such as Type of Problem) --> Click options to define the symbol you want to use. Note: it doesn't appear that the heatmap option works. | 6 | Issue Category Image | Configure the Item Details of the issue category Web Map | Edit the Thumbnail of the map | 7 | Issue Category Name | Configure the Item Details of the issue category Web Map | Edit the title of the map | 8 | Issue Category Description | Configure the Item Details of the issue category Web Map | Edit the Summary and Description of the map | 9 | Issue Category Pane Color | Configure the Reporter Web App | Theme tab --> Body Background Color |

# In Pic Above | Description | Website to go to | Thing to change | 1 | Issue Category title | Configure the specific AGO Web Map for the issue category | Rename the feature layer in it | 2 | Report Title | Configure the specific AGO Web Map for the issue category | Configure the pop-up title for the layer. You can make the title be based on static text or dynamic text based on the report |
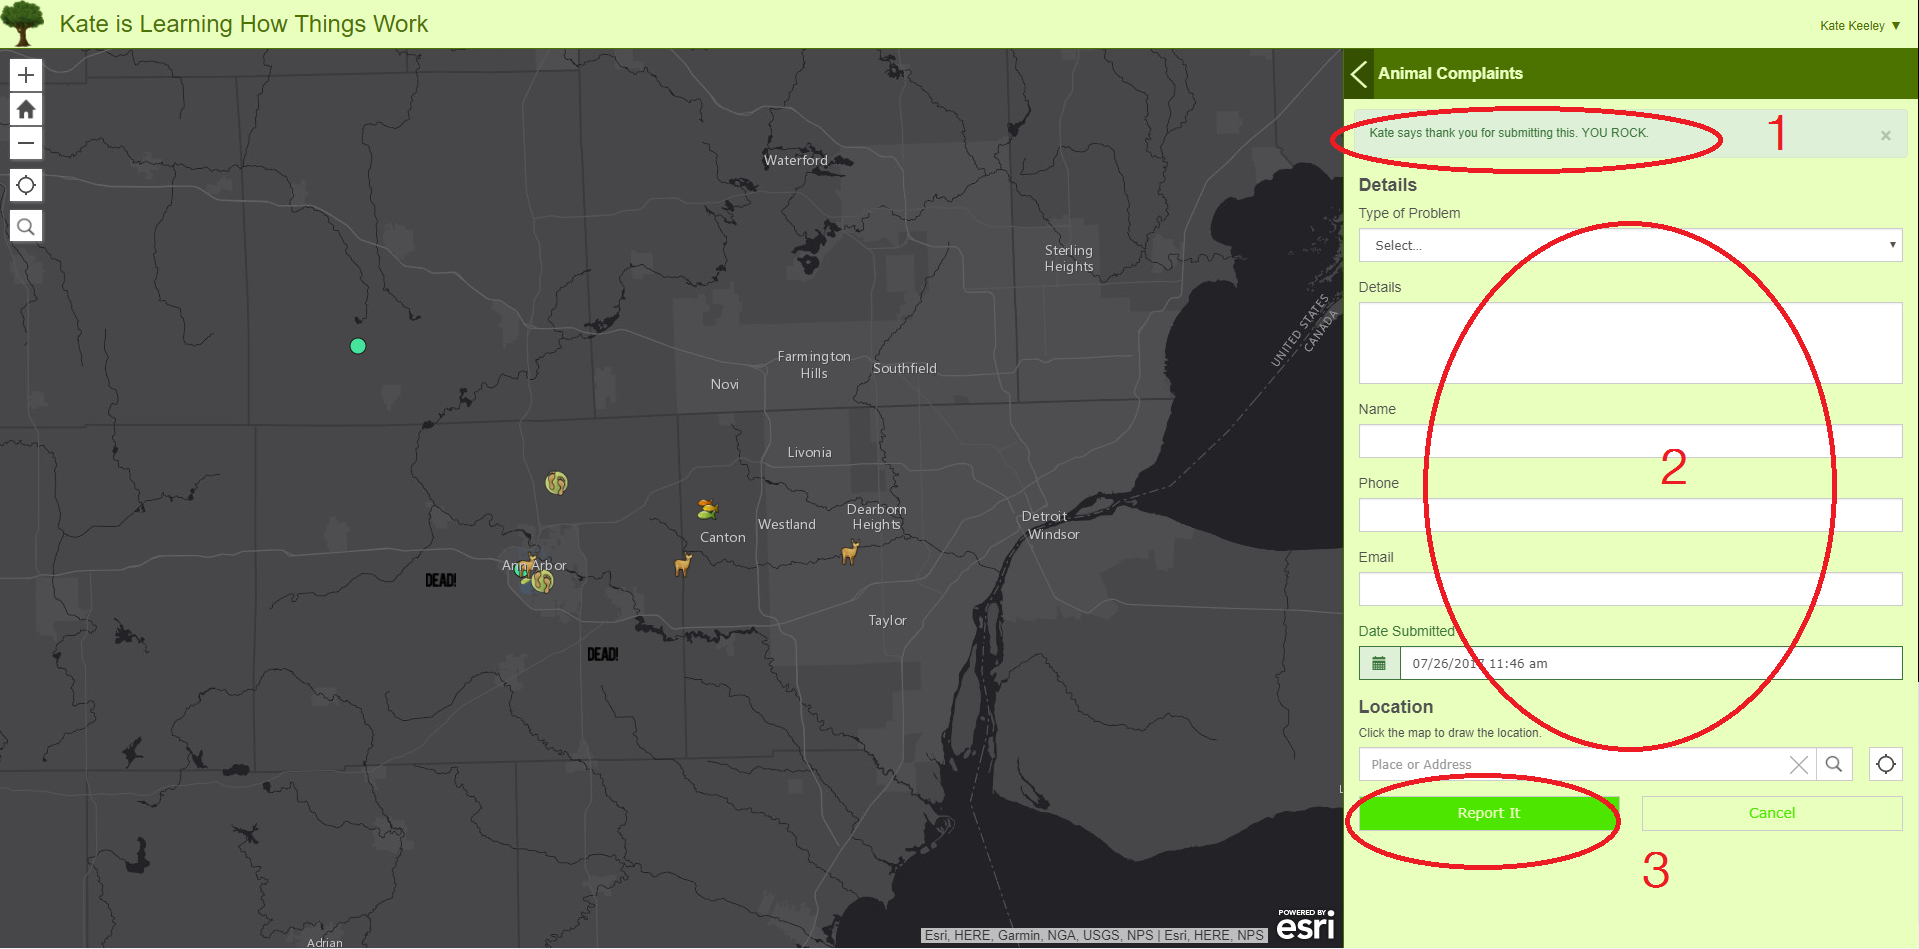
# In Pic Above | Description | Website to go to | Thing to change | 1 | Response after a citizen reports a report | Configure the Reporter Web App | Form tab --> Submission Message --> write your message in the box | 2 | Form fields | Configure the specific feature layers & AGO web maps | See FAQ questions and answers: How do I add fields in the form of the Reporter? How do I delete fields in the form of the Reporter? How do I turn off fields in the form of the Reporter? | 3 | Report It Button | Configure the Reporter Web App | Theme tab --> Button text color and button background color |
|