The Premise:
You're building a proof of concept survey for some invasive flora field work. You wish for your field workers to be able to define a quadrat boundary polygon and then complete multiple related surveys within that single polygon, recording point locations as they work. Furthermore, we want them to be able to revisit the same survey polygon and submit more location-based surveys if necessary.
Pre-requisite concepts to understand:
The Workflow:
'select_one' questions
Survey123 Connect (desktop app) allows us to include 'repeats' within our published survey. These are related tables that get published in association with our survey feature layer. And while our Survey123 surveys can only include a single type of geometry question (point, line, or polygon), we can include additional geometry questions within our related tables...
The first thing you'll want to do, is download the Survey123 Connect desktop app and install it.
- Open Survey123 Connect and sign into your web portal (ArcGIS Online or ArcGIS Enterprise) using your licensed username and password.
- Click on 'New Survey'

- Give your survey a Title: "Quadrat and Pest Species Survey"
- Ensure 'Advanced Template' is selected, and click 'Create Survey'
This will open Microsoft Excel in addition to Survey123 Connect. We use Excel to configure our survey form and take advantage of more advanced capabilities and customisations than can be acheived in the Survey123 web app. (See: ArcGIS Survey123: Web or Connect?)
- In your Excel workbook, on the 'survey' sheet, highlight the rows 2,3,4 and delete them
- In cell 2A, choose 'select_one list_name' from the drop-down and edit the text to be: 'select_one surveyor_name'
- In cell 2B, give this new field the name: 'surveyorname'
- In cell 2C, set the field alias label: 'Surveyor Name'

You've just added the first field (column) to the attribute table of the feature layer that will get created in your web portal when this survey is published. The 'select_one' question indicates that we're going to define a domain (or Choice List) for this question. So now we need to create a list of permitted options associated with 'surveyor_name'...
- On the 'choices' sheet, highlight rows 2 to 9 and delete them
- In cell 2A, enter 'surveyor_name', then grab the bottom-right hand corner of the cell and drag down to cell 5A to pre-fill those cells with the same value.
- Then fill out the 'name' and 'label' columns for those cells
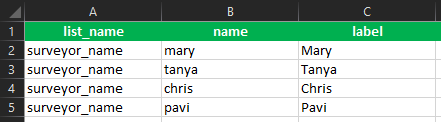
- Go back to the 'survey' sheet and Save your Excel workbook
- In Survey123 Connect, the changes you have just made in the XLSForm will be translated into the first question of your survey
Challenge - If you're completely new to this, challenge yourself to create another 'select_one' question that appears like this:
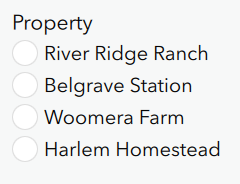
- In Excel, on the 'survey' sheet, set cells 2F and 3F to 'minimal', to turn your questions into drop-down lists, rather than radio buttons.
Adding geometry and a related table
Now that we know the very basics of navigating our XLSForm, let's add some geometry, a related table, and some additional questions to this survey and feature layer:
- Make the following additions to your survey in the XLSForm, making sure to provide some options for the 'select_one species' question on the 'choices' sheet:
typenamelabelappearancerepeat_count
| Type | Name | Label | Appearance | Repeat_count |
| select_one surveyor_name | surveyorname | Surveyor Name | minimal | |
| select_one property | property | Property | minimal | |
| geoshape | quadrat | Quadrat | press-to-locate | |
| begin repeat | pestsurvey | Invasive Species Surveys | | 8 |
| select_one species | species | Species | minimal | |
| text | notes | Notes | | |
| geopoint | surveylocation | Survey Location | hidden | |
| image | photo | Photo | | |
| end repeat | | | | |
So what have we done here and how is this survey intended to be used?
- Every time a new survey is opened, the user can select their name, the property they're on, and define a "quadrat" using the polygon tool in the geoshape question.
- They can submit up to 8x "Invasive Species Surveys" for that quadrat
- Within each of those surveys, a geopoint is automatically captured for their location at that time, they can choose from a list of species, add notes, and capture/upload an image.
- When the survey is submitted, a single polygon feature is created, alongside X related point feature surveys.
Publishing
Now what gets created in our web portal when we publish this survey?
- Save your Excel workbook and go back to the Survey123 Connect window
- Click 'Publish'

- Open a web browser, go to your web portal and sign in
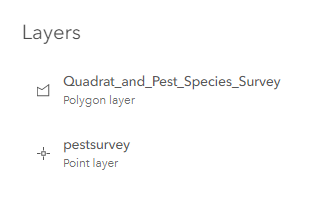
- Navigate to the 'Content' tab and observe the items that have been created:
The Feature Layer will be a 'group layer', in which there is a polygon feature class and a point feature class. If we add this group feature layer to a web map and query the polygons, then the points will appear under related records because they exist in a related table, defined by the 'repeat' in the survey form.
'Sent' and 'Inbox' Folders
Lastly, if we want our users to be able to go back and add new point surveys to the same polygon, then we would want to take advantage of either the 'Sent' folder or the 'Inbox' folder. You can read more about both of these options here: Prepare for editing existing survey data
Essentially, if we only want field workers to be able to edit and re-submit their own data, then we would let them use the 'Sent' folder (enabled by default at time of publishing). However if we wanted to enable users to modify and edit other field workers' submissions, then we would enable the 'Inbox' folder, found on the 'Options' tab when previewing your survey in Survey123 Connect.
Further Learning
Two other popular columns to investigate when starting out with Survey123 are:
- 'required' - question must be answered in order for submission to succeed
- 'relevancy' - question will appear when a certain condition is met (e.g. a previous question is answered)
Please explore these columns and all previously mentioned steps in the attached XLSForm (Quadrat and Pest Species Survey.xlsx)

