- Home
- :
- All Communities
- :
- Products
- :
- ArcGIS Survey123
- :
- ArcGIS Survey123 Blog
- :
- Survey123 Tricks of the Trade: Microsoft Excel
Survey123 Tricks of the Trade: Microsoft Excel
- Subscribe to RSS Feed
- Mark as New
- Mark as Read
- Bookmark
- Subscribe
- Printer Friendly Page
- Report Inappropriate Content
If you use Survey123 Connect to author forms you are surely to become a regular of Microsoft Excel and the Survey123 XLSForm templates and samples. In this blog post, you will find some tips to help you be more productive with all of that. The first half of the post focuses on the Survey123 XLSForm templates and samples, describing how you can manipulate them to your liking. The second half compiles a handful of general productivity tips for Microsoft Excel.
Survey123 Connect XLSForm Templates
Some context first: XLSForm, .xls files and Microsoft Excel
Before jumping into the actual tips, I want to provide some clarification about Microsoft Excel and how it relates to XLSForm and Survey123. The XLSForm specification describes the syntax you need to follow in order to define a smart form in an .xls spreadsheet file. Survey123 adheres to the XLSForm specification. The foundation of Survey123 forms is ultimately an XLSForm document (.xls file).
Xls files were introduced in 2007 by Microsoft. Initially it was a proprietary format, but it was ultimately shared as an Open Specification. Technically, you can use any means to create Survey123 forms as long as you follow the XLSForm syntax and the output is stored in a proper .xls binary file. You do not need to use Microsoft Excel, other programs such as Open Office, Libre Office, Numbers can create xls files.
Formulas and data validation in Survey123 templates and samples
Survey123 Connect includes a number of samples and templates to help you get started with XLSForms. These .xls files (technically .xlsx) have been created using Microsoft Excel, and while we know they can be used and manipulated outside Microsoft Excel, we do not test them outside of this program. On top of the compulsory XLSForm sheets (survey, choices and settings), our templates and samples include a number of formulas and data validation rules meant to facilitate the authoring of XLSForm compliant documents. For example:
- Several XLSForm columns in the survey spreadsheet include choice lists: type, appearance, bind: esriFieldType, etc. This is to make it easier for you to pick a valid XLSForm choice.
- A data validation rule in the name column of the survey sheet will highlight cells that have duplicated values. It also ensures that the value you enter will be accepted by ArcGIS as a field name. It checks for reserved keywords, length and special characters.
- A yellow tip briefly describes the intent of each XLSForm column.
- etc.
The formulas and data validation rules included in the Survey123 templates and samples are for your convenience, but they are not strictly necessary. If you feel these validation rules and formulas are in your way, you can manipulate and even eliminate them.
The next animation shows how you can access the data validation rules of a cell in Microsoft Excel.

Virtually every cell in our samples and templates has data validation. At this moment, I just want to make sure you know how to open the data validation rules for a particular cell.
Yellow tips (and how to hide/disable them)
When you select a cell in the survey sheet, you always get a yellow tip. We added them to describe the purpose of the different columns in the survey sheet. Below is the tip for the bind::esri:fieldAlias for example.
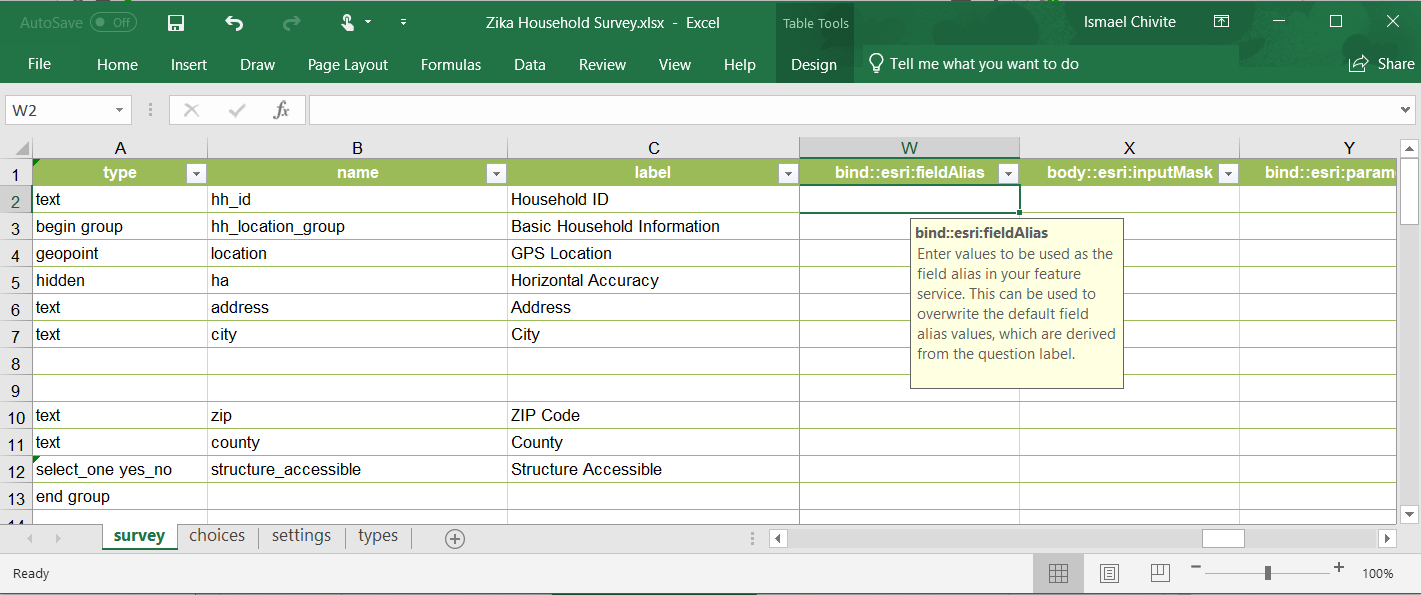
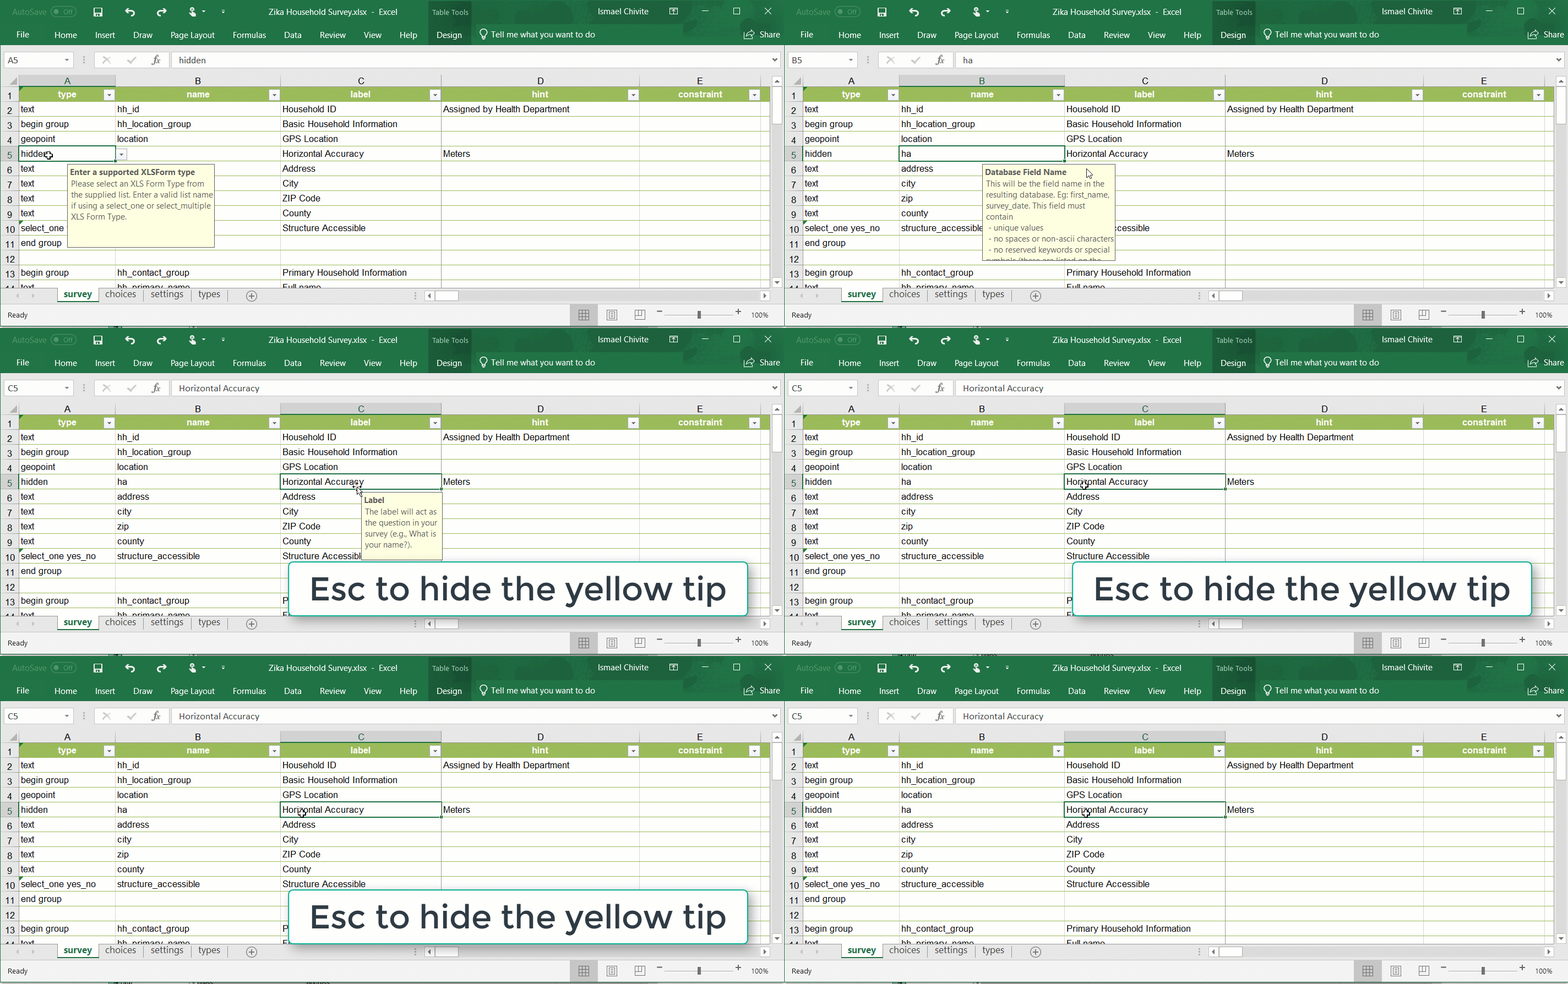
The yellow tips provide good info, but they also can get on your way obstructing the view of your form design. If you simply hit the Esc key, the tip goes away until you select another cell.
The yellow tip, in Microsoft Excel jargon, is an Input Message. To disable it, you need to go into the data validation dialog as shown in the next animation.
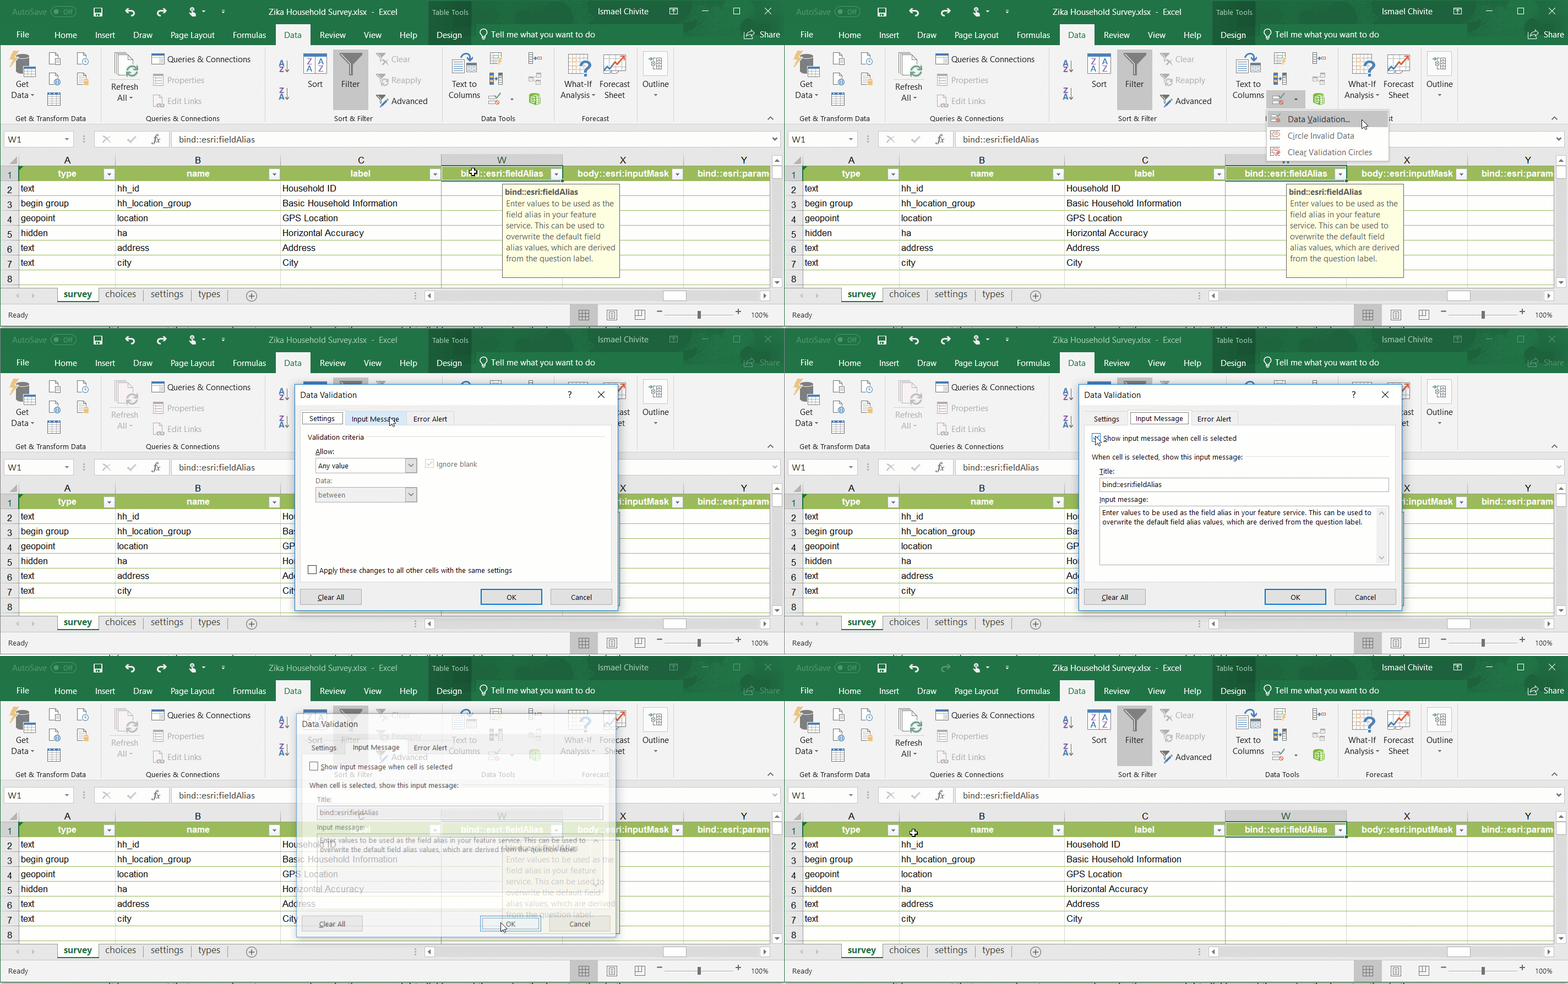
If you feel ready for it, you can also disable all the Input Messages in one go. First, select all cells in the survey sheet using Ctrl-A, then open the Data Validation dialog and disable the Input Message for all.
Manipulating XLSForm lists such as appearance, type, etc.
As described above, some specific columns in the survey sheet limit inputs to values within a list. This is the case, for example, for the type, appearance, bind::esri:fieldType, required and readonly columns. It is important to know how to manipulate these lists.
Take the type and appearance lists, for example. They define, respectively, the XLSForm question types and question appearances that Survey123 supports. As support for new question types and appearances grows, lists in old surveys you may have created could become obsolete. For example, support for geotrace and geoshape question types came with version 3.6. If your survey used a template downloaded with 3.5, these question types will be missing.
If you look at the data validation of a cell in the type column, you will see that it limits input to a list. The list is defined as a range of cells coming from the types sheet. The types sheet is not part of the XLSForm spec. It was spcifically added to the Survey123 Connect templates to help build data validation rules like this. It also serves as a nice quick reference for XLSForm syntax, listing the different question types, appearances, operators and other things you can use.
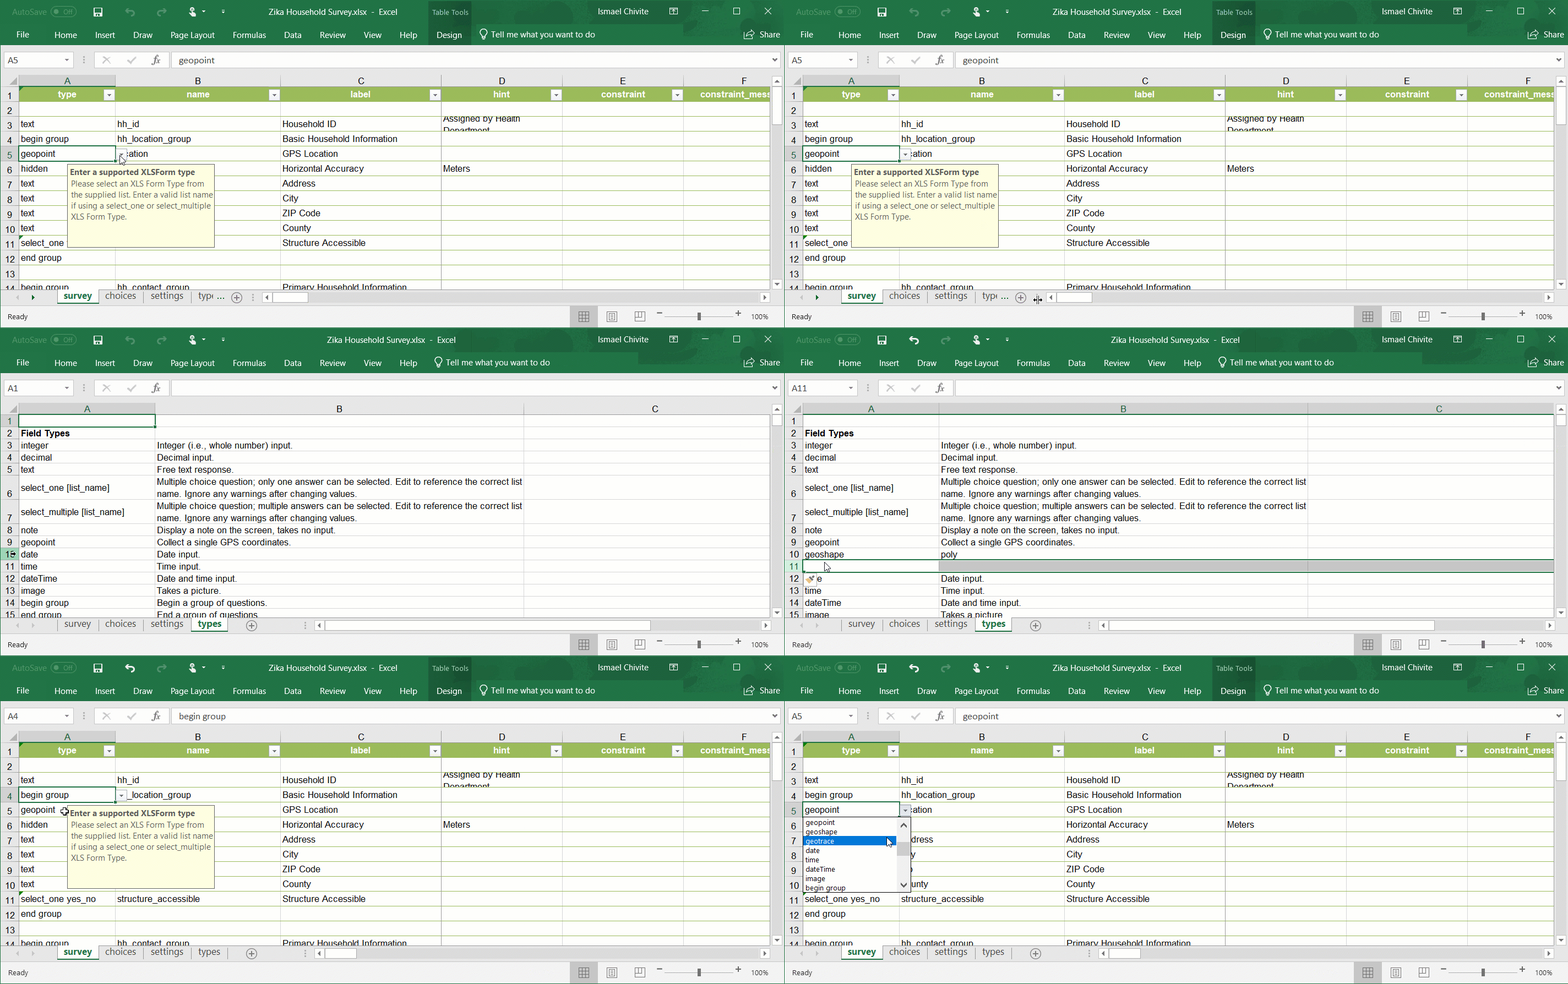
If you want to add a missing entry to a list, you will do it in the types sheet. The next animation shows how you can add the geotrace and geoshape question types into a pre-3.6 template.
The same technique described above can be used to add new appearances.
You should keep in mind two important things:
You must add new entries in the types sheet one by one. That is: You insert one new row, and you add values in it. Then you add the next row and so on and so forth. If you insert more than one row without values, your list range will not be happy.
You must enter new entries somewhere in the middle of the list. That is, never add a new entry at the very beginning (first position) or end (last position) of the list.
In the case of the lists for the required and readonly columns, you may want to delete the data validation rule completely if you want to enter an XLSForm expression in them. The list included by default only has one value: yes. If you want to enter expressions you may want to delete the data validation rule to eliminate the drop-down list.
Creating your own template
By now you may be wondering if you can create your own template. To some extent, the answer is: yes. You can first create a new survey from the Advanced Template and make your own modifications to the Excel file. You can then use the Create a new survey option to derive new surveys out of your own template.
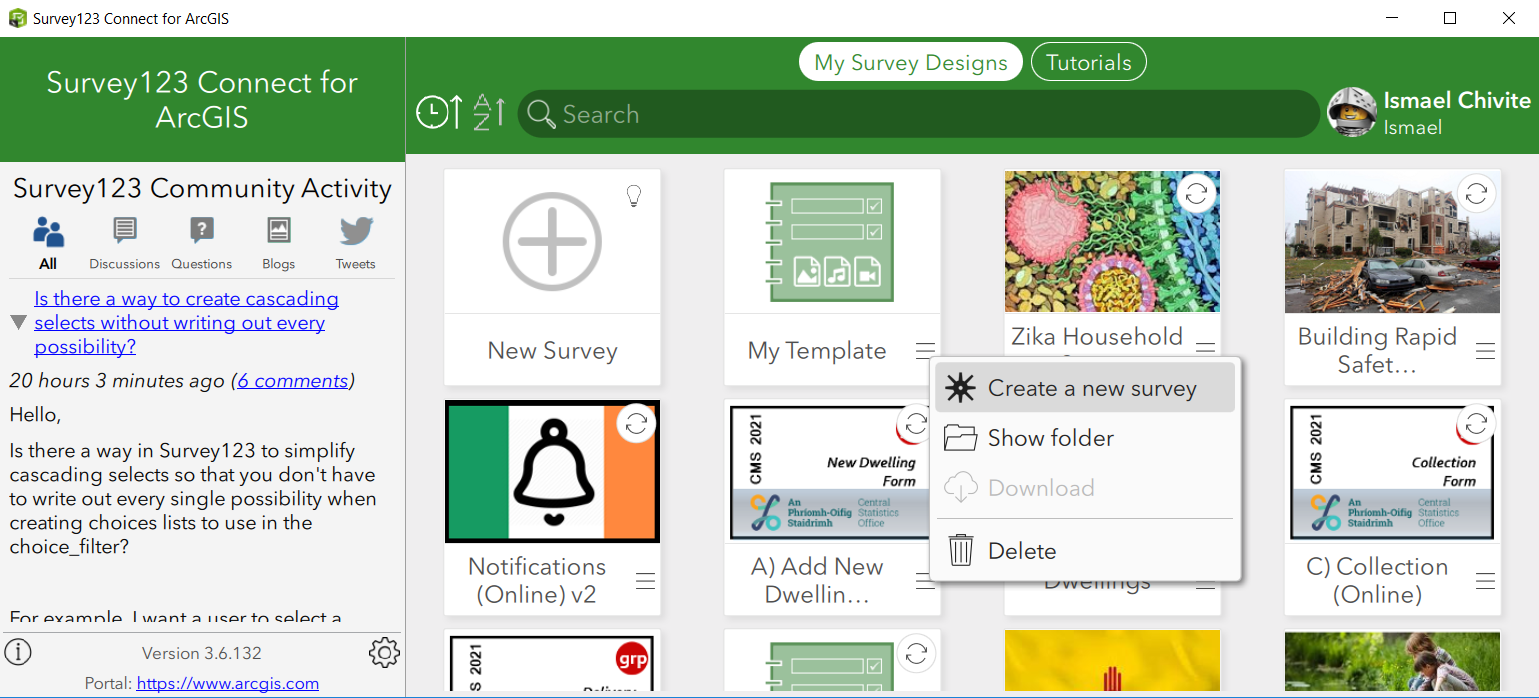
What I like about this approach is that not only you can create a new survey with all the modifications in your Excel file, your new survey will also inherit other properties of your template, such as the thumbnail, summary and description of your own template. Style, Inbox and Image settings in your template will also be matched, as well as custom content in your media folder if you ever add it to your template form.
If you publish your template from Survey123 Connect and share it with groups within your organization, other people will be able to use it too. Your survey, once published, will appear in the My Organization category of the New Survey dialog in Connect.
The real advantage here, again, goes well beyond tweaks to the data validation rules and formulas. It is other things in your template, like settings or even common lists you may have added in the choice sheet that would benefit anyone in your organization using your template.
Microsoft Excel Productivity Tips
So far, I have described specific tips to handle the Survey123 templates and samples that come with Survey123 Connect. Next, I want to compile a few general Microsoft Office tips for all of us who spend time designing Survey123 forms using XLSForms, Microsoft Excel and Connect. It is likely that you will already know many of the tips listed, but if just a single one you don't, that may make this read worthwhile. If you have other tips you want to share, please add them as a comment below, so we can keep the list growing.
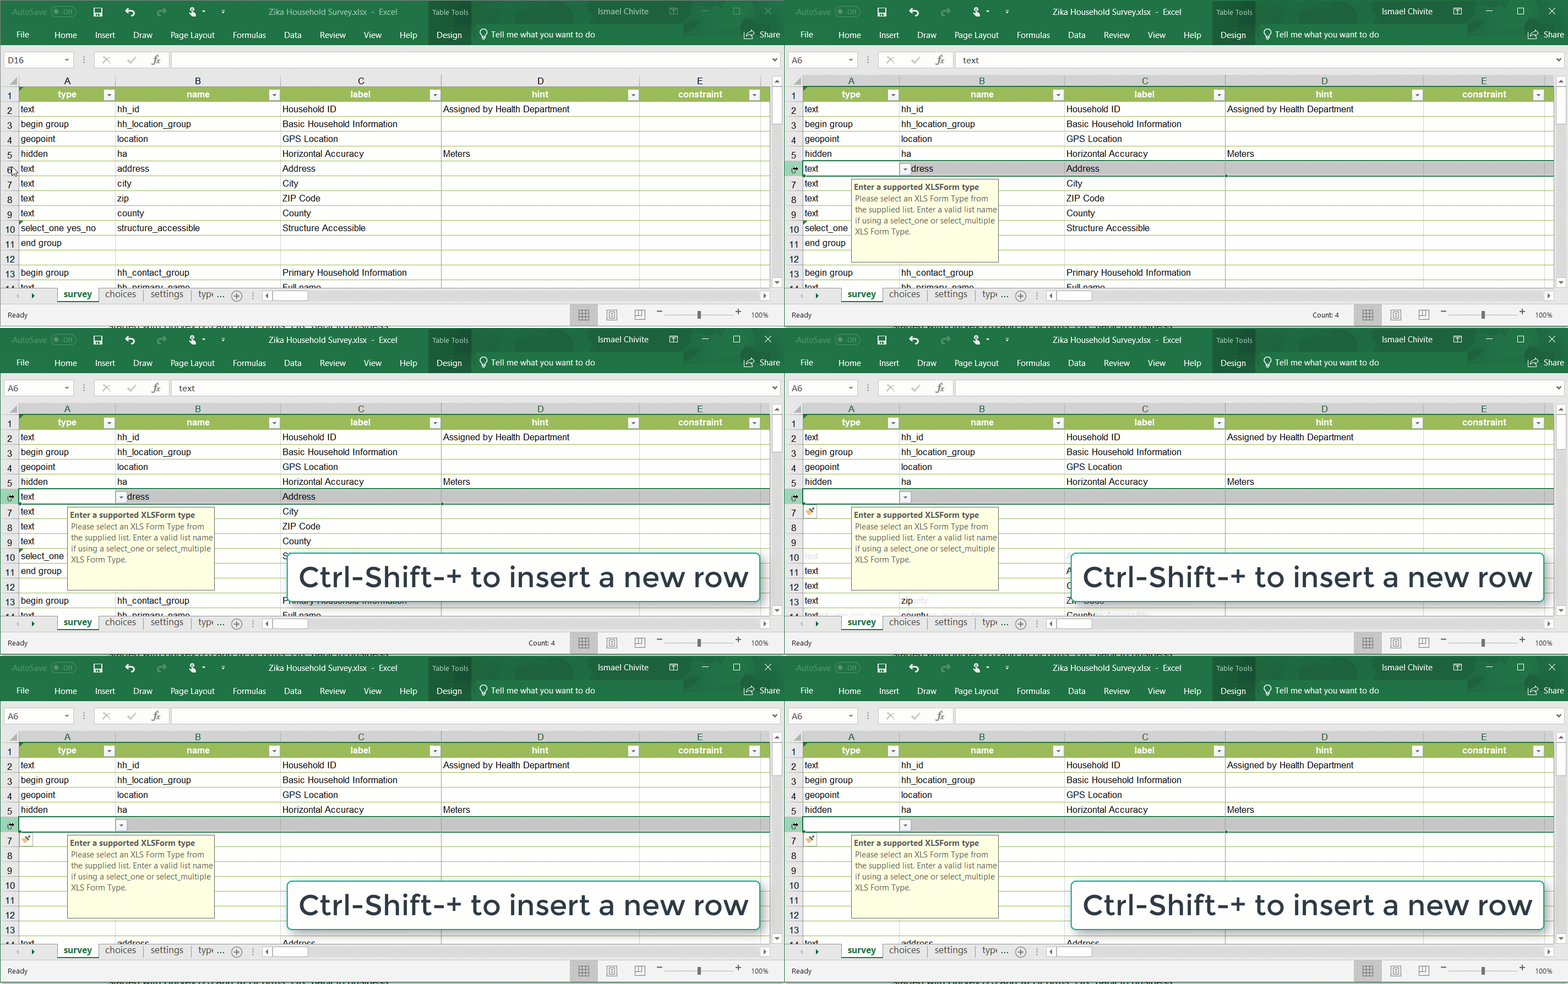
Inserting new rows, the quick way: Ctrl-Shift-+.
It is no secret that you can insert a new row by selecting a row, right-clicking and then using the insert option in the context menu. If you want to do that same thing much more quickly, select a row and then hit Ctrl Shift +.
Careful with copy paste!
Copy-pasting is often our friend. Nothing wrong with it... unless you copy too much. In Excel, when you do a standard copy-paste, you actually are copying way more than you think: you are copying the cell values, but also formatting style and formulas. It is the formula bit that can get you in trouble, particularly when you copy cells from one xls file to the next. To avoid any issues, I like to copy just the values. This is described well in this Microsoft article.
Extend values and formulas
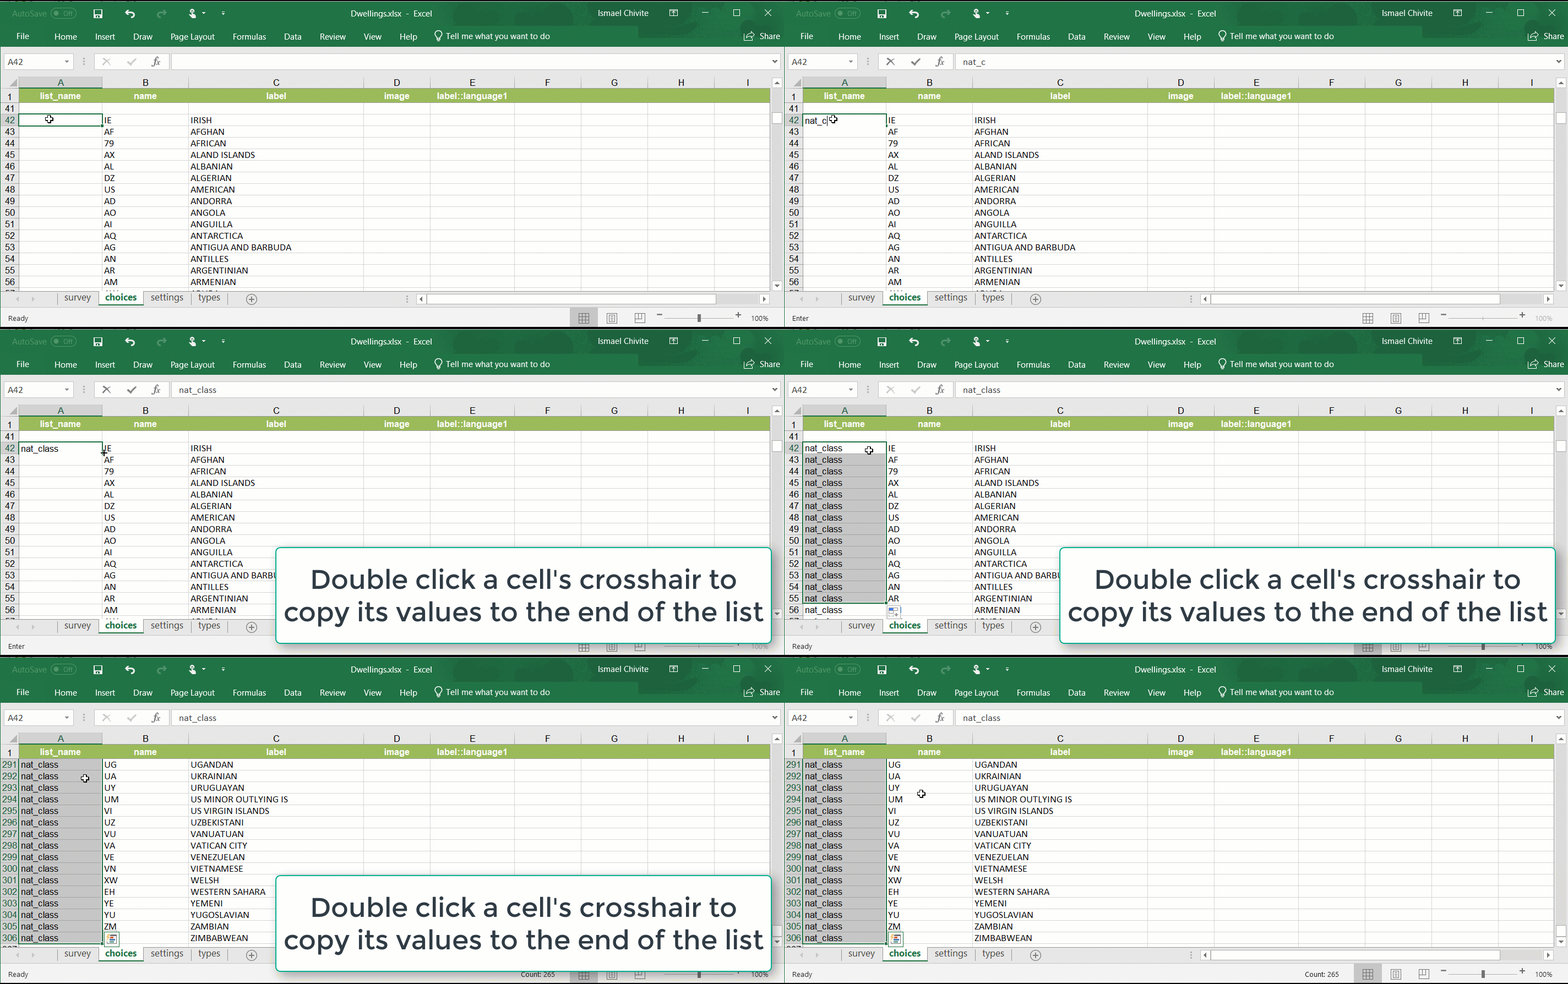
This tip is particularly valuable when constructing lists in the XLSForm choice sheet. Simply double-click on a cell's bottom right corner to extend that value and formula down to the end of the list. In the animation below this technique is used to apply a list name to over 250 list choices.
Keyboard shortcuts
In Microsoft Excel, using the mouse is often the slowest approach to get anything done. There are keyboard short-cuts for anything you can imagine. I use keyboard shortcuts for selections quite a bit: Ctrl + A to select all cells in a sheet and Ctrl + Shift + Down Arrow to expand a selection to the bottom of a list.
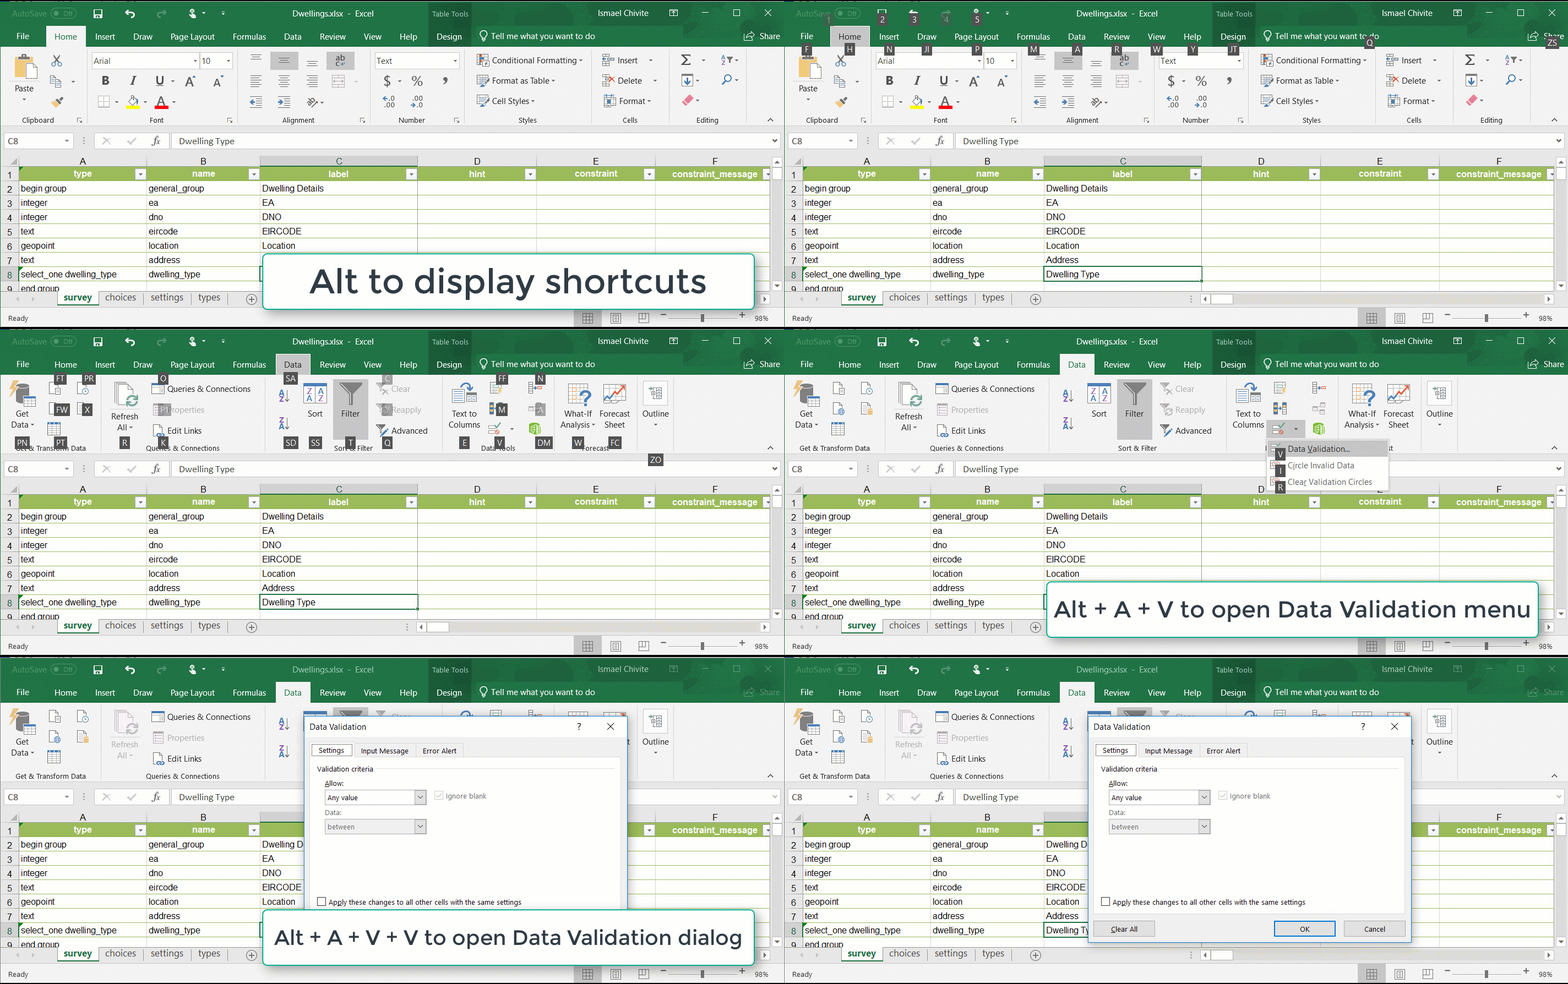
But there are way too many shortcuts to describe and only a few that you will truly take advantage of. If you hit Alt, Microsoft Excel will describe keyboard shortcuts to open a ribbon. For example, Alt + A opens the Data ribbon but you do not have to remember that, because if you simply hit Alt, the Data ribbon will be highlighted with A as a reminder. Even better, if you hit Alt + A not only the Data ribbon opens, but also every function within it is also highlighted with its shortcut. For example, Alt + A + V opens the Data Validation menu.
Again, just a few tips. If you want to share a few more, please do so below!
You must be a registered user to add a comment. If you've already registered, sign in. Otherwise, register and sign in.