-
All Communities
ProductsIndustriesDevelopersGlobal
- ArcGIS Ideas
- GIS Life
- Community Resources
- Home
- :
- All Communities
- :
- Products
- :
- ArcGIS Survey123
- :
- ArcGIS Survey123 Blog
- :
- Survey123 Tricks of the Trade: Configuring survey ...
Survey123 Tricks of the Trade: Configuring survey maps
- Subscribe to RSS Feed
- Mark as New
- Mark as Read
- Bookmark
- Subscribe
- Printer Friendly Page
- Report Inappropriate Content
[Last updated April 2022]
Take a look at the two Survey123 projects below, both of them use custom maps. The Hydrant Maintenance form on the left uses a map showing the water network as well as color coded hydrants indicating the status of the last inspection performed in them. The hydrants are also labeled indicating both their Asset ID as well as the date of the last inspection performed. The Violation Report project on the right, combines an Esri Topographic basemap with a couple of feature layers: one representing parcel boundaries in blue, and one highlighting existing violation reports within the last year. Using Survey123 web or field app, it does not matter, you can always decide what map is best for the end users of your smart form.
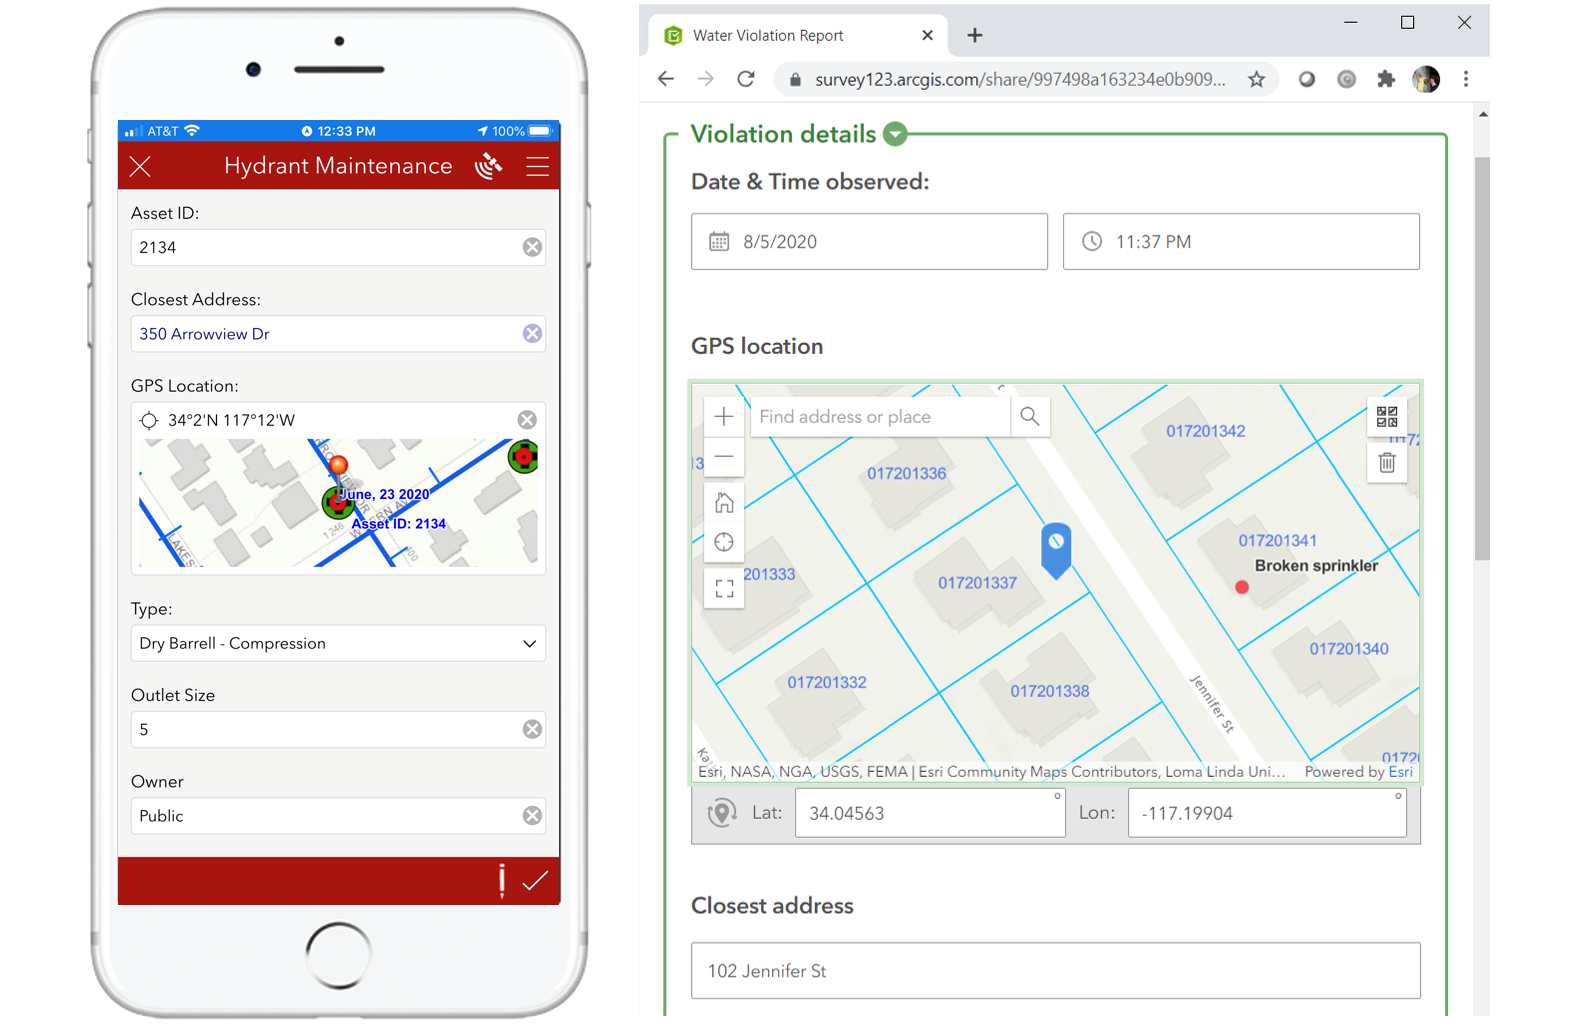
Configuring the right map for the workflow at hand is important to provide the best possible experience to end users. The map used in the Hydrant Maintenance form helps users validate if the hydrant they are inspecting is in fact the one that should be inspected. The map provides good geographic context. It also gives a visual indication of when hydrants were inspected for the last time. The Violation Report map helps more clearly identify to which property the violation found belongs and if other violations have been reported in the area in the past.
To specify a custom map for your survey, you can use Survey123 designer or Survey123 Connect.
Setting a default custom map in Survey123 designer
If you created your survey in the web designer, you are just a few click away. Watch this animation for details:

Note that you can choose between any of the organization basemaps, but also a custom web map you may have created or shared with you.
Setting a default custom map in Survey123 Connect
In Survey123 Connect, select a published survey and navigate to your Survey Settings -> Map tab. The map gallery will display choices from your organization Survey123 basemap. While the default map selected is set at the organization, as a survey author you can override it by selecting another one from the list.
Most importantly, if you switch to the Linked Content tab you will be able to link your survey with other maps, specific to your project. Linked maps will also show in the survey map gallery. You can also select any of the linked maps as the default map of your survey.
Lets do this step by step:
- In Survey123 Connect, select a survey and click on survey Settings
- Click on Linked Content and link a map
- Optionally, go to the survey Map tab, open the map gallery and select your linked map as the default map, then publish for the default map change to take effect. Note: If you go into the Map tab and you cannot see a recently linked map in it, reopen Survey123 Connect to refresh the map gallery.

You can also specify the map to be loaded in a geopoint, geotrace or geoshape question by specifying the itemId of your map in the body:esri:style XLSForm. When you take this approach, the map you choose must be previously linked to your survey. This is how you do it:

Understanding the Survey123 app map gallery
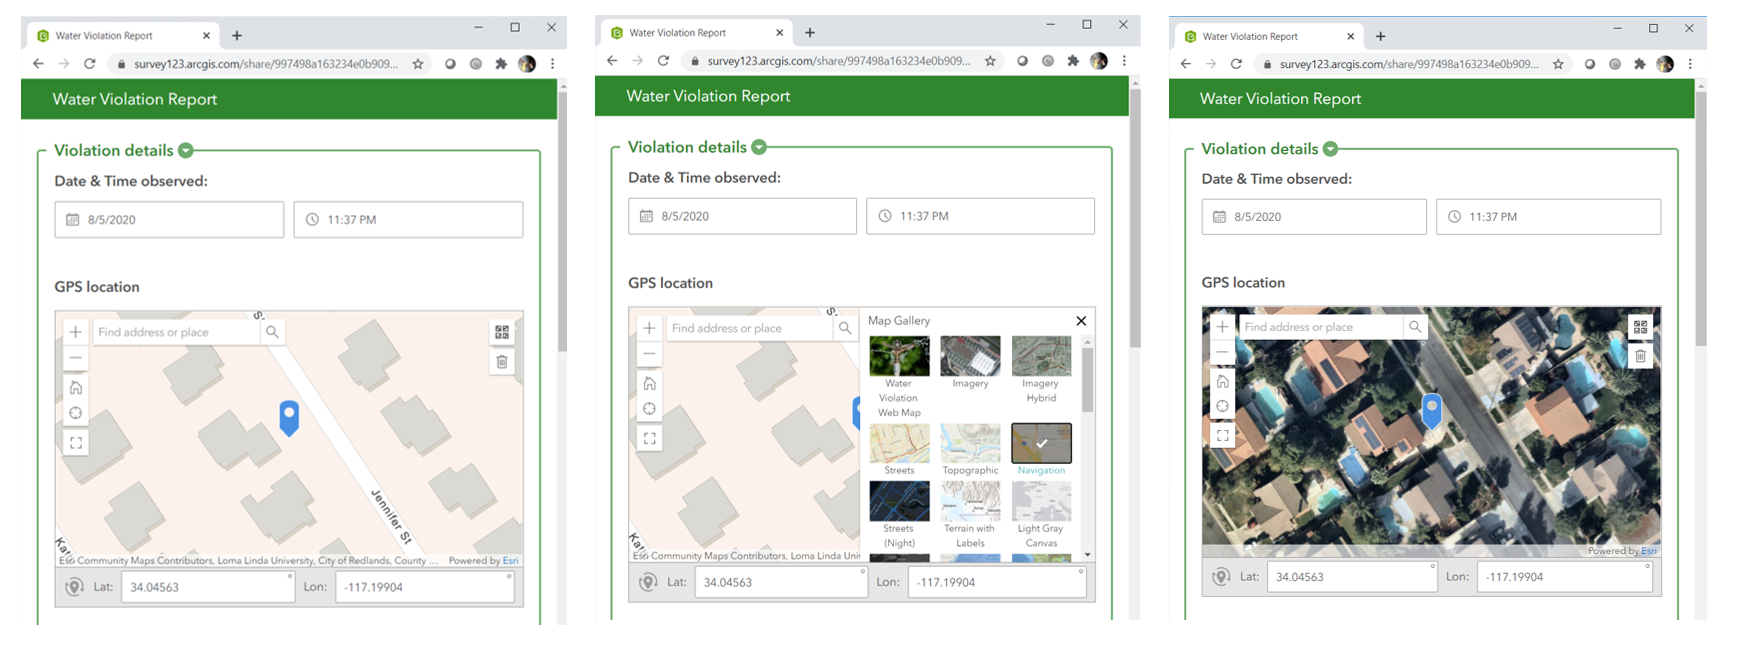
When a user interacts with a map in any of the Survey123 apps (web or field), a map gallery (aka basemap switcher) is available for users to choose what map should be displayed. The illustration below shows that the map gallery can be accessed from the top-right corner of the map in the Survey123 web app. Once opened, the user selects the map to be shown.
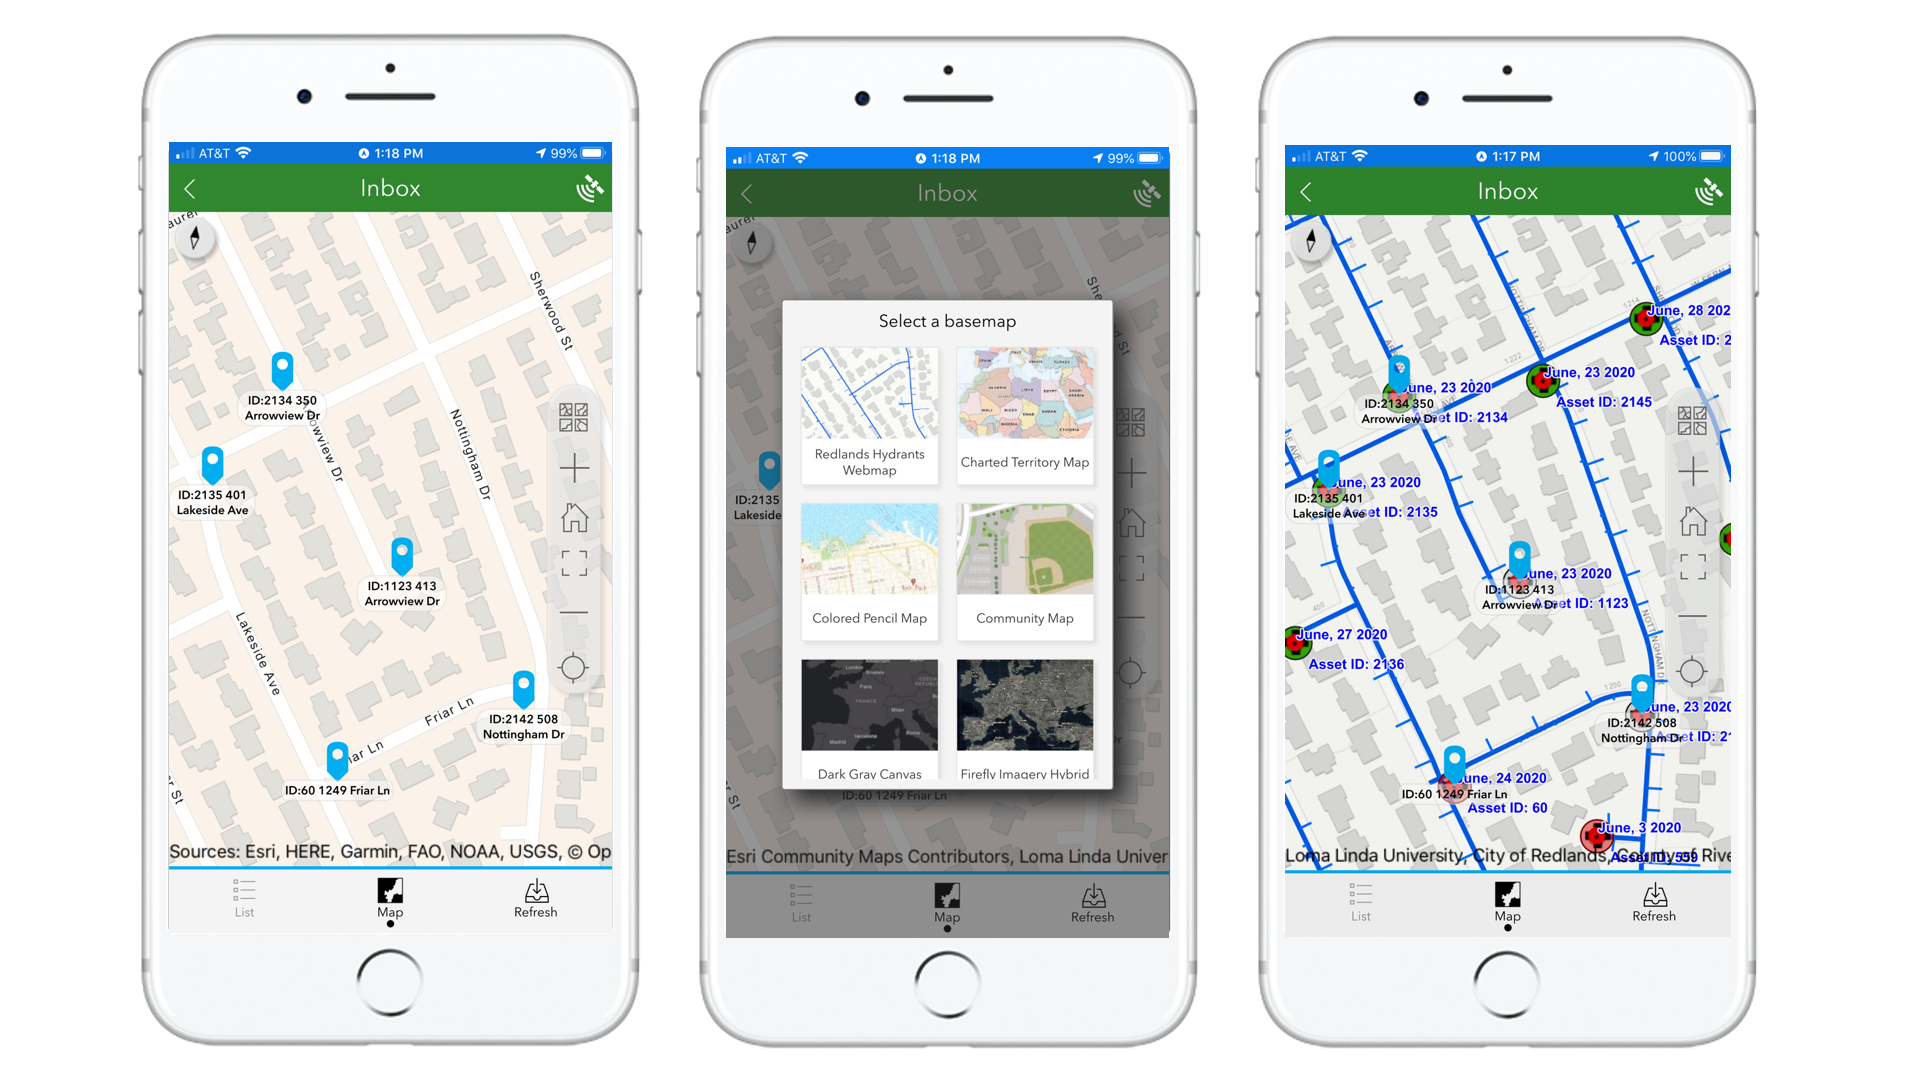
The experience in the Survey123 field app is very similar. Below you can see that the end user has opened the Inbox map to look at all the hydrants that have been assigned for inspection today. The map gallery can be accessed to switch the map at any time.
The collection of maps in the gallery, is the combination of two sets: the collection of organization basemaps, and a collection of maps linked to the specific survey.
Organization Basemaps
Organization basemaps are, no surprise, defined at the ArcGIS organization level and as such, they apply to all Survey123 projects. These are basemaps that will be made available, always, to all Survey123 users through the map gallery.
Traditionally, Survey123 pulled the list of maps from the basemap gallery defined at the ArcGIS (Online or Enterprise) level. However, in practice this may not quite work because often the collection of basemaps that makes sense to users of other ArcGIS apps, is not appropriate for Survey123 users. Starting with version 3.10, we introduced a new Survey123 specific organization setting so you can control the contents of the Survey123 basemap collection in the organization. This setting is honored by the Survey123 field app in 3.10 and will be also honored by the Survey123 web app in 3.11.
Generally speaking, you do not want to include many basemaps at the organization level. One or two at most should do for the vast majority of cases. For context, the standard basemap gallery that comes predefined with ArcGIS Enterprise and ArcGIS Online has more than 20 choices. Definitively way too many for the average Survey123 end user. So many basemaps make sense for someone authoring a web map, but not for someone completing a built-for-purpose form.
To create your own custom Survey123 organization basemap gallery:
- Login into your ArcGIS organization with a user with administrative privileges.
- Create a new Group in ArcGIS.
- Share web maps with that group, ensuring that the web maps are also shared with Everyone, or at the very least with all users within your organization.
- Login into the Survey123 website. You should see an Organization tab (only administrators see this tab).
- Click on Organization and then activate the organization Settings tab.
- Choose the group from which the maps should be shown and optionally the default map.
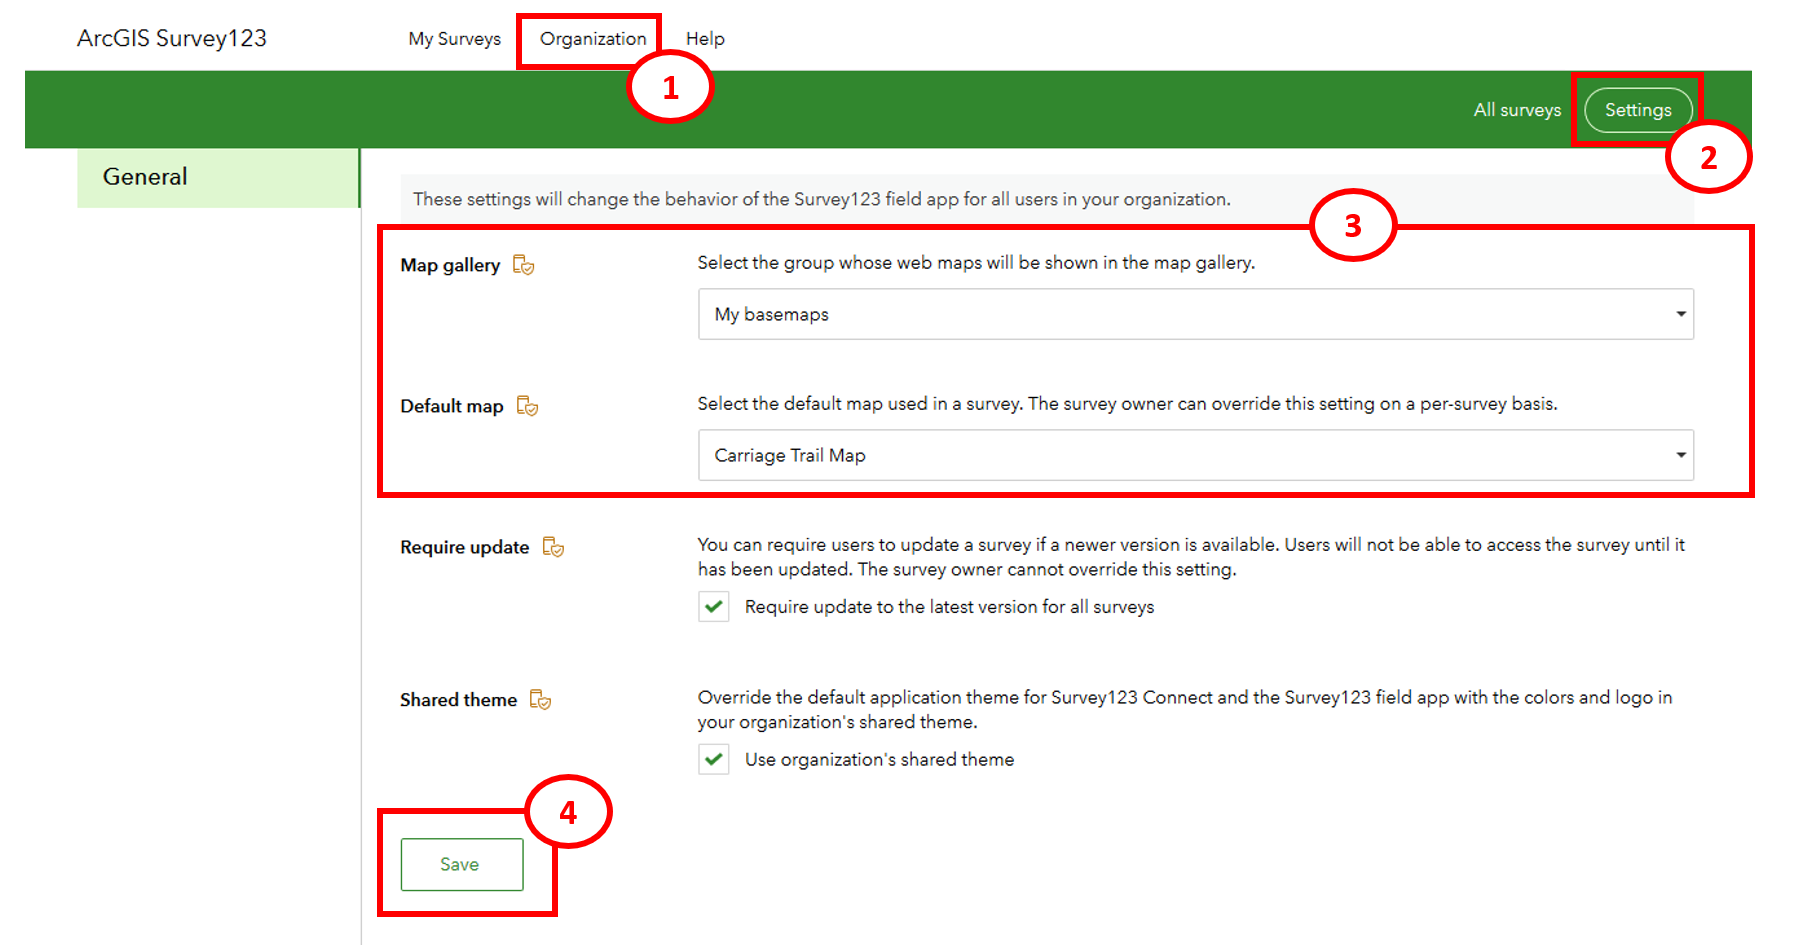
It is ultimately your call, but generally speaking, one or at most two maps in this group should probably do. Keep in mind that these maps will be shown in all surveys, so you really want to keep the list to a minimum.
Survey Basemaps
In addition to the maps set by the ArcGIS administrator in the Survey123 organization basemap gallery setting, survey authors can optionally add maps to their own surveys. This is done through Survey123 Connect.
Before we finish, just a few additional notes and considerations for Survey123 Connect users:
- Before you can link a map to your survey, you must first publish the survey. It is not possible to link maps to a survey that is not published.
- Once you link a map using Survey123 Connect, you do not need to republish the survey for end-users to see the new map. However, if you want your linked map to also be the default map of the survey, then you need to re-publish.
- You can link web maps, and also vector tile packages and mobile map packages. Now, if you link offline maps, then end users will need to manually download those linked maps before they can be used. Linked offline maps do not get automatically downloaded when the survey is downloaded or refreshed in the field app.
- You are responsible for ensuring that linked maps have been consistently shared with your end users. For example, if you link a map that is not shared with Group A, and you share your survey with Group A, then people in that group will be able to use your survey but not access your linked map. You can, of course, take this to your own advantage For example, if you work with users in 5 separate regions, it may make sense for you to share a single survey with all of them, link the corresponding 5 regional maps and share your linked apps accordingly so only users will only see maps for their own region.
You must be a registered user to add a comment. If you've already registered, sign in. Otherwise, register and sign in.