
Con el lanzamiento de la nueva herramienta de Migración para la red de servicios públicos, esta es una buena oportunidad para revisar cómo estas nuevas herramientas pueden incorporarse a las mejores prácticas existentes para implementar una red de servicios públicos. En este artículo discutiremos algunas de las mejores prácticas para usar las herramientas, junto con enlaces a recursos donde puede aprender información adicional. También puede encontrar una discusión similar en el tema Migrar datos existentes a una red de servicios públicos en la Ayuda de ArcGIS.
Antes de hablar sobre las nuevas herramientas, hagamos un breve repaso de las mejores prácticas existentes para la implementación. Esta es una versión abreviada de las mejores prácticas descritas en ela0artículo Utility Network Data Migration: Best Practicesa0.
Herramientas y modelos históricos
Antes del lanzamiento del conjunto de herramientas de migración para la red de servicios públicos, migrar a la red de servicios públicos significaba que necesitaba usar la caja de herramientas Utility Network Package junto con un modelo de datos predefinido (paquete de activos), como los proporcionados con Utility Network Foundations de Esri. Luego, los datos podían migrarse al paquete de activos usando el conjunto de herramientas Data Loading, o cualquier otra herramienta o proceso de migración de datos que deseara construir.
A medida que más clientes comenzaron a usar las herramientas de carga de datos, el equipo de ArcGIS Solutions lanzó las herramientas Create Simple Data Mapping y Create Migration Workspace para facilitar el proceso de crear un espacio de trabajo para carga de datos. Estas herramientas actúan como una interfaz específica para la red de servicios públicos del conjunto de herramientas Data Loading.
Si está interesado en aprender más sobre estas herramientas y modelos existentes, consulte laa0lista de lectura sobre migración a ArcGIS Utility Network. Una vez que entienda los conceptos, puede probar su conocimiento intentando uno de los siguientes tutoriales:
Históricamente, el aseguramiento de calidad se ha realizado en sus datos fuente usando ArcGIS Data Reviewer. El análisis y la corrección de errores dependían de revisar manualmente los errores creados por la red de servicios públicos, requiriendo una combinación de ediciones manuales y creación de scripts para limpieza de datos. El equipo ArcGIS Solutions lanzó la caja de herramientas Utility Data Management Support, que incluye varias herramientas para facilitar el proceso de revisión (Summarize Utility Network Errors) o resolución de algunos errores (Assign Terminals), pero seguía siendo un proceso mayormente manual.
Con la historia aclarada, ahora discutamos cómo las herramientas disponibles en el nuevo conjunto Migration toolset pueden complementar o reemplazar algunos de estos procesos.
Conjunto Migration toolset
El nuevo conjunto Migration toolset para la red de servicios públicos incluye herramientas enfocadas en automatizar la migración a la red creando una utility network basada en sus capas y campos existentes. Puede aprender más sobre cómo funciona esta herramienta leyendo el artículo Introducing the Migration toolset para la red y el artículo Building a utility network article.
To summarize the previous articles, the approach of the migration tools is quite different from what has come before and has several important implications. The biggest positive is that you maintain the subtypes, fields, and domains of your existing GIS features. The downside to this approach is that, because you are not implementing a known model that comes pre-configured for a specific set of industry workflows, you bear the responsibility of configuring your utility network model to behave the way you want.
Some customers may prefer this approach; however, it does mean that, instead of time spent focused on the translation of your data to conform to an industry standard model, you will be spending time focusing on configuring these same behaviors in your organization’s model.
Every time the Migrate To Utility Network tool runs, it creates a new mobile database. This begs the question of what to do when you’ve spent time configuring your utility network and need to refresh the data? You can use the Data Loading toolset to remigrate your data without losing any configuration or schema changes you’ve made. Let’s look at how the Migration toolset and the Data Loading toolset interact with each other.
Data Loading workspace
In addition to creating a mobile database containing a utility network, the migrate tool also creates a data loading workspace. A data loading workspace is a collection of files used by the Data Loading tools to migrate data from one schema to another.

This allows you to re-run the data migration of your source data into the data model that was originally created by the tool.

The Load Data Using Workspace tool in the Data Loading toolset allows you to rerun your data migration whenever you want.
The main benefit of this approach is that it allows you to keep the configuration changes you’ve made to your model, while still being able to refresh your data. However, this approach does have some limitations.
When you run the Load Data Using Workspace tool it must remove any existing data from the database. If you have enabled subnetwork controllers or created associations in your data, then these must be removed before the tool can delete the corresponding data. There are two ways around this. We will discuss the first approach in this section.
The first step to creating a repeatable migration is to run the migration tool with the Load data parameter unchecked. (it is checked by default). This will create a data model (referred to in this article as a template) and a data loading workspace containing data mappings that can be used to remigrate your data. You can then keep a copy of this empty database to use for data loading purposes.

Once you’ve loaded data and made configuration changes these can be incorporated into your data migration process. Associations and subnetwork controllers can be exported or imported using the Export Associations, Import Associations, Export Subnetwork Controllers, and Import Subnetwork Controllers geoprocessing tools. Any configuration changes you’ve made during your data migration can be applied to your template geodatabase as well.

Exporting subnetwork controllers and associations allows you to save any utility network data you manually created for re-use in subsequent migrations.
If you make any other schema changes to your geodatabase you will also need to apply them to your template. Depending on what has changed, you may need to adjust the field values or translations of your data loading workspace. You can learn more about this in the data loading workspace concepts topic in the online help.
This approach can take you quite far; however, note that if you decide to push the limits of the data model and its configuration, you will find certain types of changes are not allowed. The most common example is you are not allowed to remove or rename asset groups or asset types. So how can you deal with this limitation?
This is where the second approach comes in. To discuss the second approach, we must first discuss the history of data migration projects for the utility network and specifically discuss asset packages.
Asset Packages
The first data migrations built for the utility network required you to create and configure your network from scratch. Because this was a time-consuming process Esri developed a set of tools in the Utility Network Package toolbox to help streamline this process. These tools allow you to create and manage a specially structured file geodatabase called an asset package. An asset package is a specially formatted file geodatabase that contains the geodatabase schema (tables, subtypes, fields, domains) and tables that define the schema and configuration of the utility network being created. Another set of tools then reads this specially formatted database, using it as a template to create and configure a geodatabase and utility network matching that schema.
However, an asset package isn’t just a schema, it also contains data. Any data loaded into the geodatabase tables is appended to the corresponding tables of the newly created geodatabase. The asset package also allows you to populate the utility network system tables for subnetwork controllers and associations by populating several specialized tables in the asset package.
This is a powerful approach, but how does it apply to the migration toolset? The Utility Network Package toolbox contains a tool that allows you to export an existing utility network with all its configurations to a new asset package. This means that, once you reach the end of a prototype/pilot phase using a model that was created with the Migrate To Utility Network tool, you can use the Export Asset Package tool to turn it into an asset package for re-use in subsequent migrations.

Once you’ve exported your utility network configuration to an asset package, you then need to update the data loading workspace to point to the new asset package. This approach allows you to adjust the model, reload data to the asset package using the Data Loading toolset, and use the Asset Package to Geodatabase tool to deploy the asset package to a new utility network.

Smaller and simpler projects may not need to take this approach, but for larger, multi-month projects this allows you to iteratively develop and refine your data migration over time while still using a model produced by the migration toolset.
Conclusion
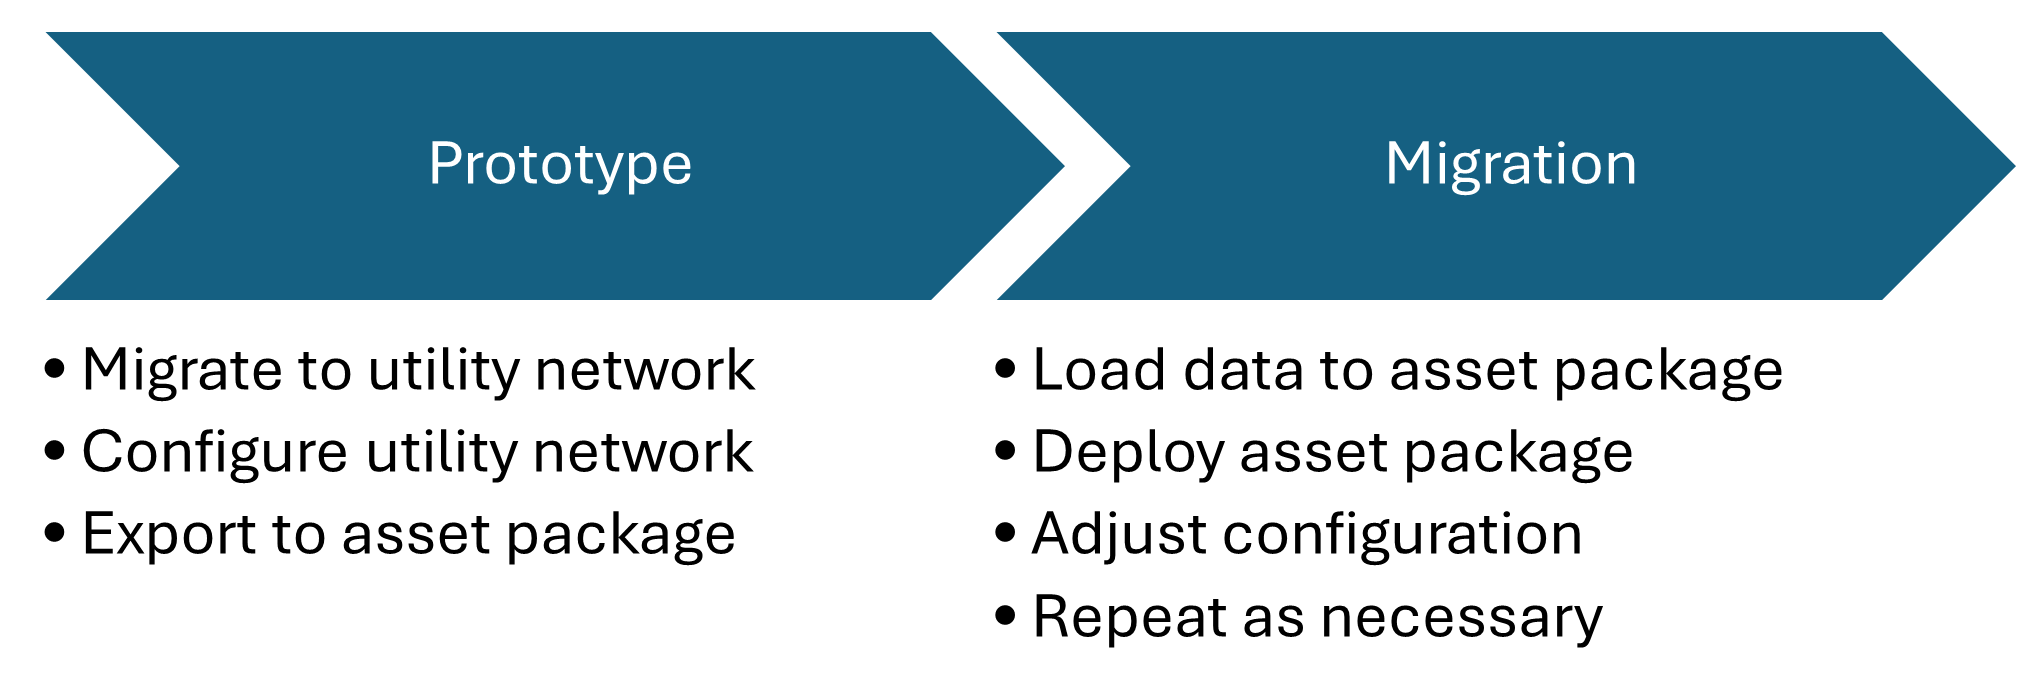
An overview of the data migration process.
Para recapitular, el propósito principal de la herramienta Migrate To Utility Network y del conjunto de herramientas de Migration en su totalidad es proporcionar a los clientes un camino sencillo hacia la utility network desde su geodatabase actual. Sin embargo, como todos sabemos, lo que puede comenzar como un proyecto simple a veces puede evolucionar con el tiempo en algo más complejo, por lo que estas herramientas pueden integrarse en las mejores prácticas existentes para la migración de utility network para adaptarse a sus necesidades.
En este artículo aprendiste cómo puedes superar los desafíos más comunes de migración utilizando las herramientas existentes de Esri. Este conocimiento debería prepararte para manejar cualquier desafío que pueda surgir en tu camino y, aunque no necesites emplear ninguna de estas técnicas ahora mismo, es bueno saber que existen por si se necesitan en el futuro. Consulta el Comenzar con el conjunto de herramientas de Migration artículo para obtener más información sobre cómo acceder a estas herramientas y encontrar recursos adicionales que cubren temas como configuración, limpieza de datos y migración de datos.