
CHAPTER 3: SYSTEM
Introduction
ArcGIS can be implemented and operated in multiple ways. Choosing the most efficient, robust, and scalable implementation for your institution is important, especially as more users learn and use the technology.
This chapter focuses on implementing ArcGIS as an enterprise system and operating it in compliance with the policies and guidelines established in the previous chapter.
This chapter applies to two types of organizations:
- New deployments—Institutions establishing ArcGIS for the first time. This includes a checklist of items to implement to achieve efficiency in managing the system.
- Existing deployment—Institutions with established ArcGIS environments that need to formalize and implement governance policies for user accounts, data retention, monitoring, and communication for maturing governance practices. This chapter will cover solutions and recommendations for managing lifecycle of content, users, and groups while maintaining good stewardship of ArcGIS resources.
NEW DEPLOYMENT
This section is for administrators who are starting a new deployment of ArcGIS. If your institution already has an ArcGIS deployment, see the Existing deployment section for more information.
If you’re new to ArcGIS, or deploying a subscription for the first time, reference the help documentation alongside this guide. The documentation provides detailed definitions and context for capabilities and actions such as configuring the website, managing members, managing content, and so on. In addition, explore My Esri, a self-service portal that allows you to manage your organization's information. You can learn more by taking the My Esri 101 web course.
Use the new deployment checklist below to ensure efficiency in deploying and operating a new ArcGIS Online subscription.

Complete the new deployment checklist
Complete the following steps when establishing a new deployment:
1. Identify an administrator and ensure proper administrative contacts in ArcGIS Online and My Esri.
First, identify a small group of people to take on the role of administrators.
Who should be an ArcGIS administrator and what are the skillsets associated with this role? They should meet the following criteria:
- Have experience with managing software and accounts in a software as a service (SaaS) model
- Ideally, have experience with ArcGIS
- Understand institutional policies and guidelines for data governance (user and account information, data retention, security, communication, and so on)
Administrative contacts must be updated in both ArcGIS Online and My Esri. See the Technical Support resource page that outlines differences between My Esri and ArcGIS Online.
The following best practices are recommended for ArcGIS Online administrators:
- Ensure you have more than one administrator to share responsibilities.
- Ensure that you have one account per administrator, not a single, shared account. This is important for accountability purposes.
- Ensure you have and use an ArcGIS account, not a SAML account, for administration. That way if there is an issue with SAML logins, an administrator can always still sign in directly through www.arcgis.com.
- Create and use separate accounts for administration work and day-to-day work. Administrators have broad access to organizational data and accounts and can accidentally overwrite or change data.
For additional information, refer to the Know who holds the keys: Review your organization administrators blog article.
The following best practices are recommended for My Esri administrators:
- Review permissions for team members who manage ArcGIS. Make sure permissions are set correctly and are current. Ensure the organization details, organization contact, and security contact are provided. As a best practice, use email aliases or other group identities for the organization contact and security contact. That way, there is not a single point of failure.
- Set up authorized support callers. Given the authorized support callers are limited in number, it is important to prioritize granting this privilege to individuals who have the role of providing geospatial support on campus (such as a GIS help desk). If there are authorized support caller spots left, those can be shared with faculty and staff who use ArcGIS the most.
- Set up a cadence (quarterly, bi-annually, or annually) to audit the settings above and ensure that the right users still have the right access.
It is important to verify and update administrative contacts at least once per semester, or when an administrator’s role in your university changes. If for any reason your administrator leaves or otherwise can’t be reached and you do not have backups, it is difficult to regain administrative access to your ArcGIS organization. Refer to the Write an ArcGIS Online Admin Change Letter of Authorization article.
2. Enable SAML or SSO.
It is recommended that you manage ArcGIS Online accounts by using SAML logins or OpenID Connect logins, commonly referred to as single sign on (SSO). SSO is a capability supported by many vendors to allow a user to access multiple systems with a single username and password, maintained by the institution. Students, faculty, and staff can use the same credentials coming from their institution’s enterprise identity store to sign in to ArcGIS Online.
SSO provides the following capabilities:
- Ease of access for students, faculty, and staff—One set of credentials will be used, which allows users to remember passwords, save projects, and access geospatial portfolios without multiple log-ins.
- Simplified user management for administrators—No additional account logins need to be created for ArcGIS Online.
- Proper access permissions—When students, faculty, or staff are no longer affiliated with the university, access is prevented automatically. They will no longer be able to sign in to ArcGIS Online.
- Tracking ArcGIS Online usage—Monitoring usage is important for showing the value of ArcGIS. Once you are using institutional identities, you can integrate information from other sources, such as a user's degrees and programs.
For additional information, refer to the Why Single Sign On for academia (SAML logins) blog article.
The following SAML practices are recommended:
- For academic ArcGIS Online organizations, allow the option to automatically join users to the organization, giving users immediate access the first time they sign in. Note, it is recommended that you scope access at the IdP (for example, app assignment and group membership) to restrict who can authenticate into ArcGIS Online.
- For administrative ArcGIS Online organizations, enable the option to manually invite users to join the organization (since there is a stricter limit of available accounts).
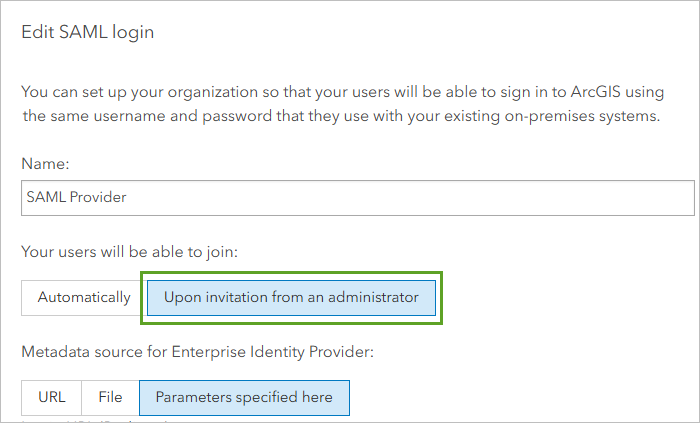
3. Customize your login configuration.
By default, ArcGIS desktop and mobile products are configured to point to the generic public ArcGIS Online address (www.arcgis.com). This means users must go through a multistep workflow to sign in to their ArcGIS Online organization; however, that can typically be alleviated by configuring your ArcGIS Online organization to only show relevant login options and allowing the apps to default to your organization.
- In ArcGIS Online, click Organization > Settings > Security > Custom sign-in. Configure it to display your SSO experience first and then the Not a member... route to the full, generic sign-in dialog box.
- In ArcGIS Pro, click Settings > Licensing, and set your Licensing portal to the URL for your ArcGIS Online organization.
- This will be done by the end user directly if they download the application from ArcGIS Online (the administrator cannot do this for everyone).
- If the ArcGIS Pro download is shared with an institutional file share, the installer could be customized by an administrator, and the end user will not have to make changes, which could save time and avoid support requests related to sign in.
4. Enable credit budgeting.
Enabling credit budgeting is the first step you must take to ensure responsible use of credits. Next, set credit allocation under New Member Defaults, so that all new members who join the organization do not exceed the allocated amount. They will not be able to run tools or processes that consume credits above this allocation.
See the Enable credit budgeting documentation to learn how to enable credit budgeting and set credit allocations. This is under Settings and Credits.
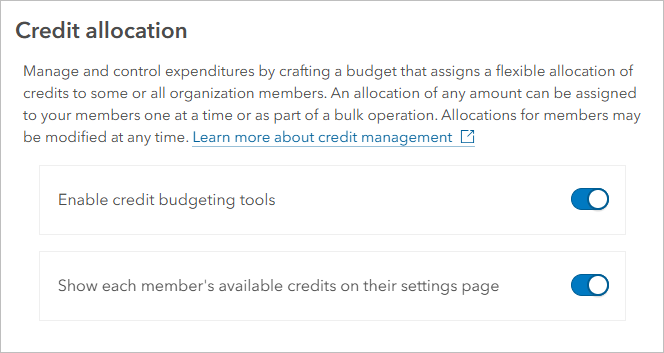
There are two main goals of credit budgeting:
- Protect the organization from user mistakes—Issues such as infinite loops during programming or working with incorrect extents can cause unnecessary credit consumption. Setting a credit allocation will prevent such mistakes from exhausting the organization’s credits.
- Promote reasonable use—Proactively direct users to better solutions instead of consuming credits beyond reasonable use. Credit budgets encourage students to find the right tool for the right job in the ArcGIS ecosystem. For additional information about various options, check the Credits section under Existing deployment below.
5. Configure new member defaults.
It is most efficient to instantly grant new users access to licenses and capabilities. Therefore, it is recommended that you configure new member defaults to assign capabilities and privileges automatically. This facilitates maximum access and minimizes inquiries to administrators, ultimately saving time and costs. Credit budgeting will determine appropriate use of resources. New member defaults include user type and role, groups, credits, Esri access, and username format.
User type and role
For Academic use (teaching and learning) ArcGIS Online subscriptions, enable the Professional Plus user type. For Administrative (operations, infrastructure, and facilities management) subscriptions, there are different options depending on your goal. Reach out to your account manager or highered@esri.com with any questions about Administrative use deployments.
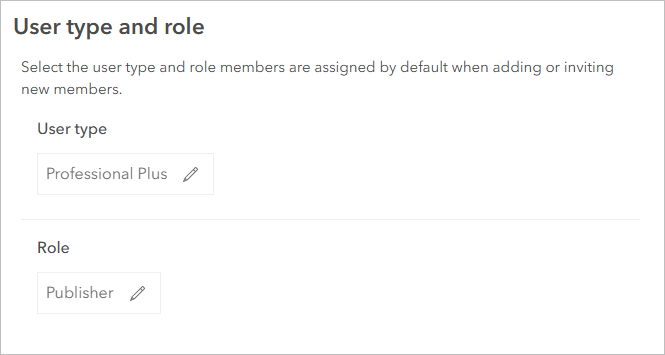
It is recommended that you create a custom role—for example, a new role called Publisher (New User) based on the built-in Publisher role—and add all relevant privileges. See the example in the image below. This allows users access to necessary capabilities while minimizing requests to administrators.
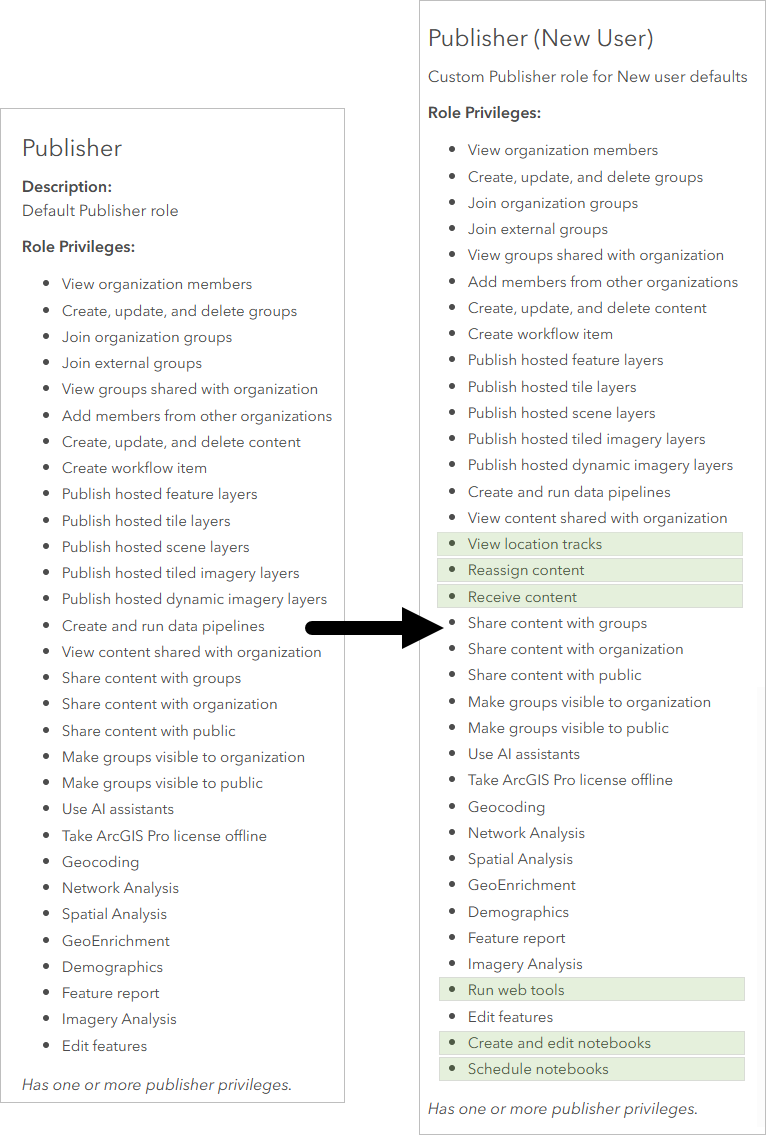
Groups
It is recommended that you create a group with curated content and add all new users to this group. It will help them get started with access to relevant content and information.

Credits
You previously enabled credit budgeting tools for the organization. Now, you’ll apply credit budgets to users by setting the credit allocation. To do this, click Settings > New Member Defaults > Credits.
NOTE: The credit allocation limit does not apply to the user's storage consumption. Monitor and manage storage separately. Storage consumption is covered in the next section.
Determine credit allocation
Credit needs for users in higher education vary. Often, a small number of advanced users require high credit budgets to do large geocoding projects, detailed spatial analysis, and other credit-intensive work. In setting a credit budget that works for both these high-intensity users and more typical education users, consider the 80/20 rule. Find a credit budget amount that satisfies 80 percent of users while recognizing that there may be outliers that require special handling as usage occurs.
It’s important to find this compromise for the following reasons:
- If the credit allocation is set too low, an excessive number of Credit allocation exceeded notifications could be received, and users may not be able to accomplish their work in a timely manner. They will have to ask for additional credits, and administrators will have to act upon the request.
- If the credit allocation is set too high, your organization may need to purchase additional credits, as the credits could be exhausted too quickly.
What is considered a reasonable credit budget varies. A large research university might allocate 2,000 credits per user. For a smaller institution where GIS is used primarily in teaching, 500 credits per user might make more sense. Setting a credit budget does not mean that everyone will consume their credit allocation limit. Most users in higher education organizations will not consume credits at all.
Therefore, setting a reasonable allocation to allow GIS users to do their work is advised, as well as regularly revisiting the amount to accommodate your organization's evolving patterns of use.
It is recommended that you regularly view the administrator dashboard to monitor the credit burn for your organization and use this information to make an informed decision about updating credit allocations. Also consider generating weekly, monthly, or quarterly reports on credit usage for tracking over time.
It is recommended that you reset users’ credit allocation each semester to ensure members of your organization have an adequate amount of credits to do their work. It can help reduce inquiries to administrators for additional credits. This can be done manually or automatically with a script.
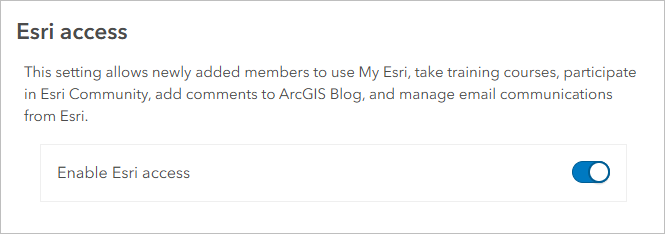
Esri access
Allow users to learn independently and help themselves by providing access to Esri resources and interactions. Enabling this option allows users to do the following:
- Access Esri Training
- Participate in the Esri Community
- Comment on ArcGIS Blogs
- Manage Esri emails
- Access My Esri
Username format
The default format is recommended. This will use the organization’s short name, which was set when the ArcGIS Online organization was created.
6. Enable the recycle bin.
Enable the recycle bin for your organization to provide protection against mistaken deletion. The recycle bin retains deleted content for 14 days. There is no backup functionality in ArcGIS Online.
- Sign in to your ArcGIS organization as an administrator.
- Click Organization > Settings > Items.
- In the Recycle bin section, click Opt in to the recycle bin and click Close to dismiss the recycling details.
For additional information, refer to the Recycle Bin—What you need to know blog article.
7. Enable AI assistants.
Generative AI assistants can streamline the ArcGIS user experience. AI assistants can help create content, search and summarize data, provide suggestions and recommendations, and write code. There are different AI assistants available for various applications. To enable AI assistants, click Organization > Settings > AI Assistants and turn on the Allow use of AI Assistants by members of your organization toggle button.
For additional information, refer to Configure AI assistants.
For additional information and to verify compliance with specific AI policies at your institution, check ArcGIS Trust Center – Trusted AI.
8. Share installers and executables.
When users get started with ArcGIS, they will first sign in to ArcGIS Online to gain access to the many apps that are available. In certain instances, they will use applications such as ArcGIS Pro, ArcGIS Drone2Map, ArcGIS CityEngine, that require an install file.
Access to install files for ArcGIS Pro can be provisioned directly through your organization, providing a self-service approach to eliminate barriers to access for users and allow scalability, while minimizing requests to administrators.

- For all other ArcGIS products, including older versions of ArcGIS Pro, use the institutional delivery method or file share of preference for your institution, such as OneDrive, Box, and so on. Do the following:
- Ensure you provide institution-specific instructions for users.
- Ensure files are accessible only to authorized users (not shared publicly).
- Provide access to multiple versions.
- Deliver custom installers that point to your ArcGIS Online organization (rather than www.arcgis.com).
Note: It is not recommended to use My Esri for all your users, as this requires manual management and scales poorly as the number of users across your institution increases.
For additional information, refer to the Best way to share ArcGIS license files and executables blog article.
9. Provide guidance on using ArcGIS Pro in a disconnected environment.
If students, faculty, and staff need to work in a disconnected environment (such as field work without internet connectivity or in secure enclaves), the options depend on their use case:
- For users who are disconnected intermittently (such as during field work), taking an ArcGIS Pro license offline is recommended.
- For users in a secure enclave (air-gapped, no connectivity), a stand-alone ArcGIS Pro license is recommended.
It is recommended that you enable offline licensing of ArcGIS Pro as an organization-wide setting (click Licenses > Add-on Licenses). There are options available for maximum allowed duration (end of license term) or for a specified period of time.
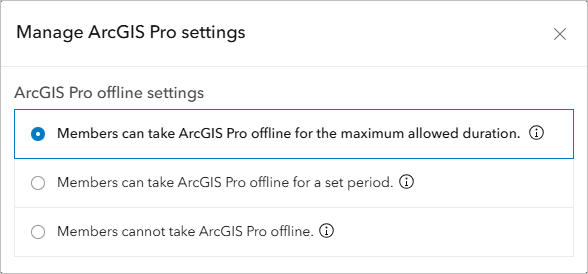
If a user checks out a license beyond the institution license renewal end date (the renewal date can be found on the ArcGIS Online overview page), the license will stop working. In such instances, the user and administrator must plan ahead for the license to be refreshed and checked out again for the new term. If that is not possible, an early renewal can be initiated, or the license term can be changed permanently so that typical field work timeframes are not impacted. Contact your account manager or highered@esri.com for assistance.
If users are working in an air-gapped or black-box environment without internet access, a stand-alone ArcGIS Pro license is available, if needed (free for the first year). Contact your account manager or highered@esri.com for assistance.
Note: You may need to recover a lost Named User license if a user’s computer is reimaged without the user first returning their license, if the user took their license offline in a virtual environment without returning it, or if the user’s computer is lost or stolen. Contact Esri Technical Support to reset lost Named User licenses.
For additional information, refer to the Taking ArcGIS Pro Offline blog.
10. Follow established ArcGIS governance policies and guidelines.
While at this stage in your new deployment, you do not have accumulated content and user accounts, it is important to ensure policies are in place and will be followed as usage of ArcGIS evolves.
See the Existing deployment section for information about evaluating, reporting and health-checking your system, as well as options and solutions for managing content or storage, credits, users, and ongoing communication.
EXISTING DEPLOYMENT
This section is for administrators who are managing an existing deployment of ArcGIS that already has users and content and for which governance practices need to be implemented or revised. This section covers the following topics:
- Migrate existing ArcGIS accounts to SAML accounts
- Evaluate your existing system with reporting and health-checking
- Manage storage
- Reduce credit usage
- Manage users
Note: It is recommended that administrators of existing deployments review the new deployment checklist to verify if their existing system can be enhanced.
Apply policies and implement management solutions for GIS content, credits, and users
As ArcGIS Online usage grows across educational institutions, higher education customers should think about managing the amount of content and storage, depending on their institutional needs and policies, as well as Esri license allocations. As discussed earlier, governance is instrumental in setting institution-wide standards and policies that apply to how users and content are gathered, stored, accessed, processed, and disposed of.
In addition, it is important to establish processes and procedures for monitoring this usage. There are multiple reasons for doing so, including the following:
- Illustrating the impact of GIS on the university’s educational and research mission
- Communicating the growing breadth and depth of GIS use to university stakeholders responsible for funding
- Maintaining and supporting institutional systems like ArcGIS
- Ensuring adherence to governance policies
- Planning for future needs
- Preventing potential storage shortages or other related issues down the road
In addition to monitoring ArcGIS use, it is important to have procedures in place for health-checking your ArcGIS Online organization to support expansion or contraction planning—such as adding or removing storage, users, credits, and so on—to ensure sustainable use. The notion of health-checking, which is periodically reviewing a checklist of items as described below, is important to ensure optimal performance and uninterrupted service.
Complete the existing deployment checklist
Complete the following steps when evaluating an existing deployment:
1. Optionally, migrate existing ArcGIS accounts to SAML accounts.
If you just enabled SAML and have been using ArcGIS already, you will have existing ArcGIS accounts. While administrators can choose to let both ArcGIS and SAML logins exist, taking proactive steps to migrate minimizes confusion of having two accounts and provides an opportunity to delete older or unused content and groups.
If you choose to transition from ArcGIS accounts to SAML accounts, see the following recommendations:
- Communicate required changes and advise users of steps they must take to change ownership of their content and groups.
- Provide a well-advertised cut-off deadline. Consider implementing a grace period, such as disabling accounts and unsharing content, before finally deleting.
- Ensure you provide support to users as an administrator, and provide information on who to contact, where to go for help, and so on.
- For additional information, refer to Transition your ArcGIS accounts to organization-specific (SAML or OpenID Connect) accounts.
2. Evaluate your existing system with reporting and health-checking.
Before governance policies and solutions are implemented, you must evaluate your existing ArcGIS system.
There are various reports and health checks that can be performed to understand the state of your system and evaluate it against your governance policies to take next steps and implement solutions. Therefore, periodic checking of your ArcGIS Online organization is recommended to ensure optimal use of the system.
It is recommended to do this once per semester or at least once per year.
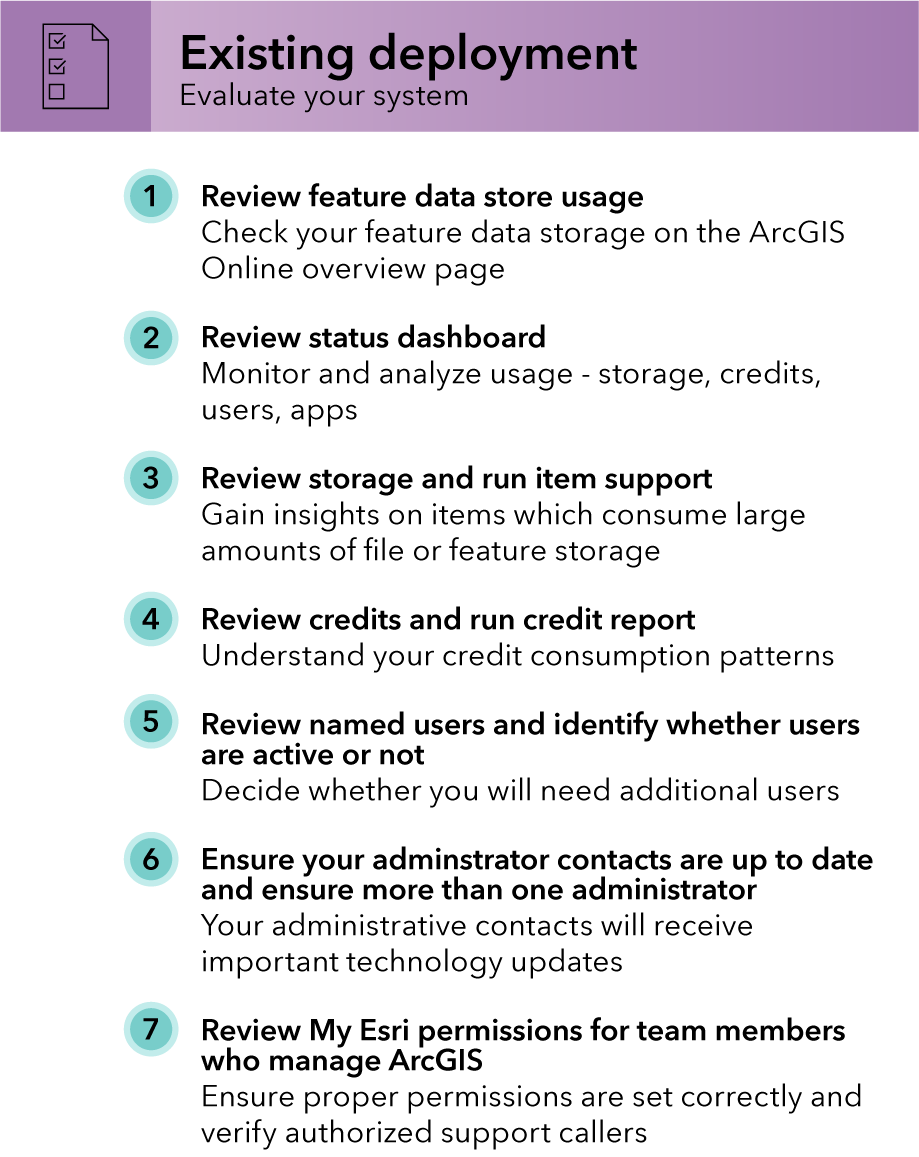
Review feature data store usage
By default, an ArcGIS Online subscription comes with Standard Feature Data Store, which includes 500 GB of feature data storage and supports the full range of hosted feature layer operations. This quota includes feature storage only and does not include file or imagery storage. The feature data store also determines the computational resources available to your organization.
Administrators must maintain their feature data store threshold below this 500 GB limit to ensure availability for users as well as optimal performance.
On average, for higher education ArcGIS Online organizations, 85 percent of credit use is consumed by feature storage. The costs associated with monthly or yearly feature storage—if one consumes the entire 500 GB of storage—are 120,000 credits per month and 1,440,000 credits per year.
Reducing the amount of content can decrease credit costs, or increasing storage capacity can ensure the organization maintains computational resources and that credit consumption is within the Education Institution Agreement credit allocation. Monitoring storage and resource usage allows you to anticipate the need to upgrade or take other actions to sustain a reasonable user experience.
To learn more about recording usage from the status dashboard, see Use the dashboard.
Review the status dashboard
One way to understand and monitor how ArcGIS Online is used is to glean information from the status dashboard. It provides administrators with tools to monitor and analyze various aspects of their organization's usage, such as tracking feature data store use, credit consumption, app use, member activities, and so on. See View and report status.
The dashboard provides detailed information about credit consumption. You can see overall metrics about the organization, or you can go deeper into this data from either an item or individual user perspective. For example, if you notice credit consumption from an analysis spike suddenly in the organization, you can use the dashboard to pinpoint which user or users are responsible for this spike as well as what kind of analysis or workflow they were running. This allows you to do quick checks or on-the-spot monitoring. For more in-depth capabilities or batch monitoring, reporting may be more suitable.
Review storage with an item report
In ArcGIS Online, you can click Organization > Status page > Reports to Create reports, specifically an item report. To identify items in the organization that consume large amounts of feature storage, download the report, open it in your preferred spreadsheet software, and sort the respective fields.
For further information, check the View and report status documentation and the Tracking your ArcGIS Online Feature Data Store Key Health Indicators and Supercharge your ArcGIS organization management with reports articles. You can also schedule the report to run automatically every week or month for future record keeping and predictions.
Once you have an idea of your items or content, you can choose a solution that works for you or a combination of them to help comply with your existing policies. Even if you’re not close to reaching the 500 GB limit, you can review the solutions below to understand your options for scaling the organization if it becomes necessary.
Review credits with a credit report
What does credit usage look like at your institution? How do you determine what most users consume credits on so they can be helped and supported?
It is recommended that you monitor credit usage weekly or monthly. For a quick view, check the dashboards in ArcGIS Online to see credit usage over time and by type. For ongoing monitoring, check the Reports section in ArcGIS Online and use the following steps:
- Generate a credit report.
- Schedule reports to capture data going forward. Schedule the report to run automatically every week or month.
- Manually run reports to capture past data and predict future consumption.
- Download the report .csv file.
- Open in spreadsheet software such as Microsoft Excel.
- Filter, sort, and summarize to explore your credit usage.
For additional credit budgeting strategies, see Managing credits in ArcGIS Online.
Once you have an idea of your credit consumption, you can choose a solution that works for you or a combination of solutions to help comply with your existing policies.
Review named users for inactive users
Education customers must proactively manage their quota of named users. With the cyclical nature of incoming and graduating students and the finite number of Named Users, it is important to think about governance standards related to Named Users, including offboarding of graduating students.
For a quick view of your members, use the Status dashboard.
For ongoing monitoring, click Organization > Status > Reports and do the following:
- Click Create report > Report schedule > Member report and choose the time period, including daily, weekly, monthly, or quarterly. Schedule reports to capture data going forward.
- Manually run reports to capture past data (ArcGIS only retains one year of history).
- Download the report (.csv file).
- Open in spreadsheet software such as Microsoft Excel.
- Filter, sort, or summarize to explore your users’ usage.
- Explore data in conjunction with other reports (Item, Activity, Credit, and so on).
Identify whether users are authorized
For institutions with an Education Institution Agreement, the license is meant to serve the entire campus community. Therefore, the potential user base includes your entire institution. In reality, not all students, faculty, and staff will use ArcGIS.
Identifying whether users are authorized should be done once a semester. This task requires collaborating with the IT team who maintains the system of record or identity provider at your institution. If you have implemented SAML accounts, or ArcGIS-only accounts in ArcGIS Online, you can use that list to compare the status of users to the system of record to determine which students are, or are not, authorized. In the case of ArcGIS-only accounts, depending on how your institutional systems are set up, you may need to both collaborate with your IT team and check students' status with the registrar's office and faculty or staff status with the human resources office.
As an ArcGIS Online administrator, you must share a list of ArcGIS Online accounts with your IT colleagues and receive a list from them of authorized and unauthorized users. With this information, you can assess the true usage statistics of ArcGIS Online (as part of a monitoring practice), and you can delete users who are no longer authorized.
Ensure your administrator contacts are up to date
It is important to verify and update administrative contacts at least once per semester, or when an administrator’s role in your university changes. Refer to Know who holds the keys: Review your organization administrators blog article.
Ensure you have more than one administrator
It is important to have more than one administrator assigned to each subscription. ArcGIS Online security has been increased to meet FedRAMP certifications, and as a result, Esri can no longer easily add new administrators on behalf of an institution. For example, if your administrator leaves and if you do not have a backup, you must follow a formal process to add an administrator. This process will include a letter with an executive signature approving the change. This process could take time and resources to complete, resulting in a significant delay in service interruption.
Refer to the Write an ArcGIS Online Admin Change Letter of Authorization article for steps to follow if your administrator leaves and you have no way to get in touch with them.
Review My Esri permissions for team members who manage ArcGIS
Review your My Esri contacts for proper permissions. Make sure permissions are set correctly and they are current. Then verify that your authorized support callers are still accurate.
3. Manage storage.
In this section, you will review and selectively identify solutions that will help comply with the governance policies and guidelines you created in the previous module. Once you have an idea of your storage needs, content, users, and credits, consider the following for your organization.
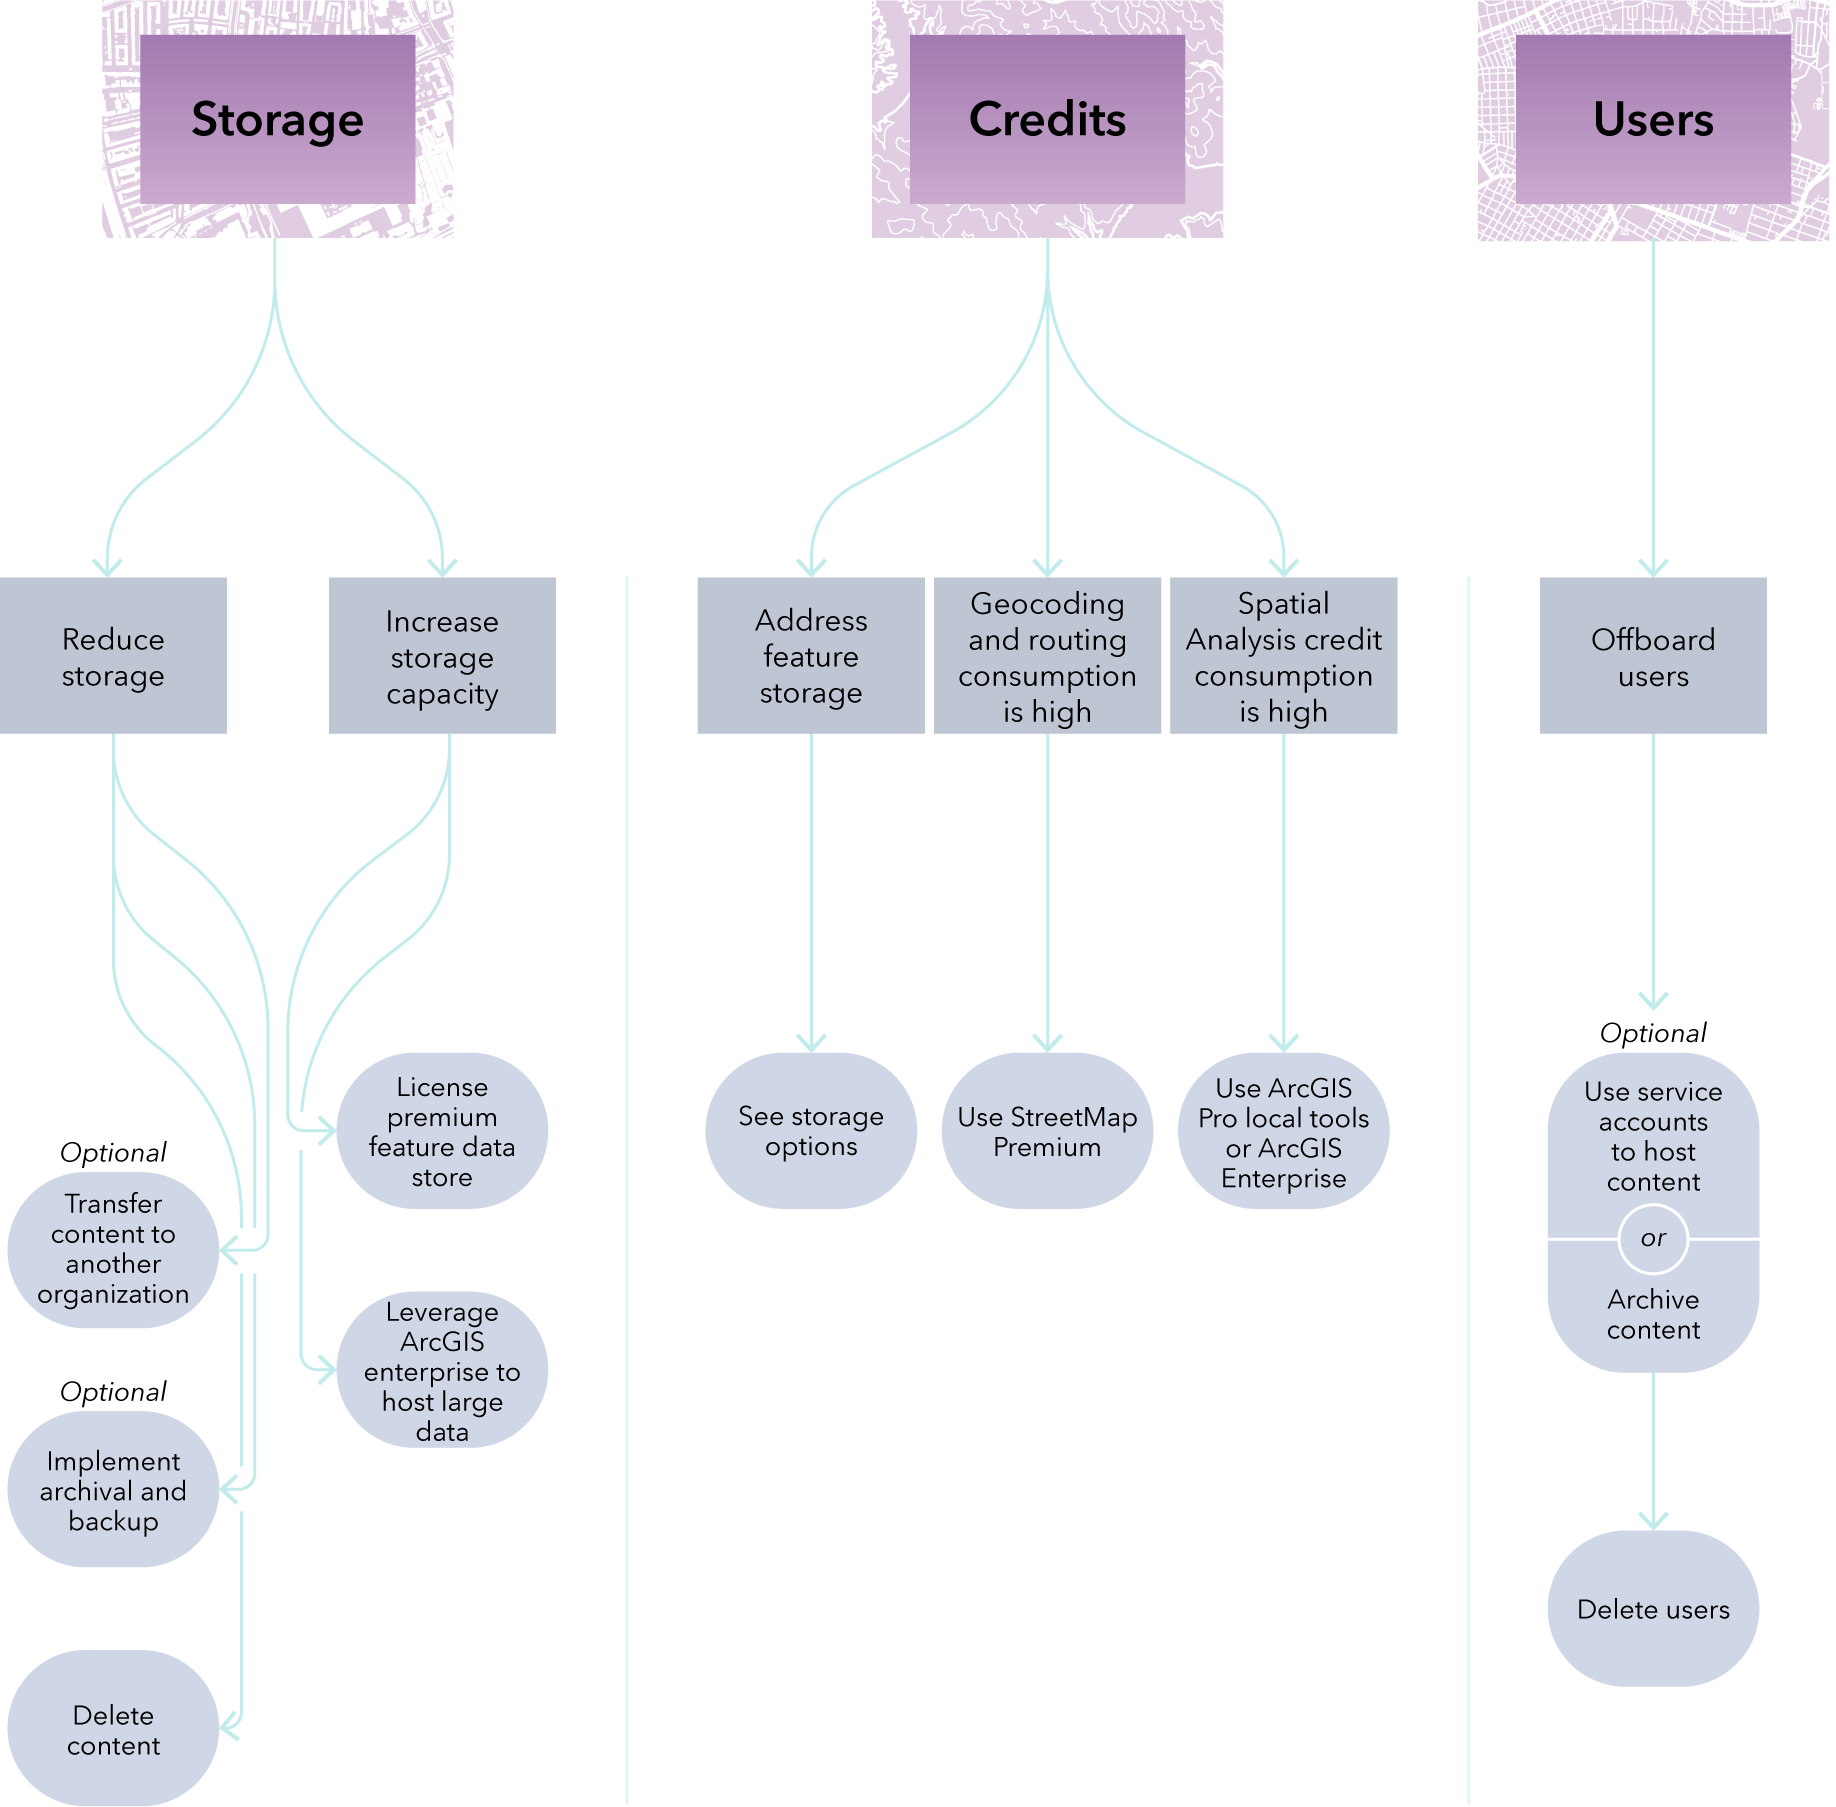
The approach you take to storage and content retention must be tied to the governance policies that you put in place.
Reduce storage
After running an item report, consider removing any large items that are not being accessed or are redundant. This includes content that is no longer needed, that can be stored in other systems equally or more efficiently, content that is redundant (for example, copies of data), or content that violates your governance principles.
Students inevitably leave the institution and become inactive users with inactive content. In addition, redundant data can result from course activities in which dozens of students follow the same workflow.
Removing content from ArcGIS Online isn’t always a question of deleting content. In some cases, it’s a question of archiving, transferring, or identifying alternative storage for content.
IMPORTANT: Before deletion, transfer, archiving, or backup take place, it is important to communicate with potentially affected users. Verify with item owners whether the items are still needed. If the items are still used, alternative options for hosting this content should be discussed. A suggested workflow, if applicable, could be a practice of un-sharing items for a grace period, and then deleting them (if no inquiries are made about the missing data). Archiving content is an option as well to ensure data is not lost, if needed. Factor the purpose of this content into your decision. For example, research data should be treated with more caution than a student’s class exercises.
Communication options and considerations are covered in the next section.
Export content from the system before deleting
One strategy for reducing space in an ArcGIS Online organization could be exporting content to another format or to another ArcGIS Online organization and then deleting the content once it has been exported.
- Ensure you have the right data in the right place—It is recommended that higher education customers verify whether certain content belongs to the academic ArcGIS Online organization. At times, academic ArcGIS Online organizations host content that should be hosted in administrative or operational ArcGIS Online organizations. Other times, content that should be widely available to the public should be hosted by outside entities, such as state data repositories.
- Transfer content during the offboarding process—In some cases, departing users should transfer content to another location for permanent storage after they no longer are part of the educational institution. For example, as students graduate, they might want to transfer GIS portfolios and capstone or thesis work to an ArcGIS for Personal Use organization.
There are several options for transferring content, listed below. Guidance on choosing the appropriate method can be found on the Esri Community blog.
Implement archiving and backups
It is recommended that you archive important ArcGIS Online content to an external destination. Archiving is the process of storing data for future reference, which is often a practice for other data management systems. Archiving could reduce storage if the original content is removed from ArcGIS Online and archived in a separate system.
As an institution’s administrator, you’ll need to decide what should be archived and which archival option would work for you. Consider items that need to be immediately accessible (which would stay in the ArcGIS Online organization) versus items that only need to be accessible once in a while (that could be archived). Take into account any existing policies about data retention that you created.
For example, you can do one or more of the following options:
- Archive hosted feature layers to cloud storage as file geodatabases.
- Archive ArcGIS StoryMaps stories as JSON files.
- Use GEO Jobe Back Up My Org.
- Use ArcGIS Enterprise as an archival solution.
- Use the ArcGIS Online notebook Demo Backup to Dropbox.
- After opening the link, sign in to your ArcGIS Online organization.
- This method requires developer access to Dropbox, usually included with Education institution licensing.
- Read Introducing the ArcGIS Well-Architected Framework for additional considerations.
You may also want to consider backing up important content for the purpose of disaster recovery. Backup is a process of duplicating data that can be retrieved in the event of data loss. An organization could consider layers of importance to be backed up. Backups do not reduce storage, though backup is a recommended practice for critical content (such as important research projects, publications, and so on). Similar example options as above would apply. You can use third-party tools, such as GEO Jobe Back Up My Org, or Esri Professional Services can provide recommendations. If interested, contact your account manager or highered@esri.com.
Delete content
After you’ve exported, backed up, and archived your content, and communicated with your users, you can delete content in accordance with the governance policy that you set for your institution. Once a process is in place, there should not be much to remove, other than ongoing maintenance and implementation of your policy.
If you are deleting users and content simultaneously, keep the following in mind:
- If you are deleting a single member who owns content and groups, you must first transfer their content and groups to a different member or delete their content and groups.
- If you are bulk deleting members, you can either transfer or delete their content. You cannot transfer groups when bulk deleting members; their groups will be deleted.
Increase storage capacity or implement alternative options to ArcGIS Online
Buy additional credits
There are two feature data store types:
- Standard Feature Data Store (default with the Education agreement)—Feature storage typically consumes a significant number of your agreement's credits, so it is the most important type of storage to manage.
- Premium Feature Data Store (additional cost)—Feature storage does not consume credits. However, you must manage your feature storage to remain within the quota defined for your Premium Feature Data Store level.
You can purchase additional credits to cover credit consumption beyond your Standard Feature Data Store license allocation.
License Premium Feature Data Store
For organizations reaching the 500 GB Standard Feature Data Store storage limits, and for which reducing feature storage usage is not a viable option, consider upgrading to Premium Feature Data Store. In addition to providing additional storage, Premium Feature Data Store provides additional dedicated database resources such as memory, CPU, and input and output (I/O) and could improve your organization's overall performance.
If you don't renew your subscription, Premium Feature Data Store will automatically revert to Standard Feature Data Store, and the storage credit model will resume, provided your subscription has less than 500 GB of storage in use.
What still consumes credits
Premium Feature Data Store does still require credits for the following:
- Credit-based transactions (for example, routing, geocoding, and spatial analysis) still consume credits when used. Each level provides twice the power of the previous, with the highest level (M4) offering 16 times the compute available with Standard Feature Data Store.
- Non-feature storage (files and attachments outside Premium Feature Data Store) still uses credits.
Note: Purchasing Premium Feature Data Store is more cost effective than buying additional credits to cover storage costs.
Use ArcGIS Enterprise to host large datasets
ArcGIS Enterprise runs on infrastructure your institution provides. It allows you to control your deployment. It can be run on Microsoft Windows, Linux, and Kubernetes, and it supports small single-machine deployments as well as large multimachine deployments in the following situations:
- Public cloud infrastructure
- Private cloud infrastructure
- On-premises infrastructure using physical or virtualized hardware
It works similarly to ArcGIS Online but provides many additional capabilities.
While licensing for ArcGIS Enterprise is included as part of the Education Institution Agreement, there is an additional cost associated with using your own infrastructure or servers (on-premises or cloud), as well as administrative costs associated with setting up and maintaining it.
Moving content from ArcGIS Online to ArcGIS Enterprise will require effort to update links and apps that depend on the migrated data.
ArcGIS Enterprise can also be used for storage or archival purposes or for storing restricted information (health or privacy protected information).
Consider the following options for purchasing Premium Feature Data Store or using ArcGIS Enterprise:
- Upgrade ArcGIS Online to Premium Feature Data Store that covers an institution’s projected feature storage needs for the year. M4 Premium Feature Data Store is the largest, which provides 4 TB of feature data storage.
- Upgrade ArcGIS Online to a smaller Premium Feature Data Store level (M2 or M3 Premium Feature Data Store) and move big projects to an institutionally supported ArcGIS Enterprise setup.
- Keep ArcGIS Online with Standard Feature Data Store and move big projects to an institutionally supported ArcGIS Enterprise set up.
Options 2 and 3 are hybrid approaches, in which an institution would choose to host big feature storage items on ArcGIS Enterprise to help manage costs, and the rest of the feature storage needs could be handled by one of the Premium Feature Data Store options or Standard Feature Data Store—depending on projected storage needs.
Your organization must consider which storage solution provides the best ROI in your specific context. With Premium Feature Data Store, Esri provides the infrastructure and management at a cost, while with ArcGIS Enterprise, the technology itself is available with your existing Esri license agreement, but there is an associated cost with setting up, operating, and maintaining your own infrastructure (on-premises or cloud) for ArcGIS Enterprise.
The advantage of storing items with ArcGIS Enterprise is that you use local resources and do not consume cloud storage resources.
A disadvantage could be that now there are two separate portals and publishers must be aware of and share content to the correct portal. However, if the system is properly designed, it will appear seamless to end users of the content. Since they are consuming the content, they will not be concerned with what portal it being hosted on.
Note: Cost comparisons of Premium Feature Data Store versus ArcGIS Enterprise depend on your institution's needs, policies, and practices. Esri Professional Services can compare staffing, support, hardware, the software to run ArcGIS Enterprise, and the cost of purchasing Premium Feature Data Store. Esri Professional Services can provide recommendations on specifications for hardware depending on your requirements or systems, the cost of doing installations, and so on. If interested, contact your account manager or highered@esri.com.
Depending on this assessment of your ArcGIS Enterprise deployment (including the costs of servers, ongoing maintenance, staff, and so on), purchasing Premium Feature Data Store could be the cheaper option. For those who aren’t already running ArcGIS Enterprise, Premium Feature Data Store is the recommended option.
Regardless of approach, it is crucial that enough lead time is provided to allow for conversations and proper scoping of requirements. You must schedule, plan, hold, and follow up on conversations with other business units and divisions in the university (IT, budgeting, and so on). Share the following resources with IT colleagues who are knowledgeable in supporting similar requirements for other systems:
Monitor performance of a feature data store
In addition to monitoring the storage consumption of your organization's feature data store, it is also important to monitor the performance of its processing power. The feature data store's compute resources (for example, CPU, I/O, and memory) power its database engine to support your queries, edits, analysis, Extract-Transform-Load (ETL), and so on. Sustained periods of peak use result in poor user experience, with requests timing out or tasks failing to complete.
As your user base grows, you are likely to require more and more feature data store compute resources to sustain your organization's workload. By monitoring use, you can predict when you need to consider upgrading to a more powerful feature data store.
Each step-up in feature data store levels, from Standard to Premium M2 to Premium M3 and so on, delivers additional compute resources.
ArcGIS Online administrators can monitor the resource usage of their organization's feature data store by clicking Organization > Overview and clicking the Feature Data Store link. The resource usage graph at the bottom of the dialog box shows the use over the last hour, 24 hours, or week.
The data in the resource usage chart can also be accessed programmatically with ArcGIS API for Python. This allows you to capture a historical record of your organization's feature data store compute performance over time, longer than the one-week rolling window available with the chart.
The historical resource usage record shows periods of sustained maximum usage (100 percent over several minutes or more). These reflect intervals when users are asking more of the system that can be delivered. Users will notice the system has slowed, or for prolonged periods of sustained load, users may experience unexpected time-outs or failures.
For additional feature data store processing power and compute resources, see Tracking your ArcGIS Online Feature Data Store Key Health Indicators.
4. Reduce credit usage.
If you predict your institution's credit consumption will exceed what is included in your licensing agreement, you can use various alternatives that provide on-premises support and resources for computationally intensive needs. These options will have an associated cost (buying additional storage, credits, or products).
Use Geocoding and Routing Solutions – ArcGIS StreetMap Premium
Using the ArcGIS World Geocoding Service or views of this locator for batch geocoding in ArcGIS. Routing and Network Analysis services also consume credits. However, credit estimation is available at the top of the tools, before running the geocoding, routing, or network analysis job. Therefore, encourage your users to estimate the number of credits they will use and have a discussion of what makes sense.
A common approach to reducing geocoding or routing credit consumption is to obtain ArcGIS StreetMap Premium, which supports institutional delivery of such services, rather than using ArcGIS Online resources. It is a subscription product renewed yearly, and it is available at a cost.
Your organization must determine what geocoding should be done in ArcGIS Online or offloaded to an alternative solution. Consider your institution’s needs, such as whether bulk geocoding is needed for research projects (100,000 addresses or more) or course projects (dozens or a few hundred addresses). Also, consideration should be given to data sensitivity. For example, if you work with health-care patient data and security is a concern, ArcGIS StreetMap Premium would be required regardless of the number of records. Once an institution has purchased ArcGIS StreetMap Premium, it can be used by others in the campus community, so that could be an advantage.
In addition, there are several types of Education licenses, which provide different credit allocations. Use your best judgment in terms of credits available to you in ArcGIS Online (including projecting for future use, which is why understanding your patterns of credit use, as outlined previously, will be important), before considering ArcGIS StreetMap Premium as a more cost-effective solution.
Work with your account manager or email highered@esri.com for additional information on obtaining ArcGIS Street Map Premium.
Use Spatial Analysis tools in ArcGIS Pro
Running any of the Spatial Analysis tools in ArcGIS Online consumes credits, though those tools only consume approximately 0.5 percent of overall credits in higher education use cases. Use the credit estimator in ArcGIS Online Map Viewer to calculate the expected credits for a transaction.
As an alternative, consider running the tools locally in ArcGIS Pro. ArcGIS Pro offers a more comprehensive suite of tools, especially for more advanced workflows.
You can also use ArcGIS Enterprise for analysis-heavy tasks.
5. Manage users.
Your practices for deleting or offboarding users must follow the governance policies that you put in place.
Delete or offboard users
Deleting users cannot be reversed. Before deleting users, decide the right time to delete users in your institution’s academic year, what constitutes old content, and what to do with the users’ content and groups, as defined by your governance policies.
There are several approaches you can take to delete users, which must be used in conjunction with your policies:
- Using the ArcGIS Online tools (GUI) is recommended for working with one account at a time. As a result, it does not scale and typically results in haphazard enforcement of retention guidelines and policies. See the Delete members documentation for ArcGIS Online.
- GEO Jobe administration tools for ArcGIS include tools for the bulk deletion of users.
- Scripting, shown in the following scriptable workflow, could be run annually at the start or end of the academic year:
- Identify users who have not signed in recently.
- Use a cutoff of a specific period of time (or as defined by your institutional policy).
- Delete any of their content that is not shared.
- Verify that no one has accessed it for the determined period of time and that it is safe to delete.
- View groups owned by the users and delete groups that have no content.
- Unshare the users’ remaining shared content and capture the sharing settings in a tag.
This provides a grace period (for example, 1 year); and this content will be deleted in step 2 upon the next iteration of the process. - If the users do not own groups or content, delete the user.
To get started, you can use notebook templates for administrative tasks in ArcGIS Online. To access these, click Notebooks > New Notebooks > Template Notebooks > Administration.
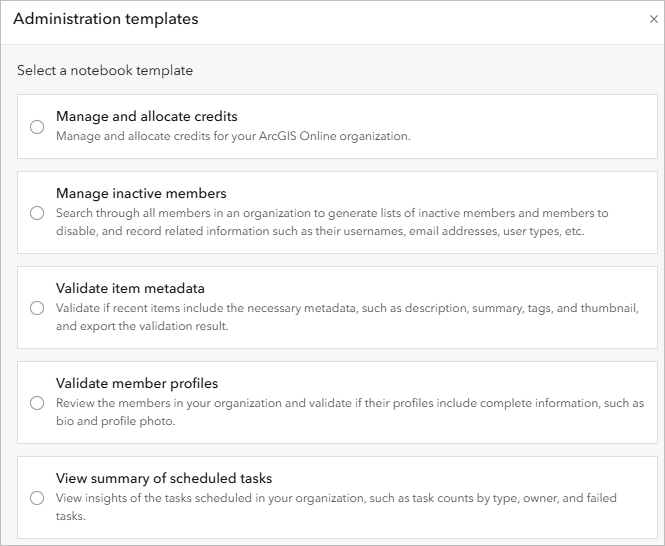
You can also use service accounts or allow alumni access.
Use service accounts
To delete a user without deleting their content, you can transfer the content to another user.
Service accounts can be used to store content from multiple users. Typically, this content is still being used. For example, a faculty member developed course materials and labs in ArcGIS that are used across the department but later leaves the institution. These materials need to be retained, so they are moved to a service account. This is a single account that can continue to host the content while allowing you to delete the original user who created the content. ArcGIS Online is a SaaS system, and accounts must be tied to individuals—except for service accounts. Passwords for service accounts should be stored in a password manager and maintained by IT managers.
Service accounts can be used if the individuals managing them (typically ArcGIS administrators) have their own named user accounts. The service account should not be their only account.
Alumni access
According to the Esri Institution Agreement, authorized users include registered students, educators, and staff members of the institution. For certain institutions, registered students could also encompass alumni.
The intent of the Institution Agreement is to provide access to current students, not alumni, but it allows the institution to set policies and practices regarding authorized users. For example, some institutions may choose to provide temporary access to alumni, such as while recent graduates are actively job-hunting and need to share their GIS portfolio from their time as a student.
Conclusion
The recommendations in this chapter can help you understand when you need to act and how to plan proactively for future years. Being a good steward of resources and operating within the bounds of existing allocations—storage, credits, users, and performance—is important for future management of ArcGIS resources.
Given the policies you defined earlier, various solutions can be implemented to comply with those policies.
Next Steps
Read the rest of the chapters:
E-book PDF will be available soon.
Contact your Account Manager or highered@esri.com with any questions.
