We often receive requests to use geocoding (obtaining latitude and longitude from an address) and reverse geocoding (obtaining an address from latitude and longitude) on the server side.ArcGIS also provides a convenient API to use these geocoding functions not only in client-side mapping applications but also on the server side.
In this article, we will introduce how to implement geocoding functionality using JavaScript runtime environment, specifically Node.JS .
Requirements for the procedure
If you do not have one, please create it (free) by following the steps here. By creating this account, you will be able to use services such as basemaps, geocoding, routing, and more.
Follow the steps here to create an API
Node.js installation. This time, we will run Node.js on a local environment with Windows using Visual Studio Code.
Installing ArcGIS REST JS package
The easiest way to implement geocoding functionality is to use the ArcGIS REST JS and the geocoding service.Using Visual Studio Code, create a
(バッチジオコーディング)、reverseGeocode(リバースジオコーディング)、suggest(住所のオートコンプリート機能)など、さまざまなジオコーディング処理にアクセスするために使用できるライブラリです。これらの各パッケージをインストールするには、以下のコマンドで npm を使用します。
npm install @esri/arcgis-rest-request @esri/arcgis-rest-geocoding
スクリプトファイルを作成する
1. Node.js プロジェクトを作成したフォルダに index.js ファイルを作成し、Visual Studio Code でコードを記述していきます。
2. ES モジュールからエクスポートを指定して、必要なコンポーネントを参照します。
import { ApiKeyManager } from '@esri/arcgis-rest-request';
import { geocode } from '@esri/arcgis-rest-geocoding';
3. ArcGIS Developers ダッシュボード に移動して、API キーを取得します。ジオコーディングサービスにアクセスするための許可(Geocoding (not stored))が設定されていることを確認します(API キー作成時にデフォルトで設定されます)。
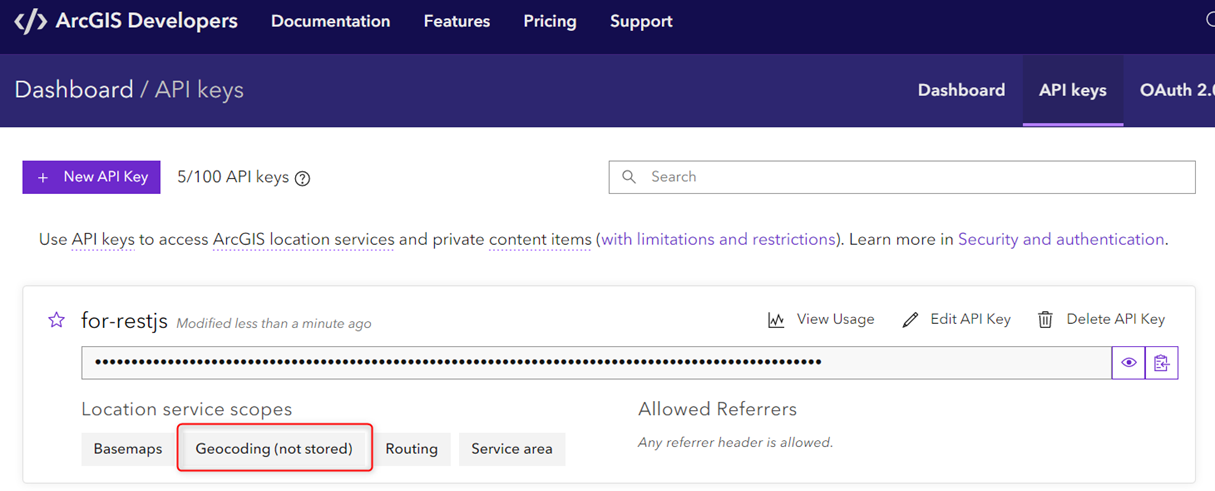
4. Visual Studio Code で、ApiKeyManager を使用して、リクエストの認証パラメータを定義します。API キーは安全に保管する必要があるため、リポジトリにコミットしないでください。 API キーには、環境変数または外部構成ファイル (.gitignore で無視される) を使用することをお勧めします。
const apiKey = "API キーを入力";
const authentication = ApiKeyManager.fromKey(apiKey);
5. geocodeインポートでジオコーディングサービスにアクセスします。以下のパラメータを指定して geocodeメソッドを使用し、緯度・経度・正確な住所文字列の候補を取得します。最も正確な結果を得るには、以下のように、address (住所文字列)、postal(郵便番号/オプション)、 countryCode(国コード/オプション)、authentication パラメータを使用します。
geocode({
  address: "東京都千代田区平河町2-7-1",
  postal: "102-0093",
  countryCode: "JP",
  authentication
});
6. 最後に、アプリケーションを実行する前に、コンソールに結果を出力するコードを追加します。スクリプト ファイル全体は、次のようになります。
import { ApiKeyManager } from "@esri/arcgis-rest-request";
import { geocode } from "@esri/arcgis-rest-geocoding";
const apiKey = "API キーを入力";
const authentication = ApiKeyManager.fromKey(apiKey);
geocode({
  address: "東京都千代田区平河町2-7-1",
  postal: "102-0093",
  countryCode: "JP",
  authentication
}).then((response) => {
    response.candidates.forEach((res) => {
      console.log(res);
    })
});
アプリケーションを実行する
Visual Studio Code のターミナル ウィンドウでアプリケーションを実行します。結果は以下の例のようになるはずです。

「Warning: To load an ES module, set "type": "module" in the package.json or use the .mjs extension.」のエラーが出た場合は、package.json に「"type": "module"」を追加します。
結果には、ジオコーディング サービスによって検索された住所の以下の内容が含まれます。複数の住所の候補が含まれる場合もあります。
- location: x(経度)とy(緯度)の値と空間参照。
- score: 検証のために使用される一致の正確さ。100 は完全一致を表し、値が小さくなるほど精度が下がることを表します。
- attributes: デフォルトの戻り値、または検索時に outFields パラメータで指定された値。
ジオコーディングの結果を保存する場合
ジオコーディング結果を保存して再利用したい場合があるかもしれません。例えば、ArcGIS のデータベースではなく自身の持つデータベースに、ジオコーディングサービスを使用して取得した住所文字列や緯度経度の値などを保存して業務で使用するなどが考えられます。
この場合は、結果を保存しない場合と消費する料金が異なるため、ジオコーディングのパラメータに forStorage:true を設定する必要があります。
geocode({
  address: "東京都千代田区平河町2-7-1",
  postal: "102-0093",
  countryCode: "JP",
  params: {forStorage:true},
  authentication
});
また、API キー作成時に「Geocoding (stored)」の機能を有効化する必要もあります。
ArcGIS Platform を使用した場合のジオコーディングの価格については、こちらのページを参照してください。
まとめ
今回は、Node.js と ArcGIS REST JS を使用してジオコーディング機能を実装する簡単な方法を紹介しました。ArcGIS REST JS には、ルート検索や空間分析など、他にも多くの機能を提供しています。サーバーサイドで、マッピング機能を構築する際には、ぜひご活用ください。
関連リンク
ArcGIS REST JS
ArcGIS Platform