Prerequisite
This tutorial contains strategies and procedures for creating and running a dynamic load test against an ArcGIS Server service and assumes you are familiar with some of the basics of Apache JMeter. If you are new to Apache JMeter, please see our Performance Testing with Apache JMeter (An Introduction).

JMeter Testing Strategies
Before diving into the details on constructing and validating a data driven load test, it’s important to first discuss a few testing strategies specific to JMeter. These tips are different that items listed in our Recommended Strategies for Load Testing an ArcGIS Server Deployment Article which is intended for use with any testing tool (but also applicable to JMeter).
A Good Test Plan Starts with a Proper Folder Structure
One tactic that can help with managing multiple tests and multiple reports in JMeter is to implement a simple but consistent folder structure for storing the various elements of each test. The primary driver for a JMeter test is the JMX file…this is where all the testing logic resides. But as you continue to add features to your test and run it multiple times, you will expand beyond the management of just the single JMX file.
A little organization goes a long way…manually creating a few key directories can help manage the various JMeter files that will populate the hard drive over time.
Note: This approach is done from the Operating System’s file system and not directly from Apache JMeter.
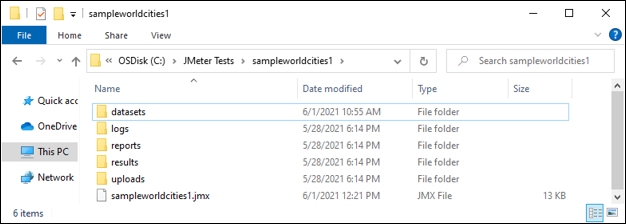
A recommended folder structure:
- name_of_project (the JMX file should be stored within it using the same name)
- datasets
- Will contain data files that make our requests dynamic with each test iteration
- logs
- Will contain debug logs of the JMeter test environment
- reports
- Will contain JMeter generated reports
- results
- Will contain JMeter test result files
- This is the RAW results files and the most important artifact of the test
- uploads
- Will contain files that are to be uploaded
Within the "project" folder, 5 empty directories would be created: datasets, logs, reports, results and uploads.
User Defined Variables
Like the folder structure mentioned above, utilizing User Defined Variables is a test construction strategy that favors portability, reusability and Test Plan sharing. Some common variables used with an ArcGIS service test are:
- ProjectFolder
- WebServerName
- ServerInstanceName
- SecurePort
- ServiceName
In the JMeter Test Plan, these variables can be easily referenced with the notation like: ${ServiceName} which would automatically be replaced with the name of service at execution time. Using variables is less error prone than using hard-coded values if you ever plan to use the test in another environment. When the test is then run against another deployment, the tester only needs to adjust the variable definition. For Test Plans with many defined HTTP Request samples, this can be a real time saver.
Choosing the Right Thread Group
There are several choices when it comes to defining your step load logic. They are all similar and offer the same basic functionality but do have some subtle differences. Thread Group is a good, safe choice that offers maximum test portability as it is included with the core JMeter product.
That said, using the JMeter Plugins Manager (installed as part of the Performance Testing with Apache JMeter (An Introduction)) to add the “Custom Thread Groups” can provide the test environment with some other useful options in this arena.
Adding Support for Custom Thread Groups into JMeter
From the Plugins Manager within JMeter (Options-->Plugins Manager):
- Select Available Plugins
- Find and select Custom Threads Groups
- Select Apply Changes and Restart JMeter
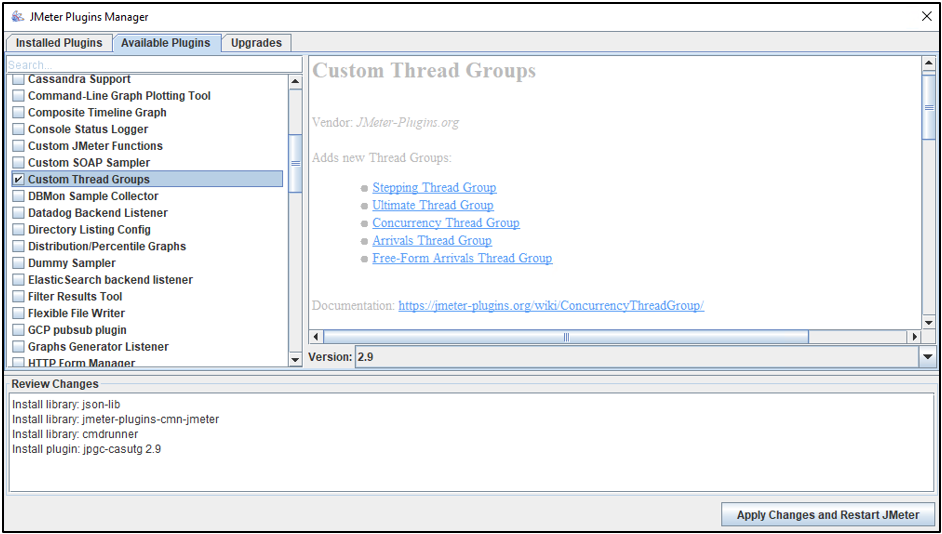
Once the “Custom Thread Groups” plugin is installed, a recommended alternative over Thread Group is the bzm – Concurrency Thread Group as it allows for a straight-forward step configuration that visually renders the defined pressure which is a great validation feature from a testing point of view.
Using Transactions to Group Requests
Adding Transactions to your test can be a helpful way of grouping one or more similar requests that belong to the same “operation”. For example, the loading of an application, a navigational map zoom or form search. Using a transaction like this can greatly aid analysis as it isolates the operation (e.g. form search) into its own logical “container” with only the requests responsible for its function. Whereas, throwing many requests, for many different functions or services into one large group can make the post-test study very difficult. With transactions, analysis can be conducted to understand the performance of each operation, respectively.
Note: Map applications and workflows vary; some operations will have transactions composed of many requests, others just one request.
Note: The performance of different operations in a test does not always scale in the same way; some may do better than others; being able to identify poor performing operations (by a unique transaction name) is good analysis.
Validate the Response is Being Returned
Ensuring the expected response is coming back from the remote server is just as import as sending the request. For various reason, when testing an ArcGIS resource like a service, relying on just the HTTP status code (e.g. HTTP 200) is insufficient.
One way to validate the response is to look for key words in the Header or Body. If a PNG image is requested but a textual error message is returned instead, a Response Assertion rule looking for “image/png” in the Header will mark the attempt as failed. If it is present in the Header, it is considered a passed request.
Note: For every HTTP Request that needs to be examined in the JMeter Test Plan, a Response Assertion rule must be added.
Creating a Data Driven, Export Map Test in JMeter
Using the strategies above, a flexible and versatile JMeter Test Plan can be created that calls for a different area of interest from an ArcGIS map service with every request. A “dynamic test” is ideal as it can make the server resources work harder than if the same data is requested every time. Such a test is more representative of real-world conditions.
As a performance tester, we want to take something like the export map request signature below and turn it into a dynamic JMeter load test:
https://yourwebadaptor.domain.com/server/rest/services/SampleWorldCities/MapServer/export?dpi=96&transparent=true&format=png32&layers=show%3A0%2C1%2C2&bbox=-108.76228873935%2C31.0409016308382%2C-88.8526618315487%2C46.9686031570791&bboxSR=4326&imageSR=4326&size=1477%2C827&f=image
JMeter offers several methodologies for constructing HTTP payloads in a Test Plan such as:
- Creating the requests by hand (e.g. manually)
- Using the built-in recorder to directly capture browser requests
- Importing from another source
This Article will focus on the first method of showing the manually practice for creating a JMeter test, how to assemble the components of the request and how to make it's behavior “dynamic”. This data driven test will call the SampleWorldCities map service (running on your local deployment) through the export function.
Note: By many measures, SampleWorldCities is considered a small and very light-weight map service, but given that it is ubiquitous with ArcGIS Server deployments, it is ideal for using it to walk through the creation of a load test.
Create and Save a New Test Plan
- From the file system create the folder structure mentioned above:
- The name of the project folder will be called sampleworldcities1
- Assume this will exist in:
- Create the supporting project directories:
- For example: datasets, logs, reports, results, uploads
- Start JMeter
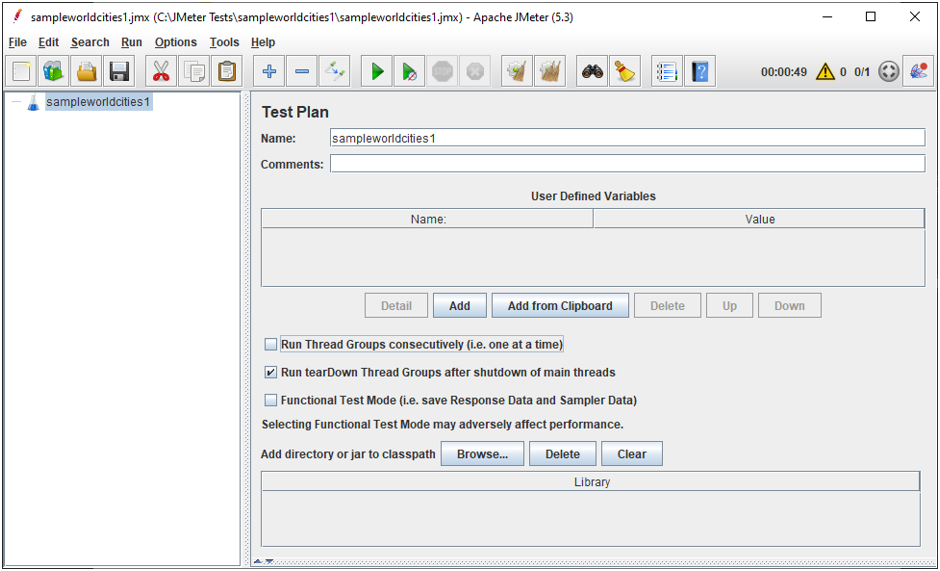
- Save the new Test Plan that JMeter creates into the sampleworldcities1 folder that was just created
- Call the Test Plan: sampleworldcities1.jmx
- Assume the full path of the jmx Test Plan is:
- C:\JMeter Tests\sampleworldcities1\sampleworldcities1.jmx
- From the file system, the project folder would look like the following:
Adding Variables to the Test Plan
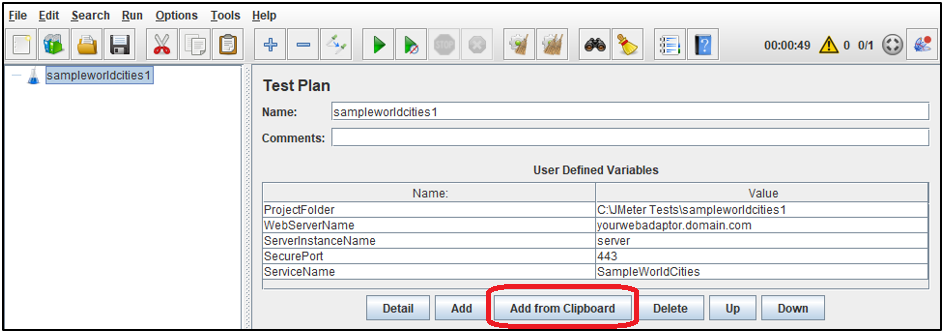
- From within JMeter, click on the Test Plan (e.g. sampleworldcities1)
- At the bottom of the User Defined Variables Section, click Add
- For Name enter: ProjectFolder
- For Value enter: C:\JMeter Tests\sampleworldcities1
- For Name enter: WebServerName
- For Value enter: yourwebadaptor.domain.com
- Enter the hostname of your Web Adaptor or ArcGIS Server
- For Name enter: ServerInstanceName
- For Value enter: server
- Some deployments use a different value, e.g. arcgis
- For Name enter: SecurePort
- For Value enter: 443
- If pointing to an ArcGIS Server instance, use 6443
- For Name enter: ServiceName
- For Value enter: SampleWorldCities
Adding the bzm – Concurrency Thread Group to the Test Plan
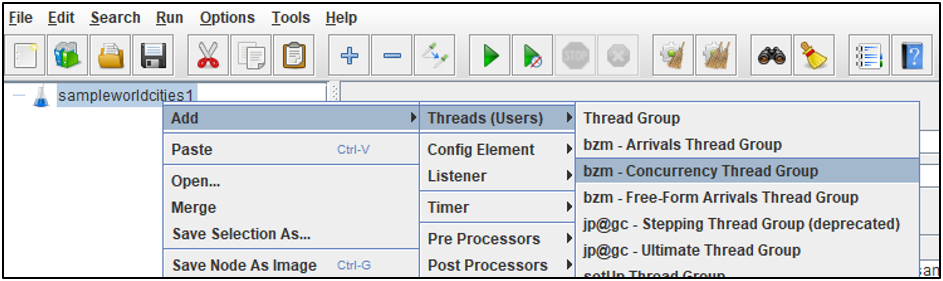
- Right click on the sampleworldcities1 Test Plan and under Add-->Threads (Users), select bzm – Concurrency Thread Group
- Under the sampleworldcities1 Test Plan, click on bzm – Concurrency Thread Group
- Configure the step load logic with the following:
- Target Concurrency: 10
- Ramp Up Time (min): 20
- Ramp-Up Steps Counter: 10
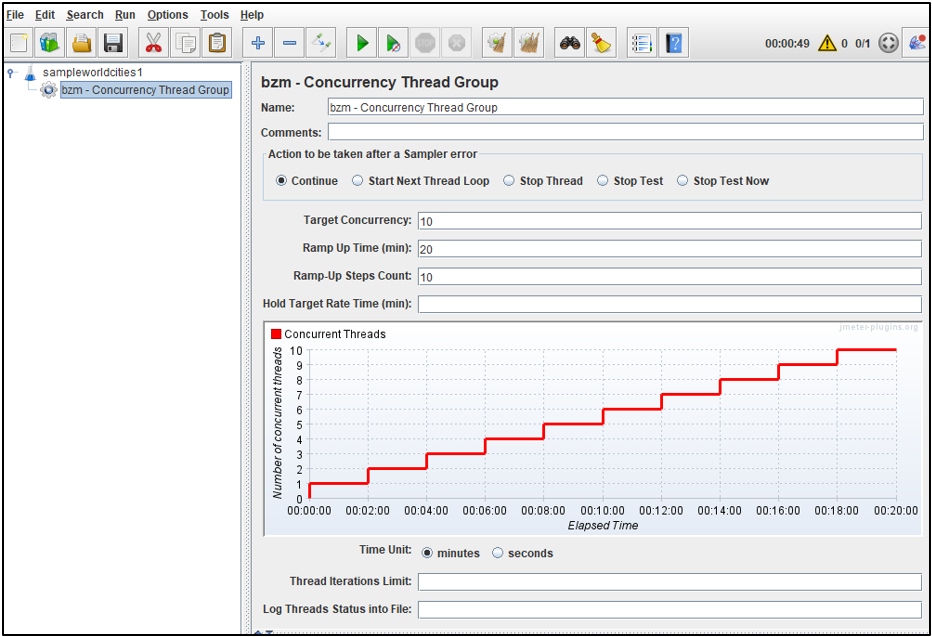
With the bzm – Concurrency Thread Group plugin, the configured step load logic can be easily seen and visually confirmed in the chart graphic above. This test will be set to run for 20 minutes, will increase pressure by using 10 different steps (adding 1 concurrent test thread at a time every 2 minutes), hit a maximum of 10 concurrent test threads then will stop.
Adding a Transaction to a Test Plan
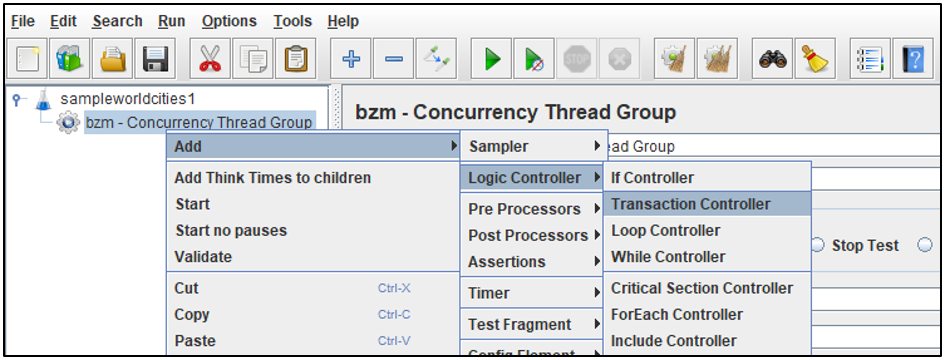
- Right-click on bzm – Concurrency Thread Group and under Add-->Logic Controller, select Transaction Controller
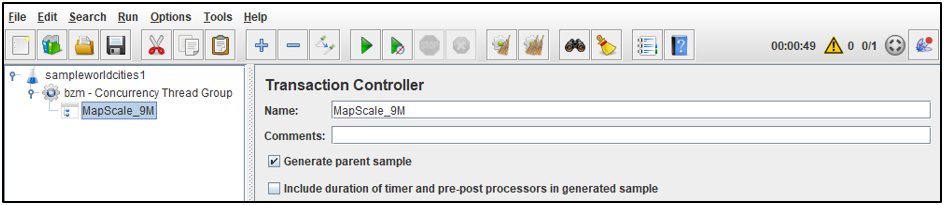
- Once added, give the Transaction Controller (e.g. the workflow operation) a meaningful name to distinguish it from others that may exist in the test
- For the name enter: MapScale_9M
- The 9M represents the map scale of 9 Million (e.g. 1: 9,244,649)
- One or more HTTP Requests can now be added to this Transaction Controller
- Select “Generate parent sample” from the Transaction Controller section
- This option can assist with validation as it displays the respective requests under the Transaction object
Adding an HTTP Request
Now we want to create a data driven HTTP request that will ask for a different spatial extent with each request. This is done with a regular JMeter HTTP Request.
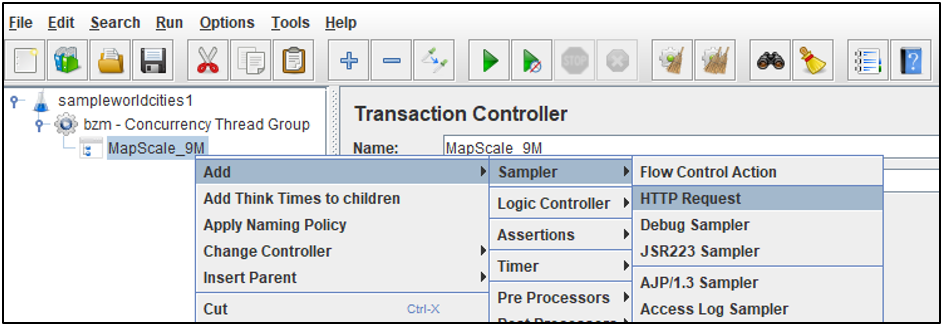
- Right click on the Transaction Controller called MapScale_9M, and under Add-->Sampler, select HTTP Request
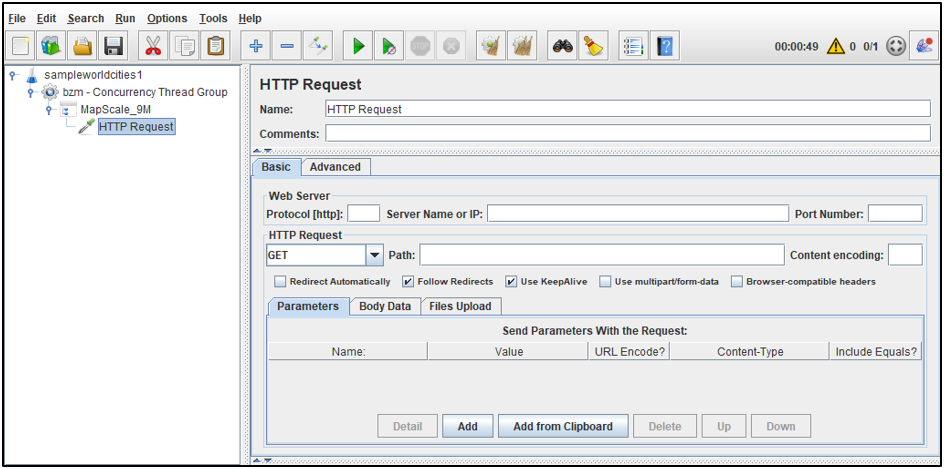
- The new, empty HTTP Request should resemble the following:
Making the HTTP Request Dynamic
A request signature for export map such as:
https://yourwebadaptor.domain.com/server/rest/services/SampleWorldCities/MapServer/export?dpi=96&transparent=true&format=png32&layers=show%3A0%2C1%2C2&bbox=-108.76228873935%2C31.0409016308382%2C-88.8526618315487%2C46.9686031570791&bboxSR=4326&imageSR=4326&size=1477%2C827&f=image
contains several URL components that need to go to different places on the HTTP Request page (to maximize flexibility and maintenance). Let’s start with the key/value pairs of the request by separating the URL parameters.
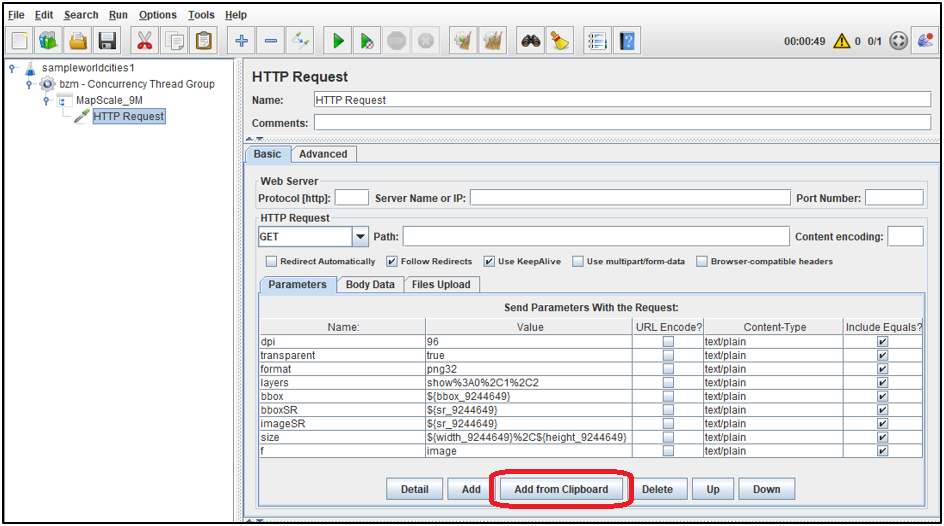
Below the parameters section has been modified to contain several JMeter variables instead of the original values. It is okay that some parts will reference JMeter variable names that have not yet created in the test.
- Copy the following and paste it into the HTTP Request by clicking Add from Clipboard at the bottom:
dpi=96&transparent=true&format=png32&layers=show%3A0%2C1%2C2&bbox=${bbox_9244649}&bboxSR=${sr_9244649}&imageSR=${sr_9244649}&size=${width_9244649}%2C${height_9244649}&f=image
This will help put in place several pieces necessary to make certain parts of the HTTP Request dynamic.
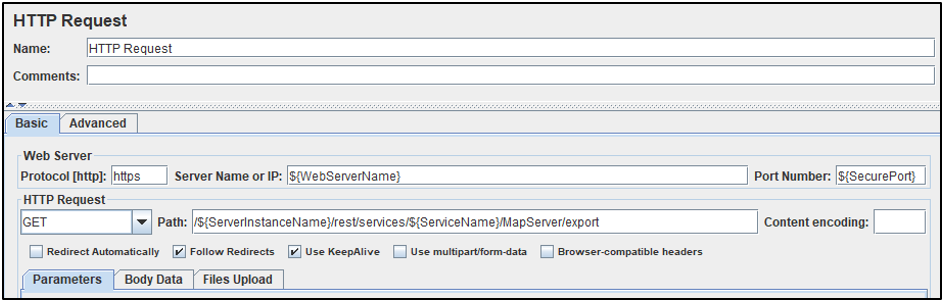
- Under the Web Server section:
- For Protocol enter: https
- For Server Name or IP enter: ${WebServerName}
- For Port Number enter: ${SecurePort}
- Under the HTTP Request section:
- For Path enter: /${ServerInstanceName}/rest/services/${ServiceName}/MapServer/export
Adding a Response Assertion
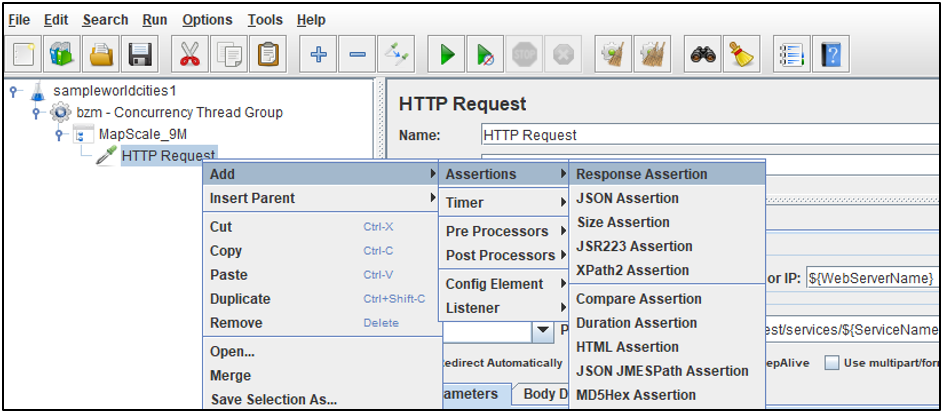
- Right click on the HTTP Request, and under Add-->Assertions, select Response Assertion
- Change several of the Response Assertion parameters:
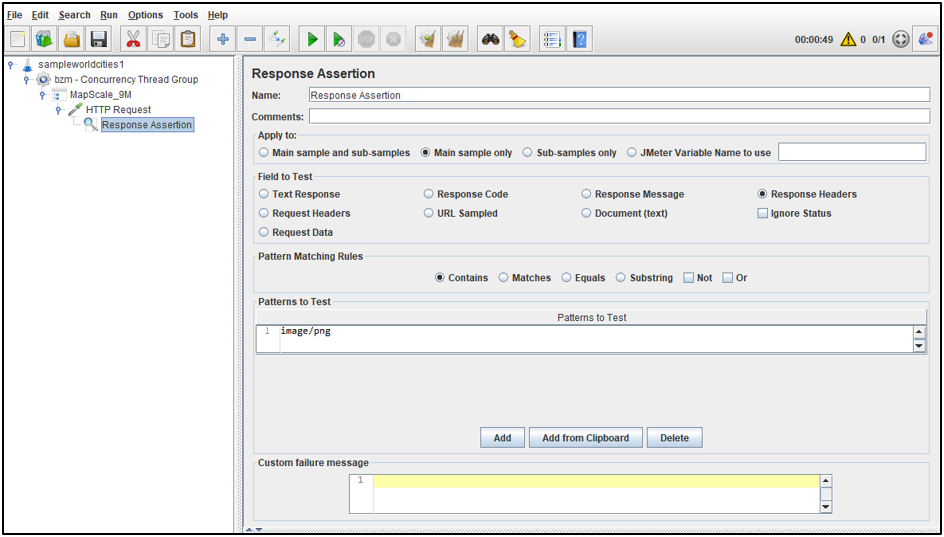
- Under Field to Test, select: Response Headers
- Under Pattern Matching Rules select: Contains
- Under Patterns to Test, click Add and enter: image/png
Adding a CSV Data Set Config
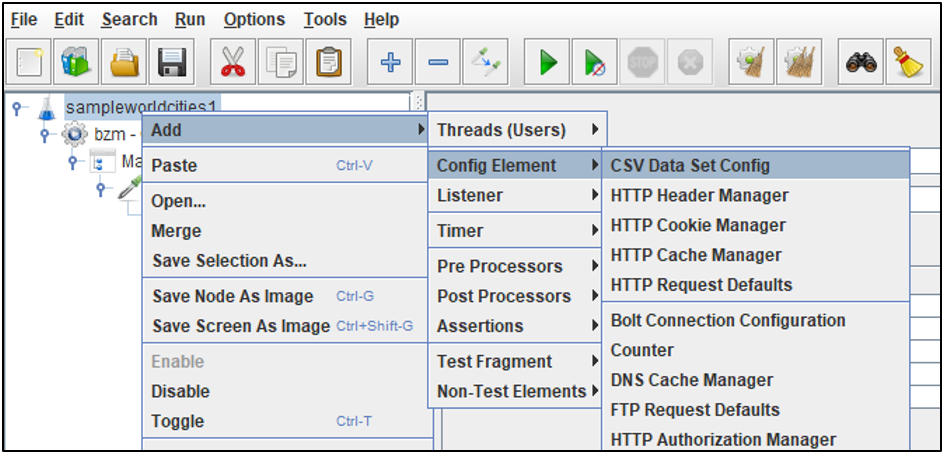
- Right click on the Test Plan (e.g. sampleworldcities1), and under Add-->Config Element, select CSV Data Set Config
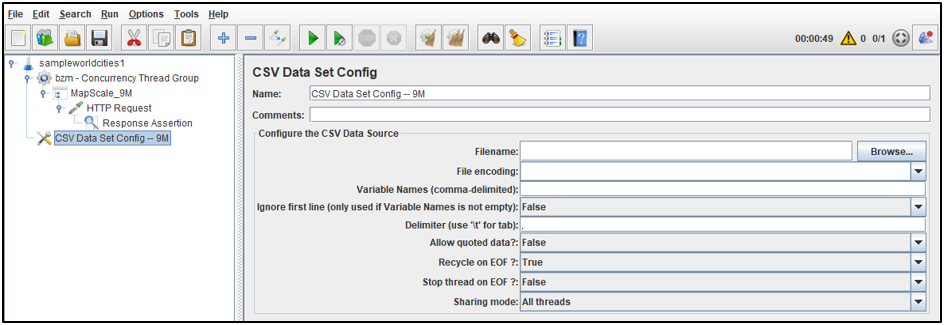
- Select the CSV Data Set Config and rename it to CSV Data Set Config -- 9M
- Providing a unique name can assist with maintenance/management if multiple data files are used within a test (e.g. one file for bounding box of each map scale)
- Using a text editor, populate an empty CSV file with the following 16 lines of data:
bbox,width,height,mapUnits,sr,scale
"-108.76228873935,31.0409016308382,-88.8526618315487,46.9686031570791",1280,1024,esriDecimalDegrees,4326,9244649
"23.1282001284589,34.337748761293,43.03782703626,50.2654502875339",1280,1024,esriDecimalDegrees,4326,9244649
"-117.052786808947,35.3545948648786,-97.1431599011459,51.2822963911194",1280,1024,esriDecimalDegrees,4326,9244649
"-100.83549484975,36.0637839078502,-80.9258679419492,51.991485434091",1280,1024,esriDecimalDegrees,4326,9244649
"17.7030587822399,34.3302705716379,37.6126856900409,50.2579720978788",1280,1024,esriDecimalDegrees,4326,9244649
"32.2827904735659,37.2792197897781,52.192417381367,53.2069213160189",1280,1024,esriDecimalDegrees,4326,9244649
"0.222469446585188,35.0562794764081,20.1320963543862,50.9839810026489",1280,1024,esriDecimalDegrees,4326,9244649
"100.262489726575,20.8660021309943,120.172116634376,36.7937036572352",1280,1024,esriDecimalDegrees,4326,9244649
"72.4186084471192,22.1748804724666,92.3282353549203,38.1025819987075",1280,1024,esriDecimalDegrees,4326,9244649
"-61.2094273153097,-26.7402777397378,-41.2998004075086,-10.812576213497",1280,1024,esriDecimalDegrees,4326,9244649
"-72.5908131920005,-26.6270515481087,-52.6811862841995,-10.6993500218679",1280,1024,esriDecimalDegrees,4326,9244649
"99.7474167083529,20.7088254145549,119.657043616154,36.6365269407958",1280,1024,esriDecimalDegrees,4326,9244649
"102.59837658124,20.384726879328,122.508003489041,36.3124284055689",1280,1024,esriDecimalDegrees,4326,9244649
"80.8239612278688,23.4521454643548,100.73358813567,39.3798469905956",1280,1024,esriDecimalDegrees,4326,9244649
"-105.812716128284,31.0536390717042,-85.9030892204829,46.9813405979451",1280,1024,esriDecimalDegrees,4326,9244649
- Save the CSV file to: C:\JMeter Tests\sampleworldcities1\datasets\bbox_9244649.csv
- From the CSV Data Set Config window, Click Browse and navigate the bbox_9244649.csv file that was just saved
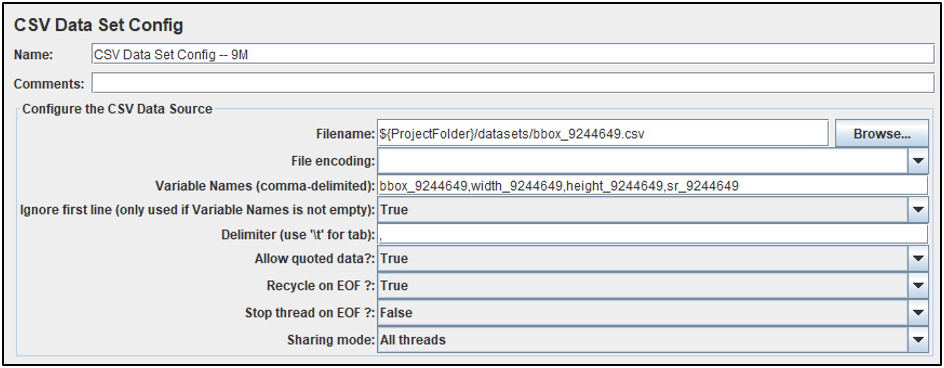
- Configure several items of the data source:
- Change Filename from: C:/JMeter Tests/sampleworldcities1/datasets/bbox_9244649.csv
- To: ${ProjectFolder}/datasets/bbox_9244649.csv
- For Variable Names add: bbox_9244649,width_9244649,height_9244649,sr_9244649
- Change Ignore first line
- Change Allow quoted data?
Validating the Test Plan
- Use the View Results Tree listener to assist with validating the response in the GUI from the remote server
- Right click on the Test Plan (sampleworldcities1) and under Add-->Listener, select View Results Tree
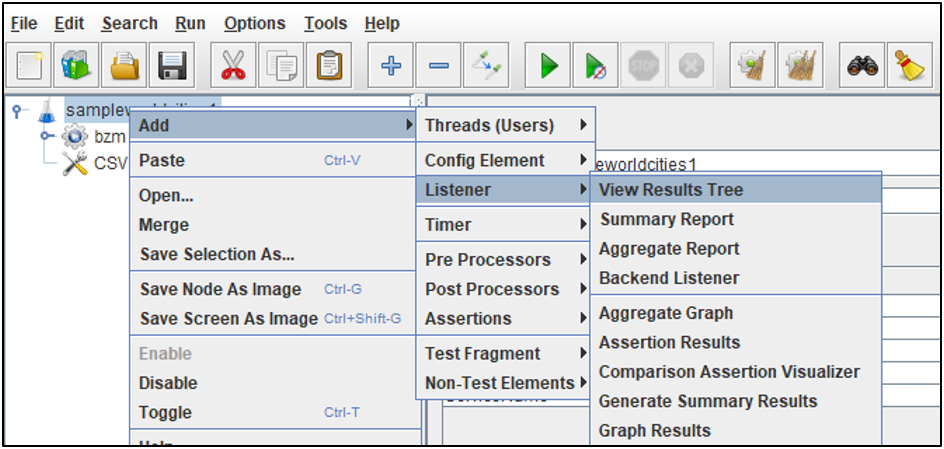
- Select View Results Tree, then Click on the green triangle at the top of the Apache JMeter GUI
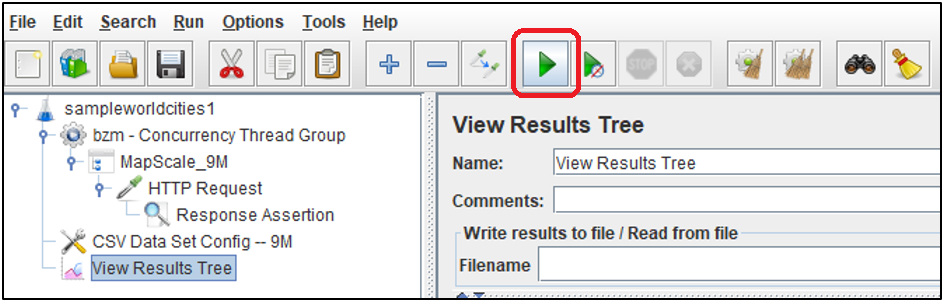
- Following the configured step load, JMeter will start by repeatedly sending requests, (initially) one at time.
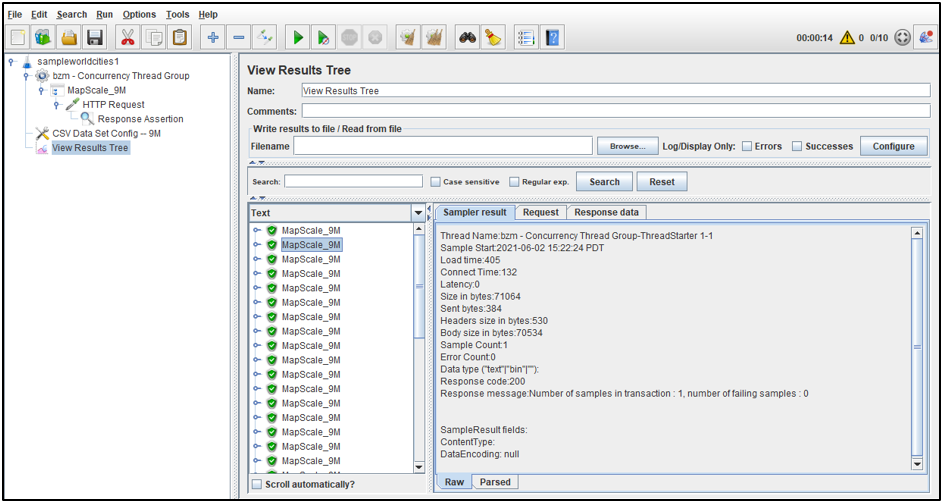
- The green shield with a checkmark is a sign of a successful request, if this is seen, wait several seconds for a handful of requests to be sent and responses to be returned.
- Clicking on one of the MapScale_9M green shields will show the Sampler result tab which displays information such as:
- Load time (response time)
- Size in bytes (Header and Body)
- Error Count
- Response code
- ContentType
Note: This info is great for validating the test playback but also useful for performance troubleshooting
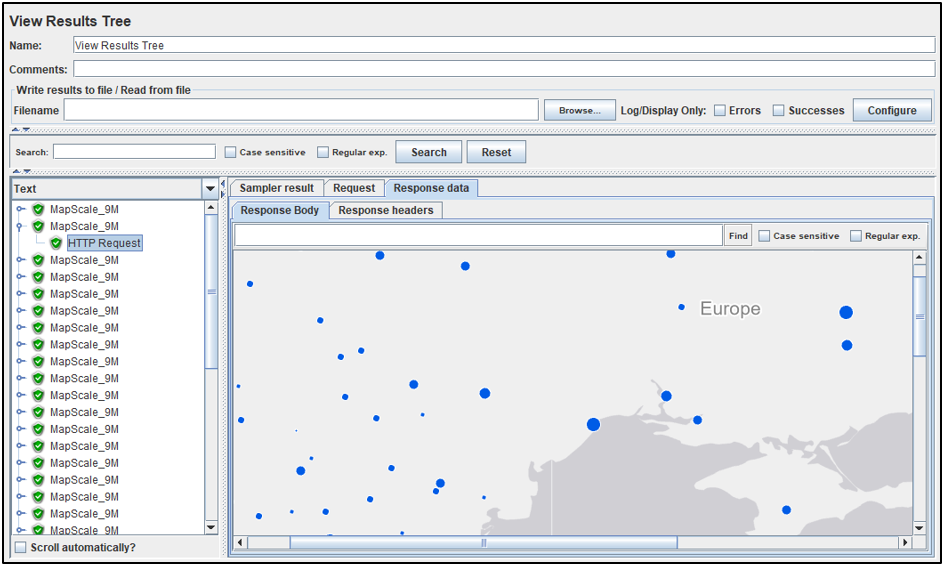
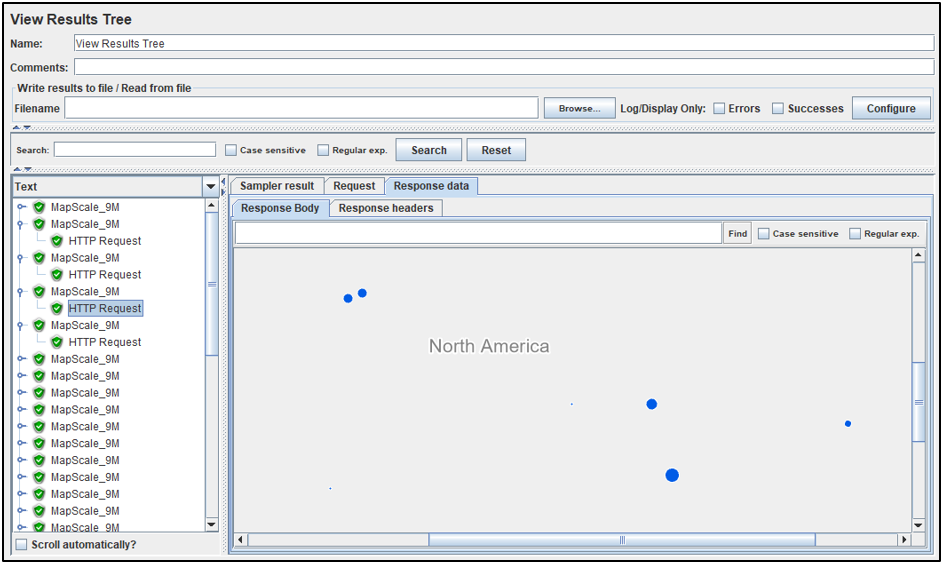
- Since this test is exercising the export map function, a visualization of the requested image would also assist with the Test Plan validation.
- Clicking the Response data tab and expanding the MapScale_9M transaction should render the requested image.
- Repeat as needed for other MapScale_9M transactions
- Toggling through several of the requests should show different images which validates the creation of a data driven export map load test in JMeter
Saving Recent Changes
Many changes were made since the last Save.
To download the Apache JMeter Test Plan used in this Article see: sampleworldcities1.zip
To download a version of this Apache JMeter Test Plan with more detail covering additional map scales see: sampleworldcities2.zip
Preparing to Run the Load Test
The Apache JMeter team recommends to not run load test from the GUI but to instead invoke the test from the command-line for optimal performance and resource utilization. Since this process can involve several switches, parameter adjustments and checks that are worth discussing in detail, it is a procedure that deserves its own Article called: Running an Apache JMeter Load Test from Command-line mode (Beginner/Intermediate).
Note: Please coordinate with your GIS team if your Apache JMeter test will be sending requests to a server that might impact other users. A load test should be scheduled to run during non-peak business hours.
For a set of additional testing tutorials (of increasing complexity), see: Performance Engineering: Load Testing ArcGIS Enterprise
Apache JMeter released under the Apache License 2.0. Apache, Apache JMeter, JMeter, the Apache feather, and the Apache JMeter logo are trademarks of the Apache Software Foundation.