This lesson teaches you how to create ISO 19139/19115 Metadata for layers in ArcGIS Online following the FGDC Technical Guidance: Data.gov and The GeoPlatform Metadata Recommendations.[1] This tutorial also applies to creating ISO Metadata in the ArcGIS Enterprise portal (10.9+).
Before You Begin
This lesson assumes that you have content in ArcGIS Online, for example, a hosted Feature Layer, and your organization administrator has enabled metadata with the ‘ISO 19139 Metadata Implementation Specification’ style.[2]
Enable Metadata
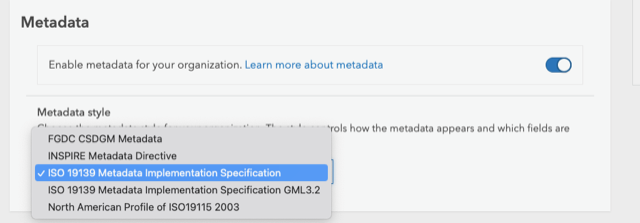
Administrators, to enable metadata for your ArcGIS ArcGIS Online organization, click the ‘Organization > Settings’ tab and choose Items in the left sidebar. Enable metadata and choose the ISO 19139 Metadata Implementation Specification style:
Enable Categories
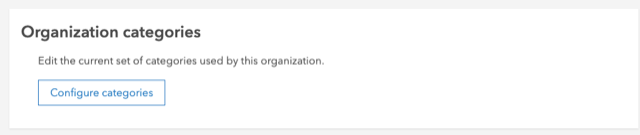
When one or more categories are assigned in your content Item information, applications such as ArcGIS Hub leverage categories in search and discovery.
TIP: Enable organization categories and choose ISO Categories.
Review Item Layer Settings
Item owners verify that you are signed in, have privileges to create content, and that your organization has enabled metadata. From the My Content tab of the content page, click the title of the item for which you want to include metadata.
Review the Item Settings and update as needed.
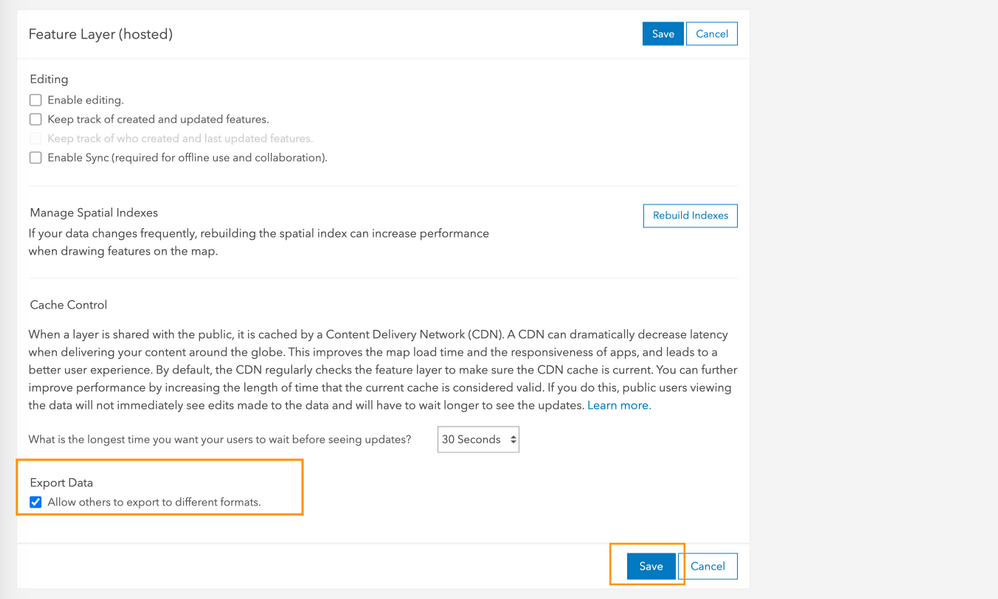
Click on the Item ‘Settings’ tab. As appropriate, mark the Item as ‘Authoritative’ and check the box to enable delete protection. Click 'Save.'
Check the 'Export Data' box to enable downloads and allow others to export different formats. Click ‘Save’ and return to the Item ‘Overview’ tab to return to the Item details page. Click 'Save.'
Begin Editing the Metadata
Return to the ‘Overview’ Item details page. Click the ‘Open in Metadata Editor Classic’ button (dropdown with the Metadata button) to open the Metadata Editor Classic and follow the instructions below.

ISO 19139 Metadata has eight main sections in a tabbed interface in the Metadata Editor Classic. Each section has subsections containing associated metadata elements. In this tutorial, you'll use the Resource, Distribution, and Metadata tabs.

When you open the editor for the Item for the first time, the editor is populated with existing metadata elements from the Item details.[2] If you published the feature layer from a layer in ArcGIS Pro that already contained metadata, the metadata flows through from Pro to ArcGIS Online.
Resource
Citation
Titles & Dates
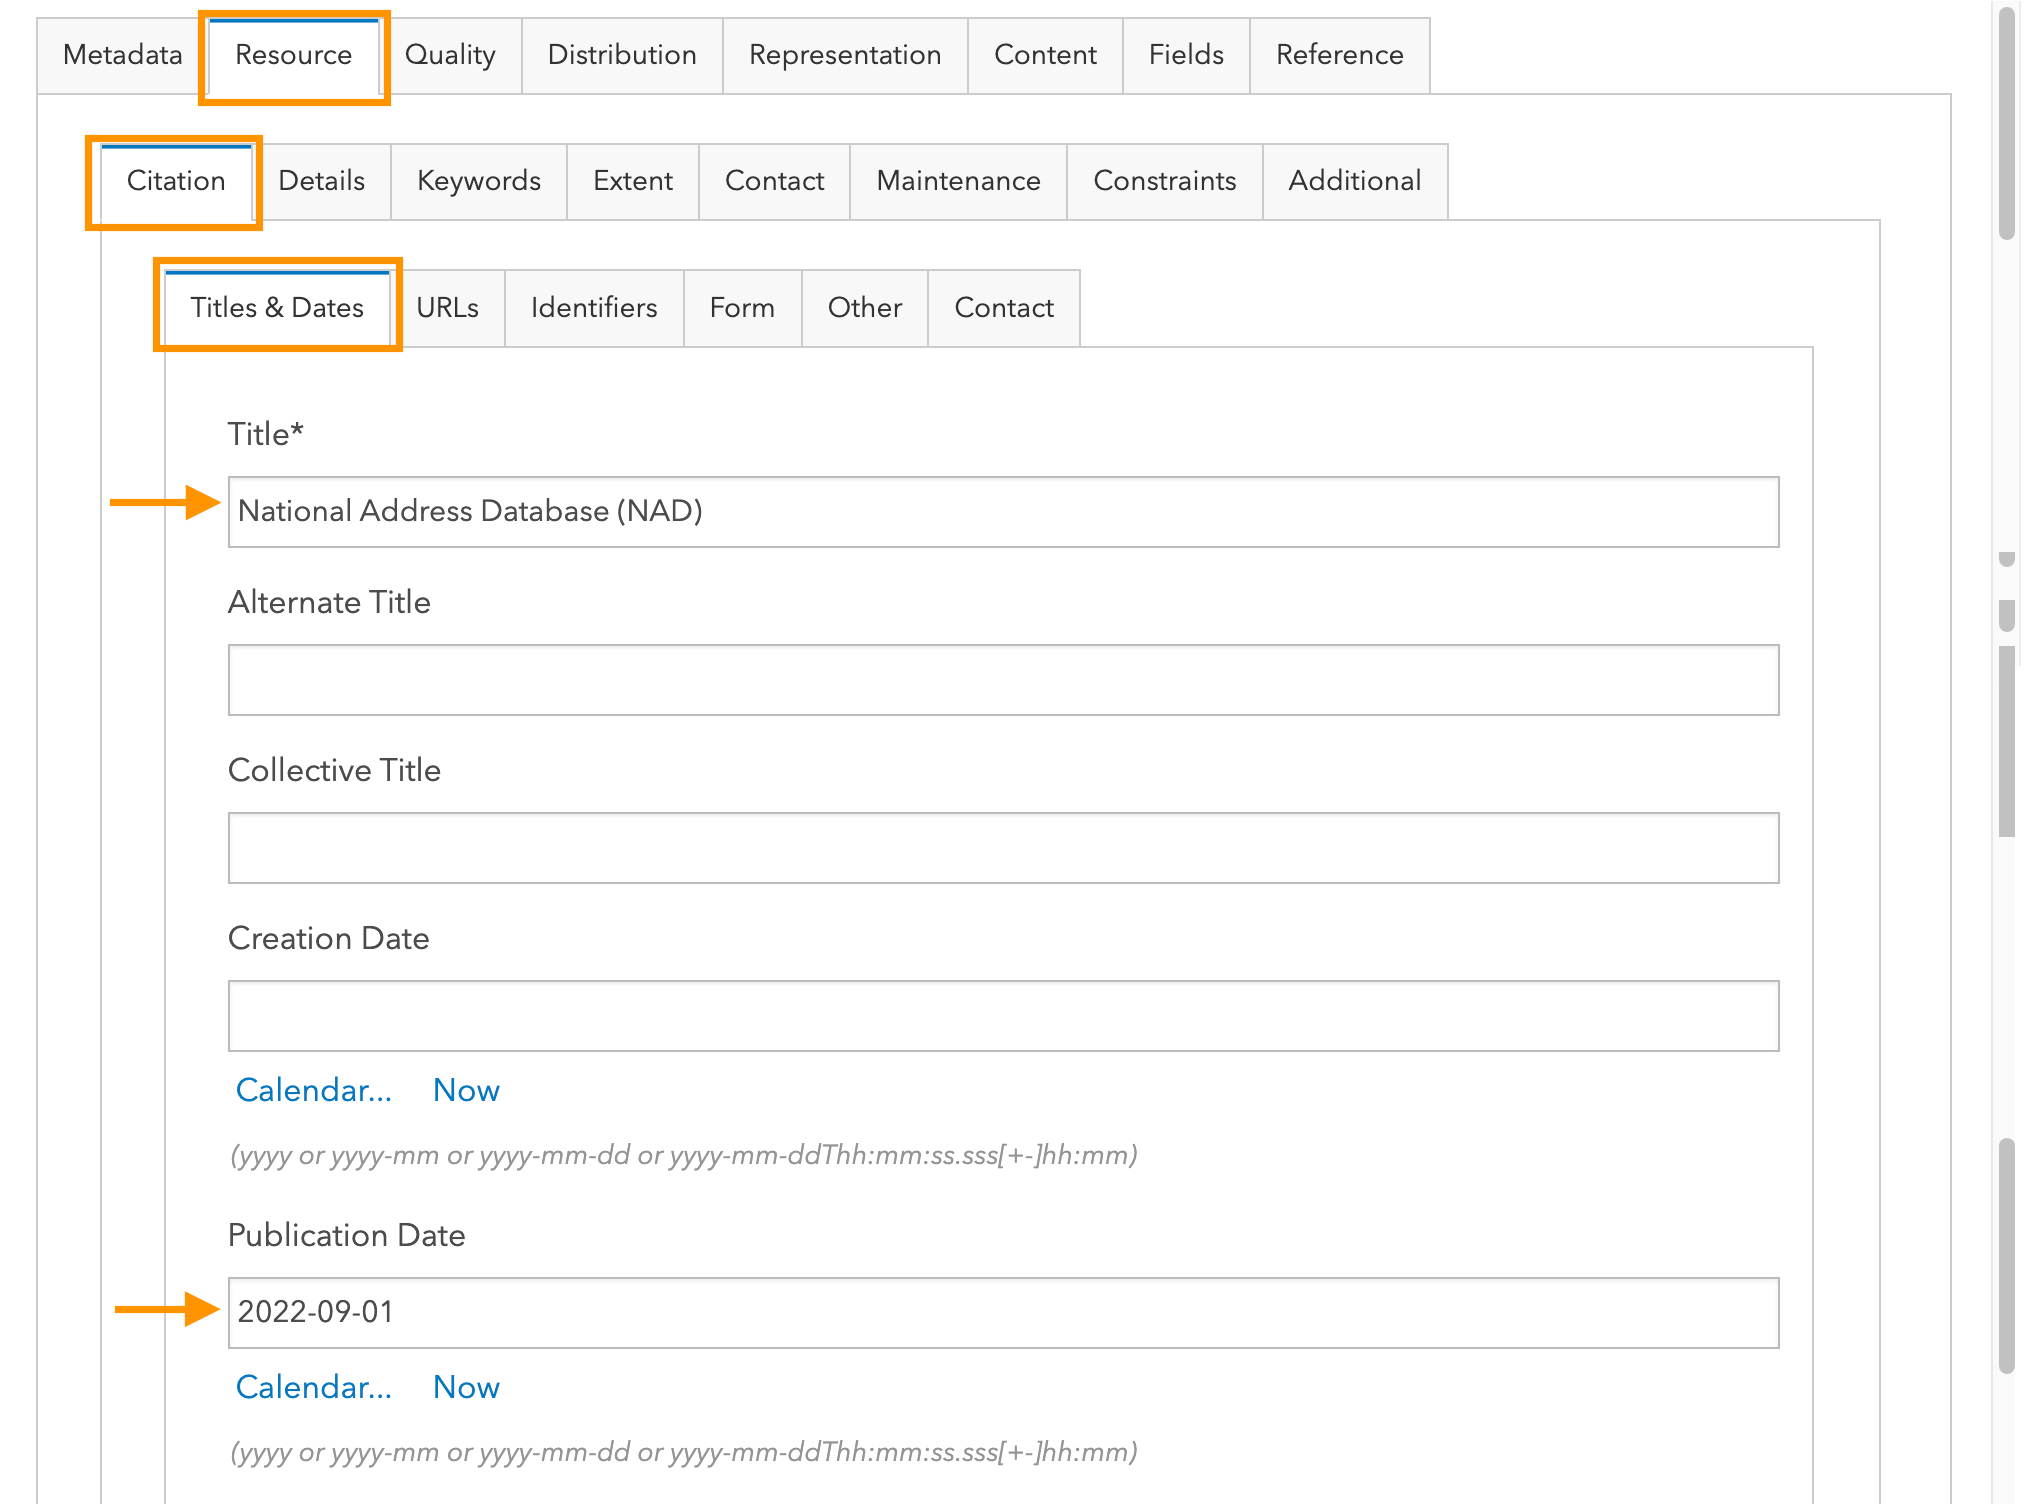
- Title - Click on the ‘Resource’ tab ‘Citation > Titles & Dates’ section. Note that the title in the metadata is automatically populated from the Item information.
Concise titles help increase discoverability. A good title is descriptive and distinctive yet succinct. Titles should strive to relay the resource’s what, where, and when, and, if relevant, the who, why, and how. Follow the pattern: "LayerTopic of Jurisdiction" and include the time period when relevant. See our good practice - Item title uses a naming convention.[3]
TIP: Changing the title in the metadata does not update the Item title (sync is one-directional). To update the title in both places, close the metadata editor and change the Item title before proceeding. To update the title in the metadata record only, do so in the metadata editor.
SpoilerNGDA Data Themes If you are documenting a National Geospatial Data Asset (NGDA), follow FGDC’s guidance for NGDA datasets.
- Title – Verify the title exactly matches the NGDA_Title provided in the NGDA Portfolio listing, e.g., “National Address Database (NAD)”
- Citation Publication Date - A citation ‘Publication Date’ is required. Scroll down in the ‘Citation > Titles & Dates’ section to complete the ‘Publication Date.’ Enter a calendar date in the specified format, e.g., yyyy-mm-dd, or click ’Now’ to populate this element with the current date.
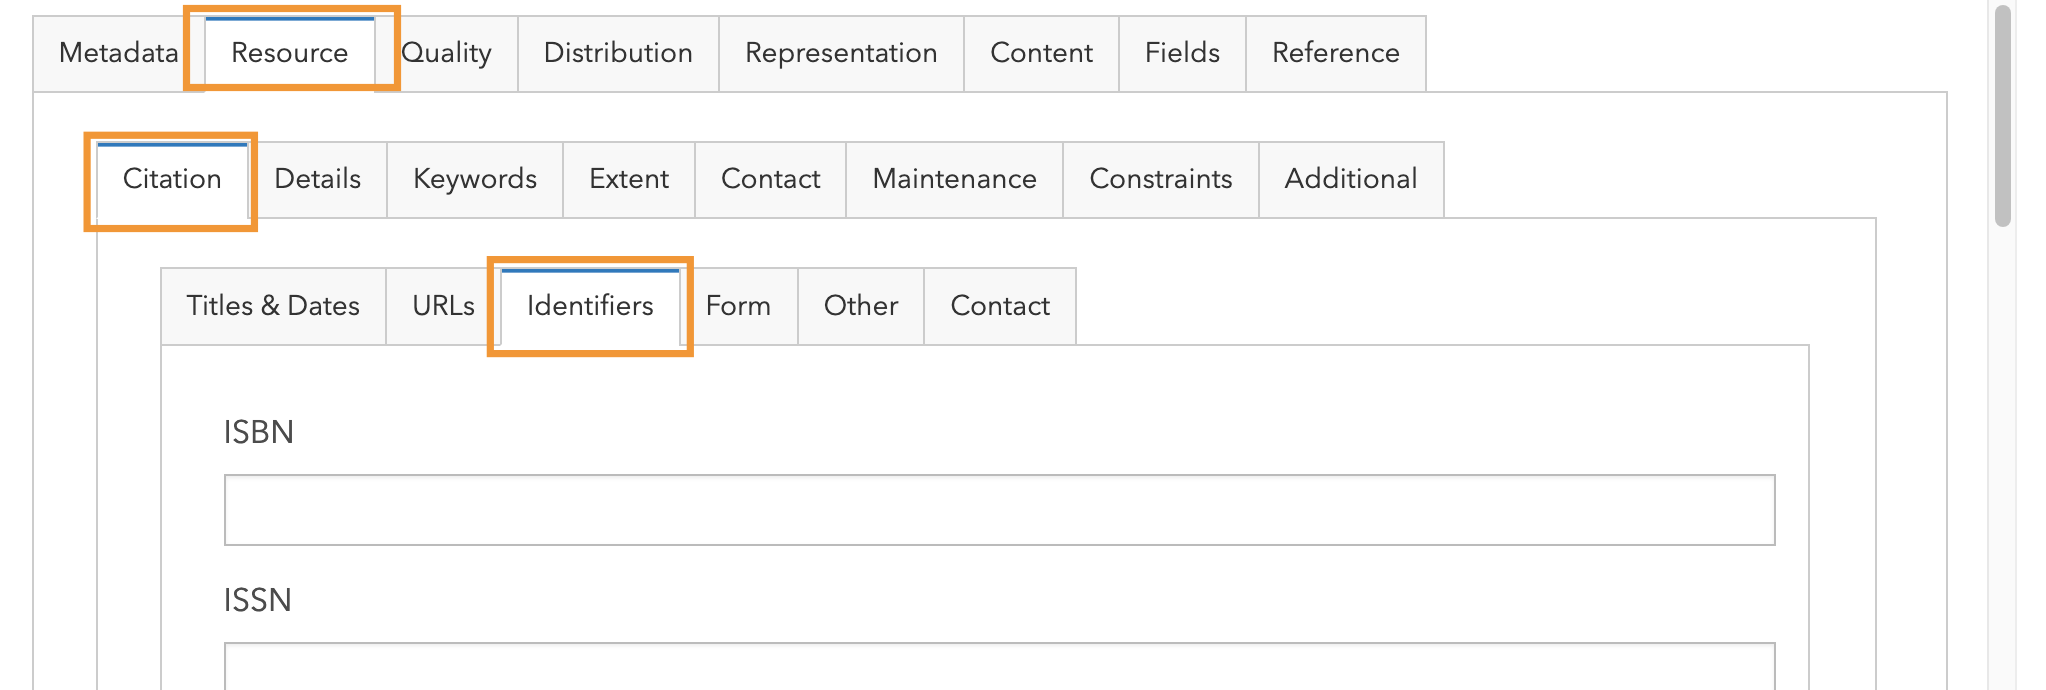
Citation Unique Identifier
File identifiers help to uniquely identify data resources and the metadata record associated with the resource. If your agency has implemented a standardized approach for assigning unique identifiers, such as an ISBN, to the resources it produces, include it here. Otherwise, leave it blank. A unique ID will automatically be captured in the Metadata information section.
Details
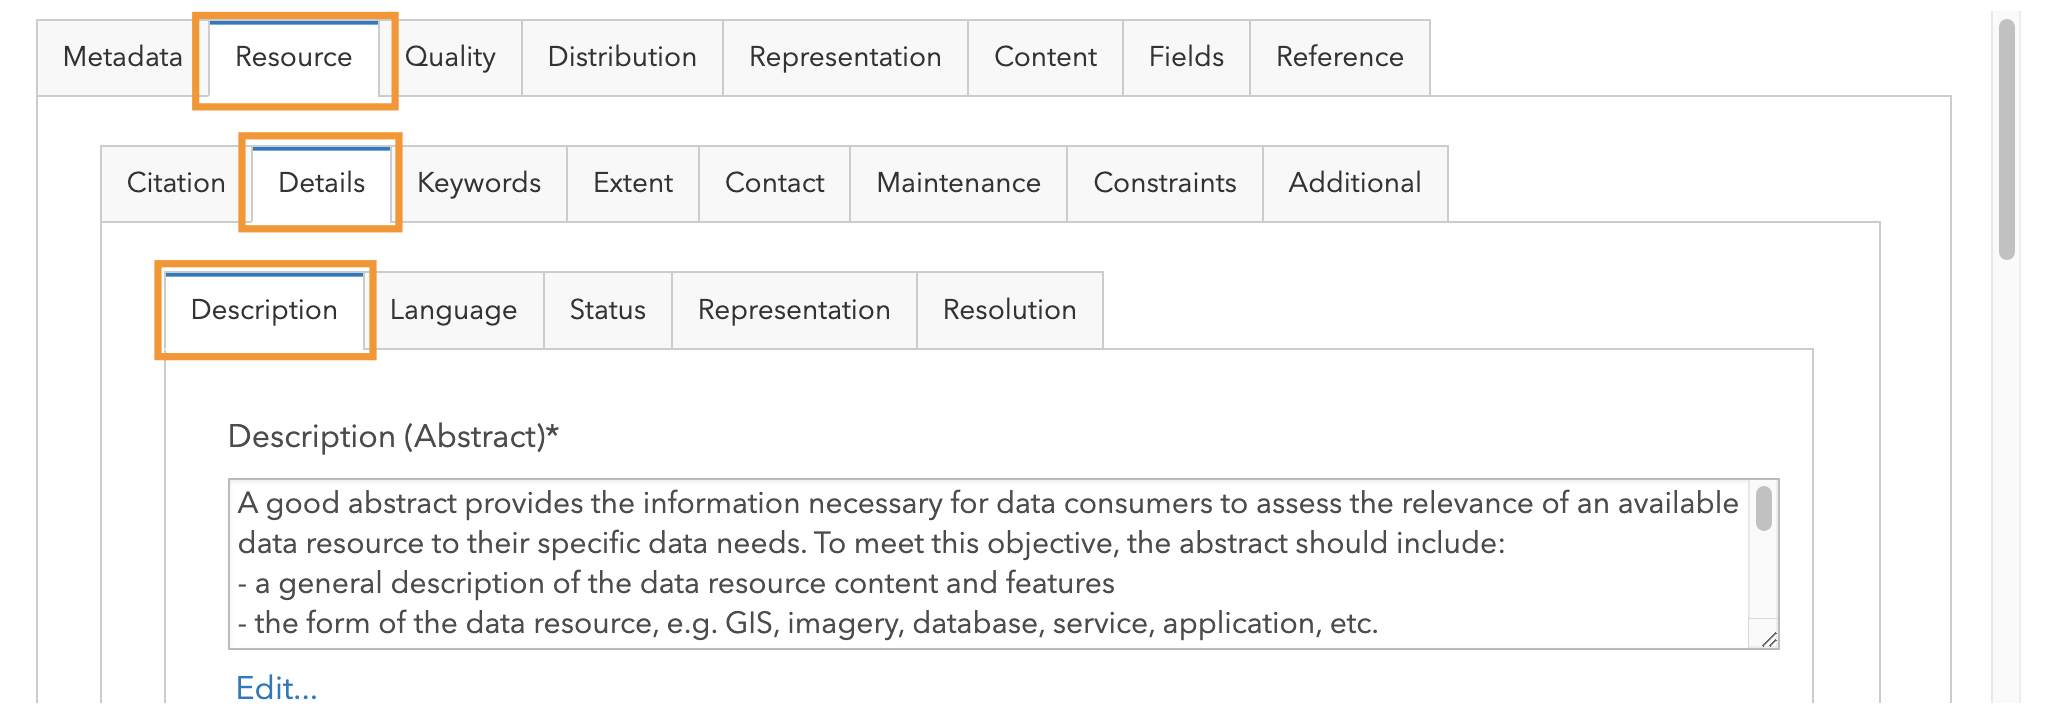
Description (Abstract)
Choose the ‘Resource’ tab ‘Details > Description’ section. As needed, enter a detailed dataset description.
TIP: Aim for a 7th-9th grade reading level to reach a broad audience. Use a free readability analysis tool to test your text.
Resource Language
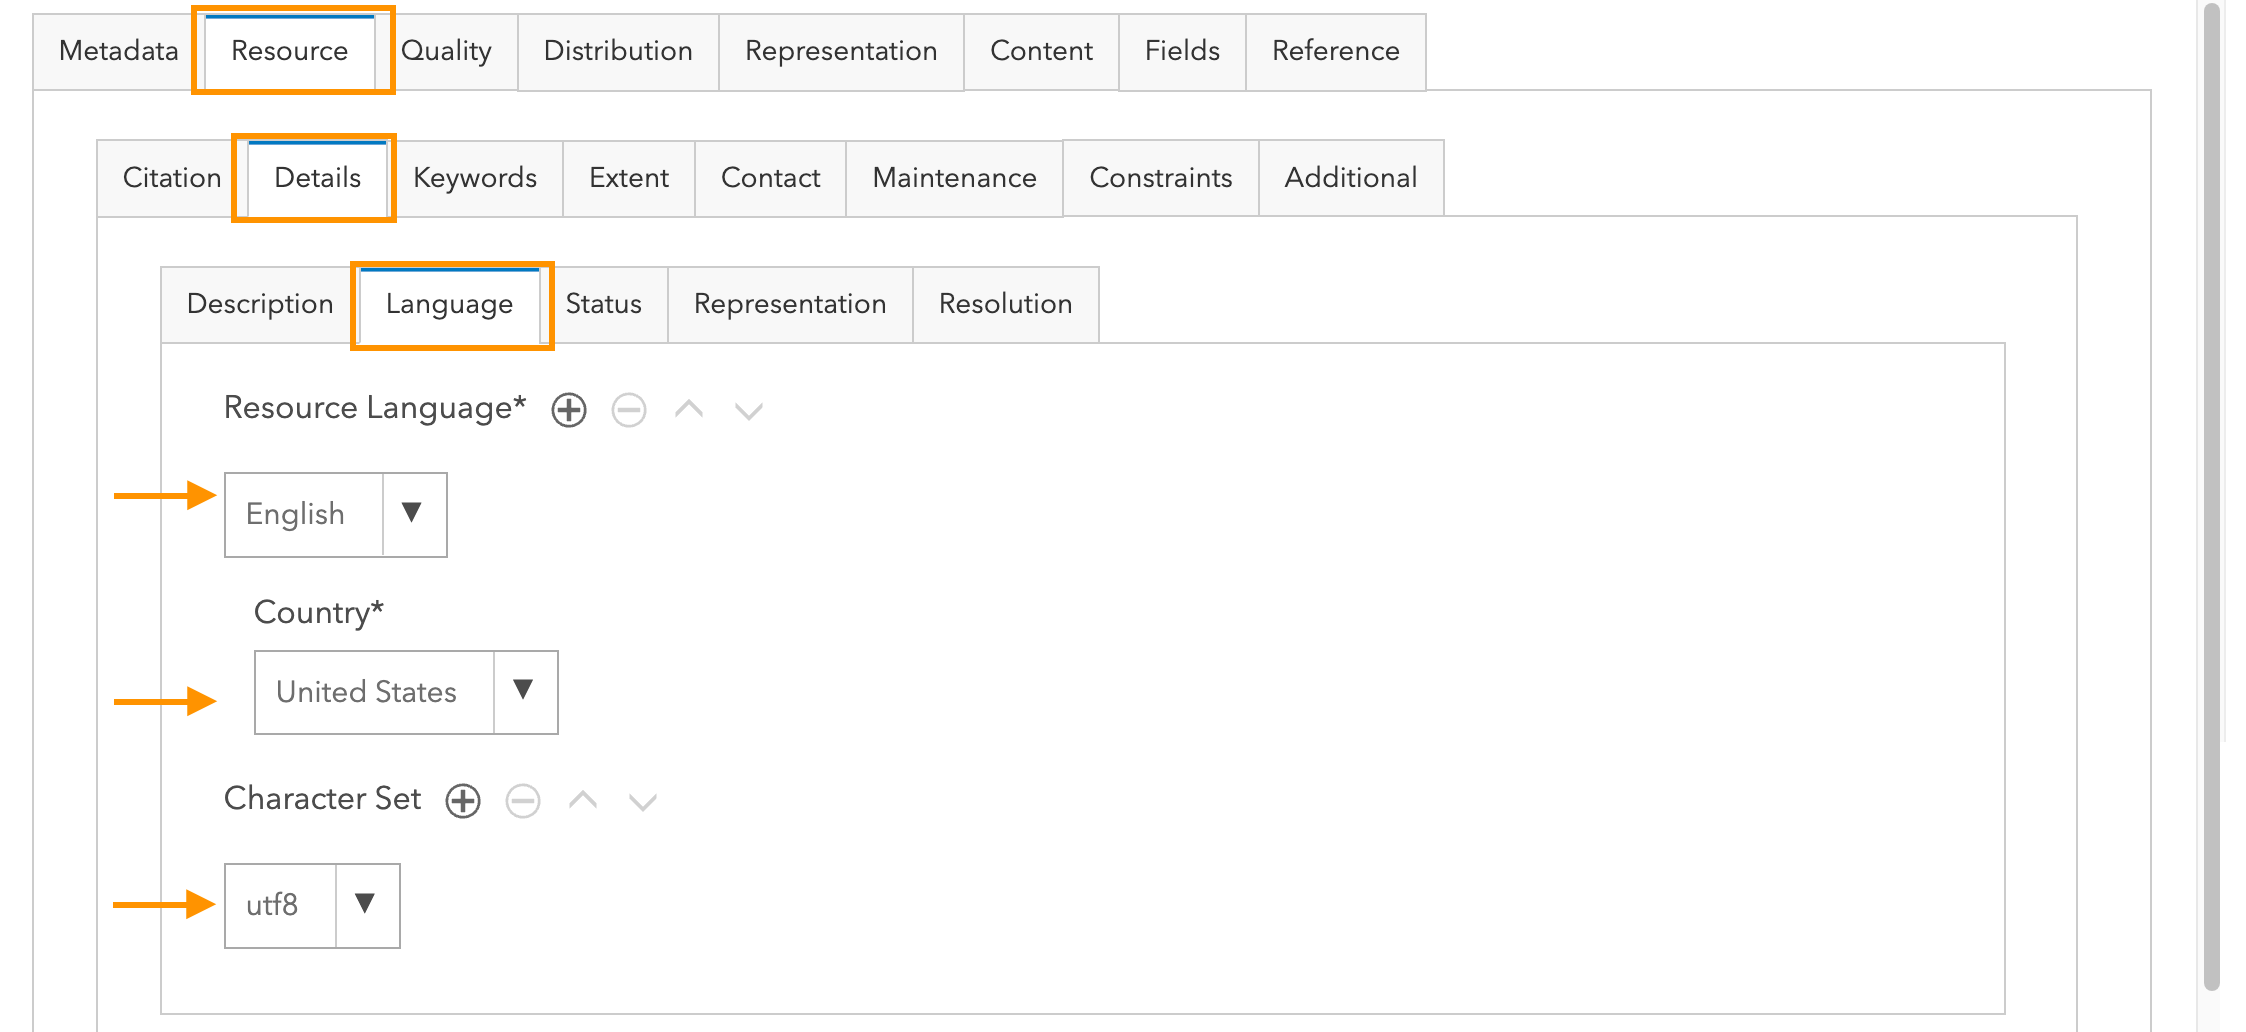
ISO requires the language of the resource to be documented. Click the ‘Resource’ tab ‘Details > Language’ section.
- Resource Language - choose the language(s) used within the resource (e.g., “English”)
- Country - choose the region of the language from the dropdown list (e.g., “United States”)
- Character Set - character set should automatically be set to ‘utf8’
Progress
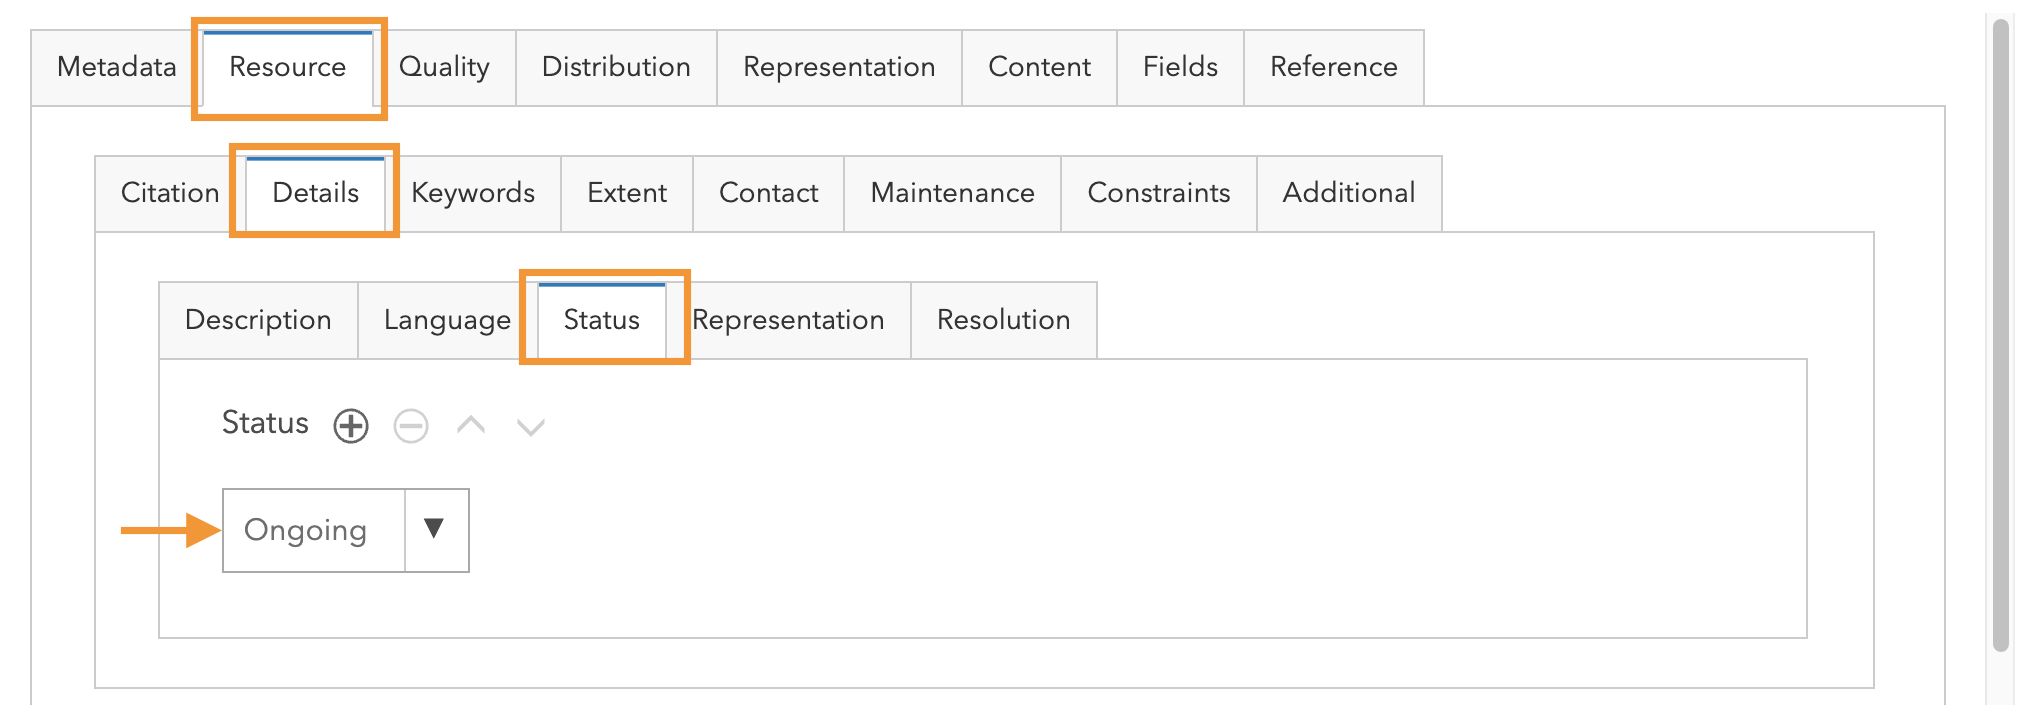
Choose a progress code from the ‘Resource’ tab ‘Details > Status’ section drop-down. For example, ‘completed’ or other, as applicable, is required for the resource.
Keywords
Topic Category
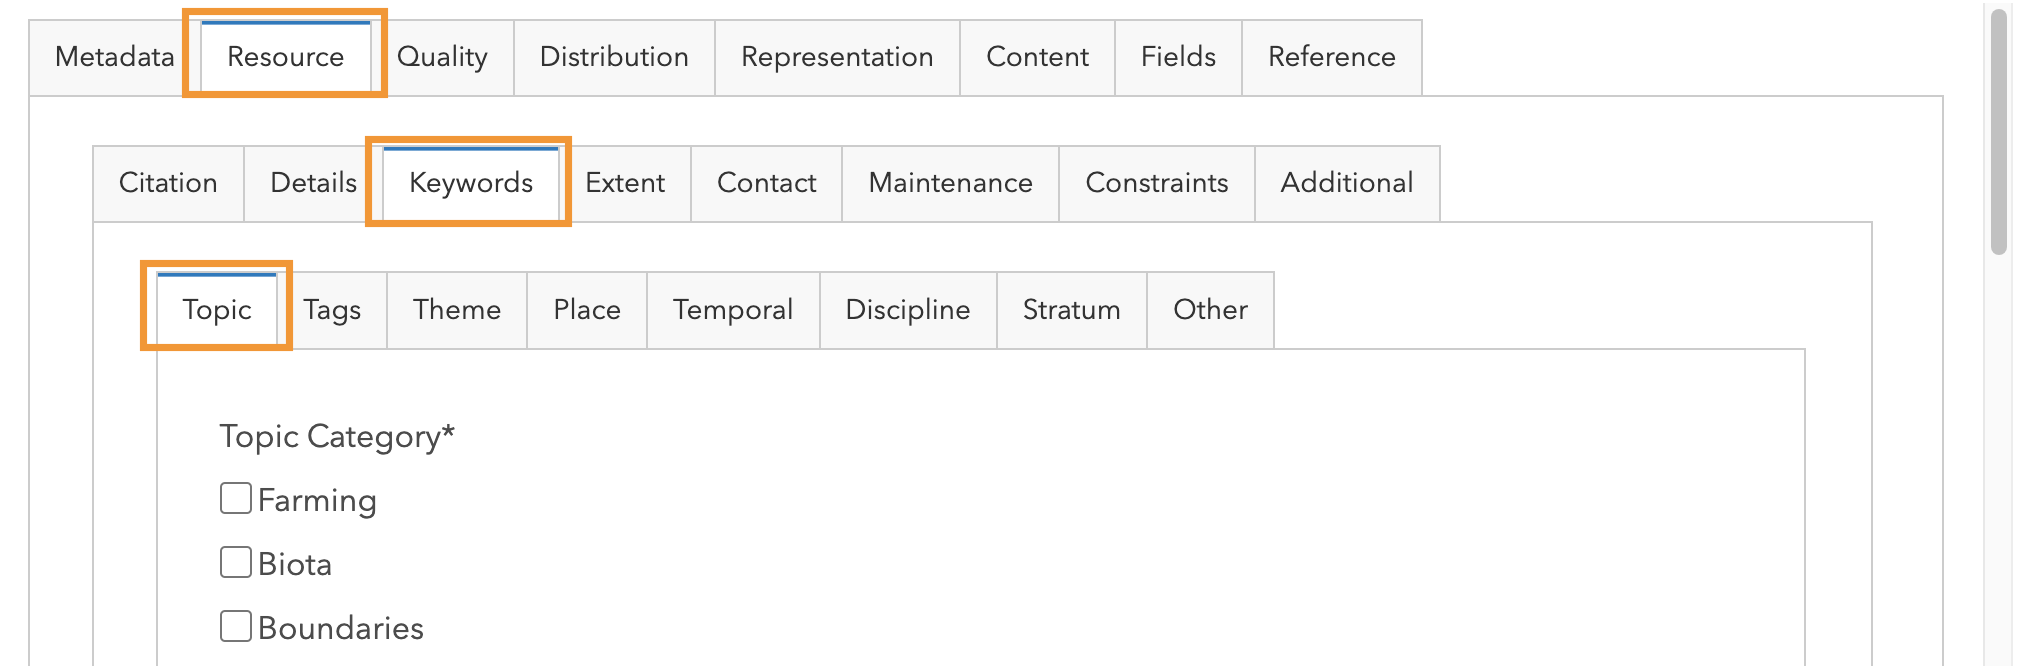
One or more ISO 19115 Topic Categories are required. A topic category is a high-level classification scheme to assist in the grouping and topic-based search of available spatial data resources. See the USGS ISO Topic Categories for a description of each category.
In the ‘Resource’ tab, choose the Keywords > Topic’ section and select one or more ISO Topic Categories.
SpoilerNGDA Theme keywords
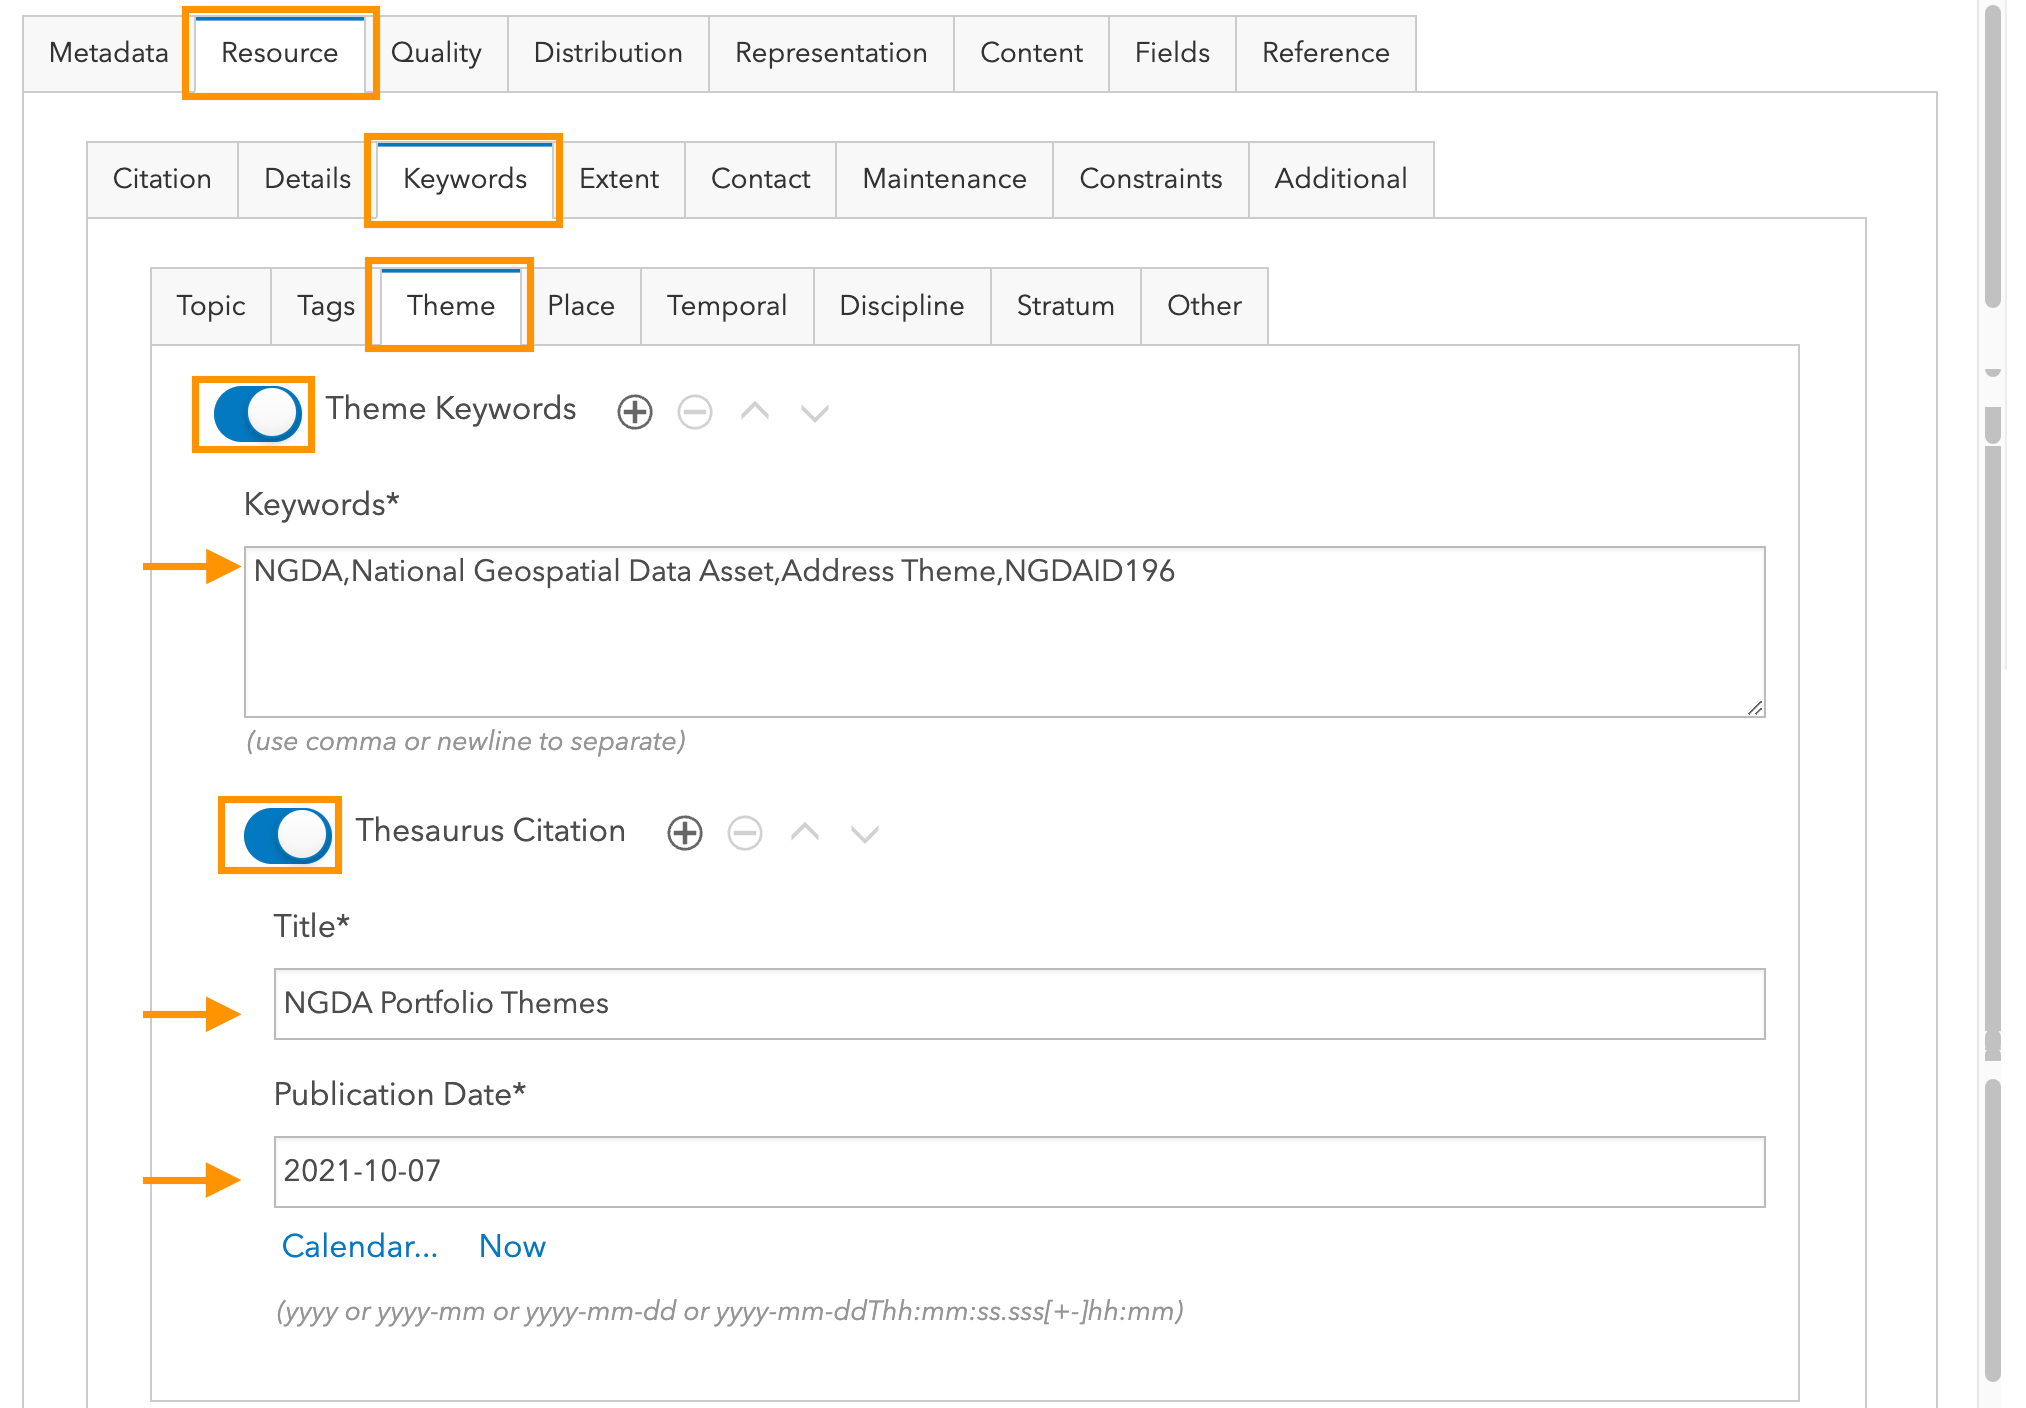
If you are documenting an NGDA dataset, choose the ‘Resource’ tab ‘Keywords > Theme’ section and toggle ‘Theme Keywords.’ Enter each of the following keywords separated by a comma:
- “NGDA”
- “National Geospatial Data Asset”
- enter the exact theme name matching the NGDA Portfolio listing NGDA_Theme; include the word “Theme” in your keyword, e.g. ‘Address Theme’
- enter the word “NGDAID” immediately followed by the theme number from the NGDA
- Portfolio listing, e.g. ‘NGDAID196’’
Toggle the Thesaurus Citation and complete the following information:
- Theme keyword thesaurus: enter “NGDA Portfolio Themes” without quotes
- Theme keyword thesaurus date: enter “2022-12-13” without quotes [4]
Extent
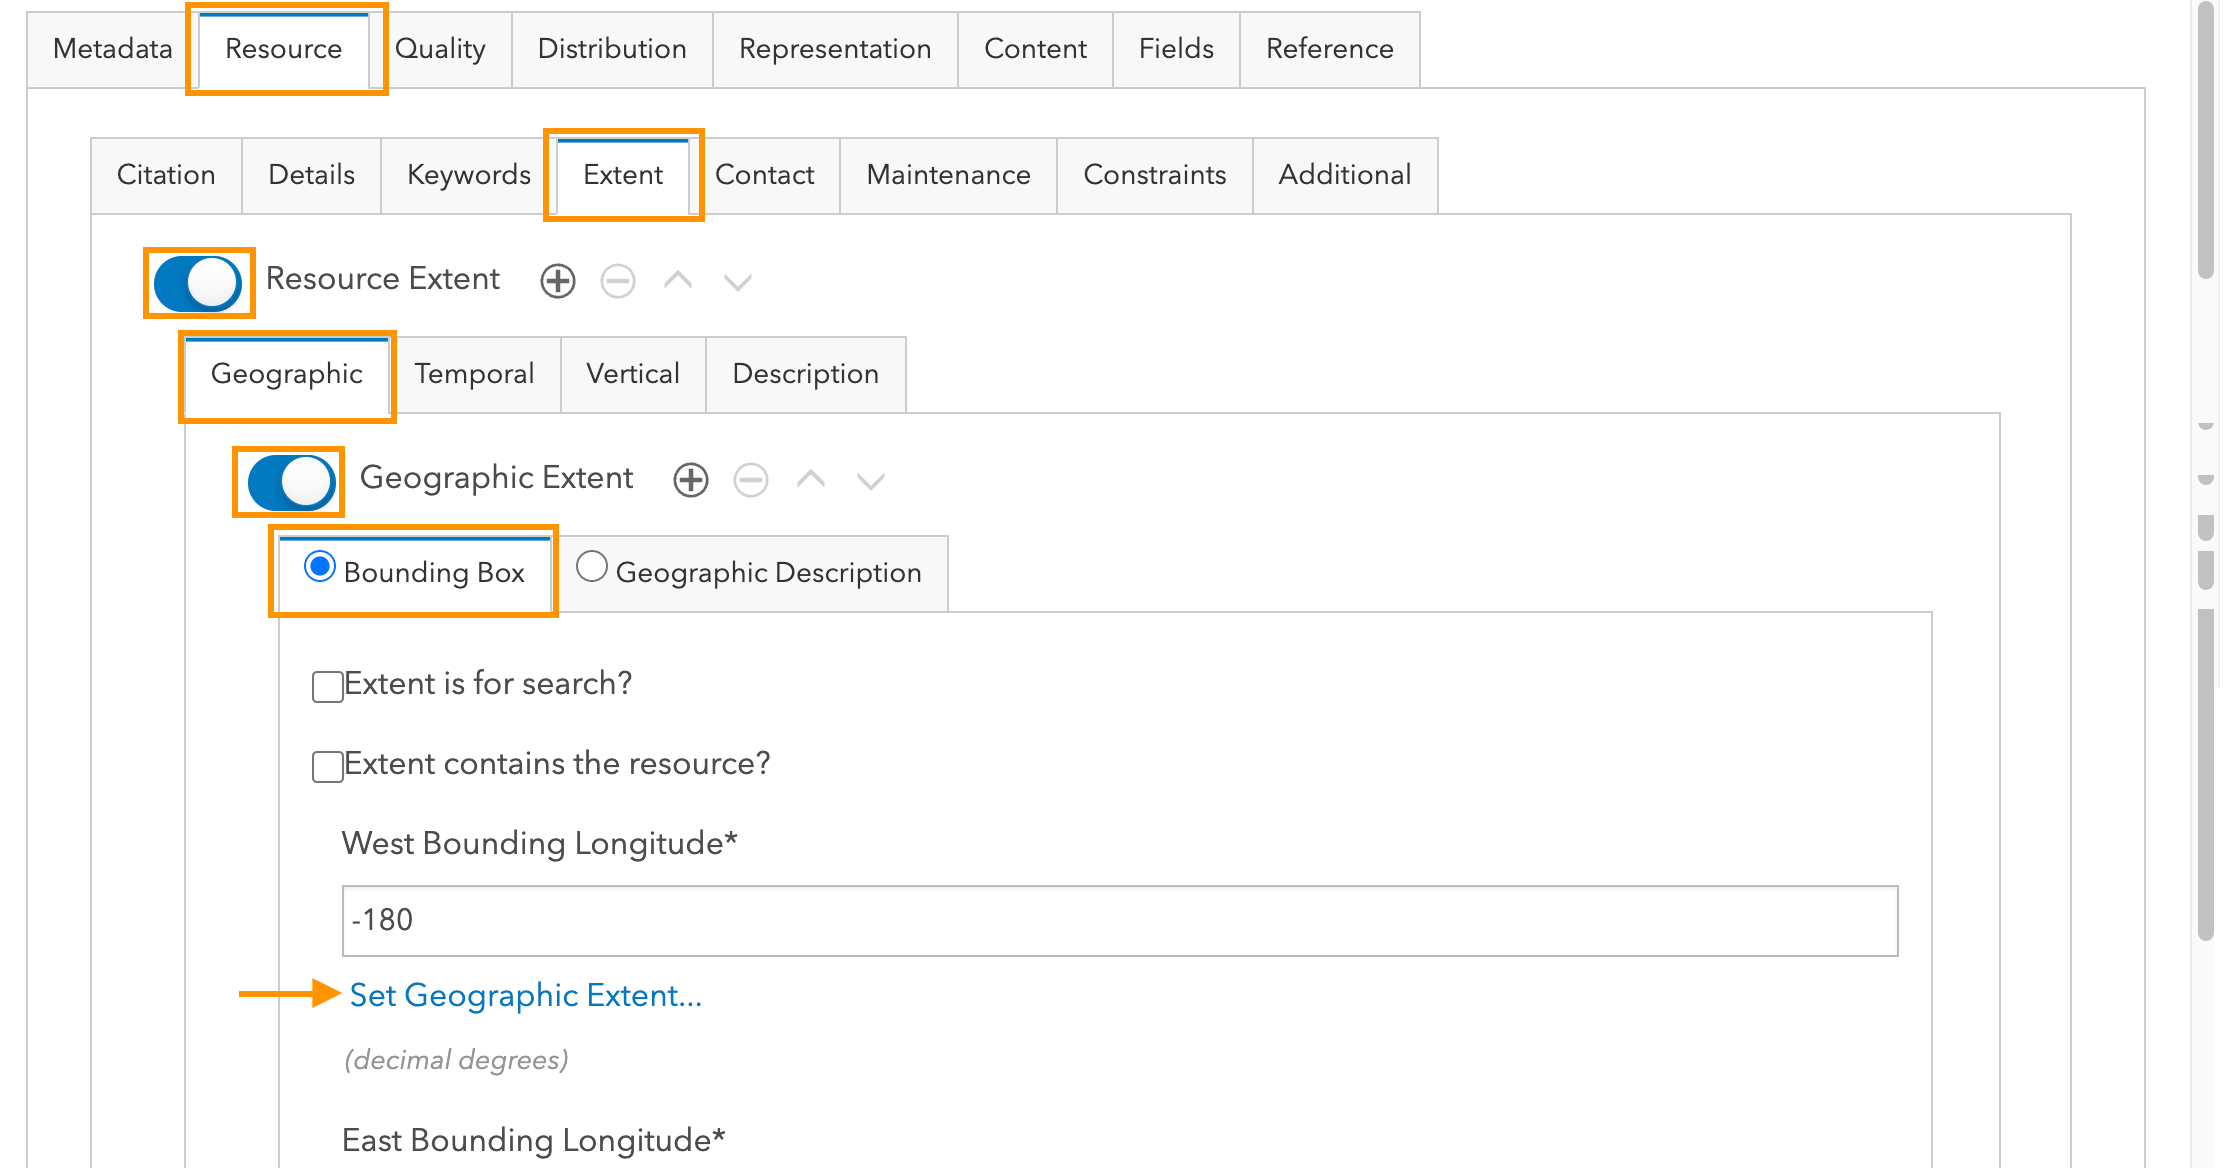
When Metadata Hierarchy Level is ‘Dataset,’ a Geographic Bounding Box or Geographic Description is required.
Click the ‘Resource’ tab ‘Extent’ section and toggle ‘Resource Extent’ then ‘Geographic Extent.’ Click the ‘Set Geographic Extent…’ link to set the bounding box of the dataset contents. The appropriate coordinates are filled in based on your bounding box selection.
Contact
Contact for the Resource
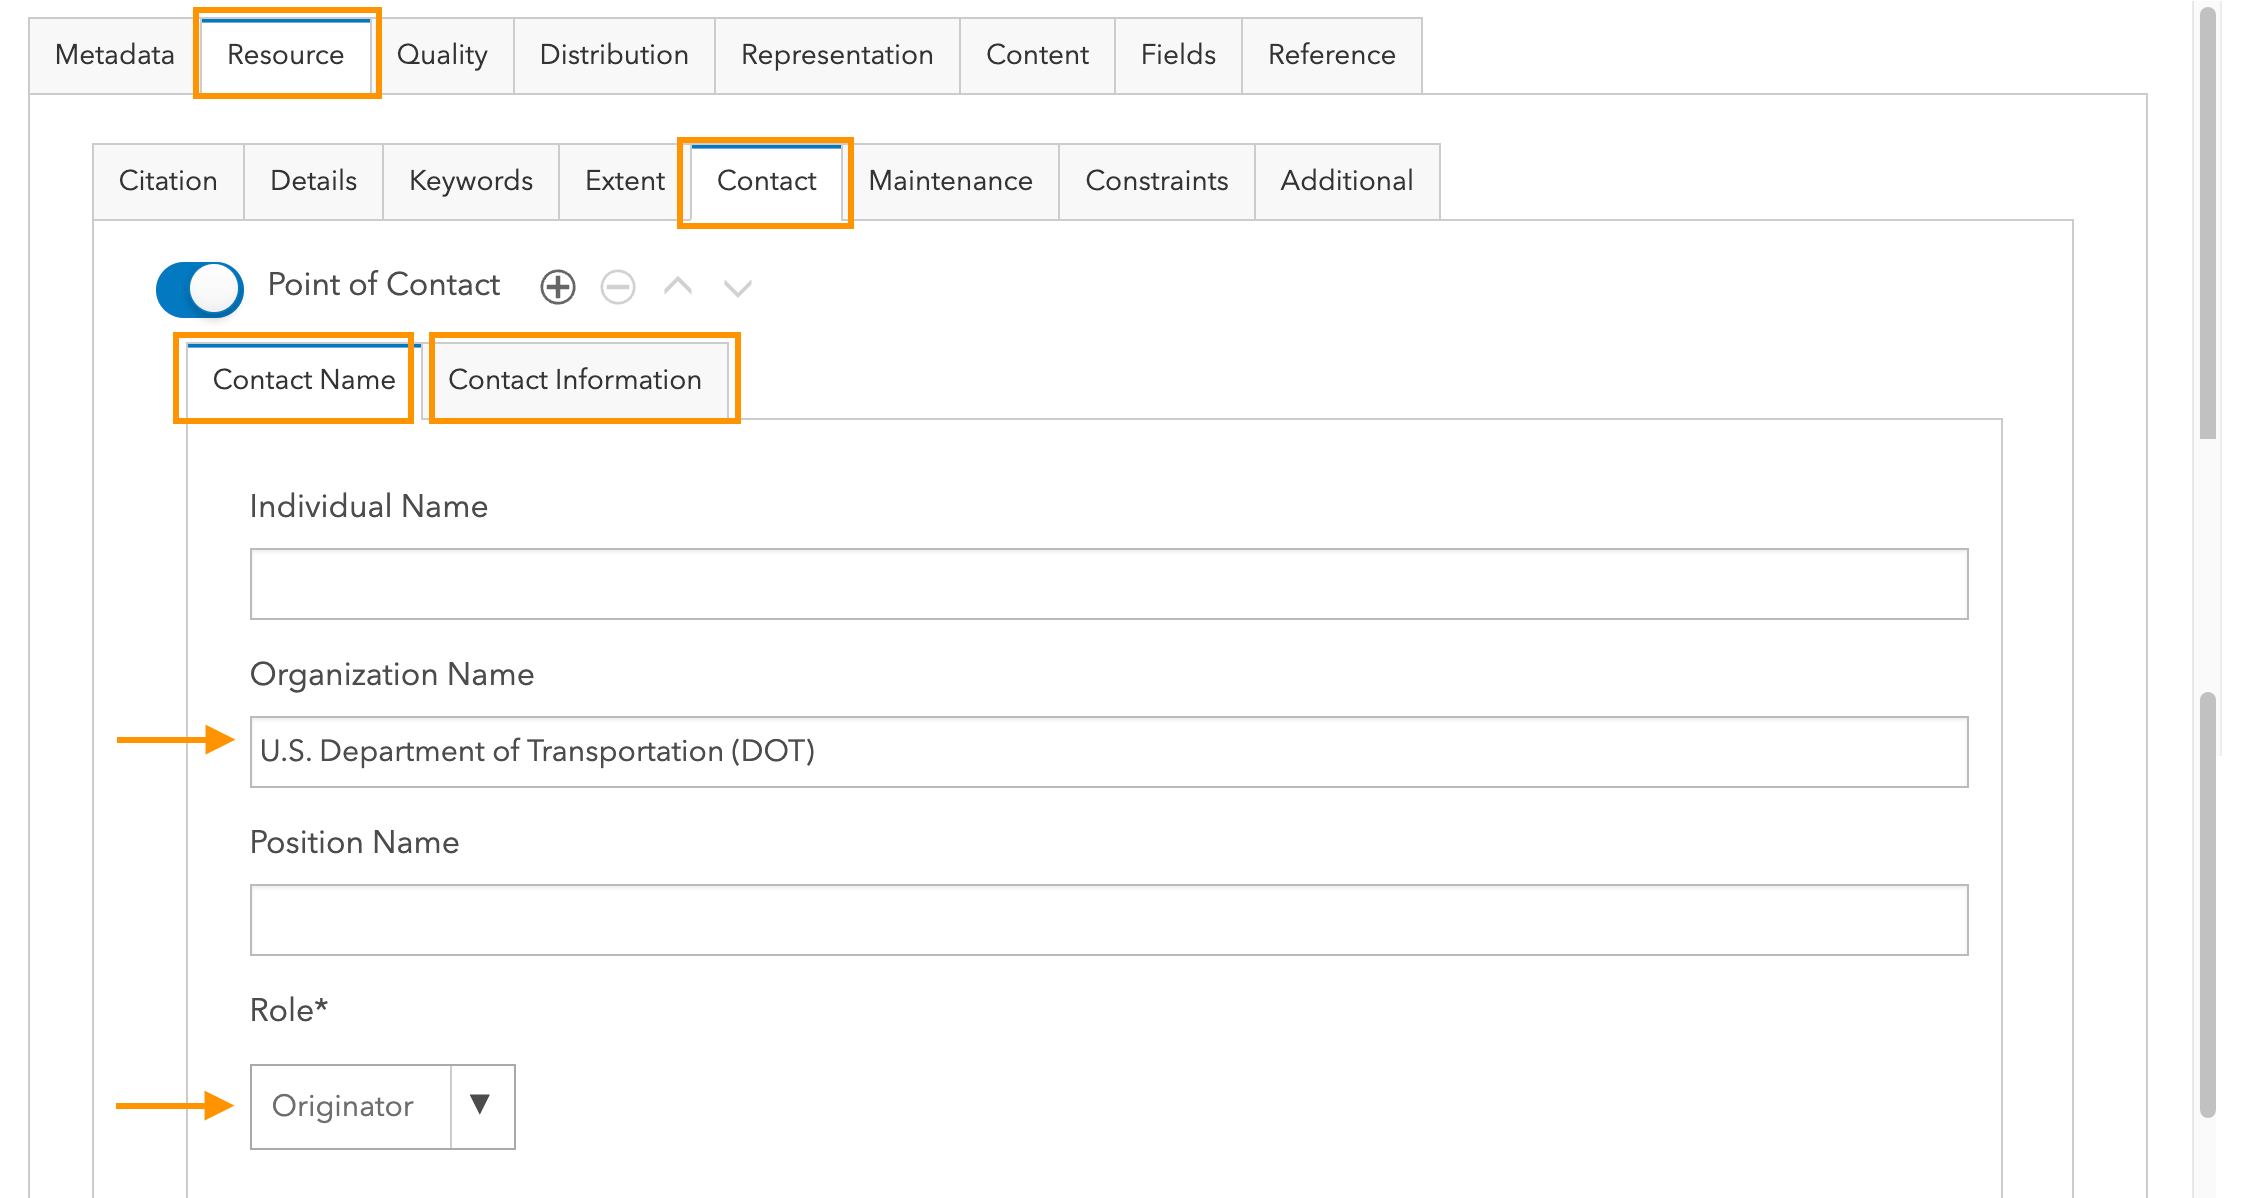
In the ‘Resource’ tab ‘Contact’ section, toggle ‘Point of Contact’ and enter the name of the organization responsible for the resource, following exactly the OMB agency names and Bureau Codes available from Preparation, Submission, and Execution of the Budget, Circular A-11, Appendix C.
As desired, add multiple contacts, such as agency and bureau names. Click the ‘+’ to add multiple Organization Name elements, for example:
- Organization Name: Department of the Interior
- Organization Name: United States Geological Survey
- Role: Include the ’Role’ of the contact. For example, per the FGDC code list description, “Originator” describes the individual or organization responsible for the data at the point when the data was first created, including for datasets that are an aggregation of two or more datasets.” [1]
- Contact Information: Click the ‘Contact Information’ section and enter the contact's email, phone number, and address.
Maintenance
Maintenance Update Frequency
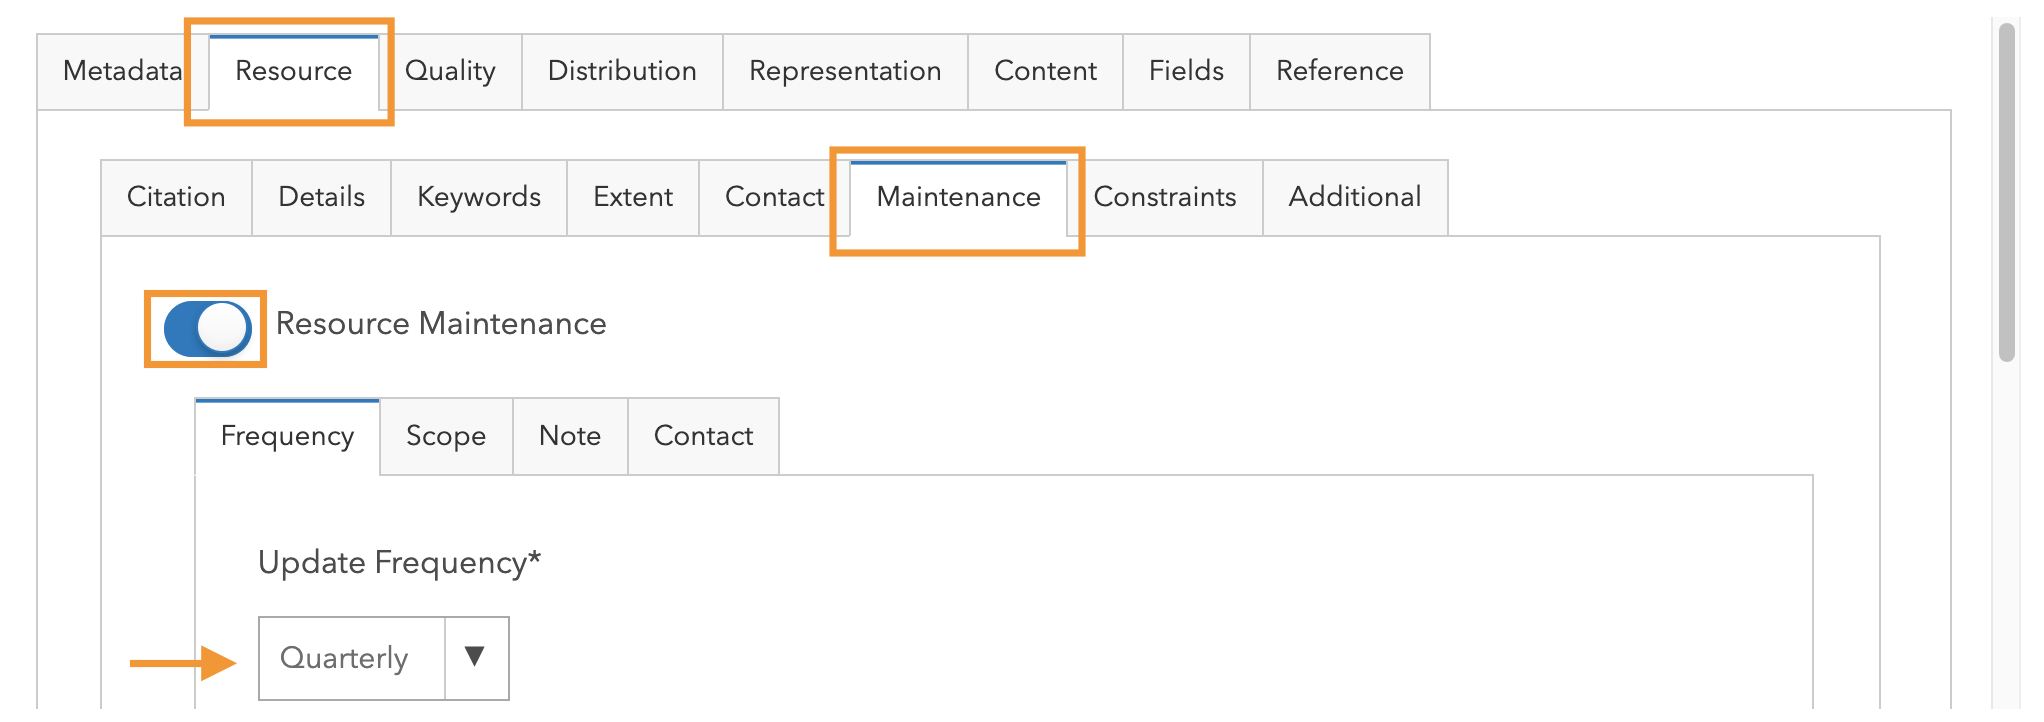
A maintenance update frequency is required for resources that are updated regularly, irregularly, or as needed. Click the ‘Resource’ tab ‘Maintenace’ section. Toggle ‘Resource Maintenance’ and choose Update Frequency from the drop-down.
Additional
Browse Graphic URL
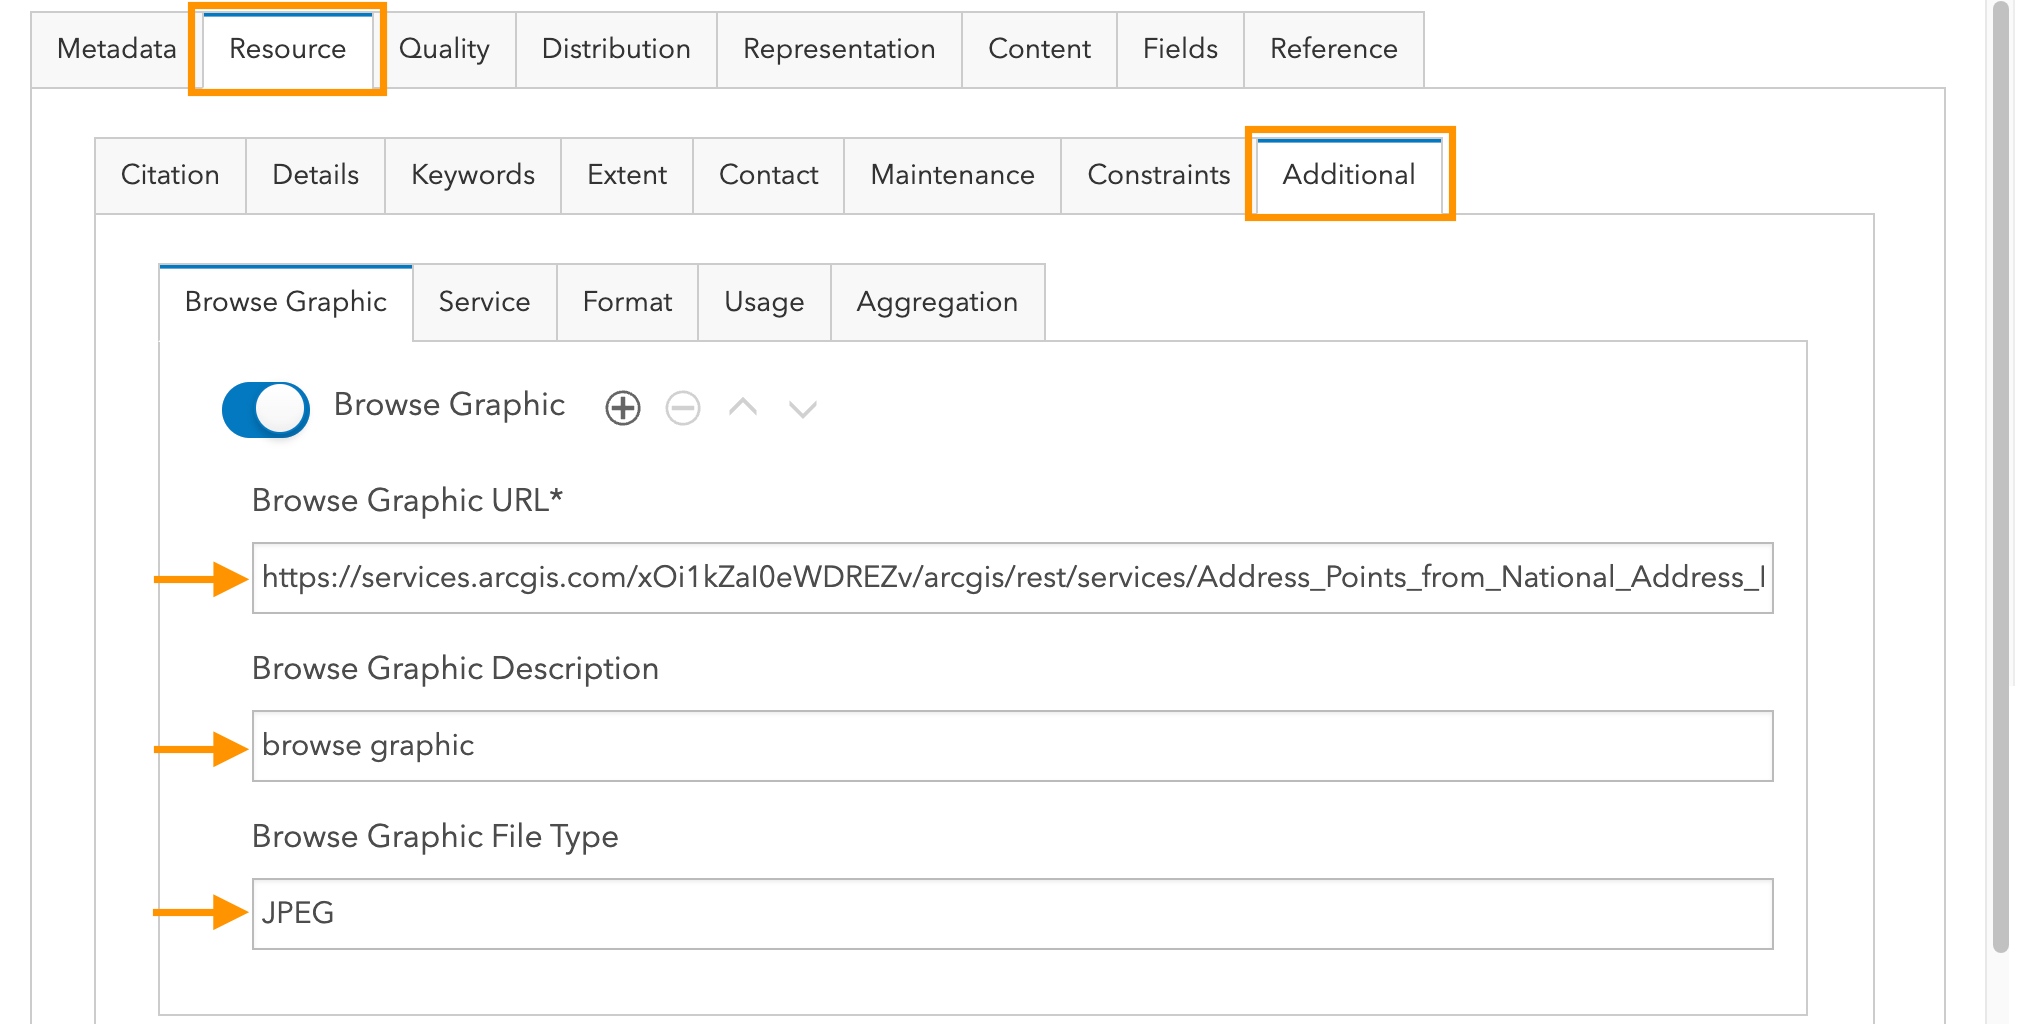
Include links to the Browse Graphic URL. Click the ‘Resource’ tab ‘Additional’ section; toggle ‘Browse Graphic’ and include the following:
- Browse Graphic URL - enter the URL to an online resource for the graphic (see TIP below)
- Browse Graphic Description - enter “browse graphic” without quotes
- Browse Graphic File Type - enter the file type, for example, “JPEG” for graphics from Item thumbnails in the tip below.
TIP: To use the URL from the Item thumbnail, first copy the service URL from the bottom of the Item details page, then append the following endpoint to the URL “/info/thumbnail”
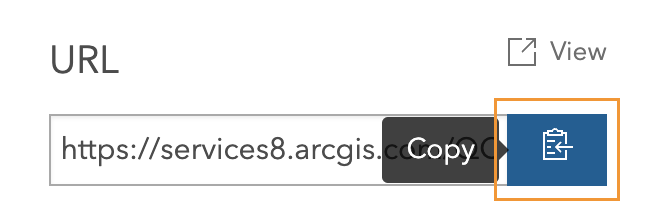
For example, the thumbnail URL will follow this pattern: https://services.arcgis.com/ITEMID/arcgis/rest/services/ItemTitle/FeatureServer/info/thumbnail
Distribution Information
Web Service URL and documentation
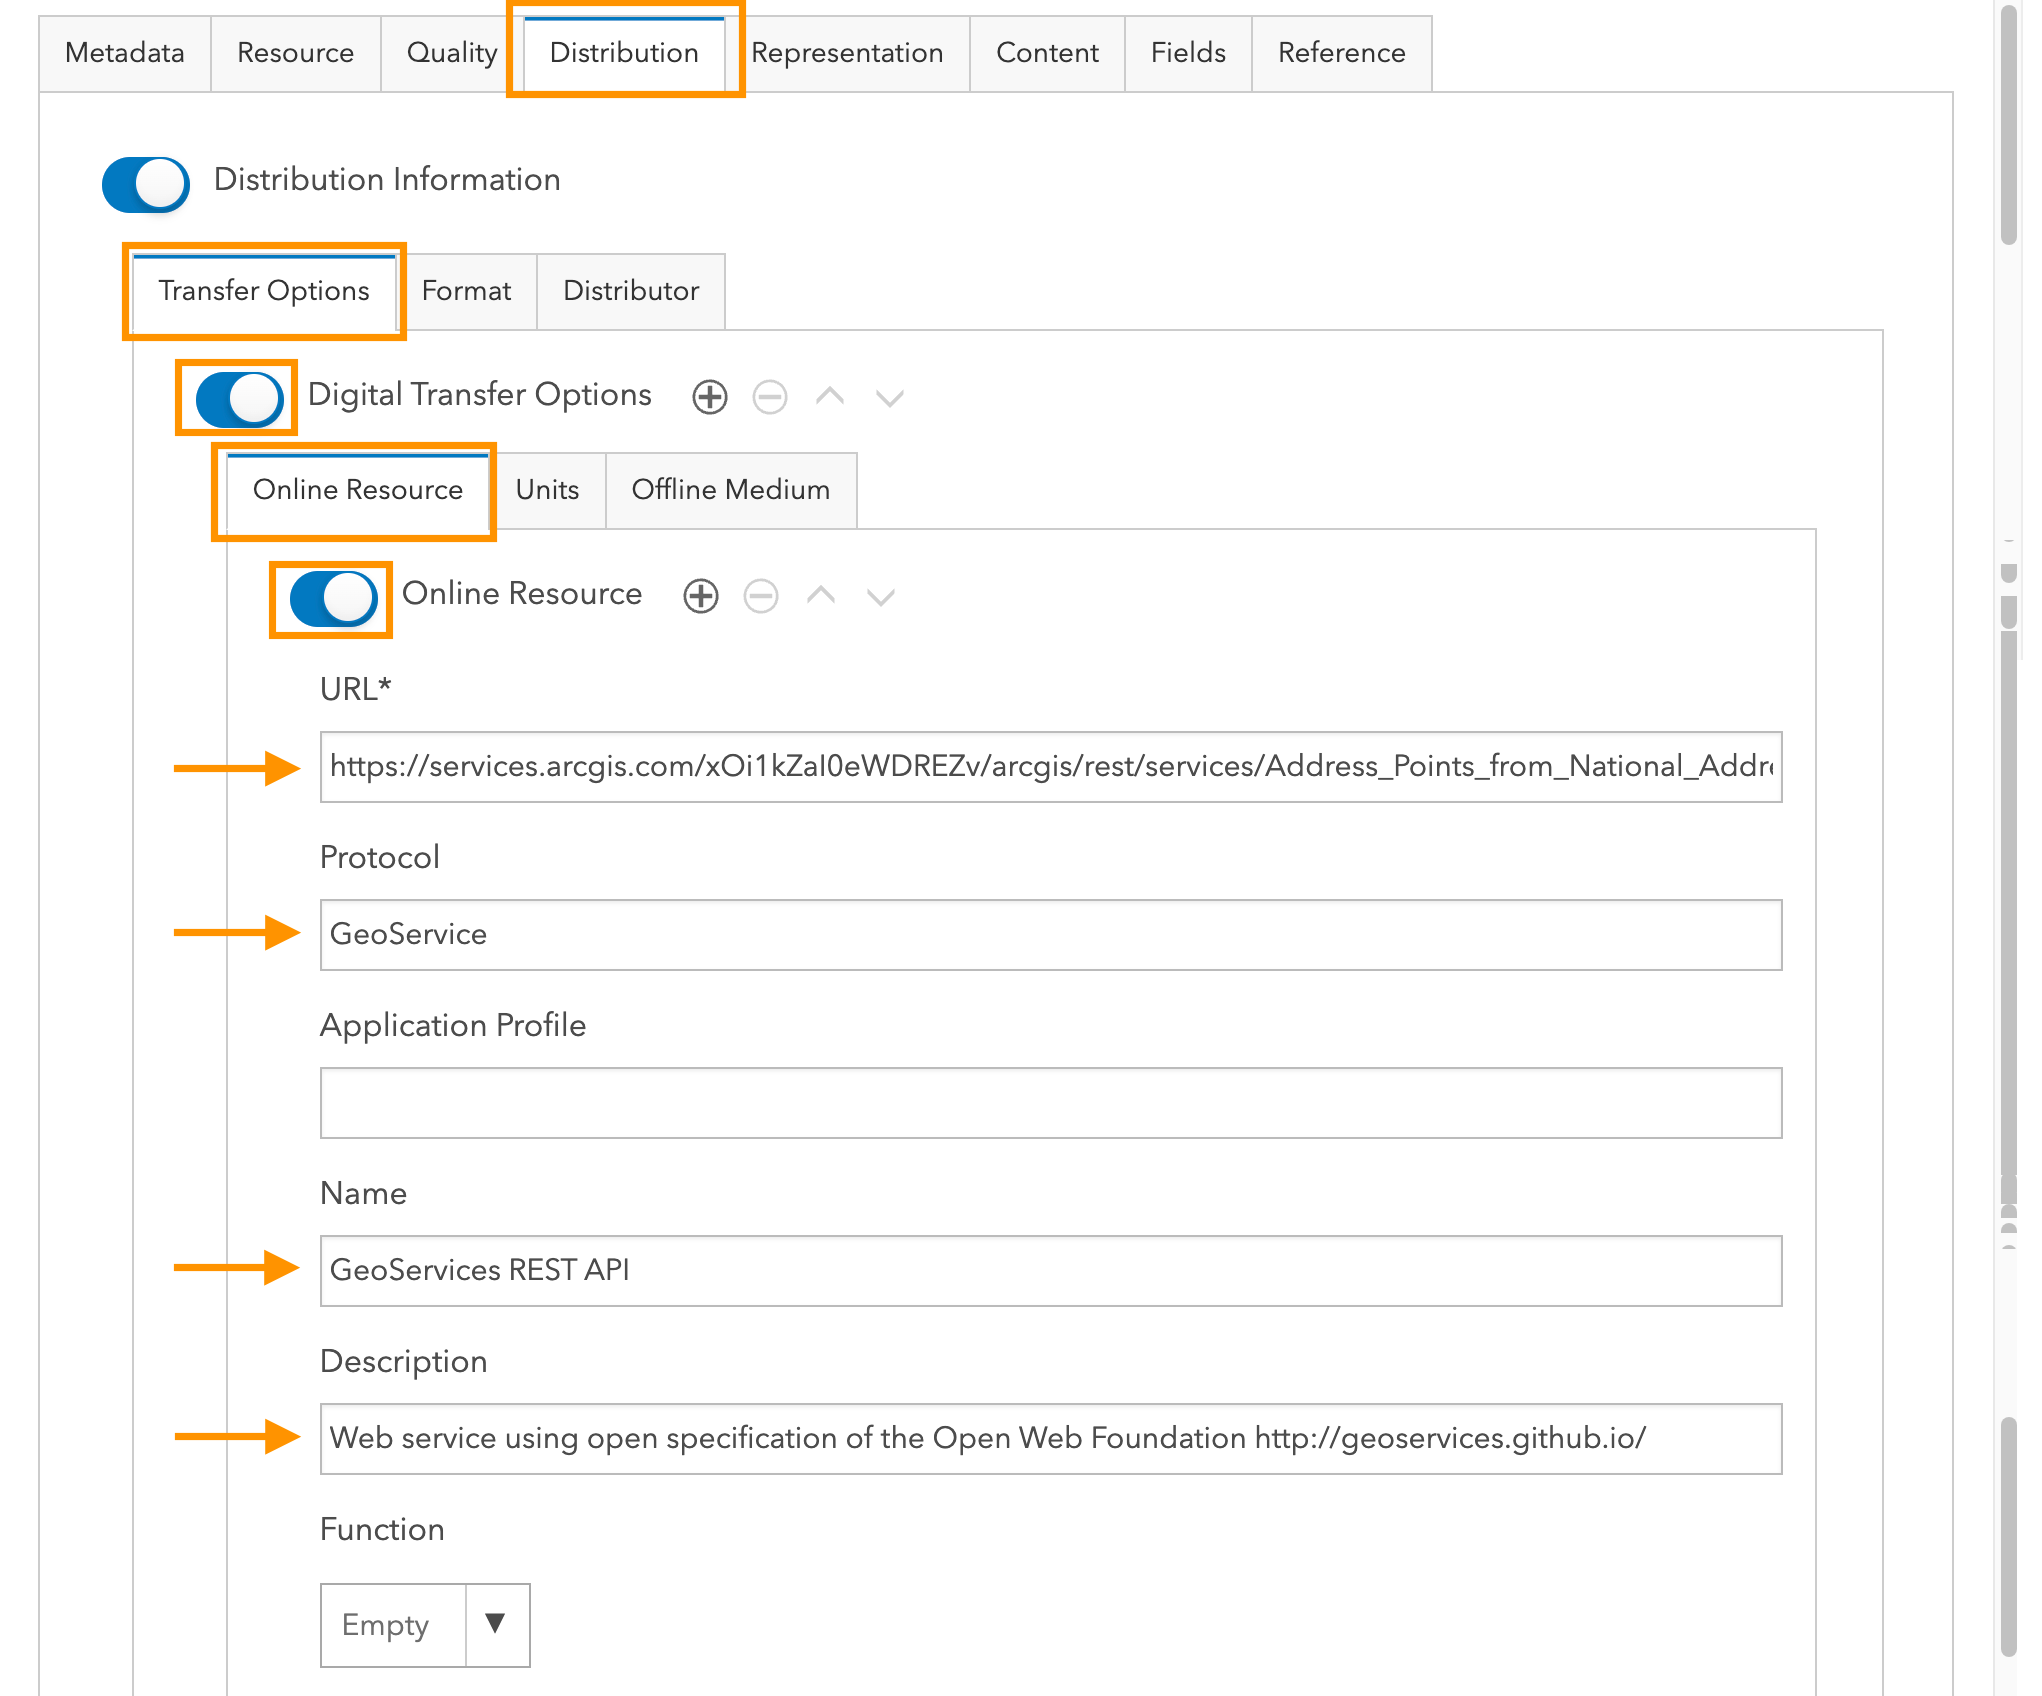
Open the ‘Distribution’ tab and toggle ‘Distribution Information’ then ‘Transfer Options > Digital Transfer Options.’ Document the ‘Online Resource’ with a web service URL protocol, service format name, and description as shown in the example below:
- URL (the service URL): note the web service URL is automatically populated
- Protocol: enter “GeoService” without quotes
- Name: enter “GeoServices REST API” without quotes
- Description: enter “Web service using the open specification of the Open Web Foundation http://geoservices.github.io/ “ without quotes
If you have published child services for your hosted Feature Layer, such as WFS, Tile Layer (WMTS), or OGC API Features, click the ‘+’ button to document them here.
TIP: Items that are shared using ArcGIS Hub use this distribution information to show 'Additional Resources' with the Hub catalog Item downloads.
Direct Data Download URL and documentation
Per the FGDC guidance, a direct Data Download URL is recommended. In the ‘Distribution’ tab ‘Transfer Options,’ click the ‘+’ button to add another Online Resource.
If you enabled downloads for the Item as described in the introduction of this tutorial, you might want to include the ArcGIS Item information as follows:
- URL (the Item URL): copy and paste the ArcGIS Item URL here
- Protocol: enter “webpage” without quotes
- Name: enter “ArcGIS Item page” without quotes
- Description: enter “The ArcGIS Item supports download of multiple files formats” without quotes
Alternatively, if you share the dataset layer through your agency ArcGIS Hub site, enter the Hub Item Download URL as follows:
- URL (the Hub Item page URL): <insert the Hub URL>
- Protocol: enter “webpage” without quotes
- Name: enter “ArcGIS Hub item” without quotes
- Description: enter “ArcGIS Hub item supports download of multiple files formats” without quotes
- Function: choose ‘Download’
Metadata Information
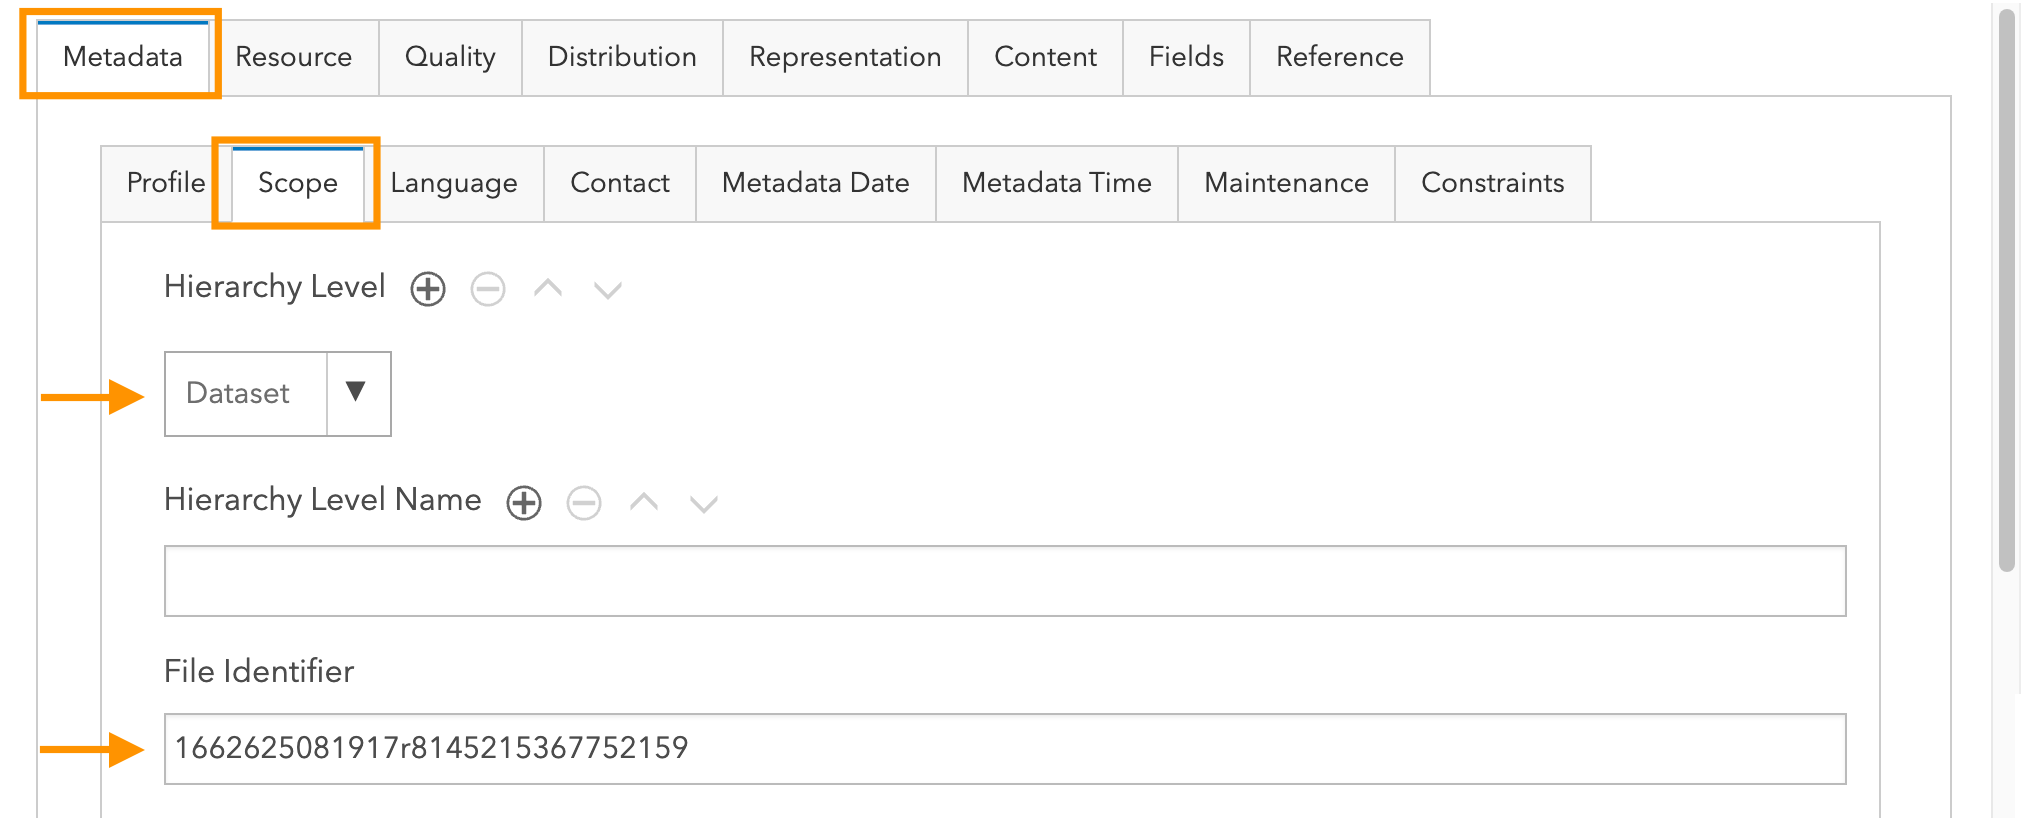
Metadata Information is information about the metadata, such as who completed the metadata record and when. Click the ‘Metadata’ tab ‘Scope’ section and complete the following:
Scope
Hierarchy Level
The hierarchy level describes the scope of the Item. Choose ‘Dataset’ from the dropdown or another resource type as appropriate.
Resource Unique Identifier
A Metadata Identifier uniquely identifies the metadata record associated with the resource. ArcGIS automatically provides the Metadata Identifier to uniquely identify the metadata record associated with the resource.
Metadata Point of Contact
Contact
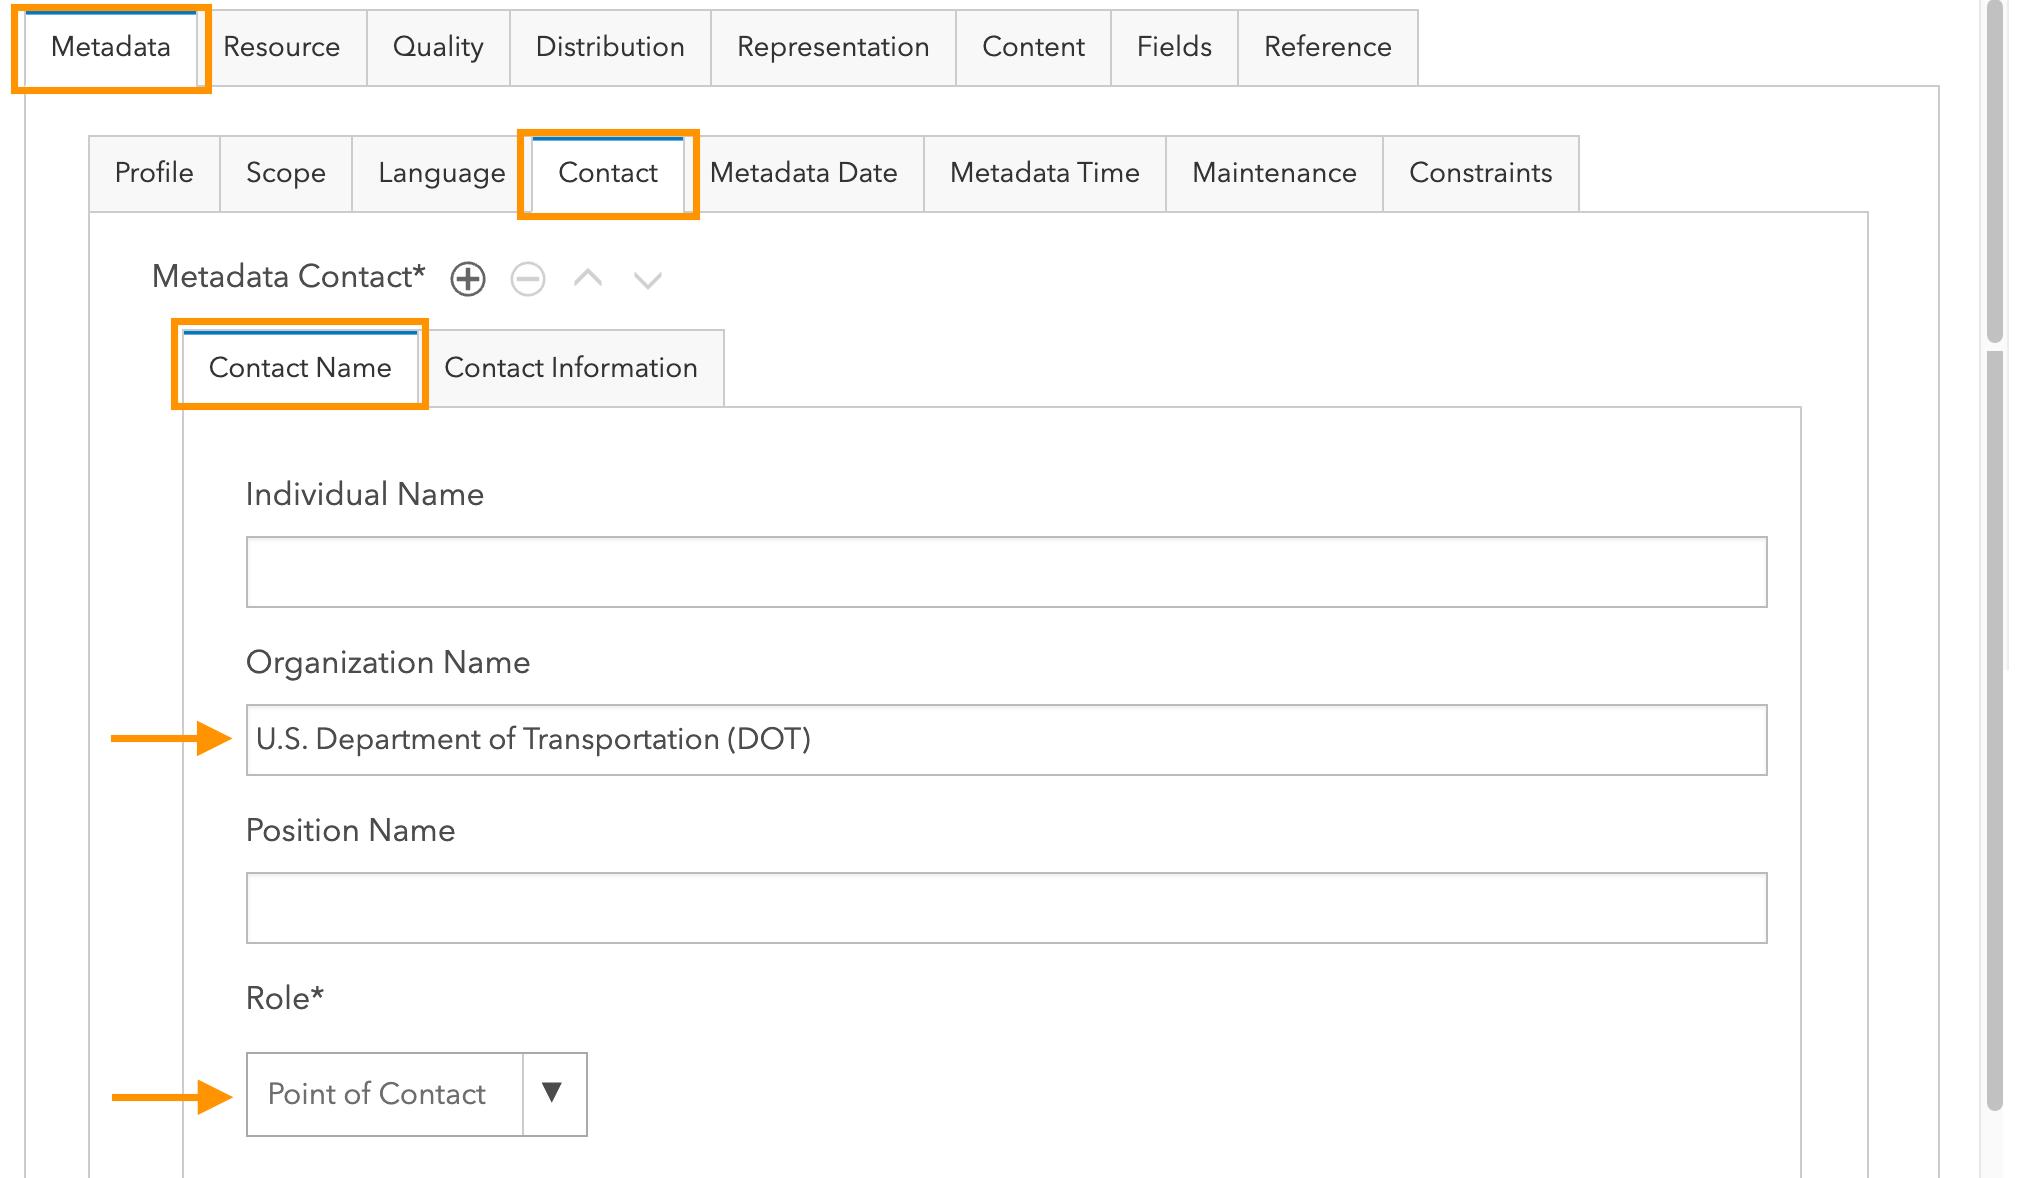
While there are many opportunities within the ISO metadata record to identify contacts, this section is used to designate the central point of contact to facilitate discovery by ‘organization’ within Data.gov and the GeoPlatform.
The Point of Contact should be the agency directly responsible for the metadata publication. Open the ‘Metadata’ ‘Contact > Contact Name’ section.
Organization Name: enter the name of the organization responsible for the resource, following exactly the OMB agency names and Bureau Codes available from Preparation, Submission, and Execution of the Budget, Circular A-11, Appendix C.
Role: Choose ‘Point of Contact’ from the dropdown.
Contact Information
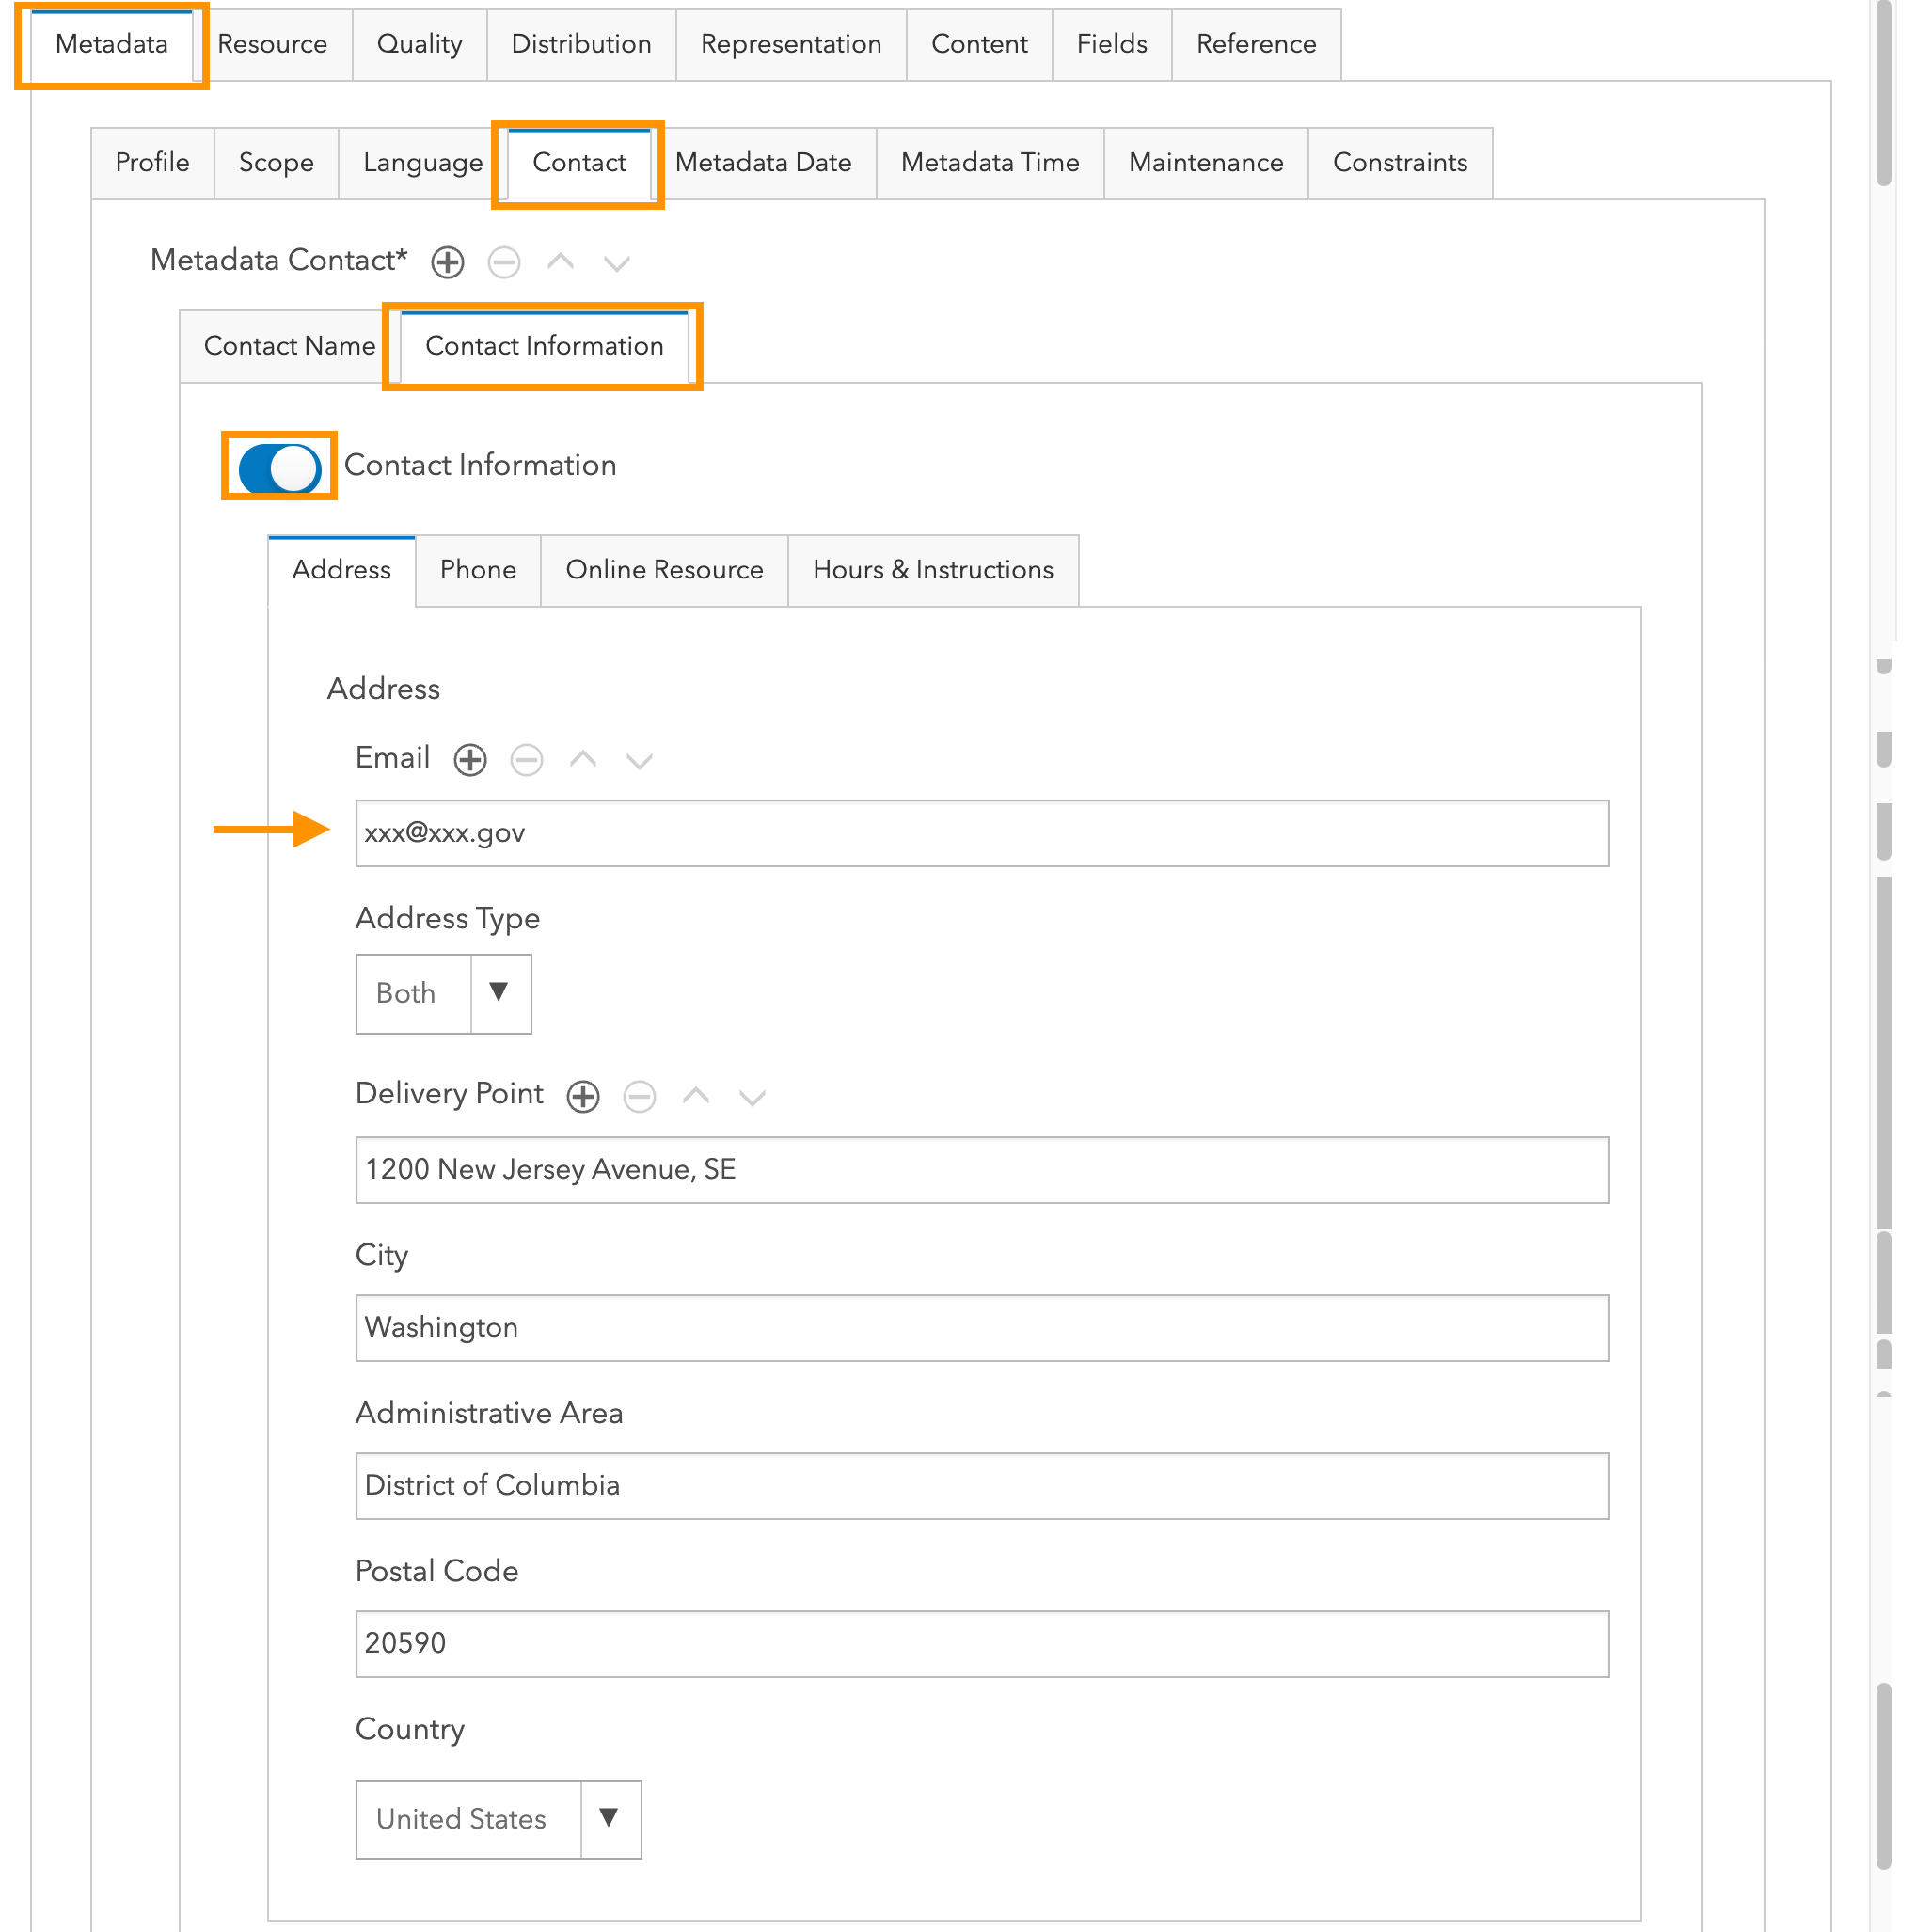
Switch to the ‘Contact Information’ section and toggle ‘Contact Information.’
Add an email address and other contact info as appropriate.
Metadata Publication
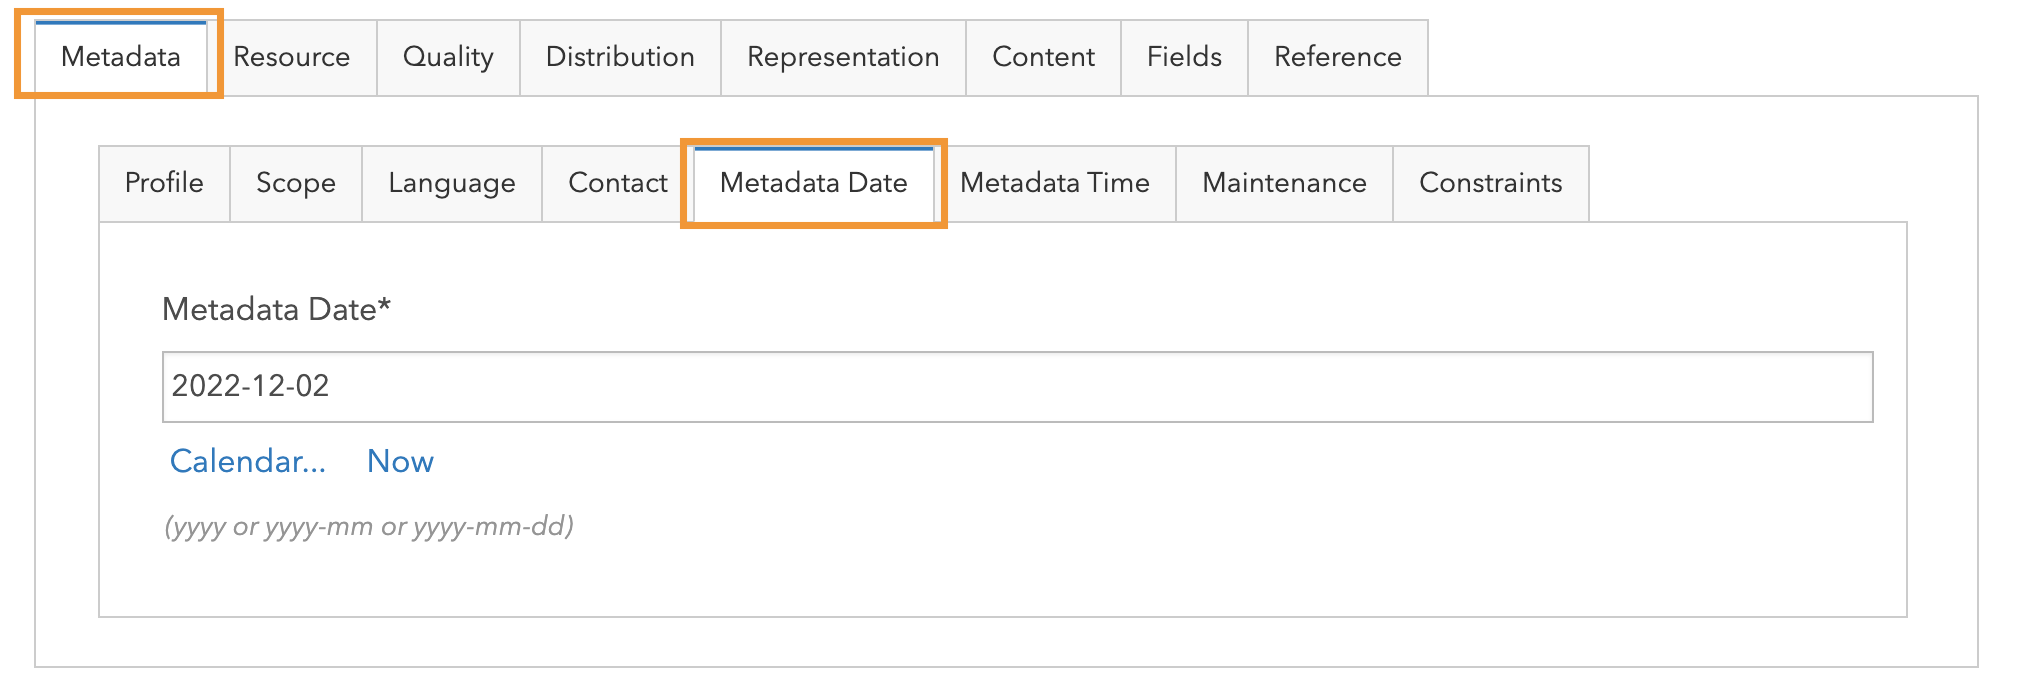
Metadata Date
Click the ‘Metadata’ tab ‘Metadata Date’ section. Enter a calendar date in the specified format, e.g., YYYY-MM-DD, or click ’Now’ to populate this element with the current date.
Validate
Finally, click the ‘Validate’ link in the Metadata Editor Classic main menu to verify that all elements required by the ISO standard are complete.
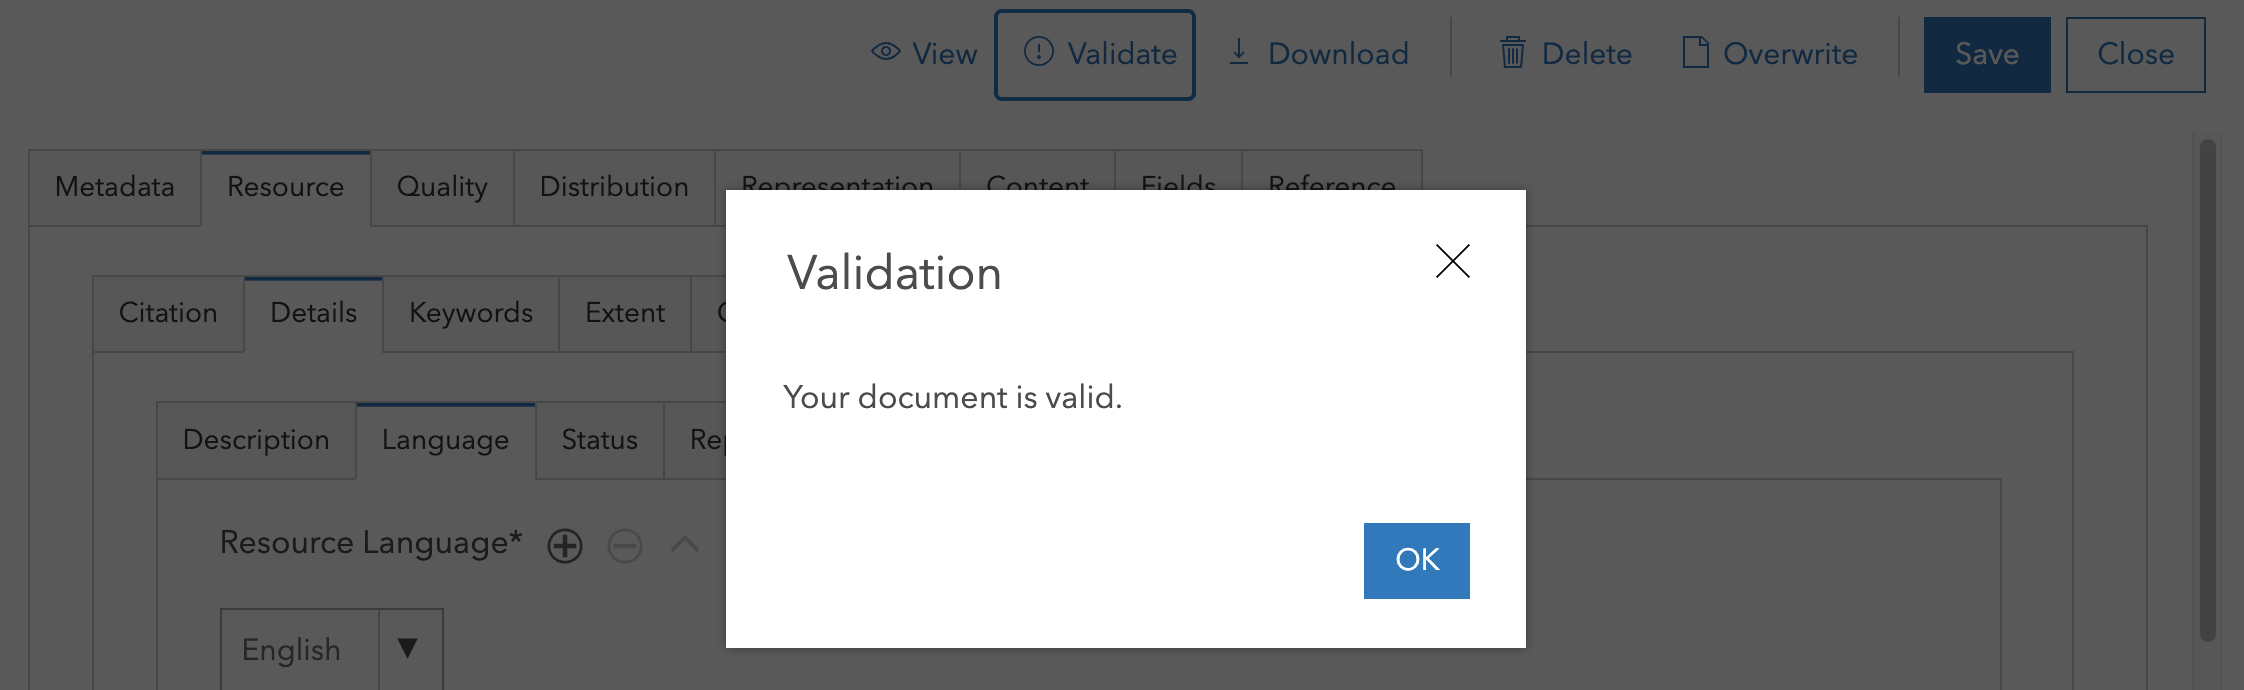
As needed, click the first validation message. Your cursor automatically moves to the incomplete element. Continue clicking through each Validate message and provide the required information in the field specified until your document is valid.
Success!
Click ‘OK’ then ‘Save’ before closing the Metadata Editor Classic.
[1] FGDC. 2022-12-13. FGDC Technical Guidance: Data.gov and The GeoPlatform Metadata Recommendations. https://www.fgdc.gov/technical-guidance/metadata/fgdc-technical-guidance-datagov-geoplatform-ngda.pdf
[2] https://doc.arcgis.com/en/arcgis-online/manage-data/metadata.htm
[3] Esri. 2022. Good Practices for Authoritative Data Providers. Story map.
[4] Theme keyword thesaurus date is required by ISO standards; we suggest using the date of the FGDC Guidance publication as cited above.