- Home
- :
- All Communities
- :
- User Groups
- :
- Web AppBuilder Custom Widgets
- :
- Questions
- :
- in creating screenshot custom widget - how to inse...
- Subscribe to RSS Feed
- Mark Topic as New
- Mark Topic as Read
- Float this Topic for Current User
- Bookmark
- Subscribe
- Mute
- Printer Friendly Page
in creating screenshot custom widget - how to insert the html?
- Mark as New
- Bookmark
- Subscribe
- Mute
- Subscribe to RSS Feed
- Permalink
- Report Inappropriate Content
In ArcGIS Web AppBuilder (Developer Edition) 2.16, I have to create in-panel custom widget to make a screenshot, based upon Take a screenshot of a SceneView | ArcGIS API for JavaScript 4.15
As I'm relatively new to this area, I'd appreciate getting advice in which way to do it? whether by javascript "innerHTML =" sentences, or to create a class like LoadingShelter? And I'd like to get some hints as to how to start doing it.
In short: I don't know the way how can I insert html and css by in-panel widget, into the main scene, which, according to what I understand, is what I need to implement in this case.
Solved! Go to Solution.
Accepted Solutions
- Mark as New
- Bookmark
- Subscribe
- Mute
- Subscribe to RSS Feed
- Permalink
- Report Inappropriate Content
Michael,
See if you can learn the principles from this. I took the sample you referenced and created a widget from it. See attached widget.
- Mark as New
- Bookmark
- Subscribe
- Mute
- Subscribe to RSS Feed
- Permalink
- Report Inappropriate Content
Correct, Using Dojo on class means that an event listener is added each time that line is called vs. onclick is a function that is just being overwritten each time.
Don't forget to make your questions as answered once they are. This helps others using the forum find the correct answer.
- Mark as New
- Bookmark
- Subscribe
- Mute
- Subscribe to RSS Feed
- Permalink
- Report Inappropriate Content
- Mark as New
- Bookmark
- Subscribe
- Mute
- Subscribe to RSS Feed
- Permalink
- Report Inappropriate Content
Dear Robert,
Thank you so much!
Now it's late here. I'll inform you after trying tomorrow. Today I tried something myself, but have not succeeded yet, so I hope to learn the right way to do it from what you sent.
- Mark as New
- Bookmark
- Subscribe
- Mute
- Subscribe to RSS Feed
- Permalink
- Report Inappropriate Content
Thank you, Robert, it works for me!
I have a few questions. most important -
If I activate your widget, I get multiple explorer download dialogs... (from the 2nd case, I get two one after another). This does not happen in esri app. I "bypassed" this problem, but I am eager to understand why the app does not have this problem, only the widget - so waht is the cause of it, and how to solve it?
The other questions (less important, but needed for me in order to understand the process of converting app to widget) -
1. why do we need and what does the line "this.inherited(arguments);" ?
2. In the file style.css, why the prefix "jimu-widget-screenshot" not needed for all items?
3. screenshotBtn have class "esri-widget" both in esri app and in your widget. why? what does it do?
4. in the app, the div "viewDiv" that contains the scene and the button, also has class "esri-widget". again, why and what it does?
Thank you
- Mark as New
- Bookmark
- Subscribe
- Mute
- Subscribe to RSS Feed
- Permalink
- Report Inappropriate Content
Michael,
If I activate your widget, I get multiple explorer download dialogs... (from the 2nd case, I get two one after another). This does not happen in esri app. I "bypassed" this problem, but I am eager to understand why the app does not have this problem, only the widget - so what is the cause of it, and how to solve it?
Hmm.. I don't see this on my end. Are you using an non-modern browser like IE?
1. why do we need and what does the line "this.inherited(arguments);" ?
A. This is a line of code that tells the function to perform the normal things that this function does if it is inherited from some other class.
2. In the file style.css, why the prefix "jimu-widget-screenshot" not needed for all items?
A. It is best to have higher class specificity by using "jimu-widget-screenshot". But sometimes coders just get lazy.
3. screenshotBtn have class "esri-widget" both in esri app and in your widget. why? what does it do?
A. esri-widget is a css rule that adds some style to the element.
4. in the app, the div "viewDiv" that contains the scene and the button, also has class "esri-widget". again, why and what it does?
A. Same as last question.
- Mark as New
- Bookmark
- Subscribe
- Mute
- Subscribe to RSS Feed
- Permalink
- Report Inappropriate Content
Dear Robert,
I assume you have not succeeded to reproduce the problem.
I always run on an updated chrome...
I assume you just created single screenshot, and indeed If you activate the widget once, it is OK.
But...
When you create 2nd screenshot, it saves AGAIN the 1st, then the 2nd.
When you activate 3rd time, it saves AGAIN the 1st, then AGAIN the 2nd, then the 3rd...
and so on and on.
This is a serious problem. I have not succeeded yet to solve it
- Mark as New
- Bookmark
- Subscribe
- Mute
- Subscribe to RSS Feed
- Permalink
- Report Inappropriate Content
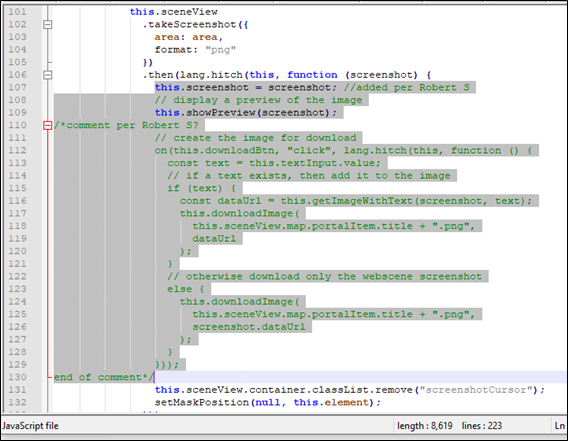
Michael,
OK, that explains the issue better. So here is the code fix.
The issue was an on click event was being added each time a screen shot was being made (thus multiple event being fired).
- Add line 10 to startup
- Add new downloadClick function lines 13-30
- Line 86 is where the on click for the download button use to be. It has been removed and replaced with the single line on 86.
startup: function () {
this.inherited(arguments);
this.element = document.createElement("div");
this.element.setAttribute('class', 'hide screenshotCursor maskDiv');
this.sceneView.container.appendChild(this.element);
on(this.closeBtn, "click", lang.hitch(this, function () {
this.screenshotDiv.classList.add("hide");
}));
on(this.screenshotBtn, "click", lang.hitch(this, this.captureScene));
on(this.downloadBtn, "click", lang.hitch(this, this.downloadClick));
},
downloadClick: function(){
const text = this.textInput.value;
// if a text exists, then add it to the image
if (text) {
const dataUrl = this.getImageWithText(this.screenshot, text);
this.downloadImage(
this.sceneView.map.portalItem.title + ".png",
dataUrl
);
}
// otherwise download only the webscene screenshot
else {
this.downloadImage(
this.sceneView.map.portalItem.title + ".png",
this.screenshot.dataUrl
);
}
},
captureScene: function(){
this.screenshotBtn.classList.add("active");
this.sceneView.container.classList.add("screenshotCursor");
let area = null;
// listen for drag events and compute the selected area
const dragHandler = this.sceneView.on("drag", lang.hitch(this, function (event) {
// prevent navigation in the view
event.stopPropagation();
// when the user starts dragging or is dragging
if (event.action !== "end") {
// calculate the extent of the area selected by dragging the cursor
const xmin = clamp(
Math.min(event.origin.x, event.x),
0,
this.sceneView.width
);
const xmax = clamp(
Math.max(event.origin.x, event.x),
0,
this.sceneView.width
);
const ymin = clamp(
Math.min(event.origin.y, event.y),
0,
this.sceneView.height
);
const ymax = clamp(
Math.max(event.origin.y, event.y),
0,
this.sceneView.height
);
area = {
x: xmin,
y: ymin,
width: xmax - xmin,
height: ymax - ymin
};
// set the position of the div element that marks the selected area
setMaskPosition(area, this.element);
}
// when the user stops dragging
else {
// remove the drag event listener from the SceneView
dragHandler.remove();
// the screenshot of the selected area is taken
this.sceneView
.takeScreenshot({
area: area,
format: "png"
})
.then(lang.hitch(this, function (screenshot) {
this.screenshot = screenshot;
// display a preview of the image
this.showPreview(screenshot);
this.sceneView.container.classList.remove("screenshotCursor");
setMaskPosition(null, this.element);
}));
}
}));- Mark as New
- Bookmark
- Subscribe
- Mute
- Subscribe to RSS Feed
- Permalink
- Report Inappropriate Content
Hi Robert Scheitlin, GISP. I'm trying to test your widget but I'm apparently doing something wrong. This is what I see when I open the widget. Should I be seeing a button of some sort? FYI, I'm in 2.13 in case it matters.

Per your instructions for Michael, I've made the following changes to widget.js (note the line #s are not the same as what you posted above):
Added line 31 &34-51

Added line 107, commented lines 111-129 (in your example it looked like the end result is my line 109, then 131).
Did I miss something or make a mistake along the way?
- Mark as New
- Bookmark
- Subscribe
- Mute
- Subscribe to RSS Feed
- Permalink
- Report Inappropriate Content
Adam,
The widget was developed for 2.16.
- Mark as New
- Bookmark
- Subscribe
- Mute
- Subscribe to RSS Feed
- Permalink
- Report Inappropriate Content
Hmmm, you're going to make me upgrade. I usually avoid that as much as possible. ;>)
Do you have an app or demo site with that widget? I'd love to test or see it before I jump into it.