- Home
- :
- All Communities
- :
- Products
- :
- ArcGIS Online
- :
- ArcGIS Online Questions
- :
- Download Photos from AGOL
- Subscribe to RSS Feed
- Mark Topic as New
- Mark Topic as Read
- Float this Topic for Current User
- Bookmark
- Subscribe
- Mute
- Printer Friendly Page
- Mark as New
- Bookmark
- Subscribe
- Mute
- Subscribe to RSS Feed
- Permalink
- Report Inappropriate Content
I have taken photos using Collector. Each photo is associated with a point. This is in an AGOL WebMap.
I am able to download the File Geodatabase by following these instructions:
- Go to the Item Details page of the layer in the Web Map which you were editing through Collector and adding attachments to.
- You should see an Export Data button.
- Click it and select the option Export to FGDB.
- Enter a Title, Tags, Summary and select the folder in your My Content directory you want the File Geodatabase saved to, then click Export.
- Once the Export is complete, you will be redirected to the Item Details page of that new File Geodatabase.
- Click the Download Button
But, this only downloads the File Geodatabase, it does not download the actual photos which were taken using Collector for ArcGIS.
Any ideas on how to get the actual photos to download?
Solved! Go to Solution.
Accepted Solutions
- Mark as New
- Bookmark
- Subscribe
- Mute
- Subscribe to RSS Feed
- Permalink
- Report Inappropriate Content
Hi Tim,
I don't have trouble getting the image attachments using the workflow you describe. You may want to create a Tech Support case to look into whether there are problems specific to your service. Alternatively, there are a few other ways that you can download your services to file geodatabase (including attachments).
- Create a replica.
1) Go to the REST endpoint of your service (URL should look something like this: http://services.arcgis.com/Wl7Y1w02PfjtJs5n/arcgis/rest/services/AlanZion_Springs/FeatureServer/. Make sure that there isn't a layer number at the end of the URL).
2) Scroll to the bottom of the page and click 'Create Replica'.
3) Fill out the page as below. You'll want to specify which service layers you want to include in your output geodatabase (yours might not be layer 0). If your service is small you don't need to create the replica asynchronously, but if you have a lot of attachments it's probably large and you may as well go asynchronous.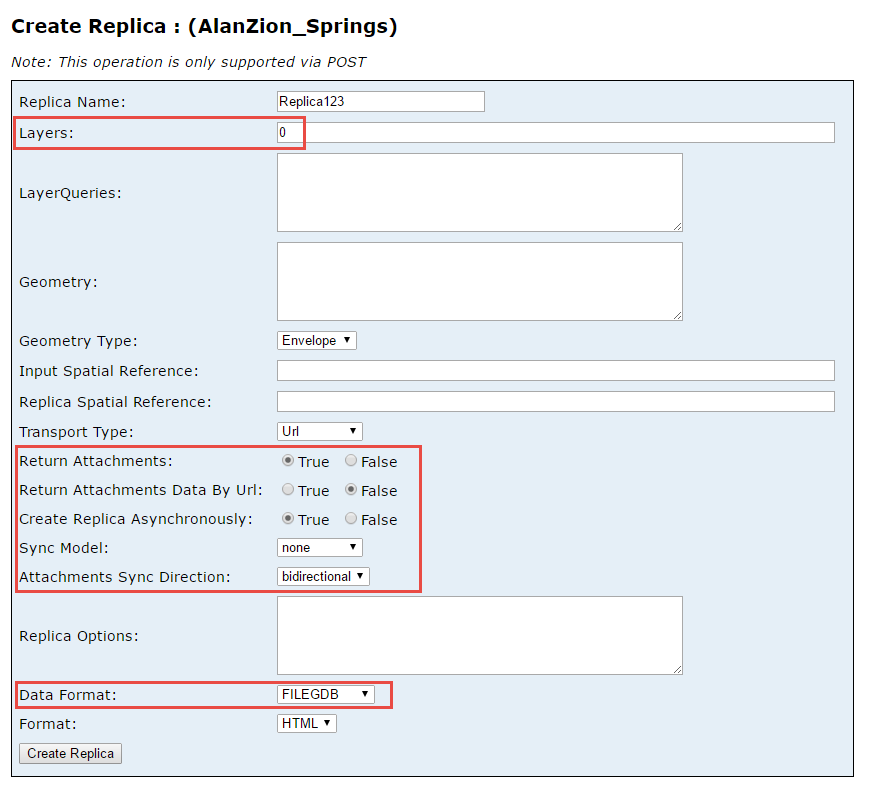
4) Click Create Replica. On the next page click "Check" until the download is complete and a result URL is provided.
Detailed description of each createReplica parameter is outlined here: ArcGIS REST API - Use ArcGIS Pro
1) Open Pro and add your service to a new map
2) In the GeoProcessing pane open the Feature Class to Feature Class tool and drag the service layer from your map into the tool as the input, then fill out the remaining parameters as needed.
The output from the tool should include your attachments. - Use the Extract Data analysis tool in the Map Viewer. Just open the service in a map and Extract Data (from the Manage Data section) and fill in the layer you want to extract. Note: running this analysis tool consumes credits. You can use the "show credits" in the tool to see how many credits will be consumed.
- Mark as New
- Bookmark
- Subscribe
- Mute
- Subscribe to RSS Feed
- Permalink
- Report Inappropriate Content
Tim,
It is likely that your photos are in the geodatabase as "attachments". You can likely get each one, but if you wanted to extract them all as a batch process, take a look at this suggestion:
- Mark as New
- Bookmark
- Subscribe
- Mute
- Subscribe to RSS Feed
- Permalink
- Report Inappropriate Content
Do I need to create a new Toolbox to do this?
- Mark as New
- Bookmark
- Subscribe
- Mute
- Subscribe to RSS Feed
- Permalink
- Report Inappropriate Content
I haven't used this script but it looks like you need to save that python code as its own script (with the .py extension), then add that script to your toolboxes in Desktop. So it's not a new toolbox, it's basically loading the script that you wrote.
- Mark as New
- Bookmark
- Subscribe
- Mute
- Subscribe to RSS Feed
- Permalink
- Report Inappropriate Content
About 7 years too late, but we have found we need to do this quite often. Since the support page is for ArcMap and assumes you know how to make script toolboxes, we needed to write a more step-by-step guide for people who are doing this for the first time and have never made script toolboxes. I just thought I would share since this page helped me learn how to do this years ago.
Apologies for the formatting, copied from a word doc, so it didn't come in quite perfectly. We would like to eventually edit the code so it has a drop-down of tables in the currently opened map and allows you to assign the name of the photo based on an identifier or combination of identifiers in the attribute table. I'm not a solid coding person myself, so I haven't had the time to dive into that.
How to Create the Photo Extraction Toolbox with Python
- Copy the code as provided here: How To: Batch Export Attachments from a Feature Class in ArcMap (esri.com)).
- Paste your copied text in a text file (use Notepad).
- Save the Notepad document as ExportAttachments.py (not .txt).
- In ArcGIS Pro in the Catalog pane, go to Toolboxes.
- Right click -> New Toolbox
- Navigate to your project’s Tool folder
- Name your new toolbox
- Create a new script tool by right-clicking on your new toolbox and click “Script”.
- In the “General” Tab, name your tool!
- The “Name” field cannot have spaces – this is how you reference the tool in Python Code.
- The “Label” field is how the tool with appear in your toolbox.
- In the “Parameters” tab, set your script up like the screenshot. These are the items that the user of the tool with interacts with.
- In the “Execution” tab, click on the folder at the top right to navigate for your python code.
- If your code does not appear, return to Windows File Explorer. You most likely have file extensions turned off. Go to the “View” tab and check the box next to “File name extensions”.
- Now on your script, rename it, and backspace the .txt at the end of the file. It should say “ExportAttachments.py”.
Return to ArcGIS Pro, try again to add your python code. If it is not there immediately, click refresh at the top of the window.- Click “OK”.
- Time to run the tool!


Use the New Toolbox
- In the Catalog pane, under toolboxes, click on your new toolbox.
- Click on your Export Attachments tool from your toolbox.
- It should look like this:
- It should look like this:
- For “Attachment Table”, click on the yellow folder.
- Navigate to where the downloaded FGDB was extracted.
- Within the FGDB is a table ending in ATTACH. Click on that.
- For “Output Folder”, this is the location where all the photos will be saved. Click on the yellow folder and navigate to that location.
- Remember that the photos will have whatever name was input when the photo was taken. If no name was provided, they will have arbitrary names. Such as “Att22_Photo 5”. They will not be grouped by asset type.
- Click Run.
- The photos should all be saved to the folder that was selected.

- Mark as New
- Bookmark
- Subscribe
- Mute
- Subscribe to RSS Feed
- Permalink
- Report Inappropriate Content
Hey. I tried using your script but I keep getting syntax errors on line 12. Any ideas? Would it be possible to get in contact to go over the issue?
- Mark as New
- Bookmark
- Subscribe
- Mute
- Subscribe to RSS Feed
- Permalink
- Report Inappropriate Content
- Mark as New
- Bookmark
- Subscribe
- Mute
- Subscribe to RSS Feed
- Permalink
- Report Inappropriate Content
Hi Tim,
I don't have trouble getting the image attachments using the workflow you describe. You may want to create a Tech Support case to look into whether there are problems specific to your service. Alternatively, there are a few other ways that you can download your services to file geodatabase (including attachments).
- Create a replica.
1) Go to the REST endpoint of your service (URL should look something like this: http://services.arcgis.com/Wl7Y1w02PfjtJs5n/arcgis/rest/services/AlanZion_Springs/FeatureServer/. Make sure that there isn't a layer number at the end of the URL).
2) Scroll to the bottom of the page and click 'Create Replica'.
3) Fill out the page as below. You'll want to specify which service layers you want to include in your output geodatabase (yours might not be layer 0). If your service is small you don't need to create the replica asynchronously, but if you have a lot of attachments it's probably large and you may as well go asynchronous.
4) Click Create Replica. On the next page click "Check" until the download is complete and a result URL is provided.
Detailed description of each createReplica parameter is outlined here: ArcGIS REST API - Use ArcGIS Pro
1) Open Pro and add your service to a new map
2) In the GeoProcessing pane open the Feature Class to Feature Class tool and drag the service layer from your map into the tool as the input, then fill out the remaining parameters as needed.
The output from the tool should include your attachments. - Use the Extract Data analysis tool in the Map Viewer. Just open the service in a map and Extract Data (from the Manage Data section) and fill in the layer you want to extract. Note: running this analysis tool consumes credits. You can use the "show credits" in the tool to see how many credits will be consumed.
- Mark as New
- Bookmark
- Subscribe
- Mute
- Subscribe to RSS Feed
- Permalink
- Report Inappropriate Content
I have encountered the same problem and I filed tech support issue. Our national Esri support where able to duplicate the bugg and filed an issue to Esri.Inc a month ago but they haven´t found a solution yet.
I have other Feature-Layer where it works as intended.