- Home
- :
- All Communities
- :
- Products
- :
- Imagery and Remote Sensing
- :
- Imagery Questions
- :
- Segmented Mean Shift: why difference among preview...
- Subscribe to RSS Feed
- Mark Topic as New
- Mark Topic as Read
- Float this Topic for Current User
- Bookmark
- Subscribe
- Mute
- Printer Friendly Page
Segmented Mean Shift: why difference among preview, segmented image end vectorized features?
- Mark as New
- Bookmark
- Subscribe
- Mute
- Subscribe to RSS Feed
- Permalink
- Report Inappropriate Content
We are trying to use segmentation tools in ArcGIS Pro 1.3.1 to classify satellite images.
We followed the two possible ways::
1) accessing from ""Classification tool/ segmentation" in the Raster layer /Data" tab
2) accessing ro "segmentation Mean shift command" in the Spatial Analyst Toolbox
to obtain a segmented image and a vector layed derived from.
Case1
In the first case the preview option shows the segment borders and this is vey usefull to set the proper parameters values (spectral, spatial detail, segment size, bands).
Once you run the tool a segmente image is created but segments are very different from the preview segment borders
Case 2
In the second case (Segment MS in Toolbox)it's not possible to have a preview. but running the tool with the same parameters values you obtain a segmented image similar to the case 1
After, if you run a raster2 vector command the polygons reflects the segmentation but are very different from the preview generated in case 1.
The question are:
1) why preview segment borders are so different from the segmented mean shift images?
2) how to control the segment image details to be like the segment borders shown in the preview?
Thank you
Enrico
Here an example : thin line are segmnent borders from preview (case1) , thicker border are from vectorization from segmented mean shift image (following case 2)

Solved! Go to Solution.
Accepted Solutions
- Mark as New
- Bookmark
- Subscribe
- Mute
- Subscribe to RSS Feed
- Permalink
- Report Inappropriate Content
Enrico,
Thank you for this informative posting.
Some short notes:
1. The two tools use the same code behind the scene.
2. Segment borders or color patches are different representations of same results.
3. The preview is closest to the result when you zoom to source resolution and make sure the display is large enough. So you want to fine tune you parameters in this setting.
Now the long story of why:
Preview is based on raster functions, which are on-the-fly processing, meaning it processes pixels currently on display (resampled to display resolution and within display extent). This is not an issue for local operations like NDVI. But it may cause a difference for regional operations like segmentation. On the other hand, actually running the tool to write out the result, will always process at source resolution.
So if you zoom out/in too far away from source resolution when preview, you may see different results.
Let me know if this helps, and feel free to post your updates.
Thanks.
- Mark as New
- Bookmark
- Subscribe
- Mute
- Subscribe to RSS Feed
- Permalink
- Report Inappropriate Content
Hua... that information would be good to add to the online documentation, please pass it on to them
- Mark as New
- Bookmark
- Subscribe
- Mute
- Subscribe to RSS Feed
- Permalink
- Report Inappropriate Content
Hua, thank you.
That's what i supposed : i agree to integreate helpdocumentatin wuth these important infos.
Just a question: what do you mean for "zoom to source resolution"? what do you think is the best zoom scale for a 10 meters resoulution image?
- Mark as New
- Bookmark
- Subscribe
- Mute
- Subscribe to RSS Feed
- Permalink
- Report Inappropriate Content
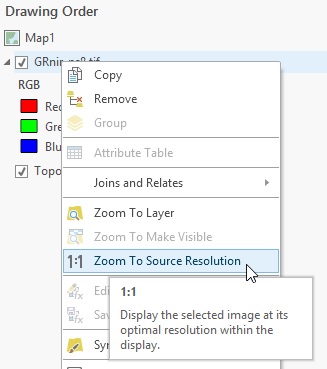
zoom to source resolution means, one pixel on your display corresponds to one pixel in your image.
you can do this by simply right click on the image layer in Pro/ArcMap Table Of Content, and choose "Zoom To Source Resolution"
we will add this to help.
- Mark as New
- Bookmark
- Subscribe
- Mute
- Subscribe to RSS Feed
- Permalink
- Report Inappropriate Content
Of course, it was so simple...
Thank you very much
E