- Home
- :
- All Communities
- :
- Products
- :
- Imagery and Remote Sensing
- :
- Imagery Questions
- :
- Export Data using a graphic to clip part of a rast...
- Subscribe to RSS Feed
- Mark Topic as New
- Mark Topic as Read
- Float this Topic for Current User
- Bookmark
- Subscribe
- Mute
- Printer Friendly Page
Export Data using a graphic to clip part of a raster
- Mark as New
- Bookmark
- Subscribe
- Mute
- Subscribe to RSS Feed
- Permalink
- Report Inappropriate Content
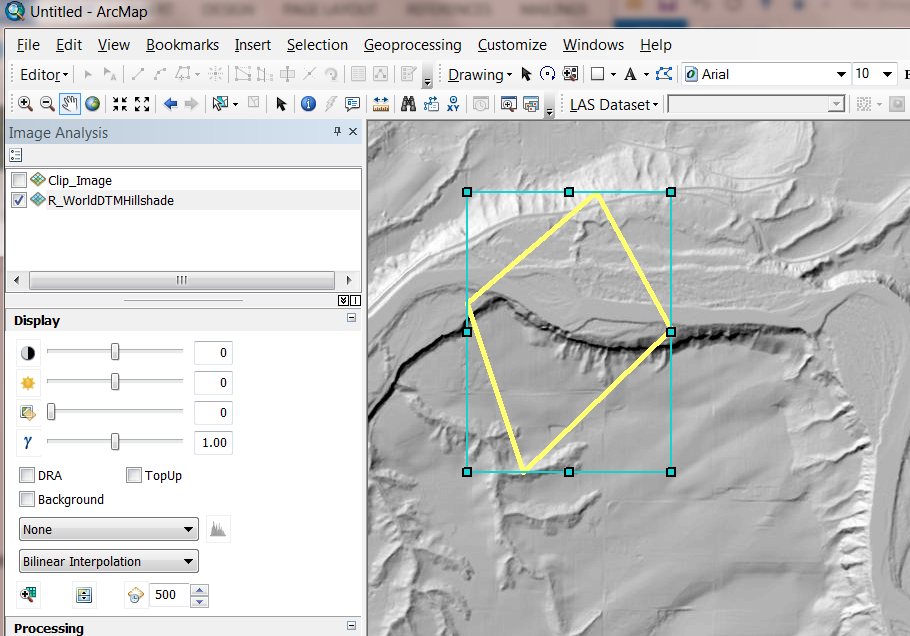
I am using polygon graphics to clip rasters when I "Export Data." I create the polygon graphic. You can see that when the graphic is selected, the light blue dashed line extends outside of the area I want to clip. Unfortunately, the area of the raster within the light blue line is also included in the clip, which is not helping. I only want the area within the polygon I created.
I am not sure what I am doing wrong and have looked in the forums, but not found anything right now.
Message was edited by: Brian Hovis
Solved! Go to Solution.
Accepted Solutions
- Mark as New
- Bookmark
- Subscribe
- Mute
- Subscribe to RSS Feed
- Permalink
- Report Inappropriate Content
Very strange that it is not clipping for you. Its as if it is somehow taking the envelope vs the graphic geometry.
Similar to Cody, I can not reproduce this.
I would still recommend that you look to use do the clipping on the fly using a mosaic dataset.
Editing the footprints directly should simple, just ensure you are selecting only on of the footprints before trying to edit. What you can also do is create a feature class and then import the mosaic dataset geometry based on a linked field. For the ordering you can use ZOrder, but also look to set the ZOrder to 0 and then use the ByAttribute method and use a fields (eg date)
The other alternative is as I mentioned in the first reply: Just use the clip tool in IAW. You can do this for multiple image and then mosaic the output into a single sheet. Will not scale to thousands of maps, but will work for 10s.
- Mark as New
- Bookmark
- Subscribe
- Mute
- Subscribe to RSS Feed
- Permalink
- Report Inappropriate Content
Graphic showing the issue is missing.
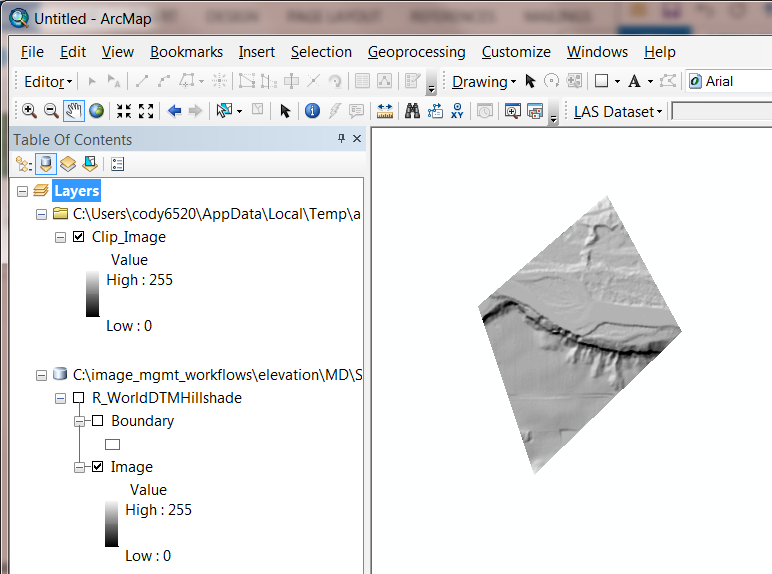
Simple workflow to to draw graphic, then use Export Data with 'Selected graphics'. Only pixels inside the graphic will be exported.
Alternative. Use the same graphic but use 'Clip' (first tool in Processing section of IAW). This will create a layer with pixels clipped to graphic. Now use this layer as input to export
- Mark as New
- Bookmark
- Subscribe
- Mute
- Subscribe to RSS Feed
- Permalink
- Report Inappropriate Content
Hi I have attached a .pdf of the problem I am having. I would prefer to figure out why I am having this problem using the graphic to clip, rather than converting all of the graphics to features. I am doing quite a few of these and I would only be able to use the feature once, while I can just delete the graphics and start another.
Simply stated, pixels outside of the graphic are being included.
- Mark as New
- Bookmark
- Subscribe
- Mute
- Subscribe to RSS Feed
- Permalink
- Report Inappropriate Content
Still do not see what the issue is.
The dotted blue line is only the envelope of the graphic. If you Export with clip to graphic then only the pixels inside the graphic (yellow shape in your case) will be included. The raster itself will send to the envelope (full extent) as it must remain rectangular.
Also note that if you are working with collections of such images, you should just create a mosaic dataset and then define the required areas as the footprints. The non required areas will be clipped out on the fly without needing to create a new copy. Similar with using a raster layer, the clipping can be done on-the-fly without the need to create a new copy of the partial raster.
- Mark as New
- Bookmark
- Subscribe
- Mute
- Subscribe to RSS Feed
- Permalink
- Report Inappropriate Content
Sorry, the screen shots were not optimal. I tried again with this .pdf to better show the problem.
I understand what you are saying, but I hope the screen shot I am sending now shows that the clipping is including pixtels outside the yellow graphic. The resulting raster that I get after the clipping is bounded by the blue lines and not the yellow area that I want.
Thanks for hanging in there with me on this. I feel that there must be some setting that is not working.
- Mark as New
- Bookmark
- Subscribe
- Mute
- Subscribe to RSS Feed
- Permalink
- Report Inappropriate Content
Brian
which version of ArcGIS are you using? I will have to check if this changed from an earlier version, but I just did it in 10.3.1 and it worked fine...
-->
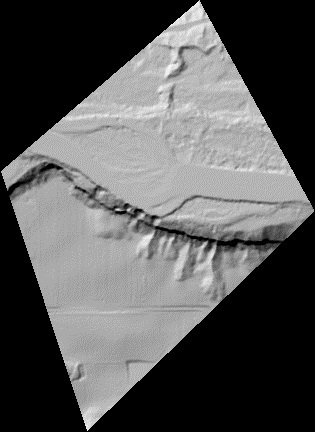
Note with regard to exporting, you are correct that if you accept the default of "set nodata=256" and "promote = yes" then your file size will increase due to promotion to 16 bits/pixel. However if you set a different value less than 256 (0=black or 255=white) as NoData, you can export without increasing file size, and have a display as above where the clipped area is transparent - but CAUTION - if you have valid pixels with value = 0 or 255 [whichever value you chose as NoData] then you'll have unwanted transparent pixels...
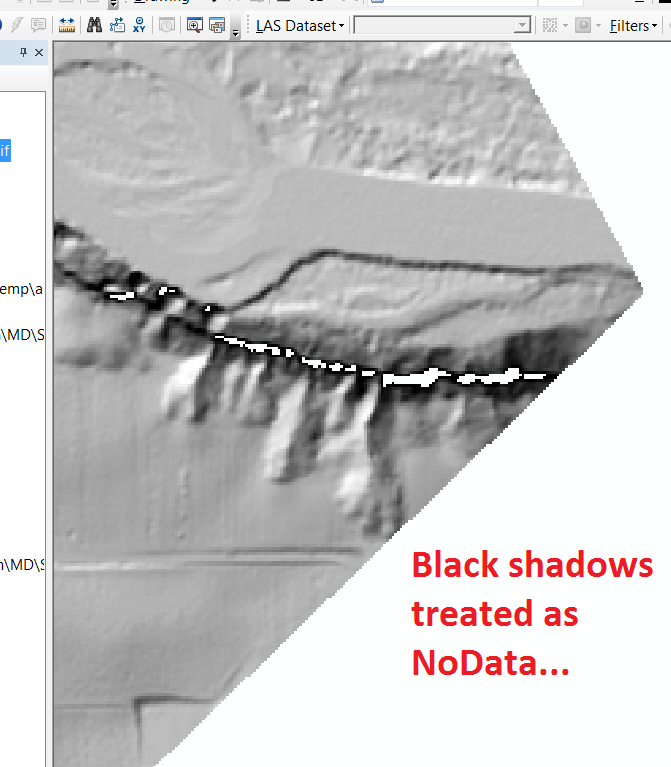
Also note that, if you view this exported file in another software package, the corners may appear to be filled with that value, so may not appear "clipped" as you're expecting.
You haven't said why you are exporting these datasets... As Peter noted, if you can stay within ArcGIS, you wouldn't need to do this export step but could use a Mosaic Dataset to create a clipped version of your data w/o writing more copies to disk...
- Mark as New
- Bookmark
- Subscribe
- Mute
- Subscribe to RSS Feed
- Permalink
- Report Inappropriate Content
Thanks for going to all the trouble, wow what interesting stuff. I am using ArcGis 10.3.1.
I am clipping the rasters and adding them to a mosaic dataset. In this particular Sanborn fire insurance map, there are many rasters and I found it difficult to edit the footprints in the mosaic dataset to remove collars and other things I didn't want. Also, some of the display I could not affect by changing ZOrder. I found it best to clip the rasters first at an earlier time in the work flow (before even georeferencing) and then they went together as I want.
The Sanborn fire insurance maps I have done before had less sheets, so they were easier. This 1924 map is way over budget for time.
- Mark as New
- Bookmark
- Subscribe
- Mute
- Subscribe to RSS Feed
- Permalink
- Report Inappropriate Content
Very strange that it is not clipping for you. Its as if it is somehow taking the envelope vs the graphic geometry.
Similar to Cody, I can not reproduce this.
I would still recommend that you look to use do the clipping on the fly using a mosaic dataset.
Editing the footprints directly should simple, just ensure you are selecting only on of the footprints before trying to edit. What you can also do is create a feature class and then import the mosaic dataset geometry based on a linked field. For the ordering you can use ZOrder, but also look to set the ZOrder to 0 and then use the ByAttribute method and use a fields (eg date)
The other alternative is as I mentioned in the first reply: Just use the clip tool in IAW. You can do this for multiple image and then mosaic the output into a single sheet. Will not scale to thousands of maps, but will work for 10s.
- Mark as New
- Bookmark
- Subscribe
- Mute
- Subscribe to RSS Feed
- Permalink
- Report Inappropriate Content
Thanks for comments from you and Cody, as usual you both are tremendously helpful. Even if I still have this issue, you have both given me good advice on how to do a work-around. The problem I have been having with editing footprints when there are overlapping sheets is that overviews and intersections complicate things.
I appreciate all the help.
- Mark as New
- Bookmark
- Subscribe
- Mute
- Subscribe to RSS Feed
- Permalink
- Report Inappropriate Content
You and Cody have been very helpful. I used the Image Analysis Window (IAW) and it worked there. Still not sure about clipping as I export data, but it is not needed now. I haven't used the IAW before, so appreciate the new thing. I realize now that Cody was also recommending the IAW, but I was too focused on why my own workflow would not work and not on a better work-around. Anyway thanks to both again and I hope the content will help someone else in a similar spot.