- Home
- :
- All Communities
- :
- Products
- :
- Mapping
- :
- Mapping Questions
- :
- Need Export to PDF Options Explained Please
- Subscribe to RSS Feed
- Mark Topic as New
- Mark Topic as Read
- Float this Topic for Current User
- Bookmark
- Subscribe
- Mute
- Printer Friendly Page
- Mark as New
- Bookmark
- Subscribe
- Mute
- Subscribe to RSS Feed
- Permalink
- Report Inappropriate Content
Hi All,
Please could some explain the options on the dialogue box for when I export to PDF?
My maps have a fair amount of data and data frames on and if I try to print to PDF which is my preference for quality reasons, it just errors.
So, I'm stuck with Export to PDF and I need the highest quality I can get. So, could someone explain:
Under General Tab:
Clip to Graphics Output
Under Format Tab:
Compress Vector Graphics
Image Compression
Picture Symbol
Convert Marker Symbols to Polygons
Thank you!
Solved! Go to Solution.
Accepted Solutions
- Mark as New
- Bookmark
- Subscribe
- Mute
- Subscribe to RSS Feed
- Permalink
- Report Inappropriate Content
Clip to Graphics Output - basically trims the output area to the minimum extent of graphics (data frames, text, etc) on your layout. This will remove any whitespace around your content in the page layout.
Compress Vector Graphics - simplifies the PDF vector features to reduce the amount of data required to display them. In a simple test this reduced a 124KB PDF to 78KB without any noticeable difference in the line quality.
Image Compression - the type of compression you want for imagery in the PDF. Use None for best quality but large file size. There is more information on some of the options.
Picture Symbol - this only applies if you use a picture marker or fill symbol. This option tells ArcMap how to export the marker or fill in the PDF (as raster or vector content).
Convert Marker Symbols to Polygons - not exactly sure how this works.
I generally find that it takes a bit of testing to find the optimum settings for each map.
- Mark as New
- Bookmark
- Subscribe
- Mute
- Subscribe to RSS Feed
- Permalink
- Report Inappropriate Content
When you are ready to export your map to pdf, you need to check these option on export map interface, such as the resolution
is 350, ratio 1:1, you can get better quality. in format, choose RGB, picture symbol is rasterize layers with bitmap marks. in advance is export layers and feature attributes. I hope these can help you.
- Mark as New
- Bookmark
- Subscribe
- Mute
- Subscribe to RSS Feed
- Permalink
- Report Inappropriate Content
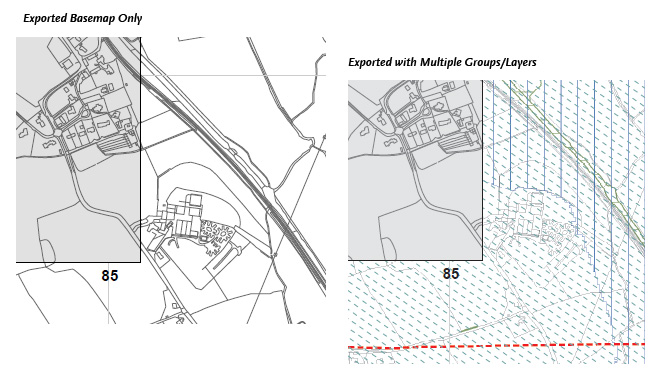
Thank you both very much for your help. I am still encountering difficulties. When I export just the base map I get lovely crisp lines. However, when I export the map with the many groups of layers etc, it rasterizes quite badly. I will attach an image of both of these scenarios and any suggestions welcome.
When I try to print to PDF as I mentioned on another thread I just get a limitcheck ecoclip error so that isnt an option.
Any more advice very much gratefully received!
Si
- Mark as New
- Bookmark
- Subscribe
- Mute
- Subscribe to RSS Feed
- Permalink
- Report Inappropriate Content
Simon,
One suggestion that I didn't see in the previous replies, in the Advanced tab of the export to pdf, change Layers and Attributes to None. The None setting will create a much smaller file size.
Scott
- Mark as New
- Bookmark
- Subscribe
- Mute
- Subscribe to RSS Feed
- Permalink
- Report Inappropriate Content
IIt depends on what the PDF will be used for. We use them as a redundancy for field collection so we need the attributes so the map will interact with the device's GPS.