- Home
- :
- All Communities
- :
- Services
- :
- My Esri
- :
- My Esri Blog
- :
- How To: Groups, User Roles, and Cross-Organization...
How To: Groups, User Roles, and Cross-Organizational Sharing
- Subscribe to RSS Feed
- Mark as New
- Mark as Read
- Bookmark
- Subscribe
- Printer Friendly Page
- Report Inappropriate Content
Adding members to an ArcGIS Group
There are three things that you need to check if you are having issues adding a member of your ArcGIS Organization or a member of another ArcGIS Organization to a group.
Part 1 – Group Settings
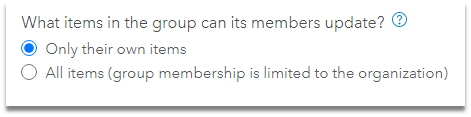
The most common reason for not being able to add a member of your ArcGIS Organization is the “Shared Update” setting that is chosen when the group is created. If set to “All items (group membership is limited to the organization)”, you will only be able to add members who have a Creator, Publisher, or Administrator User Type. You won’t be able to add members at the Editor, Field Worker, or Viewer levels. This setting also determines if you can use the group for sharing content with another Organization.
Unless you have a very specific use case for changing this setting, we recommend leaving it at the “Only their own items” default value shown in the image below.
If your setting looks like the image below, you need to create a new group because the ability to change this setting is only available during the initial creation of the group. You may want to keep the original group in place and not delete it until you have the new group created to ensure you can see which content and members need to be replicated in the new group.

What does this setting do? The term update describes the ability to modify a map, a web application, or dashboard, etc. It does not prevent the user from being able to edit the data hosted within the maps and apps if they have the correct privileges.
Part 2 – User Profiles
Note: that you need to have administrator privileges to make changes to your Organization’s roles. You also need to share this information with an Administrator in the external user’s Organization.
To add an external user to your group, their user profile should be set to “publicly visible.” There are two ways in which you can change this setting, depending on the security needs of your Organization.
The first place to check is by signing into an ArcGIS Online Organization as an Administrator and navigating to Organization > Settings > Security
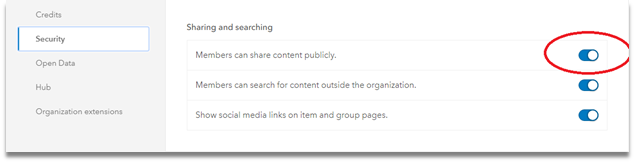
If the security setting for “Members can share content publicly” looks like the image above, each user can control the visibility of their profile to just your Organization or whether it is publicly searchable. Users can control and change this setting, or an Administrator can do it for them.If this setting is not enabled and your Organization does not wish for it to be enabled, as an Administrator, you can change this setting on a user by user basis. In both cases, you need to access the user’s profile to verify the current status. Navigate to Organization > Members > and locate the member’s profile you wish to make public.
Click on the three dots to the right of their role and select “View Profile.”

On the left-hand side of the page under their name select the drop-down under “Profile Visibility” and change it to Everyone (Public)

Once this setting is changed, the user is able to be searched for and added to external groups.
Part 3 – User Roles
Note: that you need to have administrator privileges to make changes to your Organization’s roles. You also need to share this information with someone with administrator privileges in the external user’s Organization.
When a user is added to an Organization, they are assigned to one of the Default User Roles. Their role will be set at a compatible level with their User Type.
One of the most common scenarios is that of a Field Worker user type not being able to be added to an external group. Many times, a project will have multiple AEC firms collaborating through group sharing to collect field data. A Field Worker user type is assigned the Data Editor role, which, by default, is not allowed to join an external Organization. To add the Field Worker or a role at the Data Editor or lower level, you need to create a custom role.
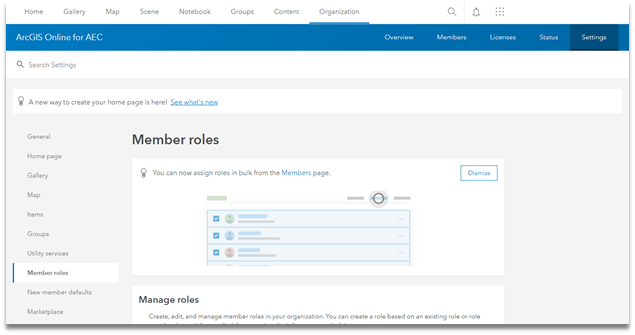
After signing into your ArcGIS Online Organization as an Administrator, go to Organization > Settings > Member Roles
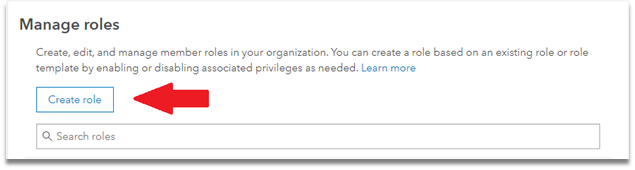
From Manage Roles select “Create Role.”
You are now presented with the “Create Role” dialog box. You want to give this role a meaningful name and a short description. You then see a Privilege Compatibility slider that is used to change privileges.
With the current ArcGIS Online release available (July 2020) 55 individual settings can be modified. This gives an Administrator a great deal of control to make adjustments. You just need to add the ability to join an external Organization. To accomplish this, you are going to copy settings over from a default user role and then make the single change.
To the right of “Role Privileges,” you should see “Set from the existing role.” This is highlighted in red in the image below. Click on “Set From Existing Role”

Use the drop-down to select the “Data Editor” role, which is a compatible role for a Field Worker User Type. Now click “Import Settings”.

When we are returned to the Create Role dialog, you should now see that 9/27 of the General Privileges have been enabled, and none of the Administrative Privileges are enabled.
Expand the General privileges and then expand the Groups privileges.
"Join organizational groups" and "View groups shared with organization" should be enabled.
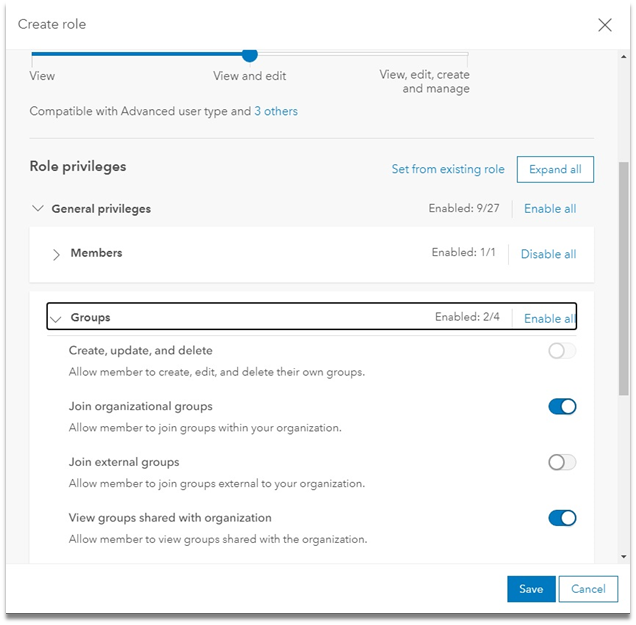
In the Groups privileges enable “Join external groups”

Click the Save button to complete the creation of the new Field Worker + External role.
Now you need to assign this new role to your Field Workers. From the Organization > Members page, locate the user(s) that need to be assigned the new role. Use the drop-down on the right-hand side of their member and select the “Field Worker + External” role. Only the roles that are compatible with their User Type are available.

You should now be able to add members from external organizations to your groups and your field users can join external organizations.
You must be a registered user to add a comment. If you've already registered, sign in. Otherwise, register and sign in.
-
Developer Subscriptions
2 -
Downloads
3 -
Licensing
25 -
Manage Users
10 -
My Esri Accounts
10 -
My Esri Release Notes
59 -
Profile
10 -
Reports
1 -
Support
7 -
Training
2 -
Transactions
3