My Esri Blog

cancel
Showing results for 
Show  only  | Search instead for 
Did you mean: 

Other Boards in This Place

Latest Activity

(115 Posts)
TeresaDolan
Esri Contributor

A new course was published this week in the Esri Academy, to assist those who have been designated administrators of their My Esri organization.

This free course offers an introduction to the responsibilities of a My Esri administrator. It walks admins through the steps on how to invite users and manage their permissions in a My Esri organization. It also introduces other admin tools such as Bulk Update, adding tags, and how to limit access using time limits.

You can access the new course at any time from the My Esri Web Courses link found in My Esri's Help menu.

TeresaDolan_0-1686340518098.png

more
4 0 500
TeresaDolan
Esri Contributor

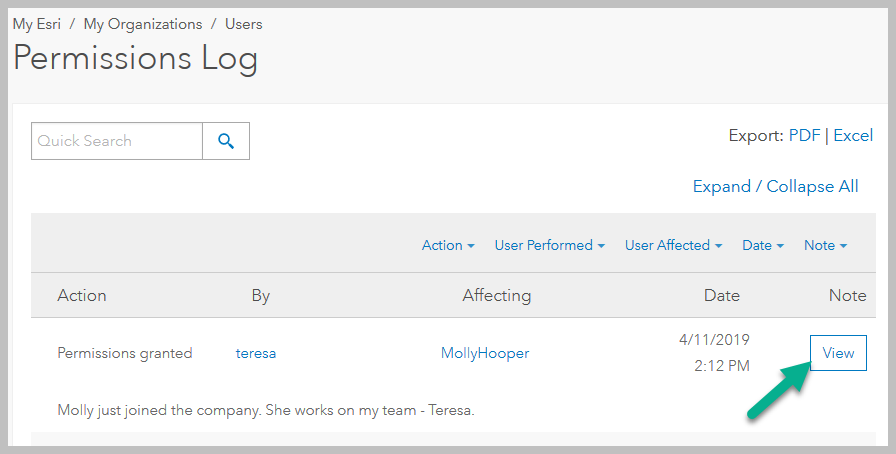
Who are the “users” listed in My Esri’s Permissions Log who aren’t really users?

Read more...

more
2 0 976
TeresaDolan
Esri Contributor

If you are an administrator for your organization on My Esri, there are some tools available from Edit Permissions that you may find useful. Some of these options appear on other pages on My Esri, too.

To get to Edit Permissions, click on the Edit (pencil) icon on My Organizations > Users > Manage Users.

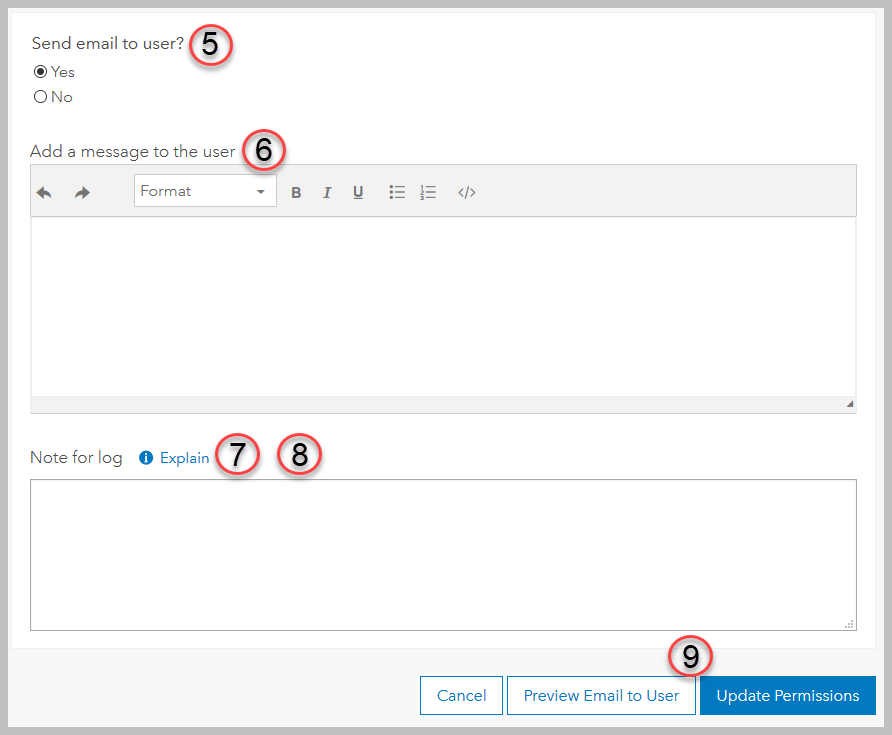
The following numbered paragraphs correspond to the red circled numbers in the next two screenshots.

1. Renamed permission. With the with My Esri Release of April 19, 2019, we've renamed the permission that makes a user an admin. Previously, this permission was called "Assign Permissions". We've renamed it to "Administrator" so that it's more clear what this permission is used for. The new term will be used throughout My Esri.

2. More Information. Most My Esri pages have More Information. Click the link to expose details about what you are seeing, instructions on how any tools may be used, and more. If you have questions about what you are seeing on a page, this is a good place to start.

3. Collapse Permissions. The list of permissions on Edit Permissions can be quite long. At any time you can collapse the long list so that you don't have to scroll all the way to the bottom of the page to save your changes.

4. Tags. Tags are a great way to help you keep track of your users. A user may have as many tags as you want. From Edit Permissions, you can create a new tag by simply typing the tag name in the Tags field. Or you can use Manage Tags from My Organizations > Users to create new tags, edit and remove existing tags, and see a breakdown of how many times each tag is used.

5. Email to the user. You can control if the user you are editing receives an email about this change or not. Emails about permission changes are also sent to any other admins at your organization for notification purposes; this setting does not affect that. This is on by default. Note that if you only change tags, no emails are sent, regardless of which option is selected.

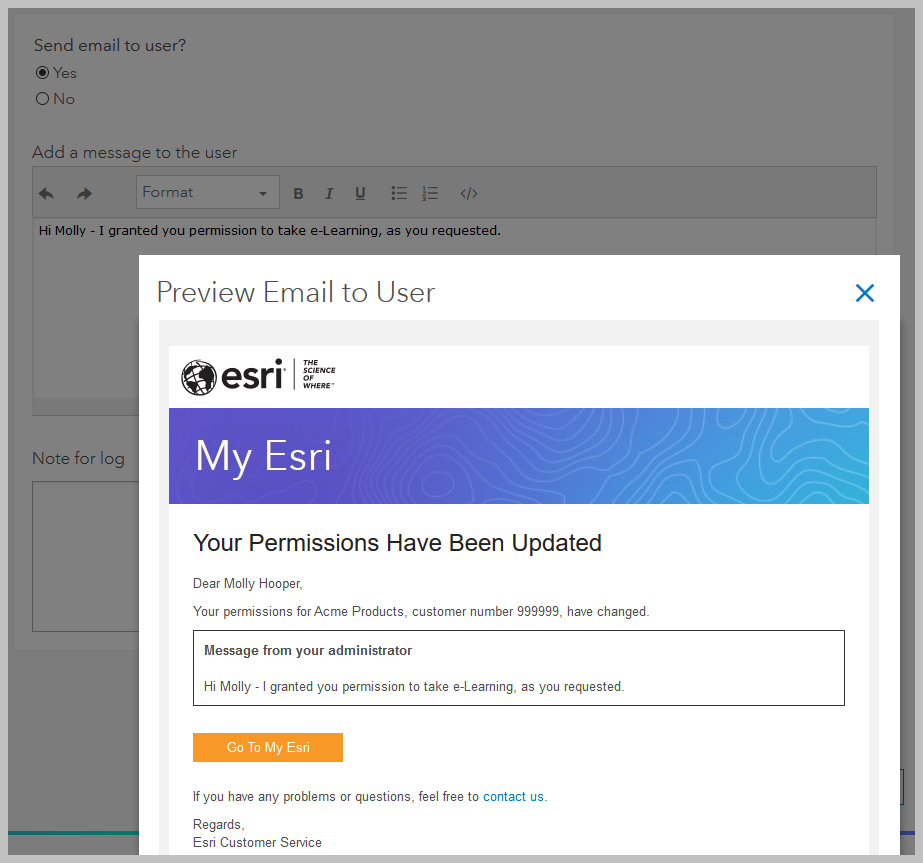
6. Message to the user. Any custom message you type here will be included in the email you send to the user. Some simple tools are provided so that you may format your text if you wish. Your message will appear in a designated section of the email that indicates that this message is coming from you rather than from Esri. This message is only sent in the email; it is not saved anywhere. This message is optional. See an example in the image at the bottom of this blog.

7. Note for log. As an admin, you have access to the Permissions Log from My Organizations > Users. Any text you include here will be saved in the log and can be viewed there. This note is optional.

8. Explain. You'll find these links throughout My Esri. Like More Information, they open up a panel with information, but in this case, for a specific tool or feature rather than the whole page.

9. Preview Email to User. This preview tool allows you to see how your email will appear to the user.

Some things to note:

  • If the user has a language set on their own profile, the email they receive will be in their requested language, regardless of what you see in the preview.
  • The customer number for the organization is only shown for domestic (US) organizations, as it is the Esri Inc. number. Organizations outside the US may have a different numbering scheme assigned to them by their distributor.
  • This email preview tool is also available on My Organizations > Users > Invite Users.

How many did you already know about? How many do you use? Did I miss any that you like to use? Add a comment!

more
2 0 1,506
TeresaDolan
Esri Contributor

Your company uses ArcGIS Online. At some point, your company's ArcGIS Online administrator created an Esri Account for you, so that you can sign in on arcgis.com and do cool things with maps.

But one day you try to sign in to My Esri - perhaps to download a new software release - and you get this message:

"Your active account <username> is not enabled for Esri access."

Accompanying this message is the name of your ArcGIS Online administrator.

Note that this message says "Esri access", not "My Esri access". This is because there is a setting on your ArcGIS Online account that, once turned on, allows you to use other Esri sites like GeoNet, the Esri Academy for training, and yes, My Esri.

Contact the ArcGIS Online administrator listed to have them turn on the Allow or Enable Esri Access setting for your account. This setting cannot be set or changed from My Esri, nor can it be changed by the user themselves.

Some ArcGIS Online organizations may not want to allow their accounts to have Esri access, so you may need to create or use another Esri Account in order to access the other Esri sites.

Here are some helpful resources about accounts.

more
3 0 11.3K
TeresaDolan
Esri Contributor

Your school offers classes that use Esri training courses as part of its curriculum.

As a professor, one of your responsibilities is to set up your students’ accounts so that they have access to the Esri Academy, Esri’s training site. In order to take training, your students need to be connected to your organization in My Esri. This connection lets the Esri Academy know which organization your students belong to.

Here’s how you accomplish this.

Become a Training Sub Admin

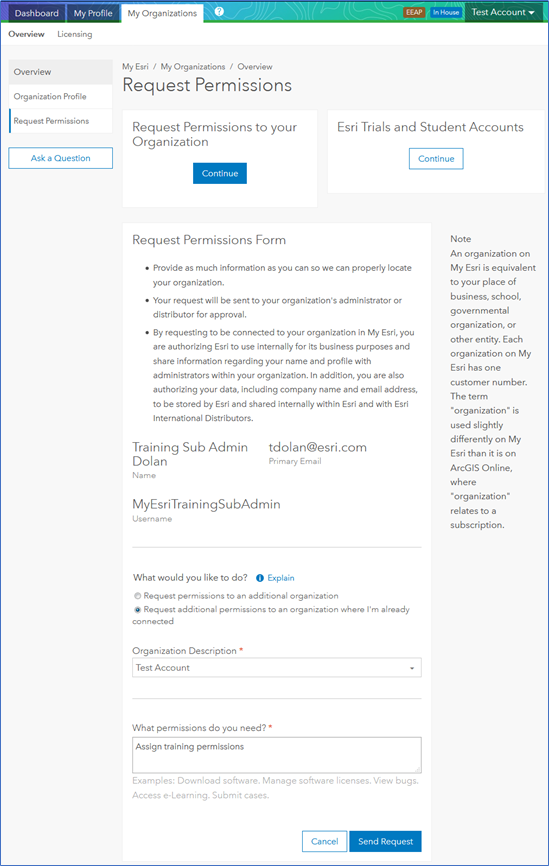
Request permission from your organization’s My Esri administrator using the form on My Organizations > Overview > Request Permissions. You only need to do this if you do not have full administration permission to My Esri already (that is, you do not have Assign permissions Administrator permission).

Ask them to grant you the Assign training permissions permission, which will allow you to manage students. We call users with this permission Training Sub Admins.

Why do you need permissions? On My Esri, permissions drive how you and your students interact with the site. Permissions are what connect you to your organization.

Your organization’s My Esri administrator will be notified of your request and grant you permission. You will receive an email with a token with instructions on how to use the token to connect to My Esri. After you follow the instructions, you’ll be connected to your organization, and you can go on to the next step.
Invite Your Students

Now that you are the Training Sub Admin for your organization on My Esri, use My Organizations > Users > Invite Users to send invitations to your students.

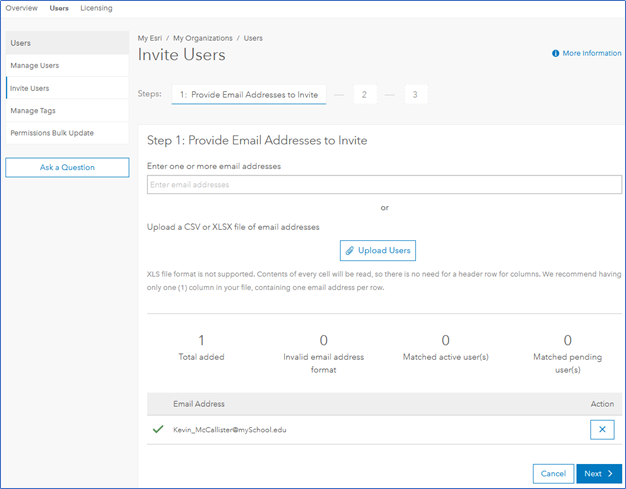
Enter the email addresses of each student you want to invite.

You can enter each address one at a time, or cut-and-paste a list into the input field. Or you can upload an comma separate value (CSV) or Microsoft Excel (XLXS) file using Upload Users. For best results, your file should only have one column in it, with an email address on each line or row.

You may invite up to 1000 students at a time.
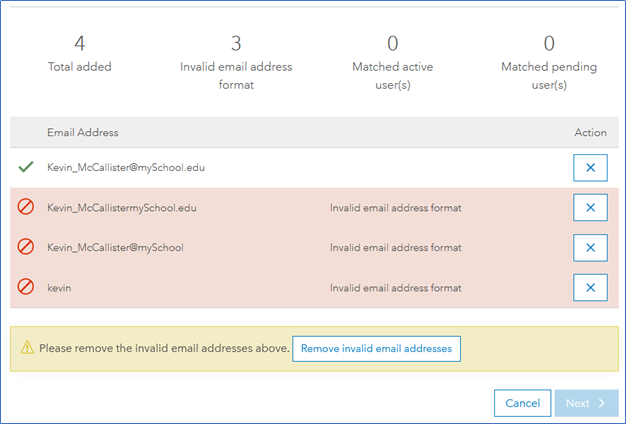
If any of the email addresses aren’t formatted properly, they will be flagged as invalid. You can click the X to remove each one one-at-a-time, or you can click Remove invalid email addresses to remove all invalid addresses at one time. Note that Next is disabled until all the addresses are valid.
If you’ve entered an email address of a user who is already connected to your organization, My Esri will let you know. It’s OK to leave these matched users on the list; they will be granted the e-Learning permission if they didn’t have it already.
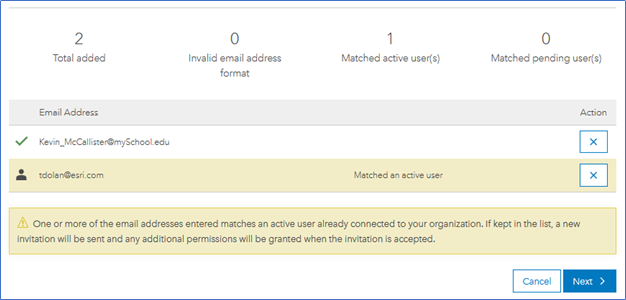
You can both add addresses from a file and input them manually until you are satisfied with the list.

Once all of the email addresses are valid, click Next.

Step 2 is for specifying which permissions to grant. However, since you are a Training Sub Admin, you can only set one permission to your students: Access e-Learning. Since this is the only permission you can grant, the other permissions aren’t shown.

Most students only need to be connected to the school’s account for the duration of the class. If you want to limit the time frame in which your students can take classes for your school, set a time limit.
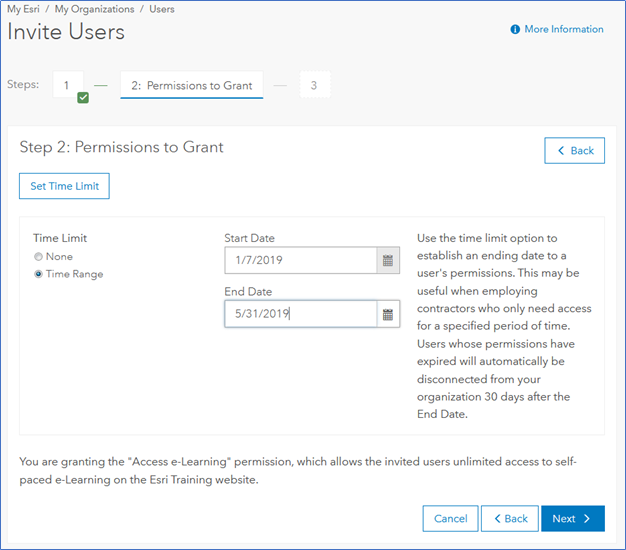
As it states on this step, users whose permissions have expired will automatically be disconnected from your organization 30 days after the End Date. This relieves you from having to disconnect possibly hundreds of students at the end of each term. Should your class be extended, or should your students continue on in another class, you can update all of their time limits at once. More on that below.

Once you have the time limit set, it’s on to Step 3.
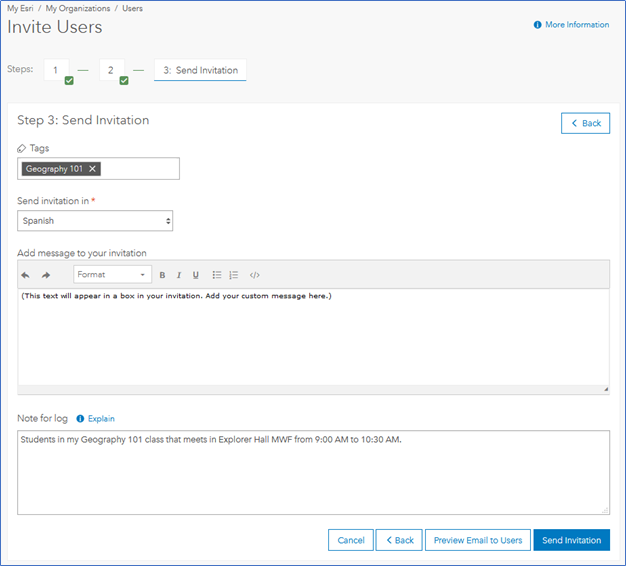
 

Here’s your chance to add a Tag. These tags can help you keep your student lists organized. Later on, when you view your list of students on My Organizations / Users / Manage Users, you’ll be able to distinguish one set of students from another. However, this is optional.

If your students use a different language than the one you are using in My Esri, you can select any of the supported languages for your invitation.

You can include a custom message in your invitation. This message will appear in a separate box in the invitation. This is optional.

You can add a note that will appear in the My Organizations / Users / Permissions Log for full admins to see. This is also optional.

Use Preview Email to Users to see the full text of the invitation email, along with any custom message your provide, in the language you selected. When you’re doing looking over the Preview, click the X in the upper corner of the popup preview window.
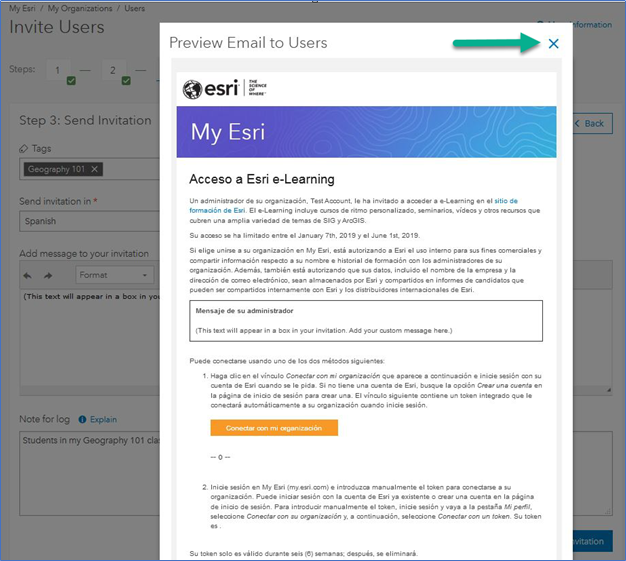
You can go back to a previous step at any time to make changes if you missed anything. Either click Back or click the step number along the top of the form.

Once you are satisfied with all the parameters, send the invitations.

About Tokens and Esri Accounts

To take training on the Esri Academy, each student must have a public Esri Account.

The username and password for that account is what they’ll use to accept the token in the invitation email. They should create this public account in advance by visiting Esri’s website at esri.com and clicking Sign In in the upper corner.

Later, your students may use this same Sign In link to sign in to the Esri Academy to take their course.

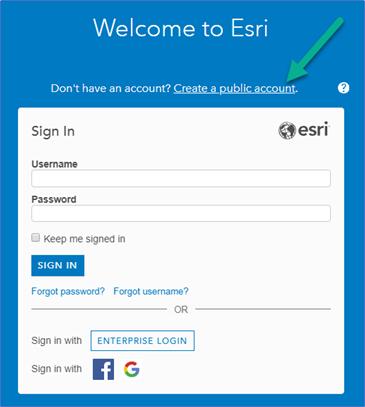
Each invitation email includes a unique token, which My Esri uses to identify each student. If students share computers, they must ensure they are signed in with the account they want to assign to the token.

Each token may be used only once; they cannot be shared.

The email explains the way for them to manually enter the token after they sign in.

Tokens must be accepted within 6 weeks of issuance; unused tokens that are older than 6 weeks are deleted. The email that your students receive will tell them this, but you may need to remind them not to wait until the last week of class to accept their tokens.

The semester has ended. Now what?

When your semester or quarter or class has ended, and the students no longer need access to your organization, you have several options to manage their access.

From My Organizations > Users > Manage Users, you’ll see a prefiltered list of your students. You can further filter the list by filtering on a tag, or on whether the permission is active or pending, for example.

From here, you can edit each student individually.

An active account is one where the student has accepted the token; a pending invitation means that the student hasn’t accepted the token yet. If their token is still pending, you can use Resend Invitation.
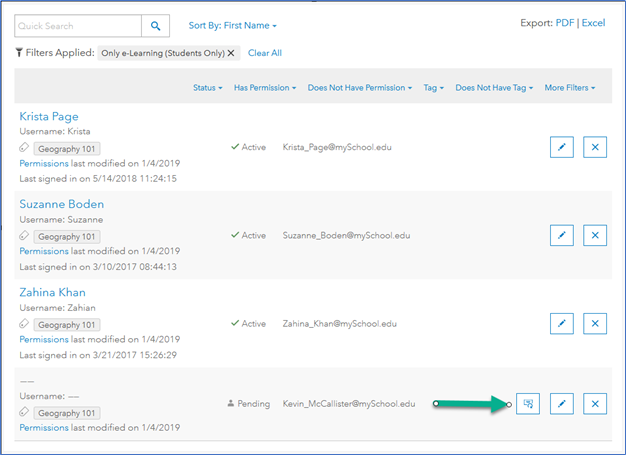
Remember that the student’s connection to your organization will be removed 30 days after the last day in the time limit you set.

A connection is removed when all of the permissions to an organization are removed. Note that this does not delete their public Esri Account – the Account remains. The student can use that account for other purposes – it belongs to them.

If you want all those students removed on that day, no further action is needed.

If only a few students will carry over into a new class, use Edit Permissions (click the pencil icon) to extend their time limits. Then their connection won’t be disconnected until 30 days after the new end date.

If a student drops your class, you can disconnect them by clicking the X at any time.

To update all the students at one time, use Permission Bulk Update. This tool is found on the same Users sub tab as Manage Users and Invite Users.

The list of users you can edit are limited to those with the e-Learning permission. Use the wizard-based form to perform any of these actions on your student’s permissions.
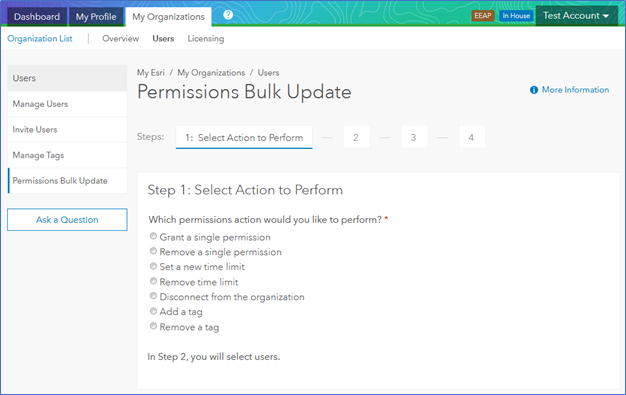
For example, say the class was extended, and you want to add a week to the time limit for all of your students in your Geography 101 class.

Click Set a new time limit. You’ll be prompted for the new time range. Supply that, then go on to the next step.

Since you tagged all these users, use the Tag Filter to narrow the list. Check the boxes next to the students you want to update. Note that you do not have to select all the students – you can only do a few if you want. But also note that if you click the checkbox in the filter bar to select all the students, you are only selecting all the students on the current page; navigate to each page to ensure you’ve selected all the students.

Step 3 of this wizard is very similar to Step 3 of Invite Users – you can specify a note for the log, send a custom message to the user. Here you can also decide if you want to send the students an email at all. If you select No for Send email to user, no emails will be sent.

Review the choices you made on Step 4, the Summary page. Use the steps at the top of the form, or use Back to go back and change anything if necessary. Then click Set Time Limit to make the specified changes.

Troubleshooting and Tips

Your organization does not have an admin. If your organization lacks a full My Esri admin, your permission request is sent to your organization’s Esri Customer Service Representative (CSR) if you belong to an organization in the United States, or to your distributor if you belong to an organization outside the US. They will process your request.

What permissions do I have? You can see all the permissions you’ve already been granted from My Profile > Profile Overview. In the Connected Organizations section, you’ll see a card for each organization you are connected to. Expand the permissions within each card (or Expand/Collapse All) to see what permissions you have.

Your students sign in on the Esri Academy, but get an error about maintenance. Contact your CSR or distributor to ensure your organization’s maintenance is up-to-date. You can use the Ask a Question form on My Esri to contact them.

A student’s token has expired. If a student waits too long to accept the token they were sent, you’ll need to send them a new token. Invite them again.

I’m a full admin – can I do this, too? Absolutely! All of the instructions in this document work for both Training Sub Admins and full admins (those with Assign Permissions Administrator permission). The only difference is that you will see more tools and permissions along the way.

I use more than My Esri to manage my students. Where I can get more info about this? These resources may help you understand more about managing an enterprise-wide solution, and explain how you manage students from ArcGIS Online.

What do you mean by “organization”? An organization on My Esri is equivalent to your place of business, school, governmental organization, or other entity. Each organization on My Esri has one customer number. The term "organization" is used slightly differently on My Esri than it is on ArcGIS Online, where "organization" relates to a subscription.

[UPDATED 4/25/2019 to change the permission formerly known as "Assign Permissions" to "Administrator".]

more
2 1 3,441
TeresaDolan
Esri Contributor

You've moved on: you've changed jobs, or retired, or graduated from school, for example. It's time to clean house. You want to remove the connection you have with the old organization in My Esri.

You can do this a couple of ways.


The first way is to use the form found at My Organizations > Overview > Contact My Administrator to request the admin at that organization to remove you. This will send an email to all the admins at your organization, letting them know you want to be disconnected. The burden is then on the admin to sign in to My Esri and disconnect you. However, if your organization lacks an admin, that will not be an option for you. Or if the admin is on vacation, or misses your email, you will still be connected.


The easiest and fastest way to handle this is to do it yourself.
 
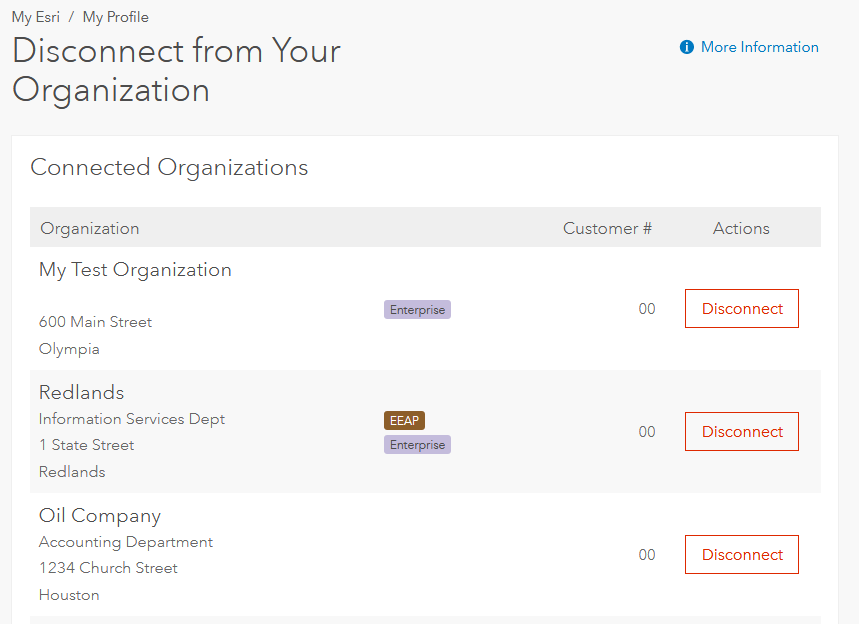
Navigate to My Profile > Disconnect from Your Organization. Here you'll see a list of all the organizations you are connected to. Click Disconnect for any organization you no longer want to be connected to.
 
 
The organization will no longer appear in your list of organizations to select througout My Esri. Any access you had to its downloads, licensing, training information, User Conference registration information, and more, will be removed.
 
Administrators at the old organization will receive an email letting them know you are no longer connected to their organization.
 
That's how you do it if you were connected. But what if you weren't connected yet - if you had only asked to be connected, but have changed your mind?
 
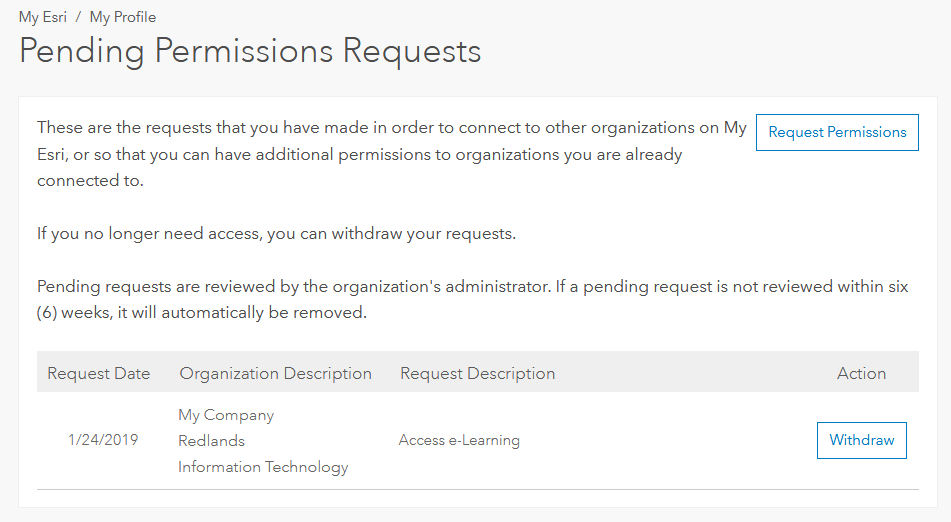
If you used the Request Permissions form, requesting to be connected to an organization, but no longer want to be connected, you can use the Withdraw tool at My Profile > Pending Permissions Requests.
 
 
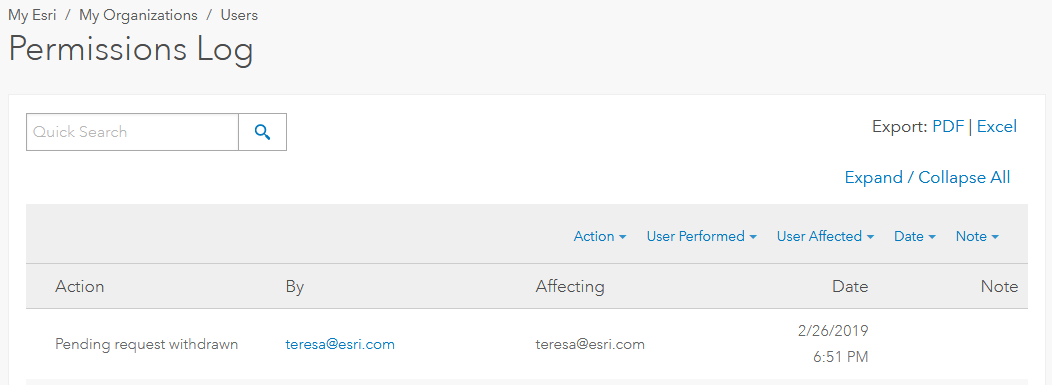
Unlike disconnecting yourself, no one is notified of this change. Because permission requests aren't necessarily tied to an organization, there isn't anyone to notify in most cases. However, if your request contained the right organization information (as when you request additional permissions to an organization you are already connected to), a record of your withdrawal is added to that organization's Permissions Log, so that the admin has visibility to your decision.
 
 
We hope you are finding these blog posts helpful. We welcome your comments, and also your suggestions for future blog posts. Is there something you need help with in My Esri? Let us know by adding your comments below.

more
1 2 1,836
TomLutz
Esri Contributor

In our next release scheduled for March 6th we will be adding a feature to the License Esri Products workflow that will allow you to add tags to better help identify files. You can add tags to assign a file to a specific person, location, or functionality as an example.

In preparation for the release of the licensing tag feature we have added a new permission to My Esri to allow users to manage these tags. You should now see a ‘Manage Licensing Tags’ permission grouped with the ‘View licensing information’ and ‘Take licensing actions’ permissions.

Turning this new permission on will allow users to create and edit licensing tags for your organization once the functionality is released. We’ve added the permission now so when the new functionality is turned on your organization will be ready to implement licensing tags.

more
2 0 584
TeresaDolan
Esri Contributor

We've written this document that we hope admins will find useful. It covers the same tools and processes discussed in the blog post A Day in the Life of a My Esri Admin, but in downloadable PDF format.


When a user is made an admin by being granted Administrator permission, this document will be provided to them in their language via a link in the invitation email they are sent from My Esri.


In case you missed the email, you can download this PDF (the English version).


If you want a copy of the non-English version, you could do this: send yourself an invitation using Invite Users. As a My Esri admin, supply your email address on Invite Users, grant yourself Administrator permissions, choose your language to send the invitation in, then send the invitation. You'll get an email with a link to the Admin PDF in the language you selected. Then delete the pending invitation.


[UPDATED 3/16/2021 to bring the document up-to-date. As My Esri evolves, we work hard to improve processes to make administering your organization easier. This new version includes more information for how to invite authorized callers to your organization if you have a Technical Support contract; updates terminology and screenshots; and explains how to get more help if you need it. The translated versions are accessible from the links in the emails to newly-invited admins.]


[UPDATED 1/20/2023 to reflect the new experience. The latest version of the PDF in English is attached below.]


[UPDATED 5/11/2023 to reflect the deprecation of the Request Permissions form. The latest version of the PDF in English is linked below. I removed the attached version, as it could get out of date. The linked version will always be the latest version.]

more
3 0 8,309
TeresaDolan
Esri Contributor

What?

What are permissions?

Permissions are a MUST for every My Esri user.

Before we get started, let’s take a little quiz to see how much you already know about permissions on My Esri.

Question 1. Permissions allow me to do which of these things? Select the correct answer.

  1. Download, provision, and license my software
  2. Connect to my organization
  3. Submit support issues
  4. View User Conference registrations
  5. View order history
  6. All of the above, and more

Question 2. True or False: I don’t need permissions to use My Esri.

Question 3. True or False: Random people at Esri determine what information I have access to on My Esri.

Question 4. True or False: The best way to find out what permissions I have is to poke around and see what I can see.


Here are the answers; how did you do?

Question 1 – f. All of the above, and more

Question 2 – This is a bit of a trick question; either answer is correct. You can access My Esri without any permissions, but you won’t be able to do much. If you want to harness the real power of the site, you need permissions.

Question 3 – False. While there are exceptions, for the most part an administrator within your own organization sets what information you have access to by granting you whatever permissions they deem appropriate.

Question 4 – False. While you are free to poke around all you want, you can easily view what permissions you have been granted from the My Profile tab, on the Overview page. Simply Expand the panel to see the details.

Why?

Why do you need permissions? On My Esri, permissions drive how you interact with the site.

Permissions determine if you manage what permissions other users have at your organization.

Permissions are what connect you to your organization. THEY ARE THE MAGIC KEY.


How?

So, how do you get permissions? And how to they work?

Let’s say you are brand new to My Esri. You’ve just created your Esri Account MyNewUsername and you sign in to My Esri. You check out the neat stuff on the Dashboard tab, then on the My Profile tab, then you click on My Organizations and you see this:


Where the heck is the information about YOUR organization?

At this point, My Esri doesn’t know which organization is yours. My Esri has lots of organizations, but it needs you to tell it which organization you are associated with.

You do this by requesting permissions.


When?

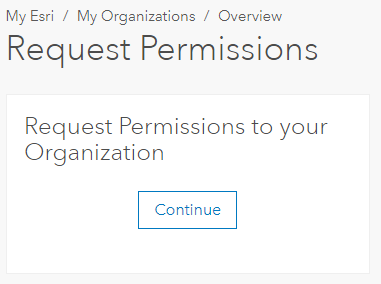
Now! In the side navigation menu is a link to the Request Permissions page. Since you want to be connected to your organization, Continue from that panel.


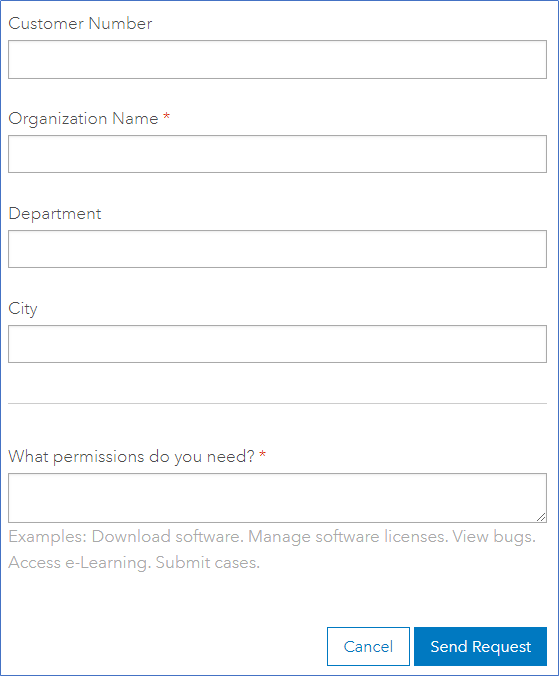
The options you see on the form depend on some things we already know about your from your profile. For example, if your profile says you live in the United States, you’ll be asked to supply your Esri customer number.


Customer Number is optional in case you don’t know it. But if you do, it will speed up things considerably. But don’t guess – requests to invalid customer numbers will be rejected and you’ll have to start over.

Tell us the name of your organization. The term "organization" is used slightly differently on My Esri than it is on ArcGIS , where "organization" relates to a subscription. An organization on My Esri is equivalent to your place of business, school, governmental organization, or other entity. Each organization on My Esri has one customer number.

Help us out by providing as much information as you can, and we’ll try to match you to the organization you want to be connected to. If your organization is known with both a corporate name and an acronym (like Environmental Systems Research Institute and ESRI), give us both to help us match you correctly.

Some large organizations, like universities, have many customer numbers. Including the department you are part of may help us get you to the right customer number.

In the same way, many organizations have offices all around the globe. Including your city will help us not connect you to your company’s affiliate on a different continent.

Lastly, tell us what you want to do with My Esri. Some suggestions are given on the form.

After completing the form, click Send Request.

Who?

Emails are now going off to various places, to alert folks that you need to be connected. Who are these people?

The people who receive your permission access request depends on several factors. But in the simplest model, an administrator receives your request and processes it. An administration (admin for short) is someone who is already connected to your organization with "Administrator" “Assign Permissions” permission.

If you live outside the US, in most cases a designated admin at your distributor will receive your access request and process it.

If the admin recognizes you, they can pick from the list of available permissions which to grant to you based on what they know about you, and what you requested. Are you in your organization’s purchasing department? They may grant you permissions to view the Transactions sub tab. Are you the point of contact for GIS-related work? They may grant you permissions to view the Licensing, Downloads, and Support sub tabs. Or they could grant you permissions for all of those, and more. The admin determines which combination of permissions is right for you.

The admin is all-powerful. They may grant you permission to their organization. But they also have the option to deny your request.

You will be notified by email either way.

Since the admin knows who you are in this scenario because you gave them good information on the request form, they granted you all the permissions you requested. You learned the news from the email you received saying you are now connected.

Congratulations!

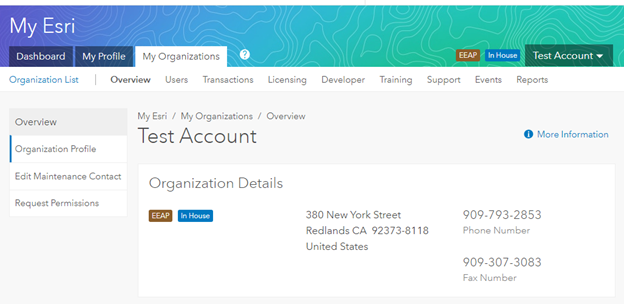
The next time you sign in to My Esri and click on the My Organizations tab, you’ll see something like this:

Which sub tabs you see (Users, Transactions, Licensing, etc.) are determined by what permissions you have been granted by the admin.

If you’re connected to more than one organization, you’ll see the Organization List on the sub tab bar. From there, you can see the list of organizations you’re connected to. You can switch between the Organization List page, or you can use the easy-access dropdown picker found on the right side of the banner.


Troubleshooting

But I’m already connected to my organization on ArcGIS . Why do I have to connect on My Esri? The term "organization" is used slightly differently on My Esri than it is on ArcGIS , where "organization" relates to a subscription. An organization on My Esri is equivalent to your place of business, school, governmental organization, or other entity. Each organization on My Esri has one customer number. Since these organizations are different entities, you must have permissions in each system.

Are you associated with more than one organization? No problem – just request permissions for all the organizations you want to be connected to . There is no limit.

Is requesting permissions the only way to get connected to my organization? Nope. Your admin could send you an invitation. The invitation email will contain a token. By accepting the token, you will be connected to your organization with the permission that were granted on the token. But don’t drag your feet; the token is only valid for a limited time. If your token expires, you will need to request permissions again.

I have permissions, but I want more! How do I get them? OK, Veruca Salt, simply fill out the Request Permissions form again, and specify the additional permissions you desire.

[UPDATED 4/25/2019 to change the name of the permission formerly known as "Assign Permissions" to "Administrator".]
more
3 0 4,290
TeresaDolan
Esri Contributor

You’re using Esri software and you find an issue. You want to let Esri know about this issue so we can fix it.

So you sign in to My Esri, and you navigate to the Support sub tab under My Organizations. You search this Support Overview page.

What is an authorized caller?
Someone from your organization who is designated to contact Esri to request technical support.

But you can’t find a way to submit your issue.

Now, on top of having the software issue, you have this to deal with.

Not to worry.

If you become an authorized caller for your organization, you can submit cases, in addition to taking other actions on cases and bugs. As long as your organization’s support maintenance contract has active entitlements, you can become an authorized caller.

How do you know if your organization’s support maintenance contract has active entitlements? Unless you see a message that your contract is invalid on the Support Overview page, you are good to go.

Adding an authorized caller

These instructions are written for someone with Administrator permission for your organization – someone we call an “admin” for short. [If you don’t have that permission, see the Troubleshooting section below.]

In this scenario, you are already connected to My Esri, and you already have View technical support information permission, and you’re also an admin, so all you need to do is add yourself as a caller.

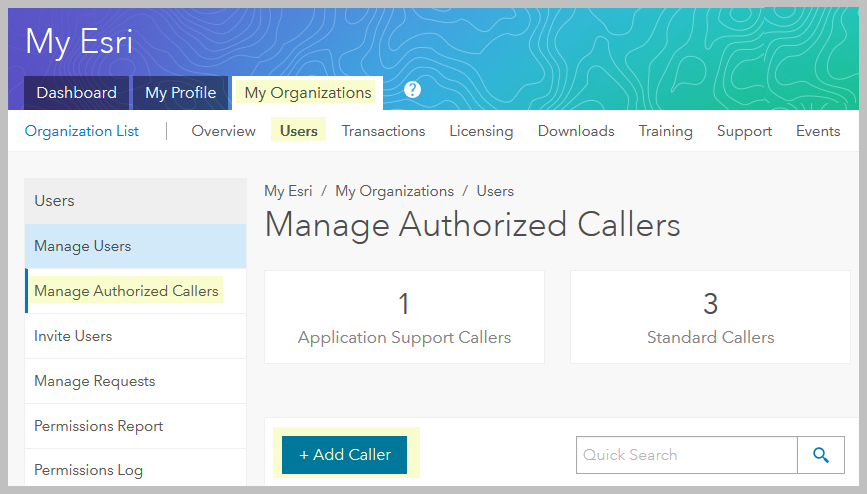
From My Organizations > Users, click Manage Authorized Callers.

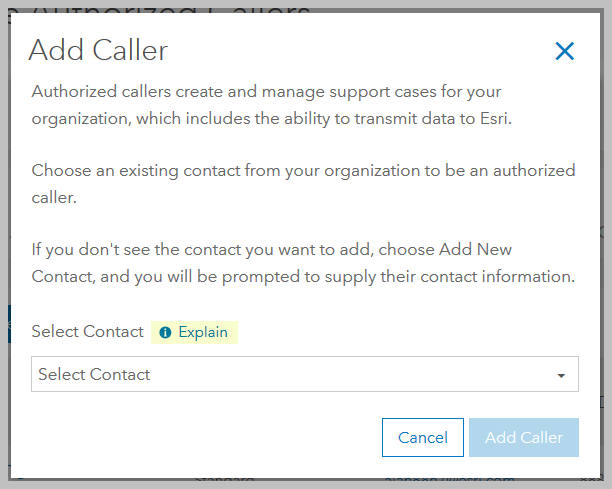
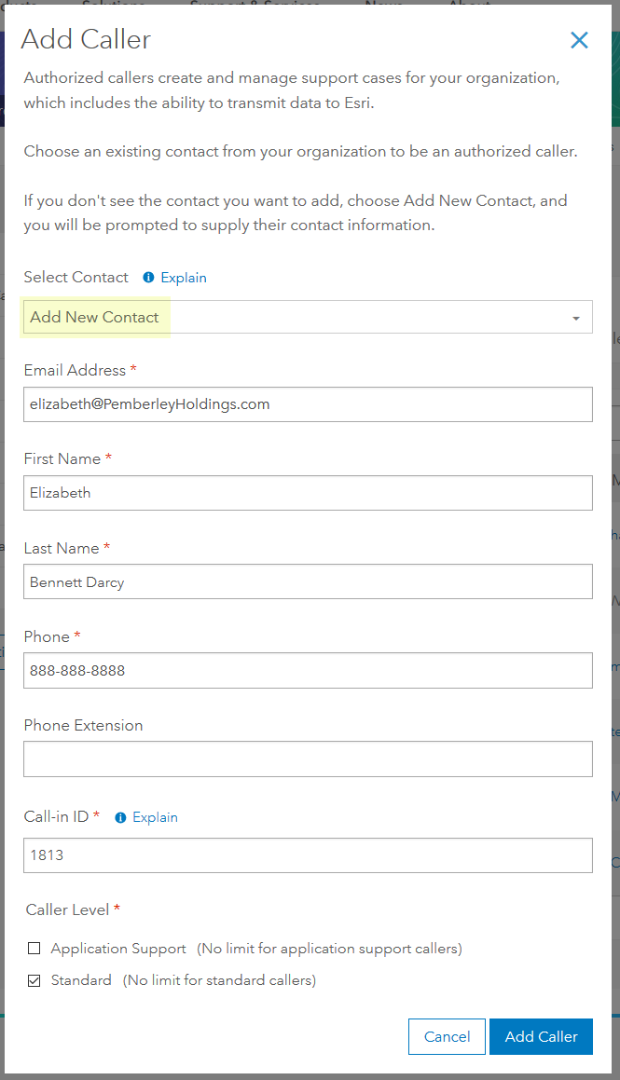
Now click Add Caller.

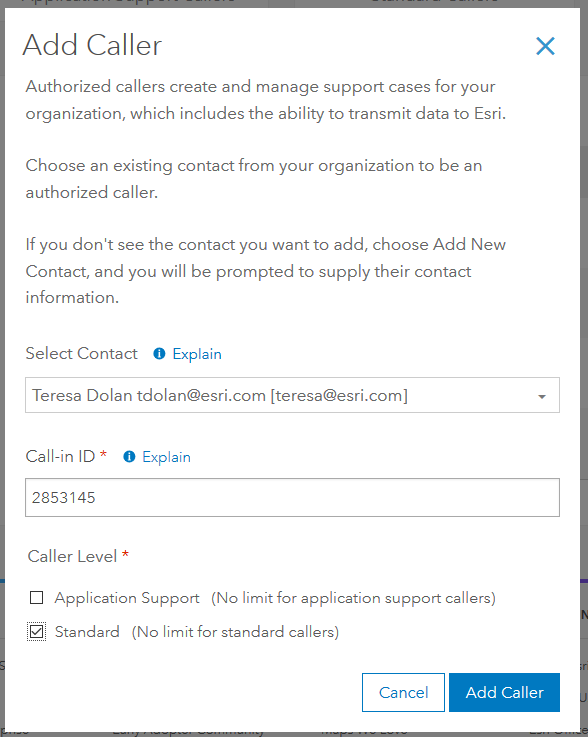
Select your name from the Select Contact dropdown list. This list offers the names of users connected to My Esri and users who are in our system who have used the phone to contact Esri Support Services. If we have a username for either type of contact, it will appear in brackets after the name.

Click on Explain to learn more about how this form works.

Supply a Call-in ID. This is any number of your choosing, between 4 and 8 digits inclusive. Should you ever want to use the phone to contact Esri Support Services, this is a key that you will dial in when you call us. Click Explain to learn more information about this number. If you are outside the US, you won't see this option.

Select your Caller Level. The options listed here depend on your organization's active support contract, so you may see different choices here. Check all that apply.

If you are at an organization outside the US, you will have an option to provide the language you prefer to be contacted in.

When you’re ready, click Add Caller.

That’s it!

After the page refreshes, you will see a confirmation message letting you know you are now an authorized caller.

Navigate to the Support sub tab, and click Request Case in the side navigation. Note: If you get a message that you aren't an authorized caller, refresh your browser page - you sometimes need to do this if you make changes to an account you are signed in with.

Complete and submit the form with the Esri software issue you found, and someone from Esri Support will contact you soon after.

Once you are set up as an authorized caller, you don’t need to go through these steps again. Request Case (and Manage System Profiles) will appear every time you sign in to My Esri.

Troubleshooting

Can’t see the Support sub tab under My Organizations? This means you lack the My Esri permissions to see this. You can Request Permissions using the form found from My Organizations > Overview.

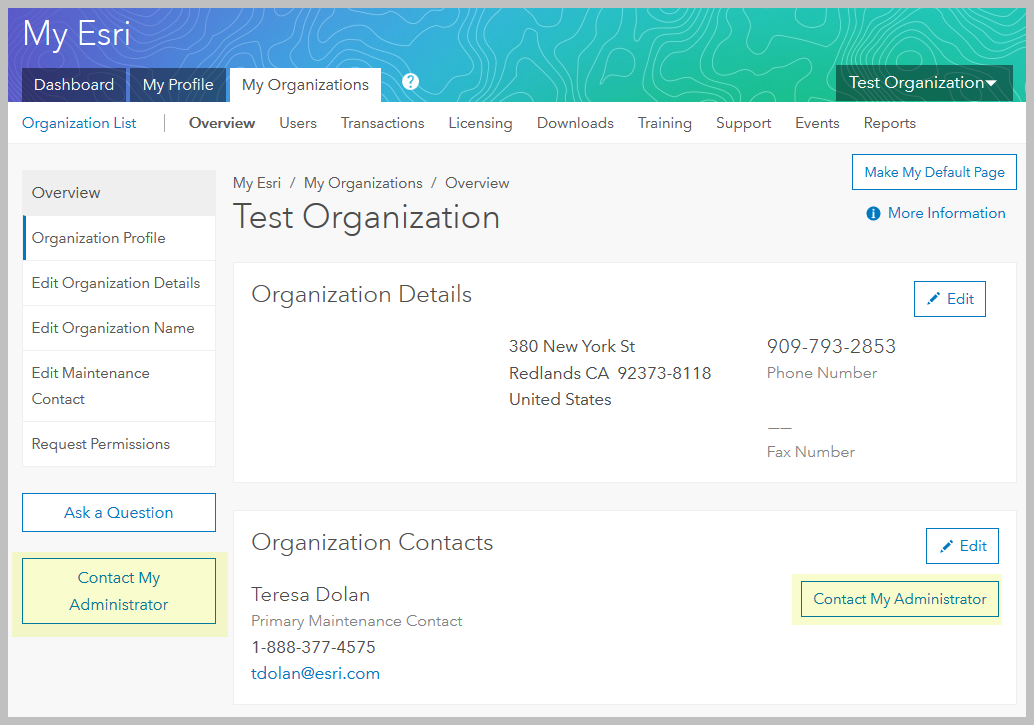
You’re not an administrator, and you don’t know who your organization’s administrator is? You can request permissions to be an admin (see above); or you can use Contact My Administrator to send your admin a message. This button is found beneath the side navigation on most pages under the My Organizations tab, and on the Overview page.

You’re the administrator, but the caller you want to add isn’t listed? No problem - simply select Add New Contact from the dropdown list, and supply the new caller’s contact info. When you submit the form, the caller-to-be will receive an invitation email from My Esri at the email address you provided. The email will contain a token that the new caller must use to connect to your organization in My Esri. Once they accept the token, they will be an authorized caller.

Don’t want to give someone full admin permissions just to manage callers? There is a permission which allows users to be able to add, edit and delete authorized callers without having to have full admin permissions. Request the Assign Authorized Callers permission from your existing admin.

Your caller is listed in the Authorized Caller list, but when they sign in to My Esri they can't use Request Case. If there isn't a username in the My Esri Access column on the Manage Authorized Callers page, then the caller can only make phone calls to get Esri Support. To set up the user so that he or she can use My Esri to submit cases, first remove them by clicking the X in the Actions column. If the user is not connected to My Esri, go to the Users sub tab on My Organizations and use Invite Users to connect to your organization. If the user is already connected to My Esri, use Add Caller and select their name from the dropdown list. Ensure you see their username in brackets after their name in the list when you select the contact. But why do you have to do that, if the user was already a caller? It may have been a timing issue - the user was probably made an authorized caller many years ago before My Esri existed, when they called Esri for Support. Once the username appears in the My Esri Access column, the user should not have any problem using My Esri as an authorized caller. (They can also still call us, too.) Check out More Information on the Manage Authorized Callers page for further details.

[UPDATED 4/25/2019 to change the name of the permission formerly known as "Assign Permissions" to "Administrator".]
[UPDATED 11/26/2019 to reflect recent and past changes made to this process.]

more
12 6 6,499
65 Subscribers