Imagery and Remote Sensing Blog

cancel
Showing results for 
Show  only  | Search instead for 
Did you mean: 

Other Boards in This Place

Latest Activity

(65 Posts)
CodyBenkelman
Esri Regular Contributor

Understand proper standards for reporting the accuracy of your deliverable products. 

Read more...

more
1 0 341
MaddeVoas
Esri Contributor

The number of satellites orbiting Earth is growing rapidly; many are used to observe our planet. And satellites are just one way to obtain geospatial imagery—there are also drones, planes, and terrestrial sensors capturing more imagery data each day.

Whether you’re a public works department looking to track assets or a governmental organization trying to keep abreast of natural disasters, as your imagery data continues to climb in volume, you might be asking yourself how you or your organization can manage it all while still being able to process your data, perform analyses, and share your findings with stakeholders. Why not have the flexibility to do it all in one place?

This is where a comprehensive imagery system comes in. Learn how ArcGIS can be leveraged from end-to-end to meet all your imagery needs. Interested?

Download the technical paper


more
1 0 348
CodyBenkelman
Esri Regular Contributor

NM_PhotosScreenshot.png

If you're interested in learning about using ArcGIS Pro for photogrammetric processing, join this 4 hour workshop on August 17!   11:00 a.m. – 3:15 p.m. Eastern time


Read more...

more
0 0 681
VinayViswambharan
Esri Contributor

The ArcGIS Image Analyst extension for ArcGIS Pro 2.5 now features expanded deep learning capabilities, enhanced support for multidimensional data, enhanced motion imagery capabilities, and more.

Learn about  new imagery and remote sensing-related features added in this release to improve your image visualization, exploitation, and analysis workflows.

Deep Learning

We’ve introduced several key deep learning features that offer a more comprehensive and user-friendly workflow:

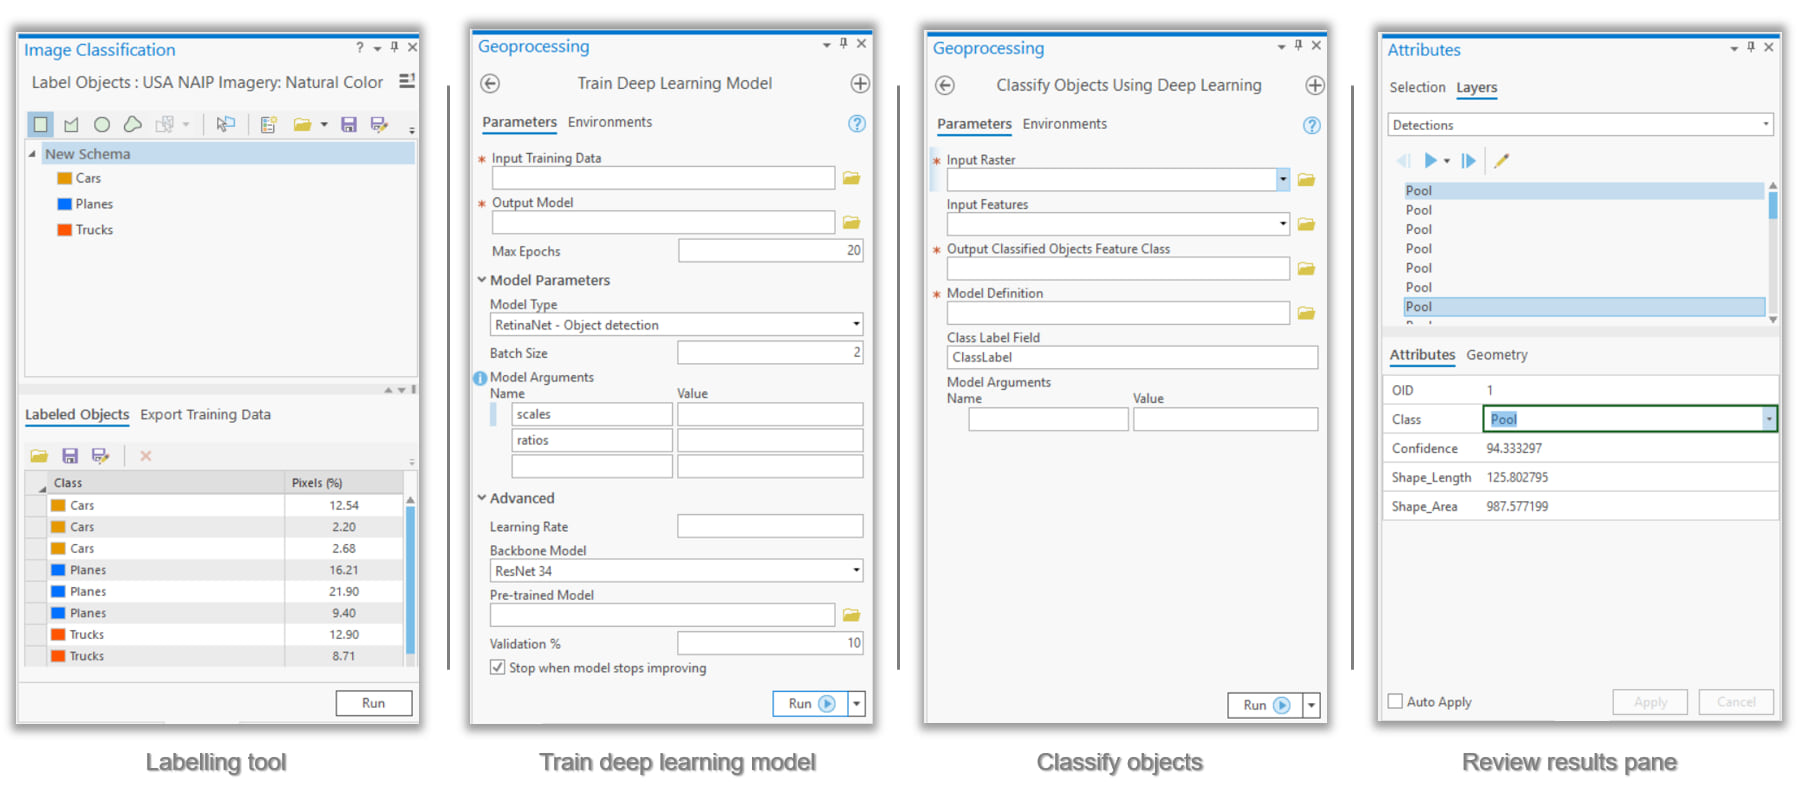
  • The Train Deep Learning Model geoprocessing tool trains deep learning models natively in ArcGIS Pro. Once you’ve installed relevant deep learning libraries (PyTorch, Fast.ai and Torchvision), this enables seamless, end-to-end workflows.
  • The Classify Objects Using Deep Learning geoprocessing tool is an inferencing tool that assigns a class value to objects or features in an image. For instance, after a natural disaster, you can classify structures as damaged or undamaged.
  • The new Label Objects For Deep Learning pane provides an efficient experience  for managing and  labelling training data. The pane also provides the option to export your deep learning data.
  • A new user experience lets you interactively review deep learning results and edit classes as required.
New deep learning tools in ArcGIS Pro 2.5

New deep learning tools in ArcGIS Pro 2.5

Multidimensional Raster Management, Processing and Analysis

New tools and capabilities for multidimensional analysis allow you to extract and manage subsets of a multidimensional raster, calculate trends in your data, and perform predictive analysis.

New user experience

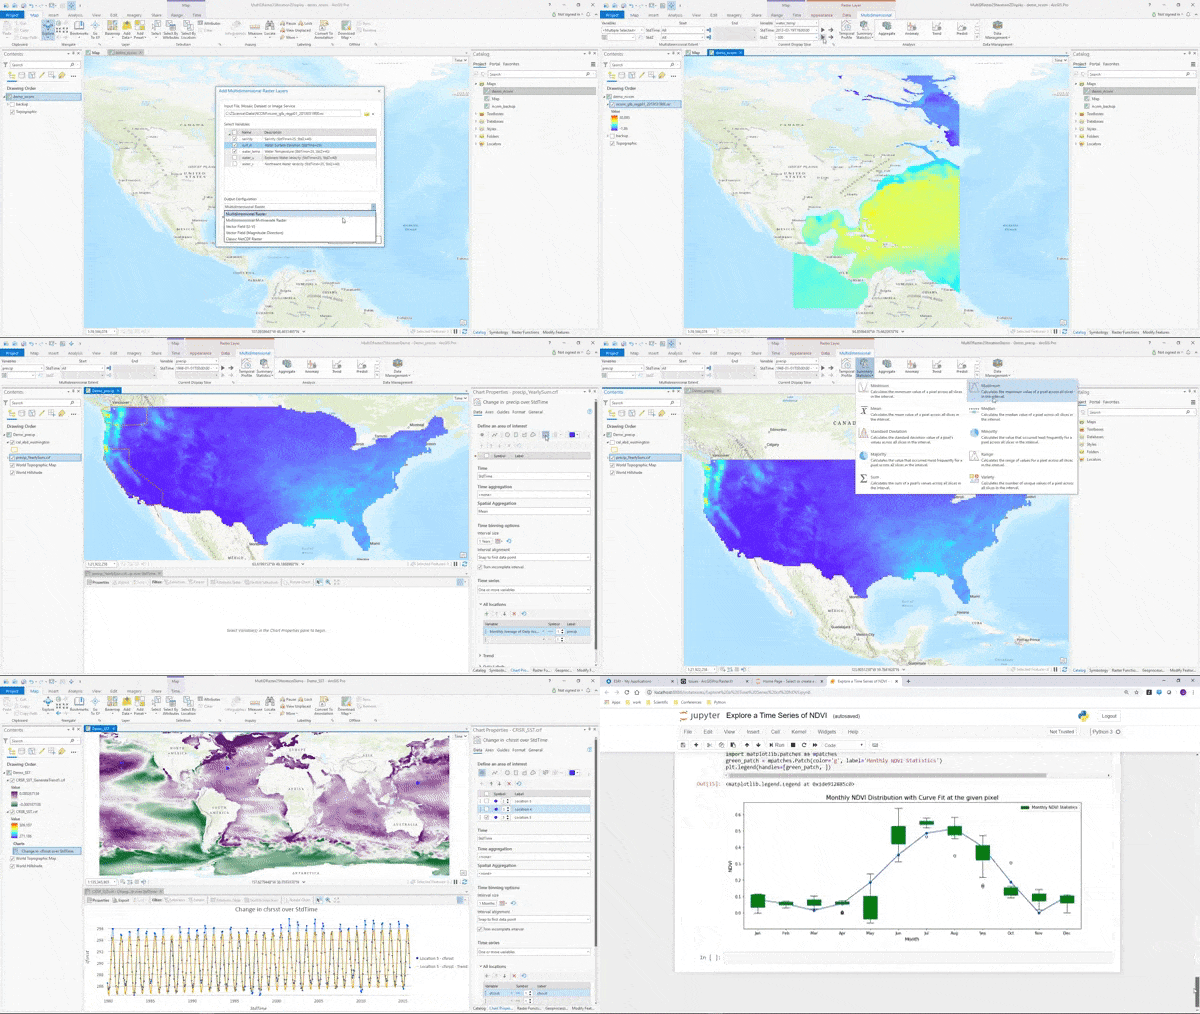
A new contextual tab in ArcGIS Pro makes it easier to work with multidimensional raster layers or multidimensional mosaic dataset layers in your map.

Intuitive user experience to work with multidimensional data

Intuitive user experience to work with multidimensional data

  • You can Intuitively work with multiple variables and step through time and depth.
  • You have direct access to the new functions and tools that are used to manage, analyze and visualize multidimensional data.
  • You can chart multidimensional data using the temporal profile, which has been enhanced with spatial aggregation and charting trends.

New tools for management and analysis

The new multidimensional functions and geoprocessing tools are listed below.

New geoprocessing tools for management

We’ve added two new tools to help you extract data along specific variables, depths, time frames, and other dimensions:

  • Subset Multidimensional Raster
  • Make Multidimensional Raster layer

New geoprocessing tools for analysis

  • Find Argument Statistics allows you to determine when or where a given statistic was reached in multidimensional raster dataset. For instance, you can identify when maximum precipitation occurred over a specific time period.
  • Generate Trend Raster estimates the trend for each pixel along a dimension for one or more variables in a multidimensional raster. For example, you might use this to understanding how sea surface temperature has changed over time.
  • Predict Using Trend Raster computes a forecasted multidimensional raster using the output trend raster from the Generate Trend Raster tool. This could help you predict the probability of a future El Nino event based on trends in historical sea surface temperature data.

Additionally, the following tools have improvements that support new analytical capabilities:

New raster functions for analysis

  • Generate Trend
  • Predict Using Trend
  • Find Argument Statistics
  • Linear Spectral Unmixing
  • Process Raster Collection

New Python raster objects

Developers can take advantage of new classes and functions added to the Python raster object that allow you to work with multidimensional rasters

New classes include:

  • ia.RasterCollection – The RasterCollection object allows a group of rasters to be sorted and filtered easily and prepares a collection for additional processing and analysis.
  • ia.PixelBlock – The PixelBlock object defines a block of pixels within a raster to use for processing. It is used in conjunction with the PixelBlockCollection object to iterate through one or more large rasters for processing.
  • ia.PixelBlockCollection – The PixelBlockCollection object is an iterator of all PixelBlock objects in a raster or a list of rasters. It can be used to perform customized raster processing on a block-by-block basis, when otherwise the processed rasters would be too large to load into memory.

New functions include:

  • ia.Merge() – Creates a raster object by merging a list of rasters spatially or across dimensions.
  • ia.Render (inRaster, rendering_rule={…}) – Creates a rendered raster object by applying symbology to the referenced raster dataset. This function is useful when displaying data in a Jupyter notebook.
  • Raster functions for arcpy.ia – You can now use almost all of the raster functions to manage and analyze raster data using the arcpy API
New tools to analyse multidimensional data

New tools to analyse multidimensional data

Motion Imagery

This release includes enhancements to our motion imagery support, so you can better manage and interactively use video with embedded geospatial metadata:

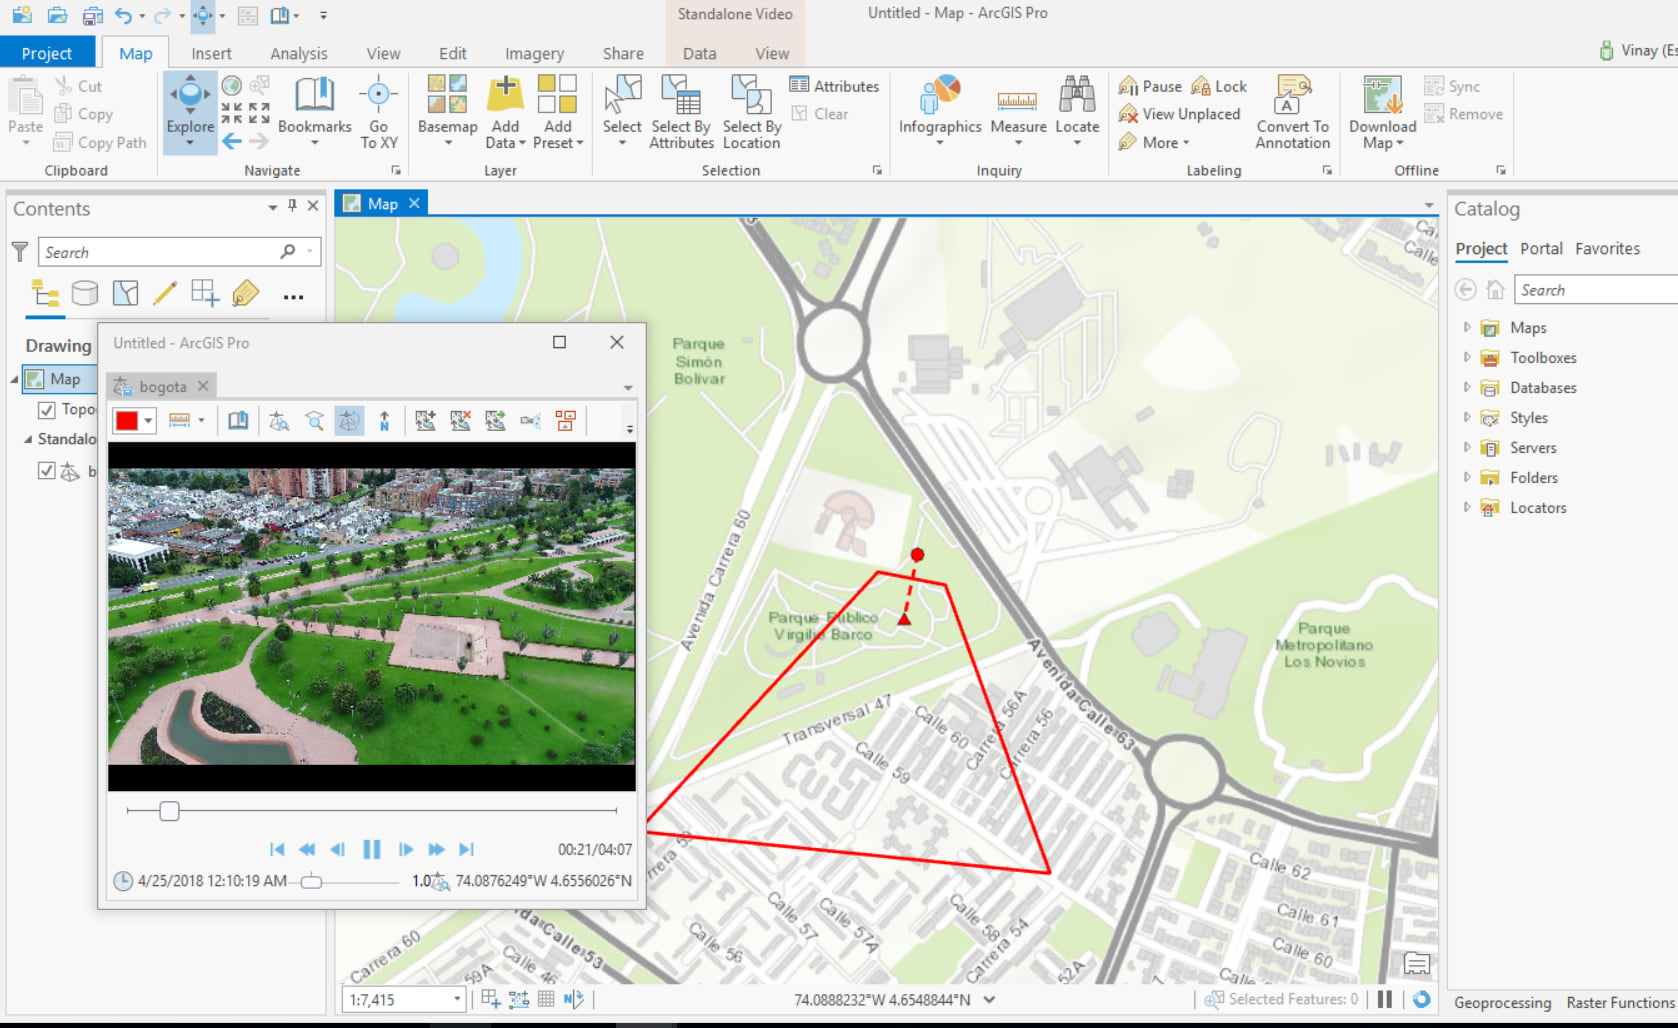
  • You can now enhance videos in the video player using contrast, brightness, saturation, and gamma adjustments. You can also invert the color to help identify objects in the video.
  • Video data in multiple video players can be synchronized for comparison and analysis.
  • You can now measure objects in the video player, including length, area, and height.
  • You can list and manage videos added to your project with the Video Feed Manager.
Motion imagery in ArcGIS Pro

Pixel Editor

The Pixel Editor provides a suite of tools to interactively manipulate pixel values of raster and imagery data. Use the toolset for redaction, cloud and noise removal, or to reclassify categorical data. You can edit an individual pixel or a group of pixels at once. Apply editing operations to pixels in elevation datasets and multispectral imagery. Key enhancements in this release include the following:

  • Apply a custom raster function template to regions within the image
  • Interpolate elevation surfaces using values from the edges of a selected region

Additional resources

more
0 0 976
JeffLiedtke
Esri Contributor

Using your knowledge of geography, geospatial and remote sensing science, and using the image classification tools in ArcGIS, you have produced a pretty good classified raster for your project area. Now it’s time to clean up some of those pesky pixels that were misclassified – like that one pixel labelled “shrub” in the middle of your baseball diamond. The fun part is using the Pixel Editor to interactively edit your classified raster data to be useful and accurate. The resulting map can be used to drive operational applications such as land use inventory and management.

For operational management of land use units, a useful classified map may not necessarily be the most accurate in terms of identified features. For example, a small clearing in a forest, cars in a parking lot, or a shed in a backyard are not managed differently than the larger surrounding land use. The Pixel Editor merges and reclassifies groups of pixels, objects and regions quickly and easily into units that can be managed similarly, and result in presentable and easy-to-understand maps for your decision support and management.

What is the Pixel Editor?

The Pixel Editor is an interactive group of tools that enables editing of raster data and imagery , and it is included with the ArcGIS Pro Image Analyst. It is a suite of image processing capability, driven by an effective user interface, that allows you to interactively manipulate pixel values. Try different operations using different parameter settings to achieve optimum editing results, then save, publish and share them.

The Pixel Editor is contextual to the raster source type of the layer being edited, which means that suites of capability are turned on or off depending on the data type of the layer you are working with. For thematic data, you can reassign pixels, objects and regions to different classes, perform operations such as filtering, shrinking or expanding classes, masking, or even create and populate new classes. Edits can be saved, discarded, and reviewed in the Edits Log.

Pixel Editor in action

Because the Pixel Editor is contextual, you need to first load the layer you want to edit. Two datasets are loaded into ArcGIS Pro, the infrared source satellite image and the classified result. The source data is infrared satellite imagery where vegetation is depicted in shades of red depending on coverage and relative vigor. This layer has been classified using the Random Trees classifier in ArcGIS Pro. The class map needs editing to account for classification discrepancies and to support operational land use management.

Launch the Pixel Editor

To launch the Pixel Editor, select the classified raster layer in the Contents pane, go to the Imagery tab and click the Pixel Editor button from the Tools group.


The Pixel Editor tab will open. In this example, we’ll be editing a land use map, so the editor will present you with editing tools relevant for thematic data.

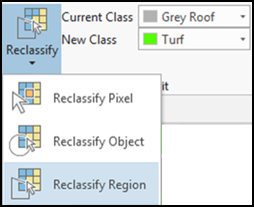
The Reclassify dropdown menu

The Region group provides tools for delineating and managing a region of interest. The Edit group provides tools to perform specific operations to reclassify pixels, objects or regions of interest. The Edit group also provides the Operations gallery, which only works on Regions.

Reclassify

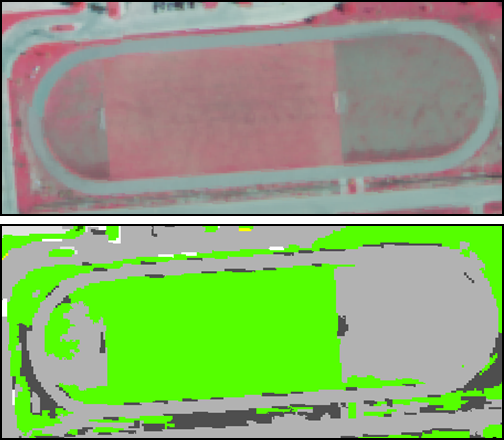
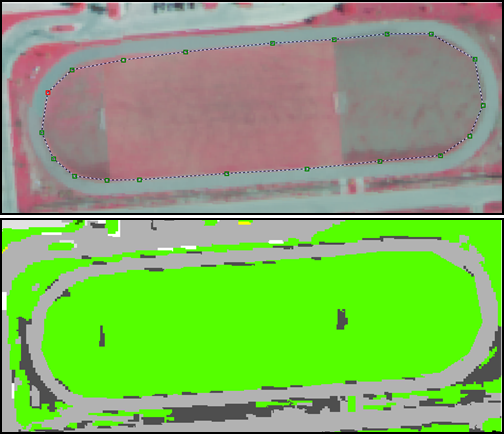
Reclassify is a great tool to reassign a group of pixels to a different class. In the example below, you can see from the multispectral image that either end of the track infield is in poor condition with very little vegetation, which resulted in that portion of the field being incorrectly classified. We want to reclassify these areas as turf, which is colored bright green in the classified dataset.

Infrared image and associated classmap needing edits.

We used the multispectral image as the backdrop to more easily digitize the field, then simply reassigned the incorrect class within the region of interest to the Turf class.

Edited classmap

Majority Filter and Expand
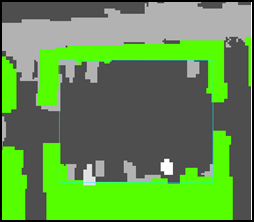
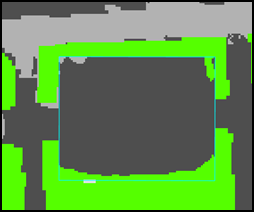
Check out the parking lots south of the track field containing cars, which are undesirable in terms of classified land use. We removed the cars and make the entire parking lot Asphalt with a two-step process:

Parking lot before editing
(1) We digitized the parking lot and removed the cars with a Majority Filter operation with a filter size of 20 pixels – the size of the biggest cars in the lot.

(2) Then we used Expand to reclassify any remaining pixels within the lot to Asphalt.

Parking lot after Majority Filter and Expand operations

Add a new class

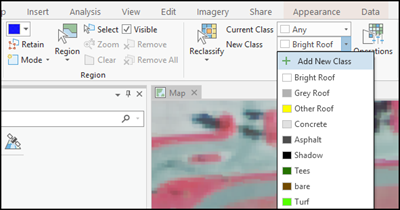
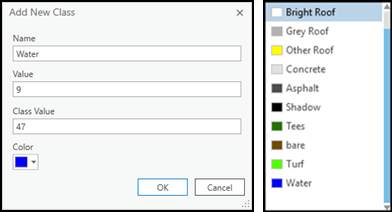
Another great feature of the Pixel Editor is the ability to add a new class to your classified raster. Here, we added a Water class to account for water features that we missed in the first classification.

Add new class

New class WATER was added to the classmap

In the New Class drop-down menu, you can add a new class, provide its name, class codes, and define a color for the new class display.

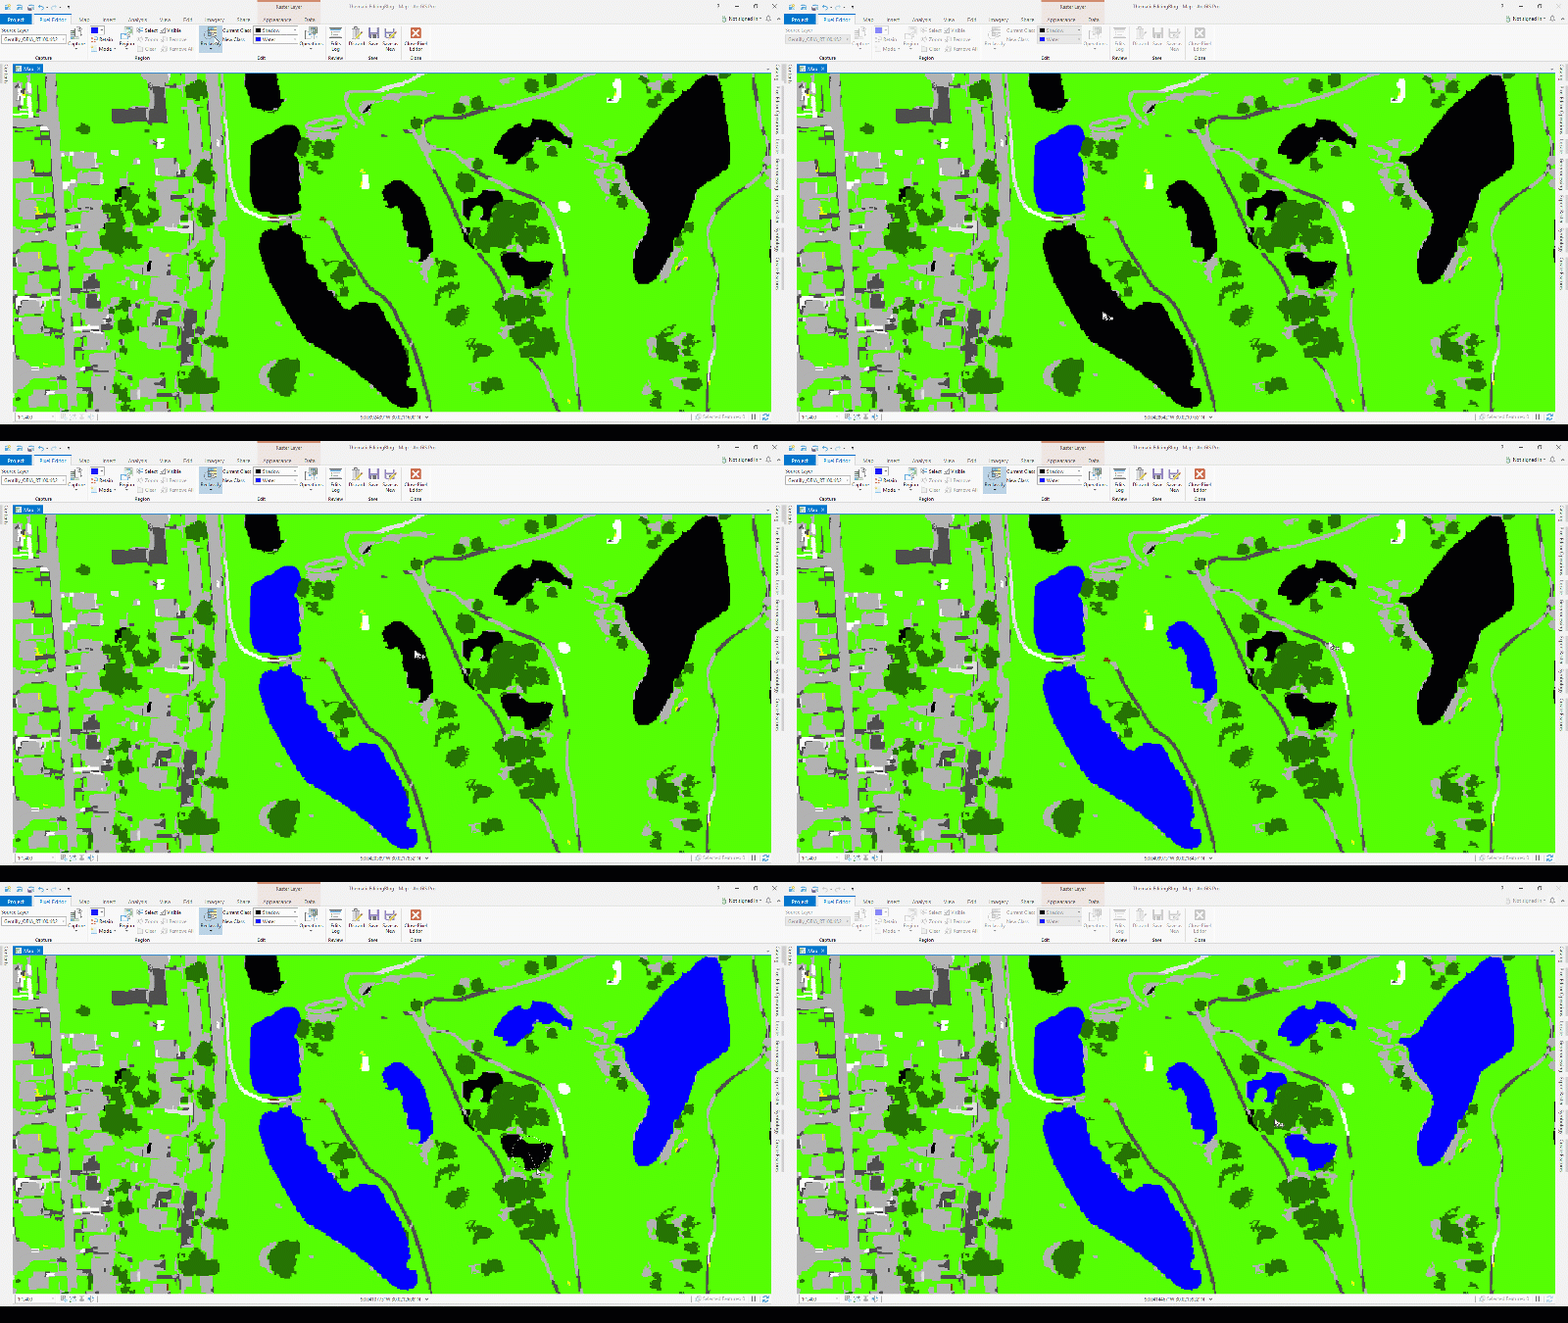
After adding the new class to the class schema, we used the Reclass Object tool to reassign the incorrect Shadow class to the correct Water class. Simply click the object you want to reclassify and encompass it within the circle - and voila! – the object is reclassified to Water.

Reclass incorrect class "Shadow" to correct class "Water"

Feature to Region

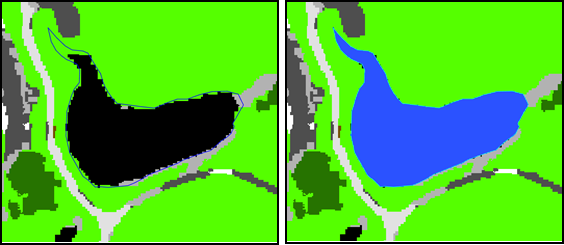
Sometimes you may have an existing polygon layer with more accurate class polygon boundaries. These could be building footprints, roads, wetland polygons, water bodies and more. Using the Feature to Region option you can easily create a region of pixels to edit by clicking on the desired feature from your feature layers in the map. Then use the Reclass by Feature tool to assign the proper class.

Region from Feature Edit

We see the updated water body now matches the polygon feature from your feature class. The class was also changed from Shadow to its correct value, Water.

Summary

The Pixel Editor provides a fast, easy, interactive way to edit your classified rasters. You can edit groups of pixels and objects, and editing operations include reclassification using filtering, expanding and shrinking regions, or by simply selecting or digitizing the areas to reclassify. You can even add an entire new class. Try it out with your own data, and see how quickly you can transform a good classification data set into an effective management tool!

Acknowledgement

Thanks to the co-author, Eric Rice, for his contributions to this article.

more
0 0 621
JeffLiedtke
Esri Contributor

Do you have blemishes in your image products, such as clouds and shadows that obscure interesting features, or DEMs that don’t represent bare earth? Or perhaps you want to obscure certain confidential features, or correct erroneous class information in your classmap. The Pixel Editor can help you improve your final image products.


After you have conducted your scientific remote sensing and image analysis, your results need to be presented to your customers, constituents and stakeholders. Your final products need to be correct and convey the right information for decision support and management. The pixel editor helps you achieve this last important aspect of your workflow – effective presentation of results.


Introducing the Pixel Editor

The Pixel Editor, in the Image Analyst extension, provides a suite of tools to interactively manipulate pixel values for raster and imagery data. It allows you to edit an individual pixel or groups of pixels. The types of operations that you can perform depends on the data source type of your raster dataset.

The Pixel Editor tools allows you to perform the following editing tasks on your raster datasets:

Blog Series

We will present a series of blogs addressing the robust capabilities of the Pixel Editor. We will focus on real-world practical applications for improving your imagery products, and provide tips and best practices for getting the most out of your imagery using the Pixel Editor. Stayed tuned for this interesting and worthwhile news.


Your comments, inputs and application examples of the Pixel Editor capability are very welcome and appreciated!

more
0 1 719
CodyBenkelman
Esri Regular Contributor

Do you have imagery from an aerial photography camera (whether a modern digital camera or scanned film) and the orientation data either by direct georeferencing or the results of aerial triangulation? If yes, you’ll want to work with a mosaic dataset, and load the imagery with the proper raster type.

The mosaic dataset provides the foundation for many different use cases, including:

  • On-the-fly orthorectification of images in a dynamic mosaic, for direct use in ArcGIS Pro or sharing through ArcGIS Image Server.
  • Production of custom basemaps from source imagery.
  • Managing and viewing aerial frame imagery in stereo
  • Accessing images in their Image Coordinate System (ICS).  


There are different raster types that support the photogrammetric model for frame imagery.  If you have existing orientation data from ISAT or Match-AT, you can use the raster types with those names to directly load the data (see
Help here). 

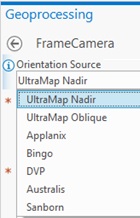
For a general frame camera, you’ll want to know how to use the Frame Camera raster type and we have recently updated some helpful resources:  

UI for automated script

Further information:

  • Note that if your imagery is oblique, the Frame Camera raster type supports multi-sensor oblique images. Refer to the http://esriurl.com/FrameCameraBestPractices for configuration advice.
  • If you want to extract a digital terrain model (DTM) from the imagery, or improve the accuracy of the aerial triangulation, see the Ortho Mapping capabilities of ArcGIS Pro (advanced license). http://esriurl.com/OrthoMapping.
  • If you are seeking additional detail on the photogrammetric model used within the Frame Camera raster type, see this supplemental document http://esriurl.com/FrameCameraDetailDoc

more
3 0 1,549
EmilyWindahl
Esri Contributor

Given the growing number of people using commercial drones these days, a common question is: “What do I do with all this imagery?”

The simple answer is that it depends on what you’re trying to accomplish.

If you just want to share the imagery as-is, and aren’t worried about making sure it’s georeferenced to be an accurate depiction of the ground, Oriented Imagery is probably your answer. If you’re capturing video, Full Motion Video in the Image Analyst extension for ArcGIS Pro is your best bet. Ultimately, though, many users plan to turn the single frame images acquired by drones into authoritative mapping products—orthorectified mosaics, digital surface models (DSMs), digital terrain models (DTMs), 3D point clouds, or 3D textured meshes.

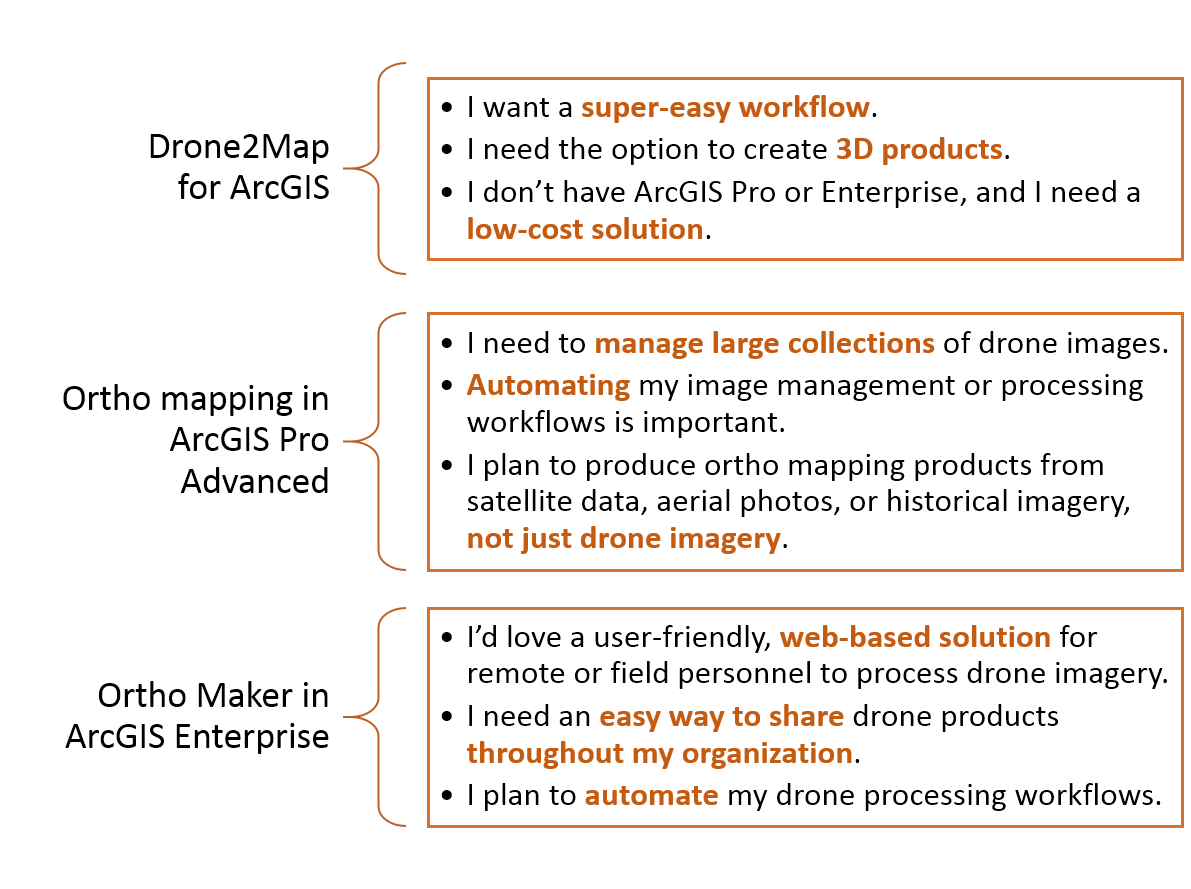
Esri has three possible solutions for producing authoritative mapping products from drone imagery, each targeted for different users— (1) Drone2Map for ArcGIS, (2) the ortho mapping capability of ArcGIS Pro Advanced, and (3) the Ortho Maker app included with ArcGIS Enterprise. Read on to get an overview of all three solutions, and to figure out which one is best for your application.

Drone2Map for ArcGIS

For individual GIS users, Drone2Map is an easy-to-use, standalone app that supports a complete drone-processing workflow.

Drone2Map includes guided templates for creating orthorectified mosaics and digital elevation models. It’s also the only ArcGIS product that creates 3D products from drone imagery, including RGB point clouds and 3D textured meshes. Once you’ve processed your imagery, it’s easy to share the final products—2D web maps and 3D web scenes can be easily published on ArcGIS Online with a single step. ArcGIS Desktop isn’t required to run Drone2Map, but products created with Drone2Map are Desktop-compatible. That’s important, because it gives you the option to use ArcGIS Pro as an image management solution, or to serve your imagery products as dynamic image services using ArcGIS Image Server.

Ortho mapping capability of ArcGIS Pro Advanced

For GIS professionals, the ortho mapping capability of ArcGIS Pro Advanced enables you to create orthomosaics and digital elevation models from drone images (as well as from modern aerial imagery, historical film, and satellite data) in the familiar ArcGIS Desktop environment.

There are added benefits to processing your drone imagery in ArcGIS Pro. For users with very large imagery collections, Pro’s image management capabilities are especially valuable. Managing drone imagery using mosaic datasets makes it easy to query images and metadata, mosaic your imagery, and build footprints. Image management and processing workflows in ArcGIS Pro can also be automated using Python or Model Builder. Finally, sharing your imagery is straightforward. While you can publish your products to ArcGIS Online, you can also use ArcGIS Pro in conjunction with ArcGIS Image Server to publish drone products as dynamic image services.  

Ortho Maker app in ArcGIS Enterprise 10.6.1+

For ArcGIS Enterprise users, the Ortho Maker app offers a solution for organizations with multiple users who want simple, web-based workflows to create orthomosaics and DEMs from drone imagery.


Ortho Maker provides an easy-to-use web interface for uploading drone imagery and managing the ortho mapping workflow, while behind the scenes it uses the distributed processing and storage capability of Enterprise and ArcGIS Image Server to quickly process even very large collections of drone imagery. (That also means it requires ArcGIS Image Server configured for raster analysis.) The ArcGIS API for Python can be used to automate the ortho mapping process. Sharing Ortho Maker products is virtually automatic—they become imagery layer items accessible in your Enterprise portal, easily shared with users throughout your organization.

What do typical users say?

things typical users of each ArcGIS option for processing imagery might say

Next steps

Now that you have a better idea which solution makes sense for your application, it’s time to take one for a test drive. Drone2Map offers a free 15-day trial, plus a hands-on Learn lesson to get started. You can try ArcGIS Pro Advanced free for 21 days, and read more about getting started with ortho mapping for drone imagery.  For users with Enterprise 10.6.1+ and raster analysis enabled, Ortho Maker is included—find out how to get started.  Other Enterprise users should contact their administrator to see about getting access. If you still have questions, contact Esri for more product information.

more
6 7 6,655
175 Subscribers