Esri Technical Support Blog - Page 2

cancel
Showing results for 
Show  only  | Search instead for 
Did you mean: 

Latest Activity

(383 Posts)
GregoryLehner
Esri Contributor

esrilogo-resize1.jpgIf you are a customer with an Oracle geodatabase and are planning to upgrade your enterprise geodatabase to ArcGIS 10.2.1, please read the following technical article before you upgrade, as some issues exist that directly impact the upgrading process. If you have any further questions or problems not cited in the technical article, please contact Esri Technical Support.


John B. - Product Management

more
0 0 507
by Anonymous User
Not applicable

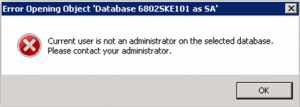
You’re all set to take on a Workflow Manager database as the new administrator. All is going well, until you try to log in to Workflow Manager Administrator. At that time, you get the following error, “Current user is not an administrator on the selected database. Please contact your administrator.” (Figure 1)

Figure-1-NoAdminWMX1-300x107.png

Figure 1 - Not an Administrator


When I first experienced this, my natural instinct was to follow my nose down the trail that the error had provided. Like me, you may even decide to grant database administrative rights to the user in question in an effort to temporarily alleviate this error. Unfortunately, this is technically not the case and you will continue receiving this error.

Don’t worry - it’s not your fault. This error is technically correct, but tends to be misleading. It gives the impression that the database user needs additional administrator privileges. This is not the case.

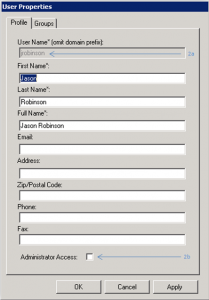
As it turns out, the error is not with the database user, but with the Workflow Administrator user which is stored on the Workflow Manager database. First, each user registered with the Workflow Manager database is listed as either having or not having administrator access. Second, each Workflow Manager user is associated with a Windows user (Figure 2).
Figure-2-User-Properties-209x300.png

Figure 2 - User Properties


When you open the Workflow Manager Administrator application, the problem surfaces because it is using your Windows credentials. If your credentials are not associated with a Workflow Manager user, the error will be flagged. Or, if those credentials are associated with a Workflow Manager user, but the user lacks administrative rights, the error will also be flagged.Solution

You need to find the user which exists on the Workflow Manager as an administrator, access the application as that user, then add your own user as an administrator. This is how to do it:
  1. Access your DBMS software.
  2. Access the Workflow Manager database. If you’re not aware of which database you’re looking for, right-click the connection of interest in ArcGIS Workflow Manager Administrator and select Properties. (NOTE: This is not to be confused with User Properties!)
  3. View the JTX_USERS table.
  4. Find the IS_ADMIN column.
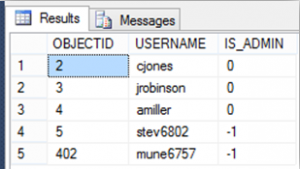
  5. Locate any record in the IS_ADMIN column which is assigned a value of -1.
  6. Take note of the value which is in the USERNAME column that is associated with the record found in Step 5 (Figure 3).
    Figure-3-USERNAME_ISADMIN1-300x169.png

    Figure 3 - USERNAME/IS_ADMIN

  7. Ensure that your Windows environment contains a user identified by the value found in Step 6.
    • If the Windows environment does not contain a user identified by the value found in Step 6, create a user.
  8. Open the Workflow Manager Administrator application as the user identified or created in Step 6. (This can be achieved by holding down the Shift key and right-clicking the Workflow Manager Administrator application and selecting 'Run as Different User'. Alternatively, you can log out and then log in to the machine as the user found in step six.)
  9. Connect to the environment.
  10. Now you’re in. The best thing to do here is to add your normal login as an administrative user to the Workflow Manager environment within the Security/Users section.

Congratulations! You’ve changed the existing environment into acknowledging you as an administrative user. As a result, the administrator error is gone, and you’re ready to administer some workflows!

more
0 0 2,578
MeganSingleton
Occasional Contributor III

With the release of 10.2 and plans to deprecate the ArcSDE command line tools, you may be wondering how current tasks that use these tools can be completed elsewhere. I wanted to share some workflows that have alternate user interface tools in ArcCatalog/ArcMap that will make transitioning as seamless as possible.


If you are a frequent visitor of the ArcSDE Administration Command reference you may have noticed within the latest versions of the command line reference, there are numerous areas that include a little globe to indicate alternate or recommended workflows:globe.jpg

NOTE: There are no web-based versions of the ArcSDE command line reference for 10.1 and 10.2, but it can still be accessed on the server on which the application server/command line tools are installed.

In order to put a nice spin on delivery I will use a ‘Do This, Not That’ theme with a list of tasks within the Enterprise geodatabase that have alternate solutions or tools. I have also thrown in a few tasks that may not be directly related to the command line, but which have new recommended workflows.

Create an Enterprise geodatabase:

Use the Create/Enable Enterprise Geodatabase tool instead of using the ArcSDE Post Installation Wizard

This may seem like a no-brainer since the ArcSDE Post Installation Wizard was deprecated at the 10.1 release, but I thought this would point you in the right direction (or at least humor you).

Recalculate the layer extent:

Use the Feature extent tab within the layer properties of ArcCatalog instead of the sdelayer -o alter -E calc command line tool.

Recalculating the XY extent can now be done within ArcCatalog using the Feature Extent tab of the Layer Properties. This tab was added at release 10.1 for the ability to administer the XY extent of layers.

Create a multi-versioned/versioned view:

Register as versioned instead of using the sdetable -o create_mv_view command line tool.

Note that the terminology for multi-versioned views has transitioned to versioned views at the 10.1 release and how they are created has changed. Registering data as versioned starting at version 10.1 will automatically create a versioned view.

What if your data is already versioned and doesn’t have a versioned view created?
    • At version 10.1, the Create Versioned View tool can be used if the data was already versioned prior to upgrading and doesn’t currently have a versioned view created.
    • At version 10.2, the Create Versioned View tool is removed. Use the ‘Enable SQL Access’ context menu for these instances where the object does not have a versioned view.

For more details on using the Enable SQL Access context menu, review the Help topic, Enabling SQL access on geodatabase data from ArcGIS for Desktop – 10.2

Place a layer in load only or normal IO mode to bulk load data or rebuild the spatial index:

Use the Layer Properties Index tab, or the Remove/Add Spatial Index geoprocessing tool instead of the sdelayer –o load_only_io/ normal_io commands.

Starting at version 10.0 the Add / Remove Spatial Index (Data Management) geoprocessing tools are available.

View the spatial column of a table that is not registered with SDE or the geodatabase:

View in Database Connections in ArcCatalog or drag/drop into ArcMap as a query layer (feature discovery) instead of using sdelayer -o register

In previous releases, database tables that contained spatial types needed to be registered with ArcSDE for their spatial column to be accessible. This resulted in the table displaying as a feature class after registration. At version 10.1, tables that contain geometry types such as Oracle Spatial and SQL Server Geometry are accessible through ‘Database Connections’. These tables will be displayed with a table icon with a square. Double-clicking will connect and determine/discover the geometry type and the icon will change to a feature class representing the geometry type.db-connections-icons.jpg

If needing to take advantage of geodatabase functionality, you can register the feature classes/tables with the geodatabase, which will also registers them with the ArcSDE system tables during the process.

Managing connections:


The Geodatabase Administration tool is new at 10.1 and can be accessed by right clicking on the geodatabase > Administration > Administer Geodatabase context menu item. One of the many uses for this tool is that it provides a user interface to view and interact with user connections. Keep in mind that certain permissions must be granted to view/disconnect users. Consult the Help topics for more details on this.Viewing connected users in ArcGIS for Desktop – 10.2Removing connections from a geodatabase in SQL Server – 10.2Removing connections from a geodatabase in Oracle – 10.2Removing connections from a geodatabase in DB2 – 10.2Removing connections from a geodatabase in PostgreSQL – 10.2A quick tour of administering ArcSDE geodatabases with ArcGIS for Desktop – 10.2

  • View currently connected users for geodatabase / view locks:

Use the Connections and Locks tab within the Geodatabase Administration tool instead of using sdemon –o info –I users/locks
  • Prevent new connections to the geodatabase:

Prevent new connections to the geodatabase in geodatabase Properties > Connections tab instead of using sdemon -o pause/resume
  • Disconnect users from the geodatabase:

Use Geodatabase Administration tool > Connections tab > Disconnect instead of sdemon -o kill

Importing datasets to the Enterprise geodatabase – shapefiles and coverages:

Use the Feature Class to Feature Class (conversion) geoprocessing tool instead of shp2sde –o create command line tool.

This geoprocessing conversion tool can be run in batch mode or scripted in ArcPy to import shapefiles into the geodatabase. If there is a further need to adjust the field mapping within the tool, use the arcpy.FieldMappings class.

We are continually working on alternative user interface solutions to the command line tools. Please contact Esri Support Services if you have workflows that use the command line tools and are unaware of alternative workflows you can utilize from the user interface.

For on-going discussion related to this topic, please visit the ArcGIS Forums: Alternatives to using SDE command line tools - Blog DiscussionMelissa J. - Geodata Support Analyst

more
1 0 4,516
MeganSingleton
Occasional Contributor III

With the growing need for organizations to distribute their data in remote locations, geodatabase replication can help to manage the changes made between geodatabases in different locations. When working with distributed and remote geodatabases it is often asked, “What is the best method to create and setup replicas?”


Working over a WAN (wide area network) or the Internet in disconnected environments is often simplified by using a geodata service to create replicas and synchronize edits for replicas. Using the Create Replica from Server tool can be useful when needing to create replicas on smaller datasets, but because this tool processes the data and replica registration in one step, it may not be a good fit for larger datasets. What is a suitable workflow to follow when the datasets to be replicated are very large?

Due to the size of data it is often not possible to create the replica using a geodata service where the data is being created and transported to the relative replica geodatabase during this replica creation process. In these cases it is better to manually transport the data from the parent geodatabase to the child location and then register the replica with the register with existing data option. The option of replicating with a disconnected workflow by creating the replica and transporting using a geodatabase or an XML workspace document is another option. Keep in mind this XML file has the potential of being very large as it will contain the data and the replica registration.

It may be better just to copy the data to the remote location first, and then create the replica registration by using the Create Replica wizard saved to an XML document that uses the 'Register with existing data' option. Then, this XML document can be imported to the child geodatabase to finalize the replica registration (use the data option on the Import XML workspace document when importing to the child geodatabase.)

In this workflow there will be an example of first transporting the data to be replicated to the destination geodatabase and then creating the replica registration via a geodata and map service with the register with existing data option.

Prerequisites


When using the register with existing data option during the replica creation, there are several things to keep in mind.
  • Geoprocessing tools like Create Replica from Server and Create Replica cannot be used with this option as it is only available in ArcMap via the Distributed Geodatabase toolbar.
  • There are several requirements or prerequisites for the data when using the 'Register with existing data option' during the replica creation / registration:
        • GlobalIDS must exist on the data that will be included in the replica prior to copying to the destination geodatabase.
        • The data must match exactly on parent and child geodatabase.
  • Please reference the Preparing data for replication and Replicas created with the option to register with existing data help topics for the tips section, which discusses important considerations.
  • Map services and geodata services must have their data sources registered as data stores prior to publishing. Please see the About registering your data with server help reference for more information about registering data stores.

Create/Register the Replica via a Geodata/Map Service


This workflow assumes that the data has previously been copied to the destination geodatabase and uses tools to register the data that are included in the replica to start tracking the changes between parent and child replica geodatabases. This data may already exist in both locations or can be easily transferred via database restore, etc. The steps use a map service to specify the exact datasets that will be registered within the replica and a geodata service component to communicate with the remote geodatabase to create/register the replica. Using the geodata enabled map service allows for the Distributed Geodatabase toolbar to become enabled to use the Create Replica tool with the register with existing data option.

Steps:

  1. Copy data to the destination geodatabase and follow all the prerequisites for distributed data/replication.
  2. Register data stores for the geodatabase that the geodata and map services will be published from.
  3. On the parent geodatabase server, publish a geodata service. (Publishing a geodata service)
  4. On the parent geodatabase server, create a map document with the data that will be included in the replica and publish this as a map service. Note: Make sure to use the same name as the geodata service and place the map service in the same location as the geodata service.
    (Publishing a map service)
  5. On the child geodatabase server, browse to the GIS Servers and add the previously created map service to a new ArcMap document. On the Distributed Geodatabase toolbar, launch the Create Replica tool and create a replica using the specific replica type needed (for example, two-way).
  6. Within the ‘What do you want to replicate?’ section, select ‘Register with existing data only’.
  7. Select the local child geodatabase within the ‘Which geodatabase do you want to replicate data to?’ section.
  8. Provide the replica with a name.
  9. Optionally, select ‘Show advanced options for overriding replica defaults when I click next’ to change the geodatabase model to full or simple and to select the Spatial extent for the replica.

After this process completes, the Replica Manager can be accessed from parent and child replica geodatabases to ensure that the replica has registered properly. The geodata service can then be used to synchronize changes when needed.

Additional Resources


Check out the ArcGIS Resource center for help topics working with Geodatabase Replication and Distributed data to learn more about different scenarios of using replication based on your organization’s needs.Melissa J – Geodata Support Analyst

more
0 1 1,694
KenGalliher1
Esri Contributor

Tuning your RDBMS is an important aspect of maintaining your enterprise geodatabase. Two tasks found in all Esri-supported RDBMS are updating DBMS statistics and rebuilding indexes. If you are loading data in bulk or running query-intensive DML operations with SQL, these tasks need to be done more often. Fortunately for us, these tasks are relatively straightforward to accomplish.


The scripts found in Esri Knowledge Base Article 24518 provide the SQL to both update statistics and rebuild indexes.

NOTE:

  • Oracle databases can be set to automatically update statistics.
  • The SQL Server script in KB24518 is still applicable for geodatabases in SQL Server 2008, 2008R2 and 2012.

Also, if you are using ArcGIS 10.2 or 10.1, there are some new geoprocessing tools in the ArcToolbox that can accomplish this:Data Management Tools > Geodatabase Administration > Analyze Datasets:
Updates the database statistics of base tables, delta tables, and archive tables, along with the statistics on those tables’ indexes. This tool is used in enterprise geodatabases to help get optimal performance from the RDBMS query optimizer. Stale statistics can lead to poor geodatabase performance.Data Management Tools > Geodatabase Administration > Rebuild Indexes:
Updates indexes of datasets and system tables stored in an enterprise geodatabase. This tool is used in enterprise geodatabases to rebuild existing attribute or spatial indexes. Out-of-date indexes can lead to poor geodatabase performance.

No matter which one you choose, these resources can be run as automated tasks using SQL, or the ArcToolBox tools can be exported to Python and automated as well.Ken G. - Geodata Support Analyst

more
0 0 1,734
JeffreySwain
Esri Regular Contributor

Lidar data is become increasingly available and there are likewise new tools to analyze and display the data. LAS is the public file format for the interchange of three dimensional point cloud data between data users. LAS information can be downloaded and has a file extension of *.las. The LAS Dataset was created in order to grant the ability to utilize LAS data quickly in ArcMap. However, with the advent of the new format, new questions are raised, including what types of analysis, geoprocessing tools and toolbar buttons can be used on a LAS dataset. The ArcGIS 10.1 help documentation lists all of the tools that can be used on a LAS dataset within ArcToolbox and on the 3D Analyst toolbar, all with only a few small steps to enable them. What small steps am I referring to?

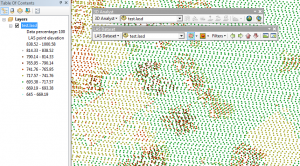
las1-300x195.png

Full Extent of the LAS Dataset with the Tools greyed out.


The ArcGIS 10.1 help on interactive toolbar tools for LAS datasets identifies one such step:

However, the tools are not always active when working with LAS datasets and the 3D Analyst toolbar tools. The 3D Analyst toolbar tools are only available when a LAS dataset is displayed as a full resolution triangulated surface. A full resolution surface is indicated in the table of contents when 100% of points are being used to construct the triangulated surface. When the LAS dataset is displayed as a point set the tools will be disabled.


What does 'full resolution' mean? According to the ArcGIS help on the topic, the definition is, "the scale threshold used to control when the LAS dataset will render itself without thinning, using 100% of the LAS points." So once you have modified the settings or zoomed in far enough to see 100% of the LAS points, you can use all the tools in the 3D Analyst toolbar, right? Almost.
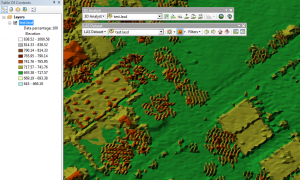
las2-300x166.png

The final step is to choose the Elevation option from the Display As TIN options on the LAS dataset. Once you make that selection, you should see the LAS dataset appear in the drop-down for the 3D Analyst toolbar and the tools should become active.
las3-300x180.png

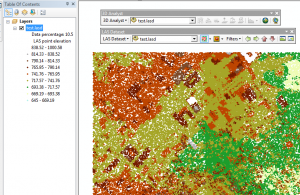
Now you can create the profile graph or generate a 3d feature just as you would with a normally recognized surface in ArcMap.


more
0 0 1,161
MeganSingleton
Occasional Contributor III

A lot of changes were made at ArcGIS for Desktop 10.1 regarding database connections within the client software. The ‘Add Spatial Database Connection’ dialog is renamed to  ‘Add Database Connection’, and new functionality is added, allowing connections to enterprise geodatabases and other supported databases.

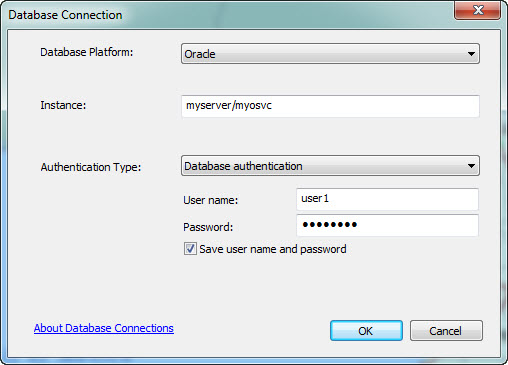
At the 10.1 release, we introduced support for the Oracle Easy Connect string when making these connections. This is a simpler Oracle naming method connect string that you can use within the Instance parameter of your Database Connection properties. The Easy Connect naming method eliminates the need for service name lookups in the tnsnames.ora file for TCP/IP environments.  No naming or directory systems are required if you use this method.


The Oracle Instant Client is a lightweight manual install. You can obtain the Oracle Instant, Runtime, or Administrator Client from Oracle and install the client on the client computer, following the directions in your Oracle documentation. It is comprised of the minimum required files necessary for making database connections using an Esri Client; however, it does not contain any executables or configuration/migration tools.

The setup process is quick:

  1. Unzip the downloaded contents into a directory.
  2. Add the location of the Oracle Instant Client directory within the system path environment variable.
    1. Example: c:appinstantclient_11_2
  3. Test out a new database connection in ArcCatalog.
    1. You can also test the connection in the Catalog window in ArcMap.

TIPS:

  • For making database connections within ArcGIS for Desktop, use the 32-bit Oracle Instant Client.
  • For using the Easy Connect string with other Oracle clients, make sure the sqlnet.ora file has EZCONNECT specified within the NAMES.DIRECTORY_PATH parameter (the Instant Client does not include this file by default).
  • Make sure the database instance is configured for EZCONNECT.
oracleeasyconnect.jpg

Making database and geodatabase connections at 10.1 just got a little easier - happy connecting!

References

Melissa J. - Geodata Support Analyst

more
0 0 1,595
PhillipWaldron
Esri Contributor

Are you working to put together a migration plan for the transition to ArcSDE 10.1?  There are some new changes for connecting and disconnecting users with ArcSDE 10.1!Good to Know

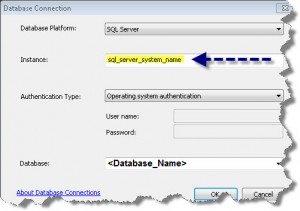
One of the more significant changes with ArcSDE 10.1 is that the default means of connecting to the geodatabases is via Direct Connections. And gone is the script, i.e. sde:sqlserver:servername, replaced by simply providing the instance name where the RDBMS resides.

database_connection-300x211.jpg

[Note:  ArcSDE service connections are still available through the use of geoprocessing tools or Python script to connect to an enterprise geodatabase.]

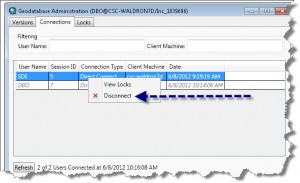
The geodatabase administrator can now disconnect users from a geodatabase from the Connections tab on the Administer Geodatabase dialog box in ArcGIS for Desktop.

  1. Right-click the database connection in the Catalog tree, point to Administration, then click Administer Geodatabase.
  2. Click the Connections tab.
  3. Choose the user connection (or connections) you want to remove.
  4. Right-click the connections and click Disconnect.

[Please note, the geodatabase administrator may need to be granted certain permissions to do this, e.g., for SQL Server the administrator must be added to the processadmin fixed server role.]Disconnect-300x183.jpg

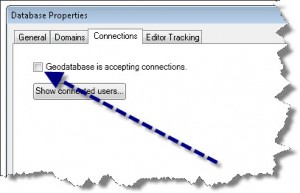
And for administrators, there is a new tool that allows you to prevent connections during those times when you need to perform maintenance.
  1. Right-click the database connection in the Catalog tree and click Properties.
  2. Click the Connections tab.
  3. Uncheck Geodatabase is accepting connections.
NotAcceptingPics-300x193.jpgWay to prepare client systems with ArcSDE 10.1

Make sure you have the correct RDBMS client for your Windows client systems. One way to download the correct RDMBS client is through your Esri Customer Care Portal downloads folder. All of the supported RDBMS clients are located in the Software Downloads section under the DBMS Support Files link.Phillip W – Geodata Support Analyst

more
0 0 582
by Anonymous User
Not applicable

Marker.jpg

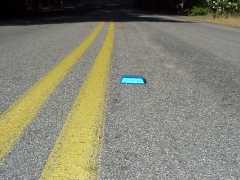
The fabled blue marker, what do you do?!


Our lives are filled with things we often overlook. Case in point, what are the little blue reflectors on the road that you see on the way home from work every day? I've tried to establish a pattern. Are they marking the center of the lane? Sometimes they’re right on the road center line, sometimes they’re right in the middle of your wheel path, thump thump, and sometimes they’re barely on the road at all. If you look, you'll see them all the time; you just have no earthly clue as to what they actually do.

The OLE DB connection is not so different. It’s always sitting there in ArcCatalog staring right back at you under Database Connections. You usually skip right over it on your way to adding a Spatial Database Connection. Today, however, I urge you to stop, peer under the hood, and look at what an OLE DB connection can do.

The OLE DB connection is a window into the abyss, a.k.a. your geodatabase repository. This area is typically off limits. Perhaps your DBA isn’t a fan of people tinkering around in the RDBMS. Esri typically says “hands off” as well, since we don’t usually support errors caused by messing around with the underlying repository tables. Their sensitive nature aside, these tables can be quite helpful and using an OLE DB connection to access them is read-only, so it’s also safe. Your DBA can rest easy.

Many of the problems you might have during the course of a normal week might be sniffed out by using this connection. I typically use mine at least once a week, maybe even three or four times depending on how heavy my workload is. I’ll give a couple examples on how this connection can help.

Pretend, for a moment, that you’re trying to take your geodatabase to a fully compressed state (i.e., State 0). The dialog indicates that the process has completed successfully, but since you’re a rock star GIS professional, you know that a successful compression is not always indicative of a full compression.  So you crack open the OLE DB connection, scroll down to your compress_log table, and look up your end_state_count. It reveals that you have a count of 1. Since 0 is a state and is always present, you know that a count of 1 indicates that you’ve successfully achieved a full compression.

But what if the value isn't 1? What if the end_state_count reveals that there are two states remaining? Not a problem, you scroll down to the state_locks table, revealing that state_id 233 is being locked by sde_id 622. You then deftly maneuver up to the process_information table and you find that sde_id 622 is your SOC account. Then it dawns on you, you never did disconnect your web server, so you stop your web server, freeing up this connection and it’s resulting locks, compress again, and you’ve achieved full compression, all without ever cracking open Management Studio or SQL Developer and freaking out your DBA.
OLEDB1-300x192.png

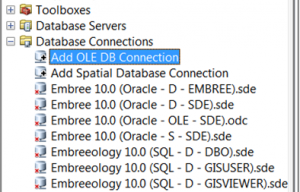
Ye Ole Db Connection


Making the connection is relatively easy. Microsoft OLE DB connection drivers, which can handle Microsoft SQL Server and Oracle databases, are automatically installed. However, you may have to install the drivers for PostgreSQL databases yourself. Once installed, just click on “Add OLE DB Connection” within ArcCatalog, highlight the provider you want to use, fill out the requested information, and test the connection. If successful, click OK and you’re in! I know you 10.1 users are out there too. Don't worry, the link to opening an OLE DB connection is no longer on your ArcCatalog tree, but it's still around. It's now a button for your toolbar, so just click on Customize, go to Customize mode, select the Commands tab, highlight ArcCatalog, and drag the Add OLE DB Connection to your toolbar.

Good luck!

Oh yeah, the next time you see a blue marker on the road, glance to the right. I bet you’ll find a fire hydrant.Steven E. - Geodata Support Analyst


Edited on 4/27.

more
0 0 609
JeffreySwain
Esri Regular Contributor

Background processing is a new feature that was added at ArcGIS 10. Background processing provides the ability to run a geoprocessing tool and not lose the ability to work within ArcMap.  Instead, the tool progress dialog message has been replaced by a scrolling bar in the lower right corner of the map document.

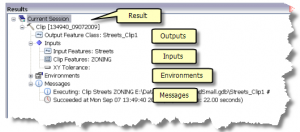
You can now stack up multiple geoprocessing tools to run in order.  The intermediate progress messages can still be seen when background processing is enabled, by expanding the Results Window.  This can be the best of both worlds, as you can continue to work within ArcMap, but still see information about what step the current geoprocessing tool is on.

results-300x132.png

Results Tab

greencheck-300x96.png

Background Processing Completion

When the background processing completes, a less obtrusive message will appear in the lower right corner of the map document, indicating it has completed.  You can control the time this message is visible under the Geoprocessing Options and adjusting the slider.


I know what you are thinking,  "but where did my captivating progress dialog message go that is usually center stage on the map document?"
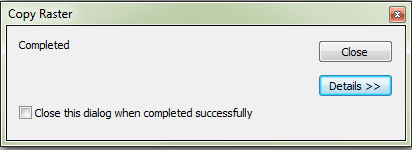
foreground.png

Foreground Processing Message


Well fear not fellow users! You too can return the progress dialog message to its former glory with these steps:

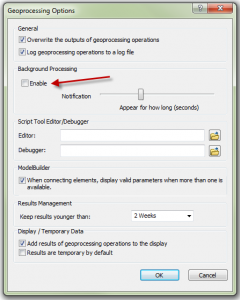
1. In ArcMap, open up Geoprocessing tab.

2. Select the Geoprocessing Options.

3. Uncheck the 'Enable Background Processing' radio button.geoprocessing-options1-240x300.png

Now the next time you run a geoprocessing tool, you will see the familiar message and be captivated again.

There is more information about the background processing here.Jeff S. - Raster Support Analyst

more
0 0 5,239
39 Subscribers