As a support analyst, we get a range of fun issues to review. These issues may be specific to the user’s environment, data, workflow, etc. Sometimes, we may notice an influx of calls pertaining to a single workflow. When this happens, we revisit the resources our users have available to them, and ensure that the documentation clearly describes how to execute workflows.
One of these workflow issues we have seen in the call center lately has been working with schema changes in replicas. For example, after creating a replica, you realize you need to add a field to a certain feature class, or remove a domain that is no longer necessary. This blog hopes to make this workflow more intuitive with a few tricks that will help the replica gurus out there efficiently deal with schema changes.
Let’s review: when a replica is created, the data and schema of the objects being replicated are registered in the parent geodatabase and child geodatabase. The data is defined as the rows in the table and uses the GlobalId values as a link between parent and child, while the schema consists of the fields, domains, subtypes, and other properties that describe the replicated data. Remember, if you use the Distributed Geodatabase toolbar in ArcMap to create the replica, and use the option to 'Register existing data only', then the replica could have differing schemas upon creation. This is allowed as some organizations have a need for this diagram, so it is up to the replica creator to ensure that the data is prepared to their own needs before creating the replica.
Ideally, the schemas are identical on both replicas during replica creation, but over time, changes might be applied to each replica schema. For example, one replica may require additional fields to complete a project, while the relative replica may need to apply a new domain to an existing field. When this happens, the schemas of the replicas are no longer the same. Again, it is not required to have identical schemas in the parent and child geodatabases; however, if the differences are not intended, then you may see some unexpected behavior.
What can happen if there are schema differences in the replicated data?
- Edits that don't synchronize- Data synchronization only imports changes for tables and fields that are common to both replicas.
- Note: If schemas do not match when data is synchronized, the data is flagged as having been sent to its relative replica. Remember, replicas do not require schemas to match, but any and all edits will be flagged as synched during synchronization, whether or not there is a matching schema (for example, a field) in the relative replica to receive the edits.
- Invalid values - Changes that violate domains, subtypes, connectivity rules, and relationship rules are applied when synchronizing changes. The validation tools on the editor can be used to check the newly imported values.
- Data synchronization errors - This can happen when you manually make a schema change to both replicas. For example, you may want to add a field to a table. If you do this, be sure to make the exact same schema change in all cases. If there is a difference (for example, a field is a string on one replica but an integer in the other), a data synchronization error will occur.
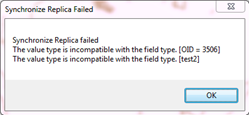
Synchronization error due to mismatched field types between replicas.
- Unsupported changes - Some types of schema changes can cause synchronization to fail, but no warning is displayed if you make the change. These changes are not detectable by the geodatabase replication system. They include database-level operations like changing permissions on tables in the database. If permissions are changed to read-only for replicated data, a failure will happen when importing changes from the relative replica.
Applying schema changes across replicas - Modifying the schema of a replica to match the schema of a relative replica is a completely separate process from data synchronization. If you believe you are encountering some of the unexpected behavior described above, you may use the following tools.
Three tools are provided to update replica schemas:
- Export Replica Schema - Used to export the schema from the geodatabase that has the schema you want applied to the relative replica. Typically only used for disconnected environments or scripting.
- Compare Replica Schema - Used to find the differences between the two geodatabases in the replica. This is always done from the geodatabase that you want the changes applied to. This is the first step if working in a connected environment.
- Import Replica Schema - Used to import the differences found during the replica comparison into the geodatabase that you want the changes applied.
The tools are available on the Distributed Geodatabase right-click context menu in the Catalog tree, Distributed Geodatabase toolbar in ArcMap, and as geoprocessing tools.
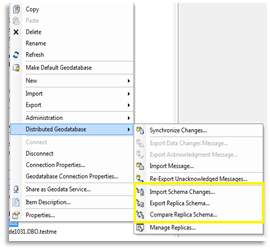
Distributed Geodatabase right click context menu in ArcCatalog
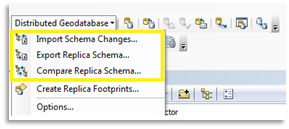
Distributed Geodatabase toolbar in ArcMap
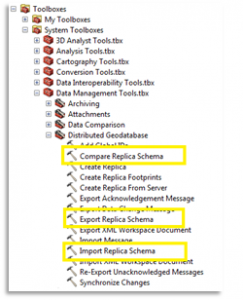
Data Management Geoprocessing Tools
It is important to note that there are very slight differences in these three methods. For example, the Import Replica Schema wizard on the Distributed Geodatabase right-click menu from ArcCatalog and the Distributed Geodatabase toolbar in ArcMap list the changes that the user can opt to apply or not apply, while the geoprocessing tools (which are more often used in disconnected environments or scripted automatic processes) do not.
Lastly, keep in mind that the geoprocessing tools are typically used in a three-step process (Export, Compare, and Import) and are mostly used when this process is part of a scheduled task. The Distributed Geodatabase toolbar in ArcMap and the Distributed Geodatabase right-click context menu can be used in a connected environment and with only two steps (Compare and Import).
While eliminating the Export Replica Schema step can save you time, if there is doubt about which geodatabase schema should be the input for the tools, or doubt about which changes are being propagated, I find that the 3-step Geoprocessing Tool method can be much more intuitive. The first tool will always be the Export Schema Changes geoprocessing tool. This tool has only one geodatabase input (the geodatabase that has the schema you would like propagated to the relative replica), and creates a single output XML file.
Now, we run the Compare Replica Schemas geoprocessing tool where our input is the relative geodatabase and the XML file we just created. The output for the Compare Replica Schema Geoprocessing tool is a single XML file. Finally, our third step is to run the Import Replica Schema. Our input will be a geodatabase - the relative to the input we enter in the Export Replica Schema tool, and the compare.XML we just created. While the geoprocessing tools do not have the organized UI that lists the recognized schema differences, this method can clarify any confusion about where the changes are being taken from and where they are being sent to.
See Resource documents:
Tina M. - Geodata Support Analyst


