- Home
- :
- All Communities
- :
- Networks
- :
- Esri Startup Program
- :
- Esri Startup Program Blog
- :
- Esri Startup Program Orientation: Access Your Soft...
Esri Startup Program Orientation: Access Your Software
- Subscribe to RSS Feed
- Mark as New
- Mark as Read
- Bookmark
- Subscribe
- Printer Friendly Page
- Report Inappropriate Content
This blog follows Acceptance & Onboarding, Access EPN Partner Benefits is next in the Orientation Series
Access Your Software
*Please read this closely to avoid headaches down the road & reference our Technical Alignment blog*
This page describes how to structure, access, and administer the software provided to your team through the Esri Startup Program, which provides a robust software benefits package. It's important to carefully admin and track your order emails, accounts/subscriptions, and usernames. We suggest you invite key staff to My Esri as soon as possible.
Overview
Esri System Destinations
There are three important destinations to access and administer your software:
- My Esri: Your one-stop destination for software downloads and authorization numbers to install and activate your licenses and developer subscriptions, admin your account, training, and other important access points for your team.
- arcgis.com or ArcGIS Online: is Esri’s GIS SaaS software. Once activated, you need to link your subscription to your My Esri. Also, ArcGIS Online provisions licenses for per-user licensed software, such as ArcGIS Pro.
- developers.arcgis.com: Manage and access your Developer Subscription Enterprise Plans through My Esri ‘Developer’ tab, which will bring you to your developer dashboard. Access ArcGIS Platform location-based services. View this video on activating your dev subscriptions!
Software Setup
Within 3-7 days of receiving your email, 'Welcome to the Program', the team member that applied will receive 3 critical software emails from the following senders, Service (service@esri.com), Esri, and My Esri (no-reply@esri.com):
- My Esri, provides instructions for the primary contact to connect to your organization and customer number within My Esri using a token. Admin needs to invite staff (users) and delegate permissions to access software or tech support.
- Esri Order XXXXXXX, PO XXXXXXXXXX, provides a link to activate My Esri as well as activation codes for your Enterprise Developer Subscriptions.
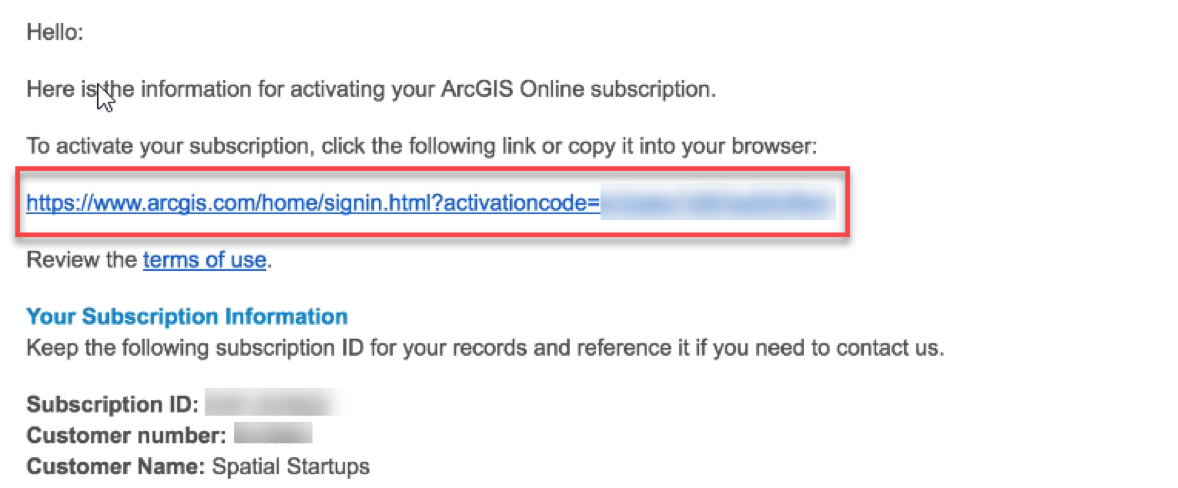
- Esri – Activate Your ArcGIS Online Subscription, contains an activation link for your new commercial ArcGIS Online Organization, with numerous user types and 10k credits. This should be used as your primary “umbrella” account vs dev/test orgs within developer subscriptions.
Accounts
Every team member needs a My Esri account and should be invited or request to connect to your organization unique customer number to gain the proper admin rights. Each subscription also results in a unique set of credentials (user types/named users). We recommend using a spreadsheet and recording these credentials for reference. We also recommend organizing your individual team member’s accounts as follows:
- My Esri Credentials: For team members who need administrative privileges or direct access to the software.
- 1 x ArcGIS Online Organization: Your commercial subscription and should be used as your PRIMARY PRODUCTION ENVIRONMENT for team members who work with production content and services. Included extensive credits and user types, carefully read Understand Credits docs and consider budgeting. Additional ArcGIS Online subscriptions are included in developer subscriptions for dev and testing.
- 3 x [Developer Subscription Enterprise Plan + Dev&Test ArcGIS Online Orgs]: The Startup Program provides access to three Enterprise Developer Subscriptions, each with its own Dev & Test ArcGIS Online Organization. View this video on activating your dev subscriptions! Provides access to ArcGIS Platform consumption pricing for location-based services (platform as a service (PaaS)). For team members who are developing, testing apps or content OR who need to demo noncommercial per-user licensed software, such as ArcGIS Pro, provided through the Developer Subscription.
If you or your team members have a prior Esri ArcGIS Login account, make sure to create new accounts as specified below--it makes life simpler to separate concerns with separate accounts. Before each step, make sure you are logged out of all accounts to avoid confusion. If you have previous accounts with existing content, work with Esri Technical Support to migrate them to your new accounts, or call to troubleshoot these steps.

1: Activate and Configure My Esri
The following assumes you have access to the Esri Order email and are setting up MyEsri for your team.1. My Esri Account Login:Open the Esri Order email, click the link to log into My Esri, with your ArcGIS username login, you can use the same login when you signed up for the program, this associates My Esri with your customer number or create a new account.


2. Invite your Team Members & update permissions: Go to “My Organizations” -> ”Users” -> “Invite Users” and follow the instructions. Here you can add multiple users by email, configure their permissions, and annotate the invitation. Be sure to activate
*Note, we recommend your team members create an ArcGIS Username login dedicated to your company to avoid confusion. Issues? Sign out of previous accounts and restart the browser.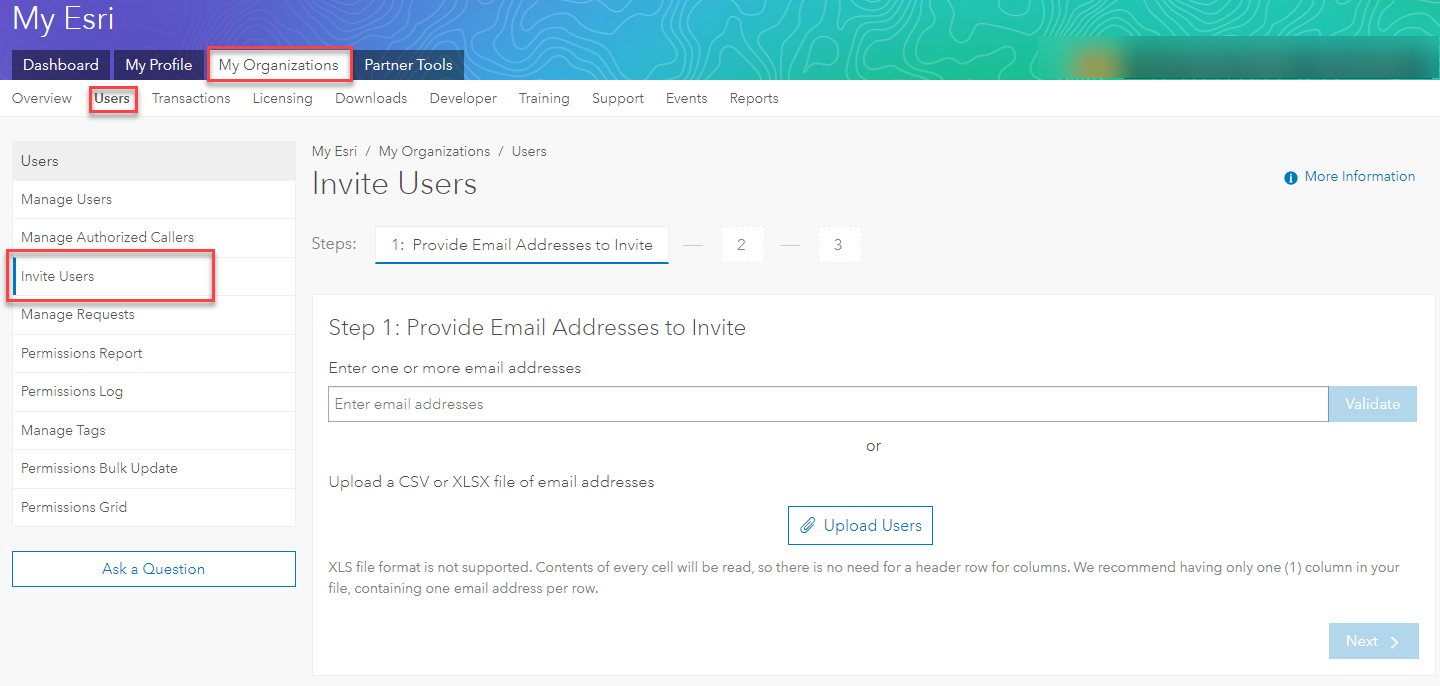 Update Permissions: Be sure to enable the proper permissions, such as access to tech support. in order for a team member to log a case with Support, they must be registered as an authorized caller.
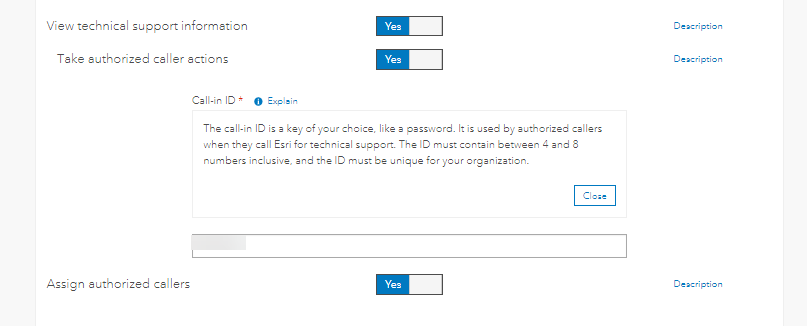
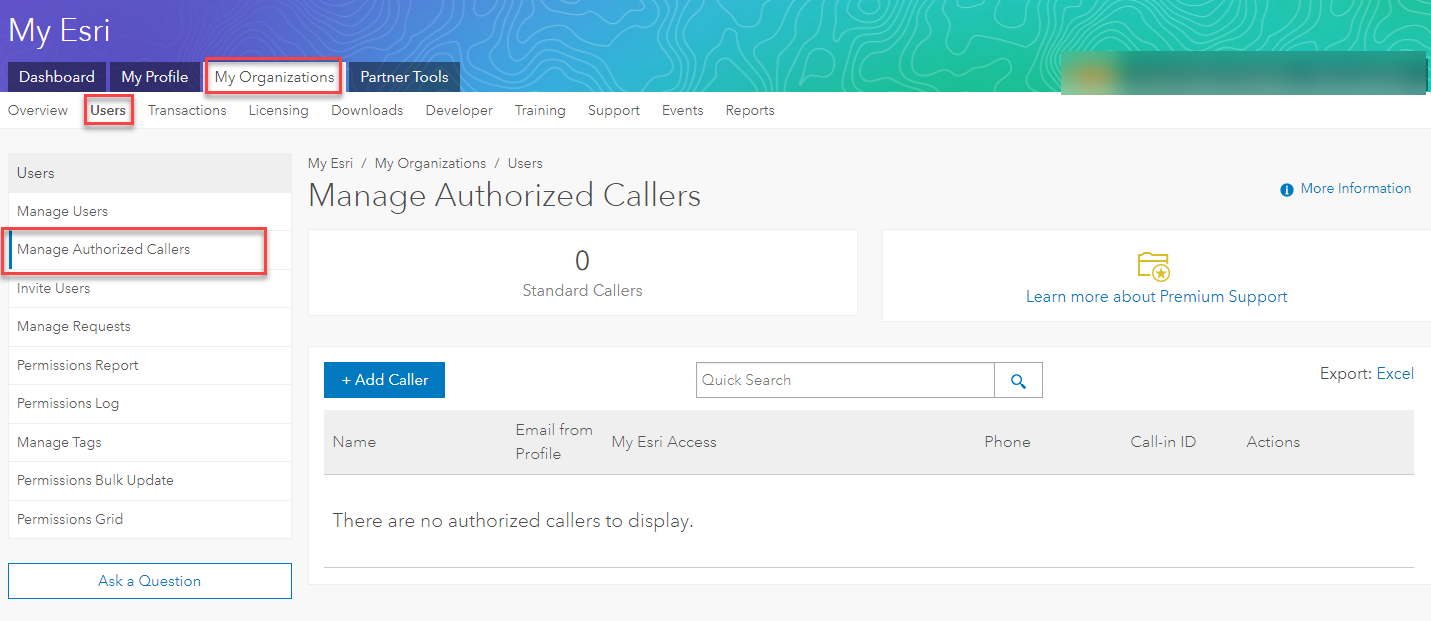
- Manage Support Cases: Go to “My Organizations” -> “Support” manage cases here, or access the external site.

2: Access Commercial Software
The following assumes you have been provisioned a MyEsri account per Step 1 and have appropriate permissions.- Access the software: Login to My Esri and go to “My Organizations”-> "Licensing". Downloads are available under the “Downloads” sub-tab and you can manage license provisions under the “Licensing” sub-tab.

3: Activate and Configure Developer Subscription
The following assumes you have been provisioned a MyEsri account per Step 1 and have access to a Developer Subscription code provided in the Esri Order email.
- Register your Developer Subscription: Open the Esri Order email, copy an unused Developer Subscription code, click the registration link, login to MyEsri, then paste and activate your code.
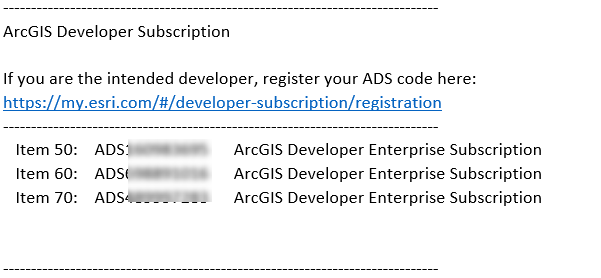
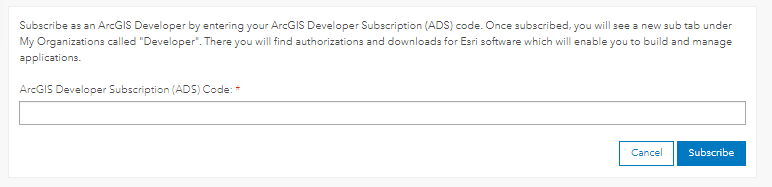
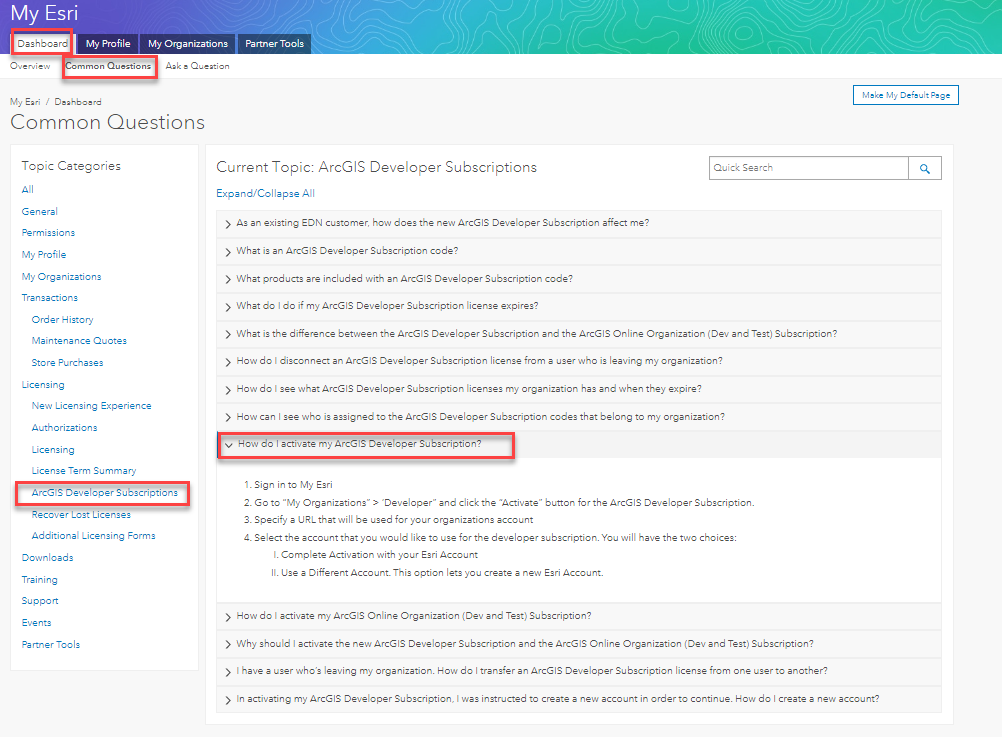
- Activate your ArcGIS Developer Subscription (ADS): Go to “My Organizations” -> “Licensing” -> on the left side find “Developers” and to enter your ADS code, click “Activate”. Reference Common Questions under "Dashboard" for the most up-to-date guidance:
- Complete Activation: Enter a URL for a single-user ArcGIS Online organization associated with your Developer Subscription and select “Complete Activation” with your EXISTING My Esri account. This ensures that your My Esri credentials are also used to access your single-user organization and the Developer Subscription Administrative Dashboard (see next step).
*Note, there is no software provided through this single-user organization and we do not recommend using it for team workflows. - Create your Developer Dev & Test Organization: After you have completed the activation, you will be prompted to log in. Log in with your MyEsri credentials to view the Developer Subscription Dashboard and click “Setup Dev and Test Organization.” Follow the steps to create a NEW This creates a new Dev & Test organization and a Developer Subscription Dev & Test account.
- Configure your Developer Dev & Test Organization: After you have created a new account, complete setup in ArcGIS Online and enter your NEW credentials when prompted. Once you sign in, fill out the forms to configure your Organization’s preliminary settings. Click “Save and Continue.” You will be taken to the Organization’s administrative landing page.
- Invite Team Members to your Dev & Test Organization: Click “Invite Members” in the “Organization” administrative console and follow the steps provided.
- Use Developer Subscription (Enterprise) software: Log in to MyEsri with your MyEsri credentials and go to “My Organizations”->”Developer”. Downloads are available under the ”Downloads” side-header and you can manage license provisions, besides those for Pro, under the “Developer” side-header.

- Configure Licenses (eg for ArcGIS Pro): Log in to your Dev & Test ArcGIS Online instance. Click “Manage Licenses” in the “Organization” administrative console and click the link under the “Licensed for” column to configure licenses for each user.

4: Activate and Configure ArcGIS Online Subscription
The following assumes you have access to the ArcGIS Online email and are setting up the umbrella Organization for your team. We recommend you read and reference "Get Started with Administration" documentation.
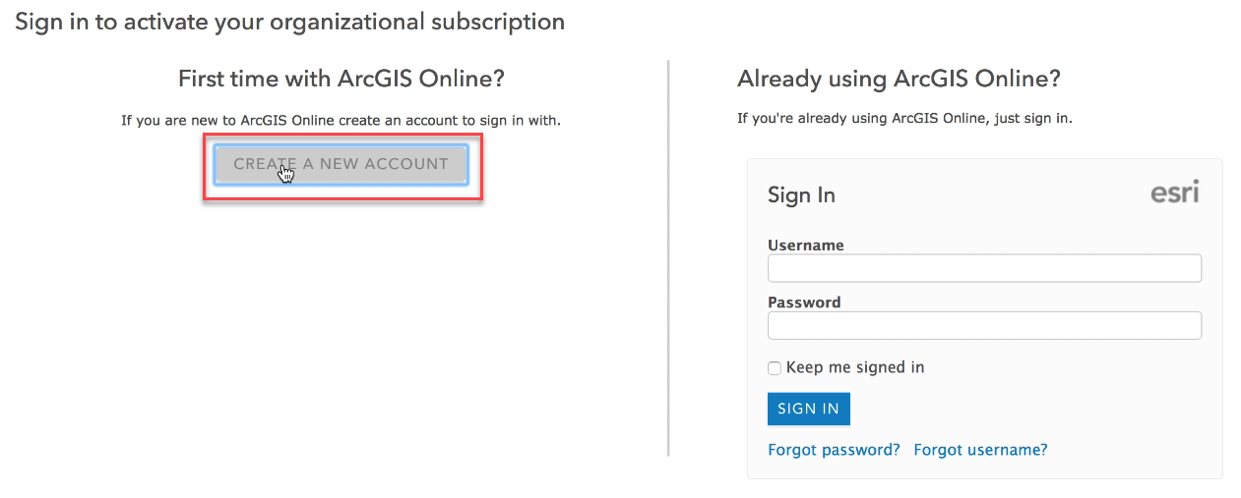
- Activate the Organization: In the ArcGIS Online email, first, click the link then create a NEW account and follow the instructions. This creates the ArcGIS Online account.
- Configure the Organization: Fill out the forms to configure your Organization’s preliminary settings. Click “Save and Continue.” You will be taken to the administrative landing page.
- Invite Team Members: Click “Invite Members” in the “Organization” administrative console and follow the steps provided.
- Use ArcGIS Online: There are no additional software configurations for ArcGIS Online. ArcGIS Online is a credit-based model and the credits provided through the Program will be consumed as you use Online services. It is important to read through Understand Credits documentation and consider enabling credit budgeting.
- View ArcGIS Online Subscription Info in My Esri: "Organization"-> "Liscensing"-> ArcGIS Online Information"

*Remember to track and save your usernames, subscription IDs, and accounts*
If you have questions, we suggest you first troubleshoot the issues with Esri Support, you have access to Standard Tech Support via the program. They have back end views into the systems. For more in-depth inquires, please email startups@esri.com.
Blog Return: Acceptance & Onboarding. Next: Access EPN Partner Benefits.
You must be a registered user to add a comment. If you've already registered, sign in. Otherwise, register and sign in.