- Home
- :
- All Communities
- :
- Industries
- :
- Education
- :
- Education Blog
- :
- IoT and GIS: How to integrate real-time updates fr...
IoT and GIS: How to integrate real-time updates from Disruptive Technologies sensors with ArcGIS
- Subscribe to RSS Feed
- Mark as New
- Mark as Read
- Bookmark
- Subscribe
- Printer Friendly Page
- Report Inappropriate Content
I recently put together a simple demonstration to show how easy it is to integrate IoT sensors from Disruptive Technologies with ArcGIS. Within just a few hours, you can start getting real-time updates from field devices (cabinets, transformers, server rooms, etc) into your maps and dashboards. Some of the use cases for the integration included getting real-time alerts around potentially hazardous situations (open cabinets/manholes) and assisting with operations by providing real-time alerts on non-SCADA devices. If you missed the recent demonstration video, you can find it here.

This blog is going to walk through the configuration that was demonstrated in the video (with help from Niklas of Disruptive Technologies... thanks Niklas!). It will take you step-by-step through the setup and provide the configuration files for getting an ArcGIS/Disruptive Technologies environment configured.
The first thing we are going to work on, is getting GeoEvent Server configured.
If you are new to Esri’s GeoEvent for ArcGIS, please take a look at some of the Getting Started material. The most basic definition of GeoEvent, is that it is a hub for real-time data that can be associated with a map. If you want to visualize real-time temperature, watch status changes on a device, or monitor weather feeds, then GeoEvent is the tool that can be used to connect A to B.
In GeoEvent, you basically need to get 3 things to get the integration in place with the Disruptive Technologies sensors: define an input, create a GeoEvent service, and then create an output. We will be walking through all 3 steps.
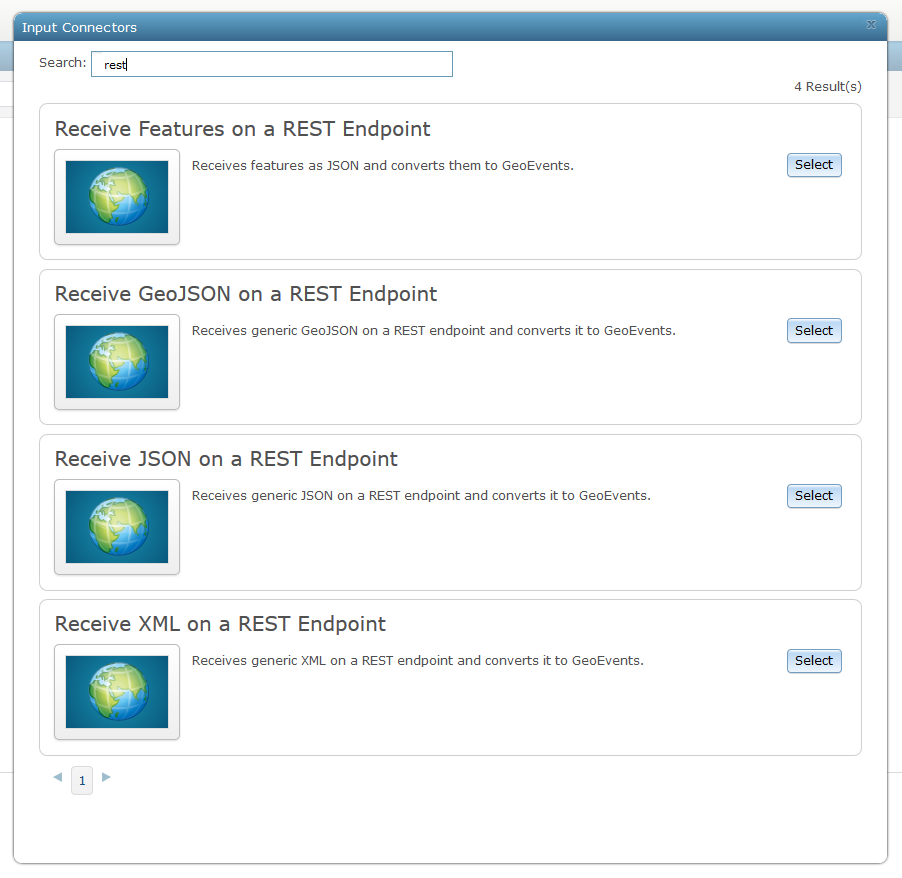
GeoEvent - Defining the Input
The first step in GeoEvent, is to build out your input. In this case, we are going to be using the ‘Receive JSON on a REST Endpoint’ input. This is installed out of the box, so you just need to select it to get started.
After you select ‘Receive JSON on a REST Endpoint, you need to configure it. The only ‘gotcha’ is to ensure that you DO NOT fill in the ‘JSON Object Name’ parameter. You can see I left it blank in the configuration below. Lastly, provide a ‘Name’ and then provide a name for the ‘GeoEvent Definition’ (we will change this later on, so the name doesn’t matter).
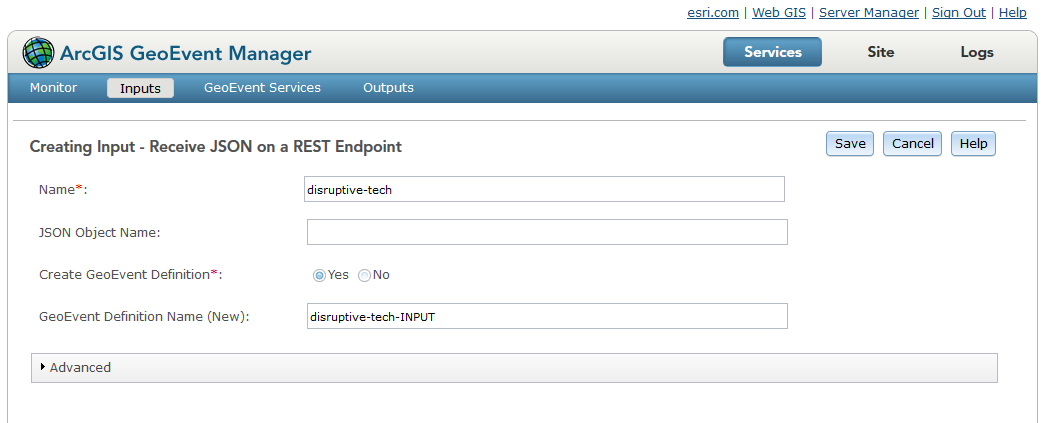
After you hit ‘Save’, go back and edit the input you just created. You should now see a URL that was generated. It should look something similar to this:
https://MYSERVER.com:6143/geoevent/rest/receiver/disruptive-tech
This will be the URL that you will provide to Disruptive Technologies to create your Adapter. So, copy it down.
This newly created input is now just waiting for data/messages. Now, we need to go over to Disruptive Technologies Studio to set up an Adapter, which will send messages to GeoEvent.
Disruptive Technologies Studio
Disruptive Technologies is a company based out of Norway, which also has offices in the US. They create some of the world’s smallest IoT sensors and have a companion software platform that can be used to manage all of the sensors. You can learn more about them at their website: https://www.disruptive-technologies.com/
All of Disruptive Technologies sensors communicate, via gateways called Cloud Connectors, back to the Disruptive Technologies cloud. All data is end-to-end encrypted, the Cloud Connectors are plug-n-play with built-in cellular and the data is available both via a web application and standard APIs.
The web application used to manage your fleet of sensors, set up integrations and give users access, is called Studio.
Creating a Data Connector
The standard cloud-to-cloud integration between Disruptive Technologies and third-party cloud services is done via a real-time push integration called a Data Connector.
For a quick introduction to Data Connectors, watch the video Data Connector in 50 seconds.
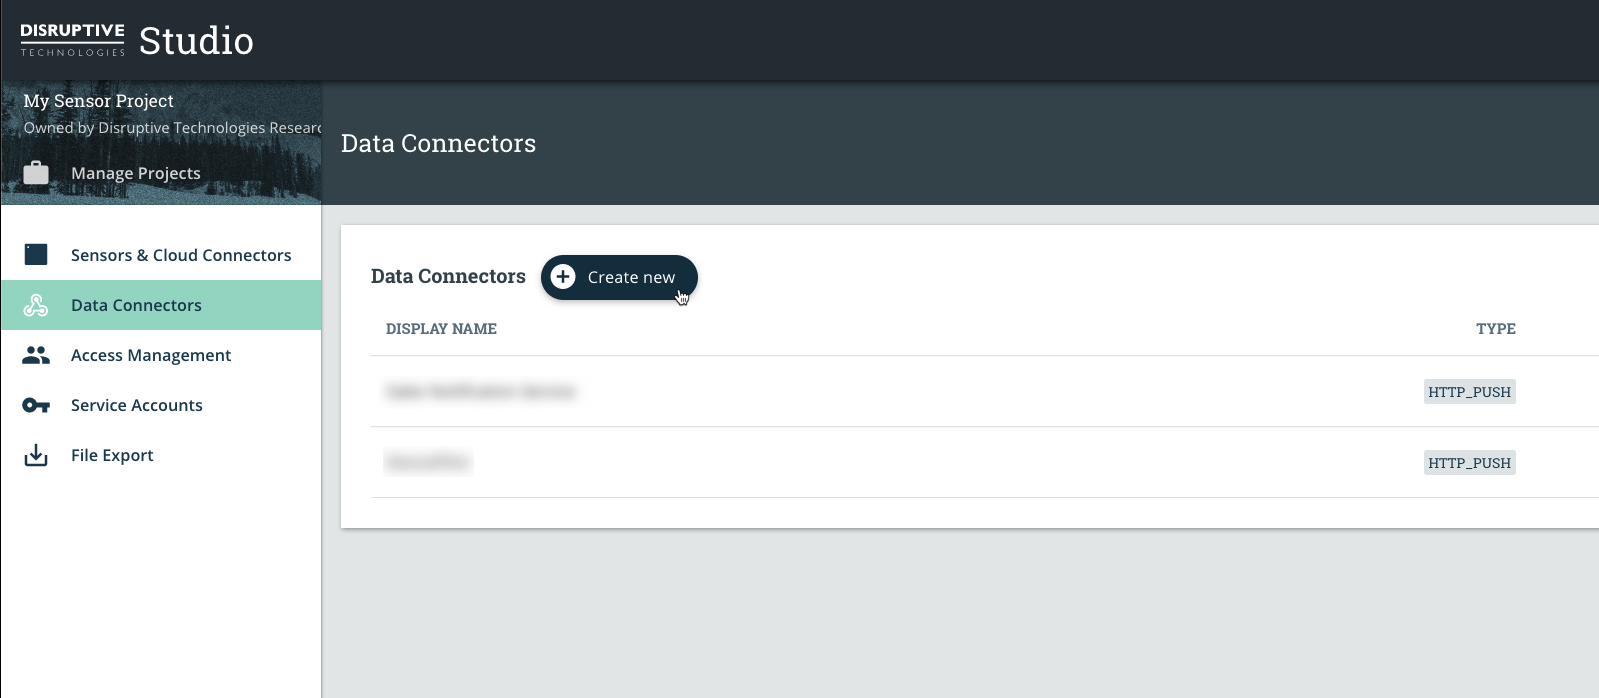
With GeoEvent set up to receive sensor events, it is now time to set up the Data Connector that will send the data over to GeoEvent.
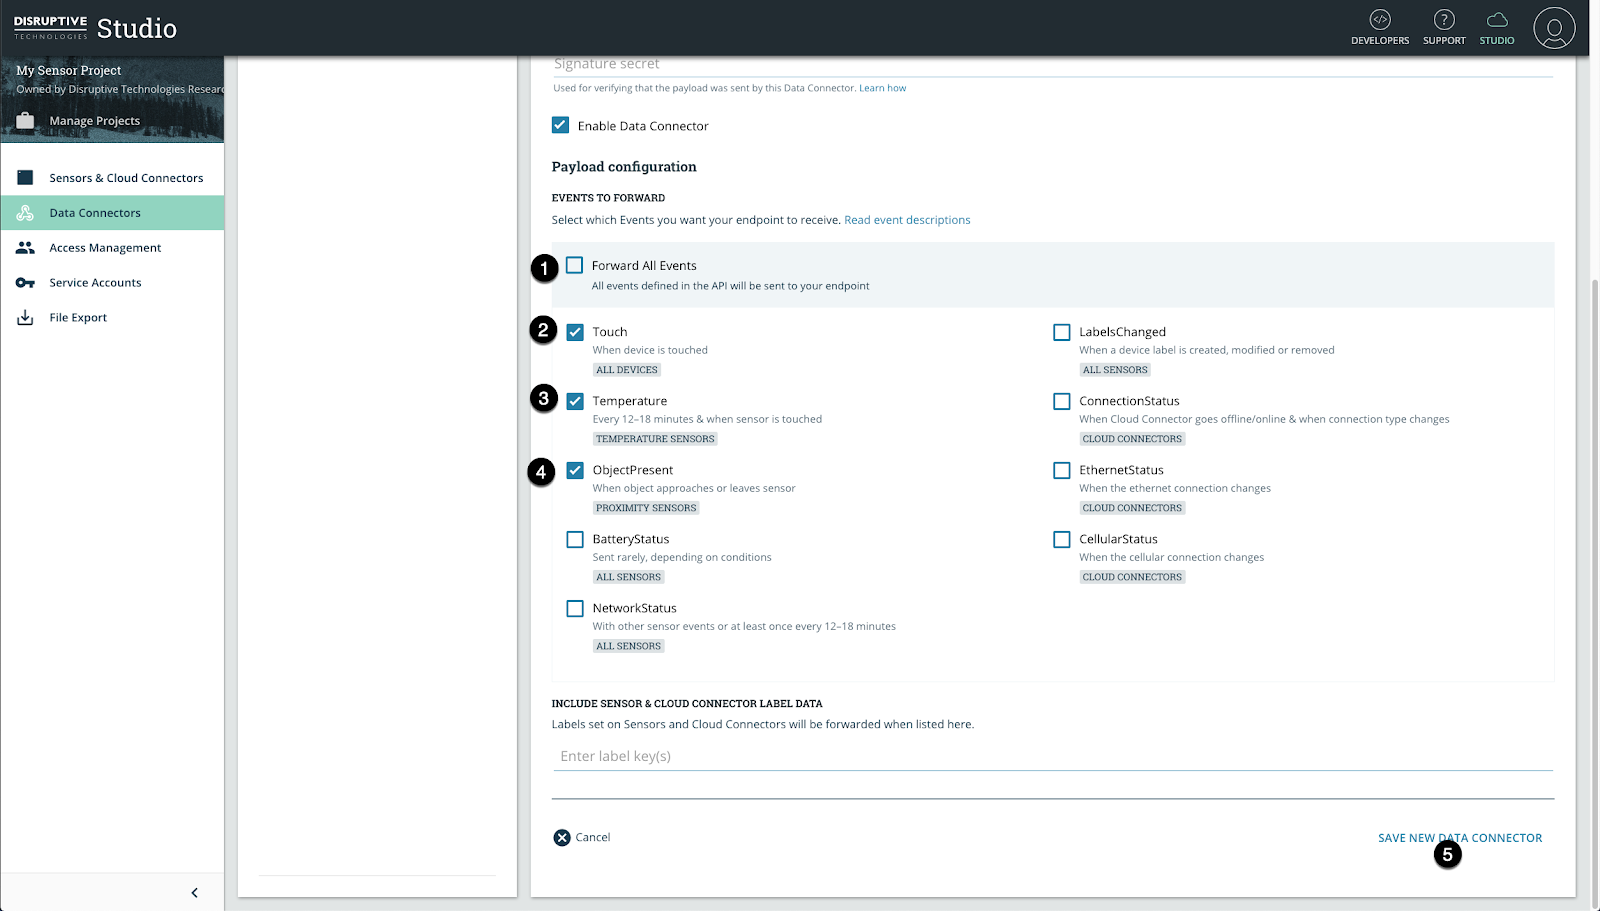
The first step is to go to your project in Disruptive Technologies’ Studio, navigate to Data Connectors and press “Create new”.
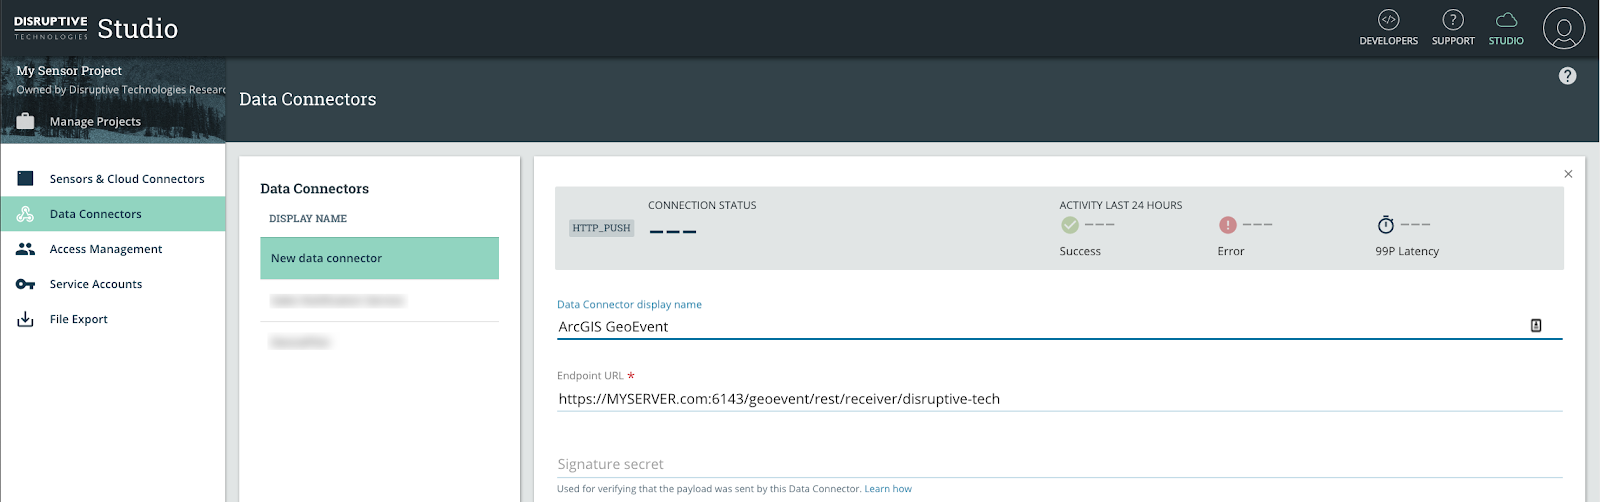
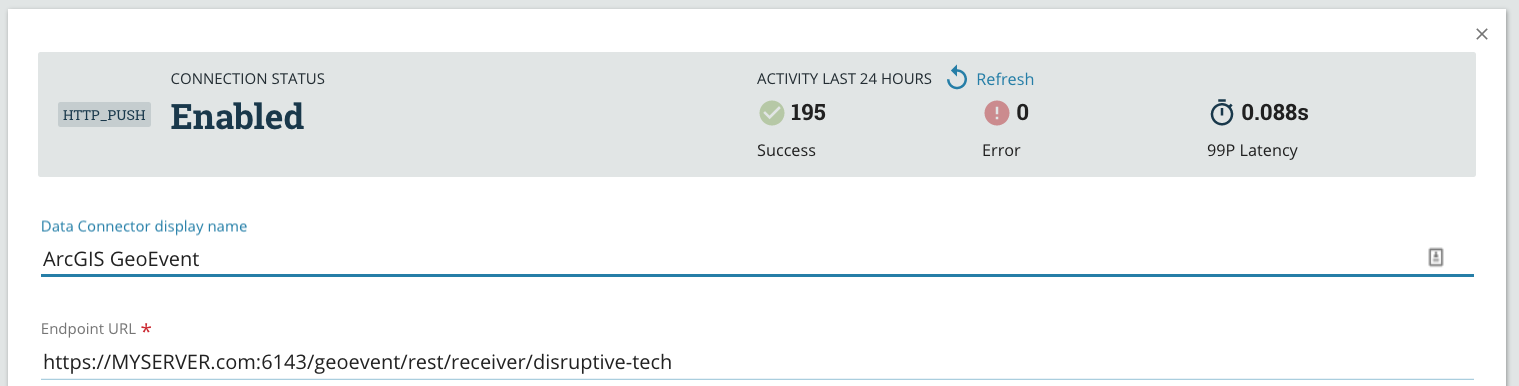
Next, fill in a name and, most importantly, the Endpoint URL which will be the URL that you saved from GeoEvent earlier.
We only want to send the events which contain sensor data, so only check these event types, and press save.
All sensor data from this Project will now be sent to GeoEvent. To verify that data is being sent and received correctly, you can open your new Data Connector and take a look at the “Activity Last 24 Hours”.
Now, lets head back over to GeoEvent to finish defining our input and get some data on a map!
GeoEvent - Creating the GeoEvent Definition
We have our input defined in GeoEvent, we have the Data Connector created in Studio… now we just need to define the message format that GeoEvent will receive in the GeoEvent Definitions.
Back in the GeoEvent Manager, you should now see that you are receiving messages on your input. These should be visible on the Monitor pane.
At the top of the GeoEvent Manager, select Site, and then select GeoEvent Definitions. You should see all of your input and output schemas defined here. For this blog, I created a sample ‘input’ schema that you can use which contains all possible fields (can download this at the bottom of the blog).
Click ‘Configuration Store’, and then select Import Configuration.
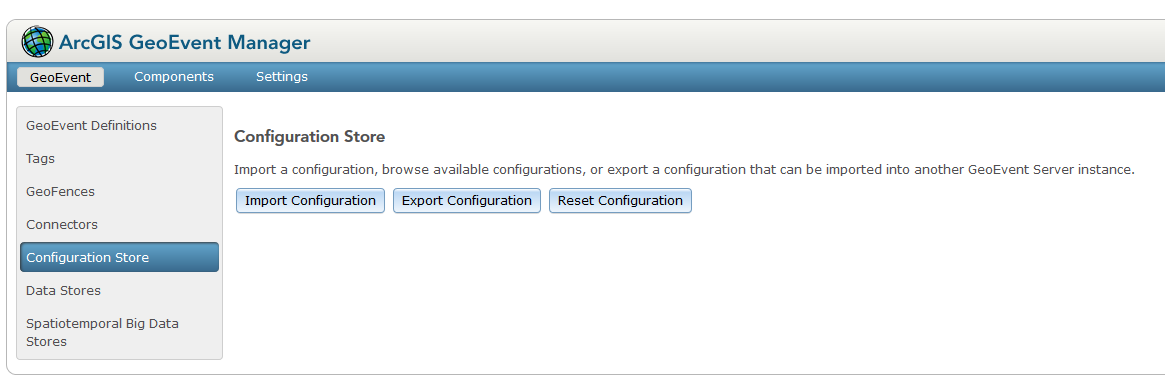
After you import the configuration, go back to GeoEvent Definitions, and you should see the new GeoEvent Definition that was just imported. Lastly, you need to go back to your input and change your setting for ‘Create GeoEvent Definition’ to NO and then select the name of the definition you just imported.
Defining the Output
After you get your input created, you need to send the data somewhere! With GeoEvent, you have a few different options available. You can either archive your data in the Spatiotemporal Big Data Store, or you can Update Features to provide a ‘real-time snapshot’ of your input data.
For this demonstration, I created a basic feature service in ArcGIS Online. Here are the fields I included:
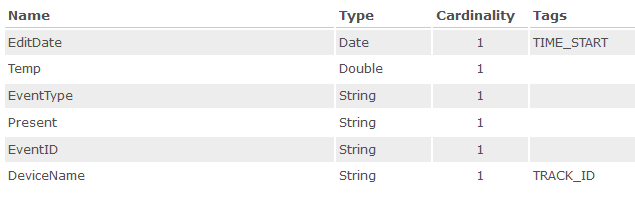
I could have included fields to capture the signal strength, transmission mode, etc, but my main goal was to capture the edit time, temperature, and a boolean for the object present sensor.
Creating the GeoEvent Service
The last step is stringing it all together. When you create a GeoEvent Service, you are basically creating the logic that connects your input to your output.
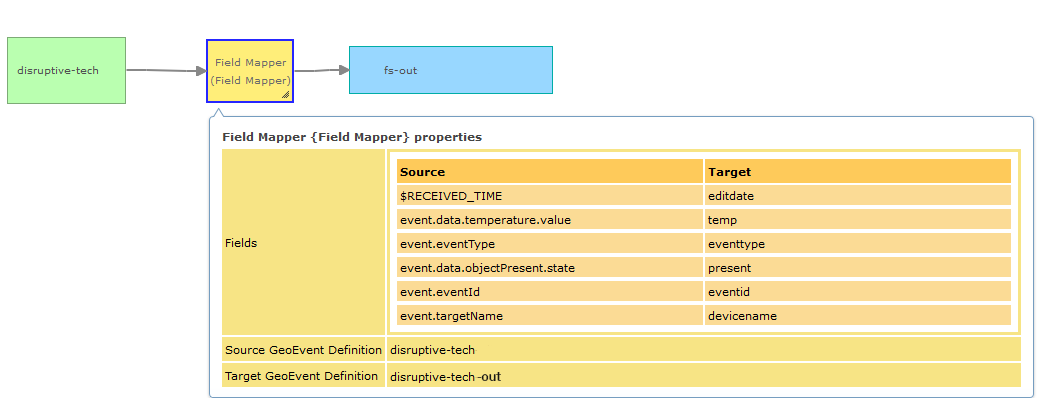
In this GeoEvent Service, I created a Field Mapper processor, to link the Source and Target fields together.
The one caveat with this, is that the input is not sending any geographic data or coordinates as part of the message. So, you need to manually place the features in your map or edit their position after they get created. Now, whenever the sensors sends data, it will update the target fields you defined.
Now you just need to build some awesome maps, apps, and dashboards!
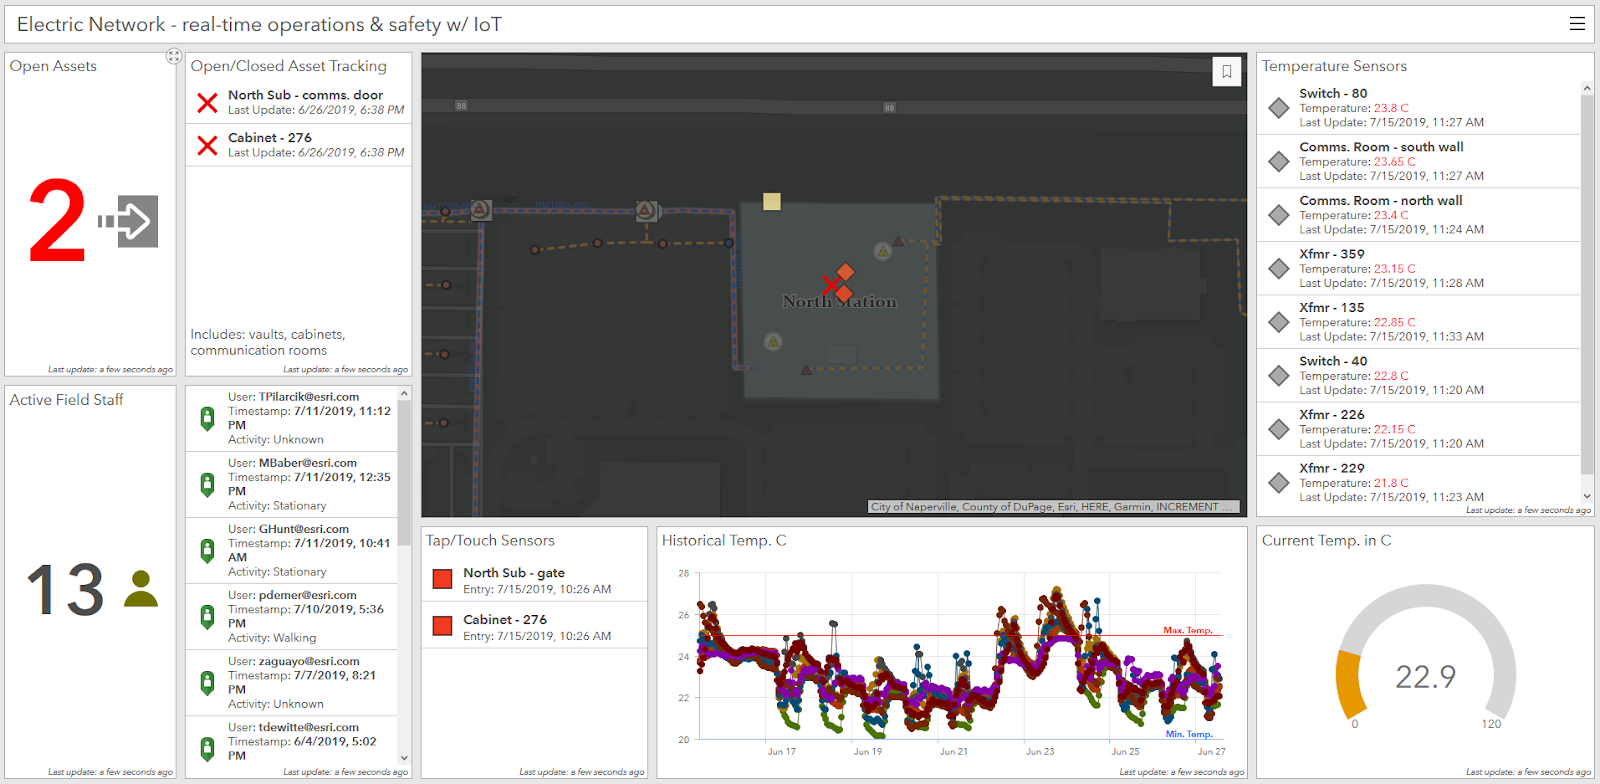
Real-time IoT and GIS
If you have any questions around the configuration, please do not hesitate to reach out. The ability to integrate the Disruptive Technologies API with GeoEvent Server was incredibly seamless and honestly fun to do. I can’t wait to see how customers continue to deploy this technology.
Brian Baldwin - bbaldwin@esri.com
Niklas Norin - niklas.norin@disruptive-technologies.com
You must be a registered user to add a comment. If you've already registered, sign in. Otherwise, register and sign in.
-
Administration
38 -
Announcements
45 -
Career & Tech Ed
1 -
Curriculum-Learning Resources
179 -
Education Facilities
24 -
Events
47 -
GeoInquiries
1 -
Higher Education
519 -
Informal Education
266 -
Licensing Best Practices
46 -
National Geographic MapMaker
17 -
Pedagogy and Education Theory
187 -
Schools (K - 12)
282 -
Schools (K-12)
185 -
Spatial data
24 -
STEM
3 -
Students - Higher Education
231 -
Students - K-12 Schools
86 -
Success Stories
22 -
TeacherDesk
1 -
Tech Tips
83
- « Previous
- Next »