Turn on suggestions
Auto-suggest helps you quickly narrow down your search results by suggesting possible matches as you type.
Cancel
- Home
- :
- All Communities
- :
- Products
- :
- Data Management
- :
- Data Management Questions
- :
- Re: Problems with black overlap while mosaicking s...
Options
- Subscribe to RSS Feed
- Mark Topic as New
- Mark Topic as Read
- Float this Topic for Current User
- Bookmark
- Subscribe
- Mute
- Printer Friendly Page
Problems with black overlap while mosaicking satelite images
Subscribe
6742
12
04-10-2012 12:58 PM
by
Anonymous User
Not applicable
04-10-2012
12:58 PM
- Mark as New
- Bookmark
- Subscribe
- Mute
- Subscribe to RSS Feed
- Permalink
- Report Inappropriate Content
Original User: grastafaram
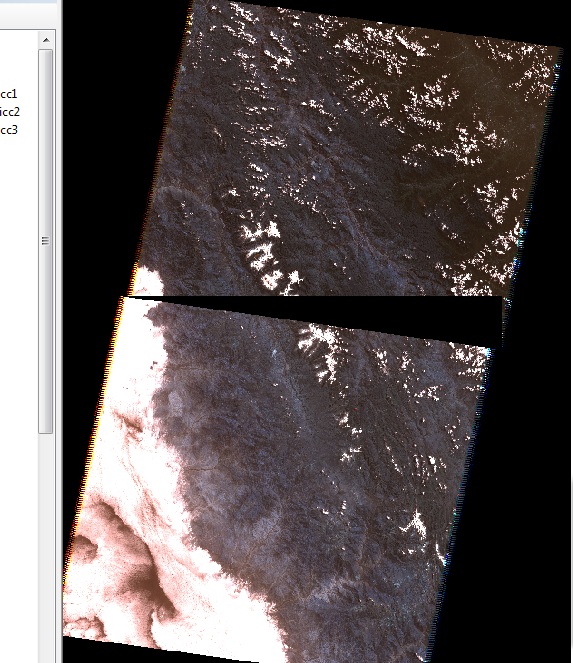
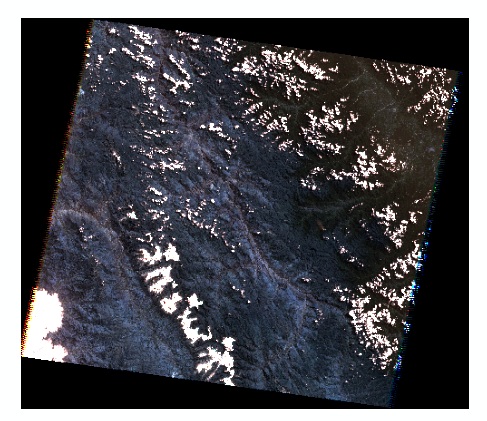
Hi, I am attempting to mosaic two Landsat 5 images taken from the USGS GLOVIS site. The images come as a tilted rectangular image inside a black rectangle, I have attached a screen shot of one image. When trying to mosaic the images together, the black portion of the rectangle covers a portion of the upper image, as shown in the second screen shot attached. Is there a way to mosaic the images together without having the black band cover the actual image?
Some info about the images - the images have the same spatial reference, 7 bands, Pixel type: unsigned integer, Pixel depth: 16 Bit, Pyramids: Level 5, nearest neighbor.
Any help is greatly appreciated.
Thanks,
Graham
12 Replies
04-10-2012
01:23 PM
- Mark as New
- Bookmark
- Subscribe
- Mute
- Subscribe to RSS Feed
- Permalink
- Report Inappropriate Content
For Mosaic Method what option are you selecting? I would go with Maximum. You can read about the available options in the Help.
Patrick
Patrick
by
Anonymous User
Not applicable
04-10-2012
02:38 PM
- Mark as New
- Bookmark
- Subscribe
- Mute
- Subscribe to RSS Feed
- Permalink
- Report Inappropriate Content
Original User: grastafaram
Hi Patrick, thanks for your reply. That works for the Mosaic to new Raster tool, but I need to use the Create Mosaic Dataset tool. As far as I can see, there is no option to select a Mosaic Method with this tool. If there is something else I might try, or if I am missing something, please let me know. Again, thanks for your help.
Regards,
Graham
04-11-2012
05:41 AM
- Mark as New
- Bookmark
- Subscribe
- Mute
- Subscribe to RSS Feed
- Permalink
- Report Inappropriate Content
Hello Graham.
Before you build your overviews you need to run the Build Footprints tool. For Landsat Images it will remove the black padding you are referring to.
Cheers
Gordon
Before you build your overviews you need to run the Build Footprints tool. For Landsat Images it will remove the black padding you are referring to.
Cheers
Gordon
by
Anonymous User
Not applicable
04-11-2012
05:47 AM
- Mark as New
- Bookmark
- Subscribe
- Mute
- Subscribe to RSS Feed
- Permalink
- Report Inappropriate Content
Original User: voldune
Hi Graham,
If you open the Catalog Window in ArcMap, and right click on the mosaic dataset, and select Properties > Defaults tab, there is a Default Mosaic Operator there. It should be set to First by default. Try switching it to Max. Or you can change the footprints using the Build Footprints tool as Gordon suggested (make sure you uncheck Skip Overviews if you have already built them). His suggestion may be faster than mine if you are displaying large amounts of data.
Patrick
04-11-2012
11:35 AM
- Mark as New
- Bookmark
- Subscribe
- Mute
- Subscribe to RSS Feed
- Permalink
- Report Inappropriate Content
Graham -
Also, overviews are created using the default mosaic operator. If you've previously created overviews where the default mosaic operator was set to 'first', you'll need to rebuild your overviews once you change the default mosaic operator to 'max'.
Also, overviews are created using the default mosaic operator. If you've previously created overviews where the default mosaic operator was set to 'first', you'll need to rebuild your overviews once you change the default mosaic operator to 'max'.
by
Anonymous User
Not applicable
04-12-2012
03:48 PM
- Mark as New
- Bookmark
- Subscribe
- Mute
- Subscribe to RSS Feed
- Permalink
- Report Inappropriate Content
Original User: grastafaram
Hi guys, thanks for all the help. Building the footprints worked fine, but I had to uncheck Skip Overviews for it to work.
Thanks again,
Graham
Hi guys, thanks for all the help. Building the footprints worked fine, but I had to uncheck Skip Overviews for it to work.
Thanks again,
Graham
04-24-2012
06:13 AM
- Mark as New
- Bookmark
- Subscribe
- Mute
- Subscribe to RSS Feed
- Permalink
- Report Inappropriate Content
Is it possible for someone to outline the actual workflow for doing this (aka from the beginning)? I have the same issue, except with Quickbird satellite imagery, however I am not very proficient with Arc10. At all. Thanks so much!!
T
T
by
Anonymous User
Not applicable
04-24-2012
08:04 AM
- Mark as New
- Bookmark
- Subscribe
- Mute
- Subscribe to RSS Feed
- Permalink
- Report Inappropriate Content
Original User: jgamble
1. Create File Geodatabase in arcCatalog
2. Right click file geodatabase in arcCatalog -> Create mosaic dataset
3. Right click mosaic dataset in arcCatalog-> Add Rasters. In the Add rasters tool, under the Raster Type dropdown, there should be a quickbird option. Select that. Then select the images you want to add under the 'Input data' section.
4. Right click mosaic dataset in arcCatalog -> Build Footprints. Define your valid pixel range in the build footprints tool. Since you have said you have black pixels along the edges of the footprints, you'll probably want to make sure your min data value is set to '1' and your max data value is set to '255'. This means the footprint tool will look to remove any pixels along the image edge with values outside the range of 1-255. A black pixel has a value of '0', thus the tool will try to remove the black pixels. Also, set the approximate number of vertices option. When I build footprints I set this value to -1 so that the footprint polygon is not generalized. Try using the default setting to see what results you get - obviously you can play around with this option to see what works best in your case.
5. Have a look at the new footprints - Did you successfully remove the bounding pixels? You may need to do some manual clips on the edges of the images if not. You can also use the 'Shrink' option in Build Footprints tool to bring in the footprint edges by a predetermined amount.
6. Right click mosaic dataset in arcCatalog -> Build overviews. Accept defaults and run the tool. This could take a while depending on how large your dataset is.
7. Once the overviews are complete, open up arcMap and add your mosaic dataset to see the results.
8. Laugh at how easy that was.
The process defined above is a (very) general approach. The process changes depending on your imagery. In the case where we have multiple tiles overlapping one another, we can use mosaic operators to define how the images will be displayed (i.e. which image is should be on top, should we blend images, etc). If we look at Graham's case, he had tiles where imagery overlaps black pixels. We want to make sure we always show imagery on the top, and not the black pixels. So that is why it was suggested to use the 'max' operator. The max mosaic operator analyzes the pixels lying on top of one another and chooses to display the highest value. Since we know that a black pixel has the value of '0', we know the max operator will surpress the black pixel and choose the pixel value from the actual imagery to display. Different mosaic operators can be used in different situations to achieve your desired results.
The default mosaic operator can be changed in the mosaic dataset properties. Access these properties by right clicking on the mosaic dataset in arcCatalog->properties->defaults tab.
Note that a mosaic dataset builds it's overviews using the default mosaic operator! And overviews are static! Meaning if you change your default mosaic operator after building overviews, you will need to rebuild overviews before you can see the changes in the overviews.
Anyways - hopefully the above helps you get your feet wet. I left out parts about understanding minPS/maxPS, but it is definetly a part of mosaic datasets that you need to understand as well if you haven't already.
Cheers.
Is it possible for someone to outline the actual workflow for doing this (aka from the beginning)? I have the same issue, except with Quickbird satellite imagery, however I am not very proficient with Arc10. At all. Thanks so much!!
T
1. Create File Geodatabase in arcCatalog
2. Right click file geodatabase in arcCatalog -> Create mosaic dataset
3. Right click mosaic dataset in arcCatalog-> Add Rasters. In the Add rasters tool, under the Raster Type dropdown, there should be a quickbird option. Select that. Then select the images you want to add under the 'Input data' section.
4. Right click mosaic dataset in arcCatalog -> Build Footprints. Define your valid pixel range in the build footprints tool. Since you have said you have black pixels along the edges of the footprints, you'll probably want to make sure your min data value is set to '1' and your max data value is set to '255'. This means the footprint tool will look to remove any pixels along the image edge with values outside the range of 1-255. A black pixel has a value of '0', thus the tool will try to remove the black pixels. Also, set the approximate number of vertices option. When I build footprints I set this value to -1 so that the footprint polygon is not generalized. Try using the default setting to see what results you get - obviously you can play around with this option to see what works best in your case.
5. Have a look at the new footprints - Did you successfully remove the bounding pixels? You may need to do some manual clips on the edges of the images if not. You can also use the 'Shrink' option in Build Footprints tool to bring in the footprint edges by a predetermined amount.
6. Right click mosaic dataset in arcCatalog -> Build overviews. Accept defaults and run the tool. This could take a while depending on how large your dataset is.
7. Once the overviews are complete, open up arcMap and add your mosaic dataset to see the results.
8. Laugh at how easy that was.
The process defined above is a (very) general approach. The process changes depending on your imagery. In the case where we have multiple tiles overlapping one another, we can use mosaic operators to define how the images will be displayed (i.e. which image is should be on top, should we blend images, etc). If we look at Graham's case, he had tiles where imagery overlaps black pixels. We want to make sure we always show imagery on the top, and not the black pixels. So that is why it was suggested to use the 'max' operator. The max mosaic operator analyzes the pixels lying on top of one another and chooses to display the highest value. Since we know that a black pixel has the value of '0', we know the max operator will surpress the black pixel and choose the pixel value from the actual imagery to display. Different mosaic operators can be used in different situations to achieve your desired results.
The default mosaic operator can be changed in the mosaic dataset properties. Access these properties by right clicking on the mosaic dataset in arcCatalog->properties->defaults tab.
Note that a mosaic dataset builds it's overviews using the default mosaic operator! And overviews are static! Meaning if you change your default mosaic operator after building overviews, you will need to rebuild overviews before you can see the changes in the overviews.
Anyways - hopefully the above helps you get your feet wet. I left out parts about understanding minPS/maxPS, but it is definetly a part of mosaic datasets that you need to understand as well if you haven't already.
Cheers.
04-30-2012
02:06 PM
- Mark as New
- Bookmark
- Subscribe
- Mute
- Subscribe to RSS Feed
- Permalink
- Report Inappropriate Content
Hi Graham,
If you open the Catalog Window in ArcMap, and right click on the mosaic dataset, and select Properties > Defaults tab, there is a Default Mosaic Operator there. It should be set to First by default. Try switching it to Max. Or you can change the footprints using the Build Footprints tool as Gordon suggested (make sure you uncheck Skip Overviews if you have already built them). His suggestion may be faster than mine if you are displaying large amounts of data.
Patrick
How would one attempt this in 9.3 ?
Thank you for the help in advance!
Todd