ArcGIS Workforce Blog

cancel
Showing results for 
Show  only  | Search instead for 
Did you mean: 

Other Boards in This Place


Latest Activity

(29 Posts)
JeffShaner
Esri Regular Contributor

We've added background sync to Workforce! Grab the latest update and rest easy when Workforce is running in the background.

Read more...

more
1 0 602
JeffShaner
Esri Regular Contributor

Enhance and streamline data capture integrations with the ability to integrate all fields in your assignment layer with ArcGIS Field Maps and Survey123

Read more...

more
0 1 513
JeffShaner
Esri Regular Contributor

Learn what's new and coming next inside ArcGIS Workforce.

Read more...

more
0 0 632
JeffShaner
Esri Regular Contributor

We just released a new update to ArcGIS Workforce that adds support for ArcGIS Enterprise 10.8.1.

Read this release blog announcement for download details.

more
0 11 1,261
JeffShaner
Esri Regular Contributor

On Tuesday August 4th, we released an exciting new version of ArcGIS Workforce that supports offline workflows, has a completely new experience (and listings) for the mobile apps, and much more. 

Please view our official blog announcement for details:

What’s New in ArcGIS Workforce 

more
0 2 718
JeffShaner
Esri Regular Contributor

The Workforce website (https://workforce.arcgis.com/) and the Workforce beta website (https://beta.workforce.arcgis.com/) are scheduled for maintenance on Saturday, May 30th at between 07:00:00 AM EST and 09:00:00 AM EST.  During this time, you'll be unable to access either web application.

All other aspects of Workforce will be remain available, this includes the mobile application, ArcGIS API for Python and the ArcGIS Online services. 

If you are using Workforce with ArcGIS Enterprise, you will not be affected by this maintenance.

The ArcGIS Workforce team

more
0 0 504
JoshuaClifford1
Esri Contributor

Take automation to the next level by scheduling tasks for Workforce for ArcGIS. If you are operating on a Windows machine, you can use the Windows task scheduler to automatically run Python scripts foyour Workforce project at a customized date and time.  

Here are a couple of examples of when you might want to schedule a Python script for Workforce: 

  • You want a daily report of all completed assignments, so you schedule the export_assignments_to_csv script to run at the end of each day.  
  • Every two weeks, you want to reset workers within your project to a status of “not working”, so you schedule the reset_stale_workers script to run every other Sunday.  

All of the available Python scripts for Workforce are found in the  workforce-scripts GitHub repository. If you are new to automating tasks for Workforce, you may want to check out this introductory blog series firstAutomating Workforce with ArcGIS API for Python 

For this exercise, you will schedule the reset_stale_workers script using the Windows task scheduler. You can also use any script that makes sense for your Workforce project. 

Overview 

  • Create the Python environment  
  • Clone the workforce-scripts repo and install dependencies 
  • Schedule the script in Windows Task Scheduler 

Create the Python environment

First, you will create the Python environment that you'll use to run the Python scripts for Workforce. To do so, you'll first add the ArcGIS Pro helper scripts to your system path. Then you'll create a new conda environment to run the scripts in. 


1.    Sign into ArcGIS Pro with a licensed account. Then, exit the program. 

      Note: ArcGIS Pro comes with ArcGIS API for Python and Conda. If you don’t have ArcGIS Pro, you will need to       download and install ArcGIS API for Python separately.

      For more information, see Install and set up ArcGIS API for Python


2.    Add the ArcGIS Pro helper scripts that come with Pro to your system path environment variables. This will allow you           to  run conda in the command prompt.  

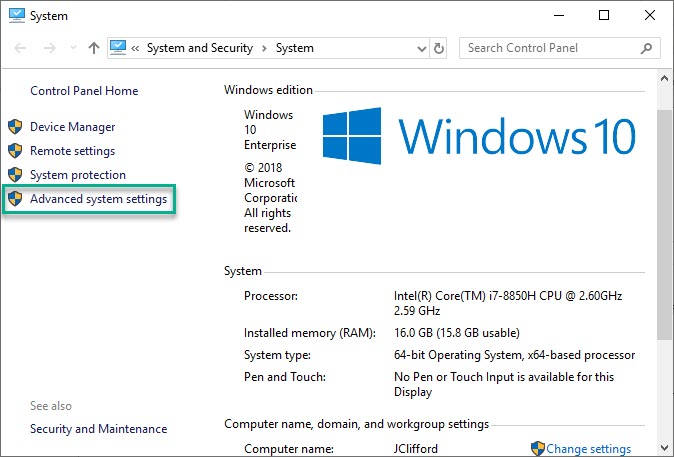
       On your Windows device, search for and open System (control panel)

       In the System window, click Advanced system settings

      System (control panel) window

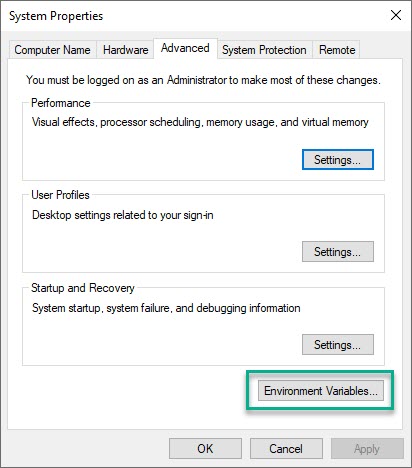
      In the System Properties window, click Environment Variables.

          System Properties window

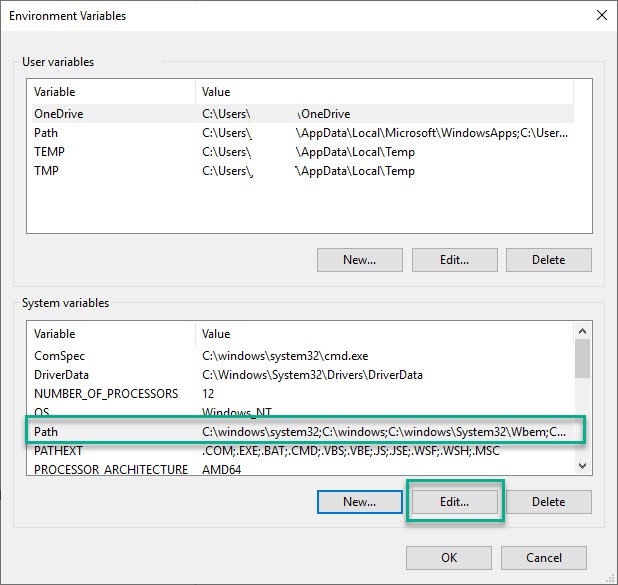
   In the Environment Variables window, under System variables, select Path. Then, click Edit.

   Environment variables window

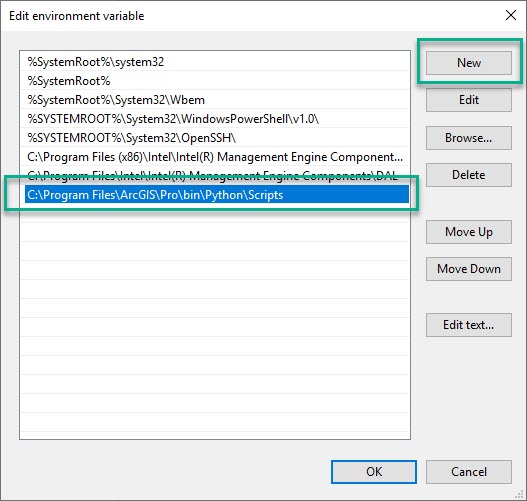
In the Edit environment variable window, click New, and add the file path to the ArcGIS Pro Python scripts. 

Here is the default file path: C:\Program Files\ArcGIS\Pro\bin\Python\Scripts 

   Edit environment variable window

Click OK

3. Open the ArcGIS Python Command Prompt. This should be located in: 

  Programs -> ArcGIS -> ArcGIS Pro -> Python Command Prompt 

    In the command prompt, run:

  conda create -n workforce --clone arcgispro-py3 –y 

  This will create a new conda environment in the following location:

    C:\Users\<account-name>\AppData\Local\ESRI\conda\envs\workforce 

  This is the environment that you'll use to run the Python scripts for Workforce. 

Clone the workforce-scripts repo and install dependencies 

Next, you'll clone the Workforce scripts to your machine and install the required Python libraries needed to run them. 


1. Clone or download the Workforce scripts found in the GitHub repository.

2. In the ArcGIS API for Python Command Prompt, navigate to the Workforce scripts folder:

   cd C:\Users\user\Desktop\workforce-script\scripts

3. Run:

    activate workforce

4. Install the required libraries using Python's default package installer, pip:

    pip install -r requirements.txt 

ArcGIS API for Python and the required libraries are now installed. You are now able to run Workforce scripts on your machine. 

Schedule a script in Windows Task Scheduler 

Finally, you will schedule a Python script to run using Windows Task Scheduler. You’ll schedule the reset_stale_workers script to run every other Sunday evening. 


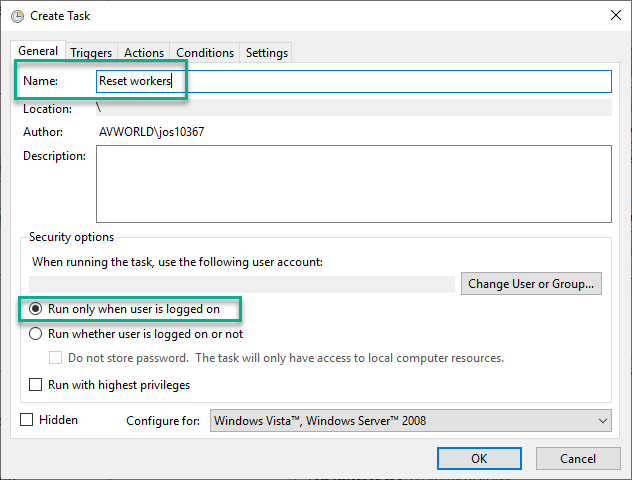
1. In the Windows Start menu, search for "Task Scheduler" and open the program. Click Actions > Create taskIn the Create Task dialog box, name the task “Reset Workers” and select the Run whether user is logged on or not security option.   

   Create task dialogue window

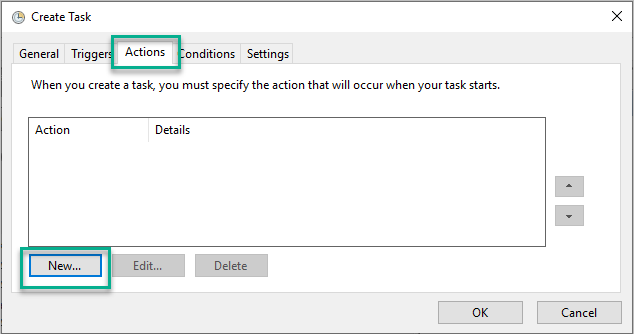
2. In the Create Task dialog box, click Actions > New.

   Create task dialog box

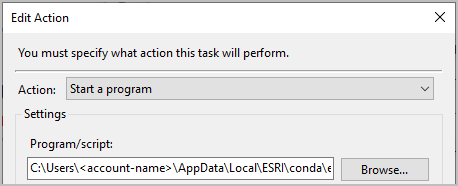
    The New Action window appears.

    For the Program/script settingcopy and paste the file path for the Python environment you created earlier. The           file path should read as follows, where <account-name> is your system account name: 

    C:\Users\<account-name>\AppData\Local\ESRI\conda\envs\workforce\python.exe 

   Edit action window


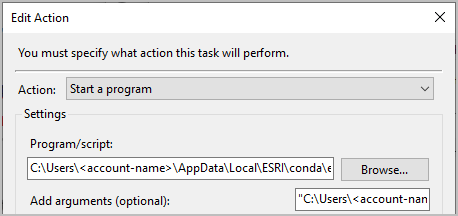
   For the Arguments setting, enter the complete file path to the script you want to run followed by the     script’s parameters. It should look like this:   

"<full path to reset_stale_workers.py>" -u <arcgis-username> -p <password> -org <url-to-your-organization> -project-id <project-id> -cutoff-date 1 -timezone "US/Eastern" -log-file "<full path to log.txt>" 

   Be sure to edit the following parameters: 

  • Include the full path to your reset_stale_workers.py script.
  • Edit the usernamepasswordorganization, and project-id to match your own credentials.  
  • Set the cutoff-date to 1. This tells your script to reset workers whose statuses haven’t changed in the past minute.  
  •  Include the full path to your log.txt file.  

Note: If you are working with a Classic project (a v1 project), the Project ID is the item ID of the project item. If you are working with projects enabled for offline use (a v2 project), the Project ID is the item ID of the Workforce feature service. Regardless of what version you are working with, the Project ID can be found in the URL of your project. 


  In the Add arguments setting, add the complete file path to the script you want to run followed by the list of parameters   (shown above). 

  Edit action window 

  Click OK to close the Edit Action window. 


3. Create a new trigger

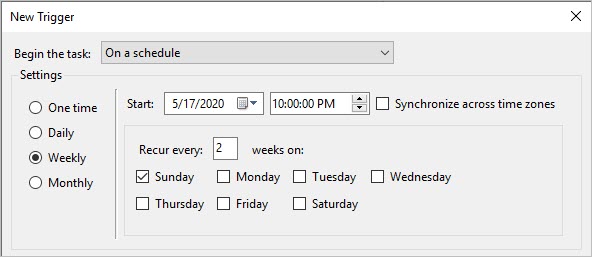
In the Create Task dialog box, on the Triggers tab, click New to open the New Trigger window. This is where you set how often you want your script to run. For this exercise, the script is set to run every two weeks on Sunday at 10:00PM. 

New Trigger window

Click OK to close the New Trigger window. The trigger you just created is now listed in the Triggers tab.  

Triggers tab


You can set multiple triggers for your script, depending on the needs of your Workforce project. Click OK to close the Reset Workers Properties window.     

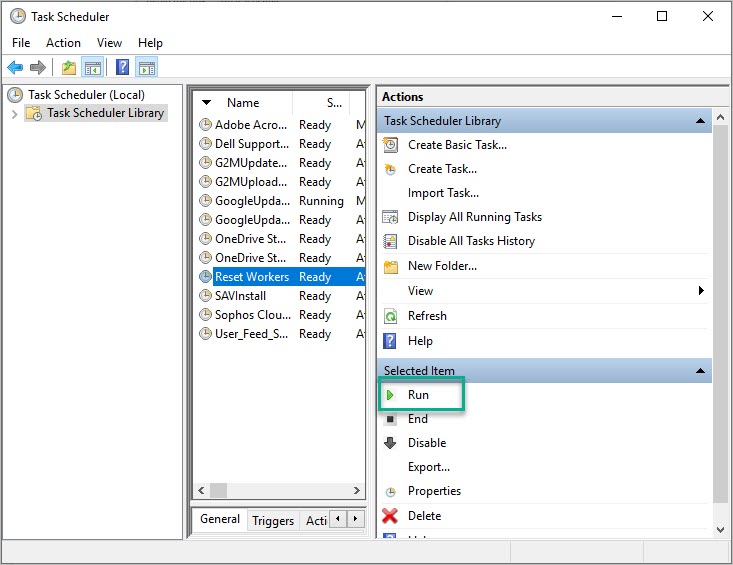
The reset_stale_workers script is now set to run every other Sunday. If you want to test that this script will work, you can run it manually at any time. Select the script in the Task Scheduler Library and click Run.     

Task Scheduler Library

After running the script, you can view the log file to confirm that it worked. 

more
1 0 2,157
DerekLaw
Esri Esteemed Contributor

Workforce for ArcGIS is a mobile app solution that uses the power of location to coordinate your field workforce. It integrates work management to reduce reliance on paper and provides everyone with access to the authoritative data they need. Workforce for ArcGIS is designed to help you reduce errors, boost productivity, and save money.

This blog is meant to be a live resource that will be updated to share the latest resources for working with Workforce for ArcGIS. FYI: access the general help documentation here.

Last edited: September 24, 2020

Video Resources

How to Blogs

Related Blogs

Whitepapers

more
2 0 2,335
JoshuaClifford1
Esri Contributor

Over time, projects in Workforce may become cluttered with assignments that are no longer needed in the regular working view of the Workforce project. The project may also contain workers who, for various reasons, have not correctly updated their working status. 


This blog post will teach you several ways to clean out and maintain your Workforce projects using ArcGIS API for Python. You’ll learn how to delete assignments and assignment types, how to archive assignments by copying them to a new feature layer, and how to reset workers who have been inactive. You’ll also learn how to verify assignment completion based on the completion of work orders.


These scripts will make tidying up your Workforce projects a quick and efficient task.  


Overview

  • Install ArcGIS API for Python
  • Download Workforce scripts
  • Delete assignments
  • Delete assignment types
  • Copy assignments to a feature layer 
  • Reset stale workers
  • Report incomplete assignments that have completed work orders
  • Additional resources


Download Workforce scripts


First, clone or download the workforce-scripts GitHub repository This contains the Python scripts for Workforce as well as the version of the Python API needed to automate Workforce projects. Once it's downloaded, navigate to the “workforce-scripts” folder in either the terminal or the command prompt. A Windows operating system is used for this example. 


cd C:\Users\user\Desktop\workforce-scripts


Install ArcGIS API for Python


To automate and script Workforce projects, you must use ArcGIS API for Python 1.8.3 or later. Version 1.8.3 is included in workforce-scripts file. 


Run the following command in either a Python script or Python console to create the virtual environment with the correct dependencies and to install ArcGIS API for Python 1.8.3: 


conda env create --file environment.yml


Next, activate the environment:


conda activate workforce-scripts


Once you've created and activated the environment, you are ready to use the Workforce scripts. 


Delete assignments

Caution: The following script will permanently delete assignments from your Workforce project. Be sure to create a backup of assignments before running this script. One way to create a backup of assignments is by running the copy_assignments_to_fs script, shown later in this blog.


The delete_assignments script allows you to delete assignments based on a specific field within the assignments layer. Quickly delete assignments based on completion status, assigned worker, or any queried field using the following script:


python delete_assignments.py -u username -p password -org "https://<org>.maps.arcgis.com" -project-id <project-id> -log-file "../log.txt" -where "1=1"


Run this in the terminal or command prompt after editing the username, password, organization, and project-id to match your own credentials.


Note: If you are working with a Classic project (a v1 project), the Project ID is the item ID of the project item. If you are working with projects enabled for offline use (a v2 project), the Project ID is the item ID of the Workforce feature service. Regardless of what version you are working with, the Project ID can be found in the URL of your project. 


Edit the where clause to query for the assignments you want to delete. Here are a few examples that demonstrate how you can write the query when using this script:


  • Someone left a company after completing hundreds of assignments during their tenure. The company queries their Worker ID and deletes all assignments they were assigned to.
  • Query: -where “WorkerID=1”
  • A snow plowing team has no reason to keep completed assignments. They query for completed assignments and delete them all.
  • Query: -where “status=3"
  • A landscaping company has completely changed their system of assigning work. They use the default where clause to delete all existing assignments.
  • Query: -where “1=1”


For more information on the values you can query for, see Overview of the Workforce Schema.

For more information on this script, see the delete_assignments readme.


Delete assignment types

The delete_assignment_types script allows you to delete all assignment types within a project. This is useful if you have many assignment types that you need to change or replace. Instead of making a new Workforce project or manually removing assignment types one by one – use the following script to delete all assignment types at once:


python delete_assignment_types.py -u username -p password -org "https://<org>.maps.arcgis.com" -project-id <project-id> -log-file "../log.txt" 


Run this in the terminal or command prompt after editing the username, password, organization, and project-id to match your own credentials.


Note: The script will not run if any of the assignment types are in use.


For example, a Workforce project contained 25 assignment types related to maintaining community parks. Park maintenance standards were updated, so the assignment types needed to be replaced. The delete_assignment_types script was used to delete all of the existing types at once to make room for the new assignment types.


For more information on this script, see the delete_assignment_types readme.


Copy assignments to a different feature layer

The copy_assignments_to_fs script copies assignments from your assignments layer  to a new feature layer. This script is useful for archiving assignments -  allowing you to clean out your project without permanently deleting its assignment history.


You’ll first need to identify or create the target feature layer you want to copy assignments to. Name it something meaningful. For example, if you’re copying assignments from a tree inspection project, name the target layer tree assignment copies or tree assignment archive.  


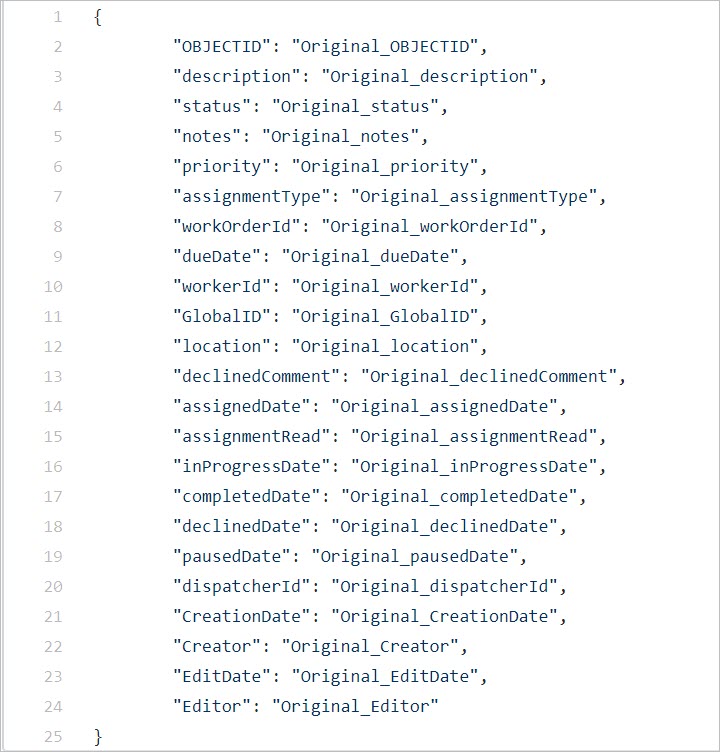
This script uses a JSON configuration file (shown below) to map the assignment layer field names to those in the target feature layer. The field names on the left belong to the assignments layer, and those on the right belong to the target feature layer.


Default configuration file


When creating the target feature layer, use different field names to distinguish them from the assignments layer. If you don’t want to edit the default configuration file, name your target fields “Original_” followed by the original field name (shown above).


It’s important that you create a new OBJECTID and GLOBALID field in your target feature layer (named Original_OBJECTID and Original_GLOBALID, respectively). Since these are system generated fields, you may encounter duplicated values if you don’t create new fields. The Original_OBJECTID field should be an integer value, and the Original_GLOBALID field should be a string value.


Note: If your target feature layer has different field names than those shown above, edit the configuration file to match your target field names. Then save the file.


Once you have created your target feature layer and have edited the target field names in the configuration file, you are ready to run the script:


python copy_assignments_to_fs.py -config-file "../sample_data/fieldMappings.json" -u username -p password -org "https://.maps.arcgis.com" -target-fl -where "1=1" -project-id -log-file "log.txt" --copy-attachments


Be sure to edit the following:

  • Provide the file path to the config-file  
  • Provide your username, password, and organization to connect to your content.
  • Provide the complete feature service URL of the target feature layer (-target-fl). For example:
  • "https://services.arcgis.com/<server>/arcgis/rest/services/AssignmentsArchives/FeatureServer/0"
  • Use the where clause to query for the assignments you want to copy. The script defaults to copying all assignments (-where “1=1”).
  • Provide the project-id of your Workforce project.
  • Optionally, you can copy attachments (copy-attachments). Setting this parameter could slow down the script depending on how large your attachments are.

Once you run this script, your assignments will be copied to the new feature layer. After you check to make sure this was successful, you can delete those assignments from your active Workforce project.


For more information, see the copy_assignments_to_fs readme.


Reset stale workers

The reset_stale_workers script resets workers to the not working status if they haven’t changed their location, status, or contact information after a set date or time. If a worker forgets to update their status before taking a break or leaving for the day, they will still appear to be working on the dispatcher map. The following script keeps your project organized by resetting workers after a date or time that you set:


python reset_stale_workers.py -u -p -org https://arcgis.com -project-id -cutoff-date -timezone "US/Eastern"


Run this in the terminal or command prompt after editing the username, password, organization, and project-id to match your own credentials.


The cutoff-date acts as the threshold for when workers should be reset. Input either a specific date or amount of time (in minutes) to satisfy this parameter. For example: 


  • A manager runs this script every Monday morning to make sure each worker begins the week with a status of not working. They run the script to reset workers who haven’t updated their status in the past 24 hours. Their cutoff-date input would be 1440 (the number of minutes in 24 hours).


For more information, see the reset stale workers readme


Report incomplete assignments that have completed work orders

The report_incomplete_assignments_with_work_orders script reports assignments that have a completed work order, yet have an assignment status of unassigned, assigned, or declined. This script gives you the option to cancel assignments that meet this condition. This allows you to clear your project of completed assignments that have an incorrect status in Workforce.  


Features in Collector and surveys in Survey123 can be integrated as work orders for Workforce assignments. To learn how to integrate Survey123 and Collector with your Workforce project, see Integrate other apps.


In this example, there are four tree inspections that have been assigned to one mobile worker. The Workforce project is integrated with Survey123, so there is a survey (work order) associated with each assignment.


While the worker completed three work orders, they only updated one assignment to have a status of completed, as shown in the table below.


Work Order ID

Workforce Assignment Status

Survey123 Work Order

1

Assigned

Completed

2

Assigned

Completed

3

Completed

Completed

4

Assigned

Incomplete


Run the following script to report the assignments that have completed work orders, but an incomplete status. The script will also cancel these assignments.


python report_incomplete_assignments_with_work_orders.py -u username -p password -org https://arcgis.com -project-id -survey-id -field-name work_order_id --cancel-assignments


Be sure to edit the following:

  • Your username, password, and organization
  • The project-id for the Workforce project
  • The survey-id – this is the item ID for your survey layer
  • The field-name you used to integrate your Workforce project with either Collector or Survey123. The script defaults to using the work_order_id. This is the field used in the example above.
  • Add the optional --cancel-assignments parameter to cancel any assignments the script reports.

After running the script, it reports the incomplete assignments with completed work orders. In the example above, the script returns assignments 1 and 2 and then cancels them both.


For more information, see the report_incomplete_assignments readme.


Note: There is also a script available that reports any assignment that have a status of “completed” yet don't have a completed work order. For more information, see the report_complete_assignments_without_work_orders readme.


Additional resources

This blog post taught you how to use ArcGIS API for Python to clean and maintain your Workforce projects. See the following blog posts to learn about other ways to automate tasks for Workforce:

Feel free to test out all of the Workforce scripts in the Github repo. To learn more about the Workforce module within the Python API, see Managing Workforce for ArcGIS Projects

more
3 0 3,111
JoshuaClifford1
Esri Contributor

Welcome to another blog post that will teach you how to automate tasks for Workforce using ArcGIS API for Python. The last blog in this series was about using Python to set up and configure a Workforce project. We covered how to import workers, create assignments based off a feature layer, and assign work based on location. You can check it out here.


This blog will teach you three different ways to monitor assignments using ArcGIS API for Python. It can be overwhelming to keep up with all of the assignments within your project, especially when you have multiple workers. The following scripts are designed to help you monitor work efficiently.


You’ll learn how to create a dashboard for your project using ArcGIS Dashboards, how to monitor the status of assignments using Slack, and how to verify a worker’s location at the time they modified an assignment.


Overview

  • Scenario
  • Download Workforce scripts
  • Install ArcGIS API for Python
  • Create a dashboard
  • Monitor assignments with Slack 
  • Check assignment completion location
  • Additional resources


Scenario

A tree inspection company is using Workforce to assign inspections to workers, and there are 24 open assignments throughout the city of Atlanta. You, as the inspection lead, want an easy way to monitor the progress of these assignments.


Note: This scenario uses the project created in the first blog; however, you can use any Workforce project that you own to follow along with these exercises.


Download Workforce scripts


First, clone or download the workforce-scripts GitHub repository This contains the Python scripts for Workforce as well as the version of the Python API needed to automate Workforce projects. Once it's downloaded, navigate to the “workforce-scripts” folder in either the terminal or the command prompt. A Windows operating system is used for this example. 


cd C:\Users\user\Desktop\workforce-scripts


Install ArcGIS API for Python


To automate and script Workforce projects, you must use ArcGIS API for Python 1.8.3 or later. Version 1.8.3 is included in workforce-scripts file. 


Run the following command in either a Python script or Python console to create the virtual environment with the correct dependencies and to install ArcGIS API for Python 1.8.3: 


conda env create --file environment.yml


Next, activate the environment:


conda activate workforce-scripts


Once you've created and activated the environment, you are ready to use the Workforce scripts. 

Create a dashboard


Note: The following section describes how to create a dashboard for Classic projects. To learn how to automate the creation of a dashboard for a project that is offline enabled and supported in ArcGIS Workforce, see Monitor assignment status in ArcGIS Dashboards using a joined Workforce layer


ArcGIS Dashboards is a web application that allows you to monitor your operations in real-time. While the Workforce web app allows dispatchers to edit and view assignments, a dashboard provides a read-only alternative for supervisors and users. A dashboard displays key statistics, allowing you to understand the progress of your project at a glance.


You can create a dashboard for your Workforce project with just one command.


Have the following information ready to use as parameters for the script:

  • Username
  • Password
  • Organization URL (<org>.maps.arcgis.com)
  • Project ID 


Note: If you are working with a Classic project (a v1 project), the Project ID is the item ID of the project item. If you are working with projects enabled for offline use (a v2 project), the Project ID is the item ID of the Workforce feature service. Regardless of what version you are working with, the Project ID can be found in the URL of your project. 

For a complete list of parameters, see the readme for this script.


Run create_ops_dasbhoard.py in either the terminal or command prompt. Be sure to swap the default parameters with your own.


python create_ops_dashboard.py -u <username> -p <password> -org https://arcgis.com -project-id <project_id> --light-mode


Once you run this script, you’ll see a new dashboard has been shared with the group containing your Workforce project. Here’s what the dashboard for the Tree Inspections project looks like:
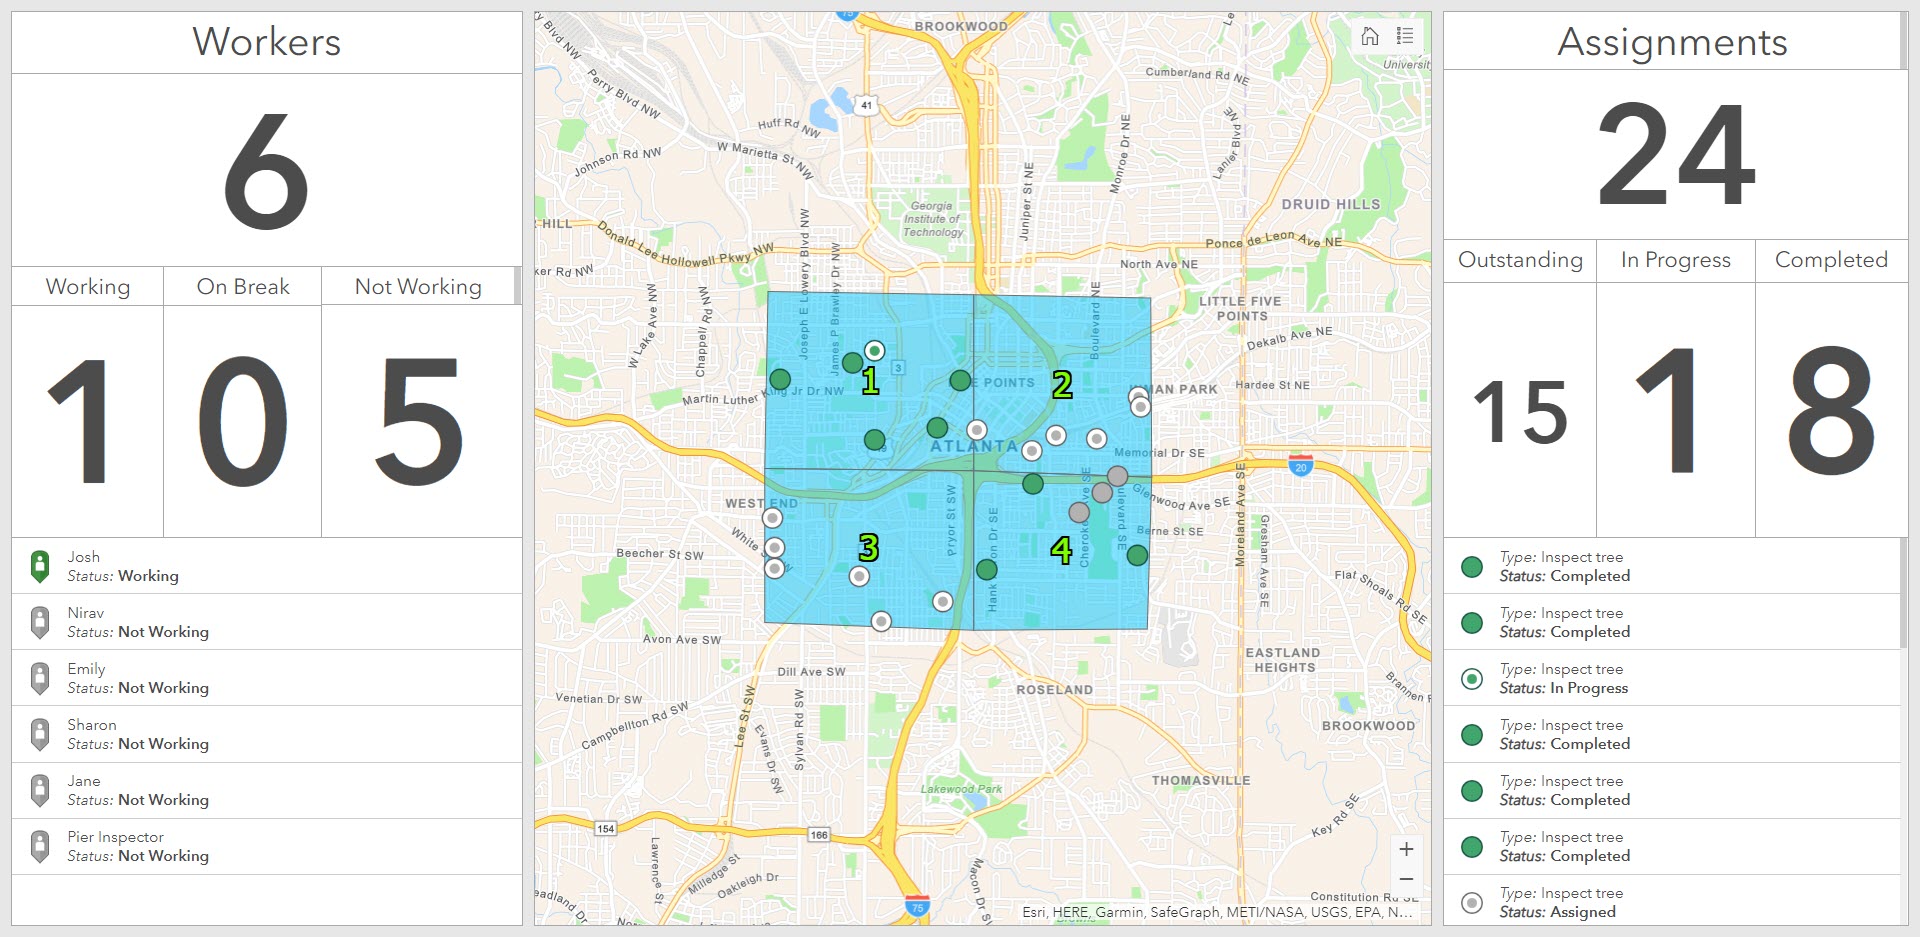
 

Dashboard for the Tree Inspections Workforce project.


The script creates a dashboard that shows worker information, assignment information, and a copy of the Dispatcher map. The dashboard will update to reflect changes in assignment completion and worker status in real time. This is great to have displayed in the office to quickly note the progress of your operation.


Monitor assignments with Slack 


Slack is an office communication tool that allows employees to stay connected with one another during the workday. By adding a webhook to a channel on Slack, you can receive information and updates from outside web sources, including Workforce.


The assignment monitor script connects your Workforce project with a webhook so that you will receive a message in Slack every time an assignment is completed. Anyone who joins the Slack channel that contains the webhook will receive these notifications.


Tip: This script can also be configured to send notifications to your email account. See the assignment_monitor readme for more information. 


To add a webhook to a Slack channel, you’ll first need to create a new app in Slack. Visit the Your Apps page in the Slack API and click Create New App.


Create new app button


Give your app an appropriate title. This one is called “Tree Inspections”. You’ll also need to select the Slack Workspace you want your app to belong to.
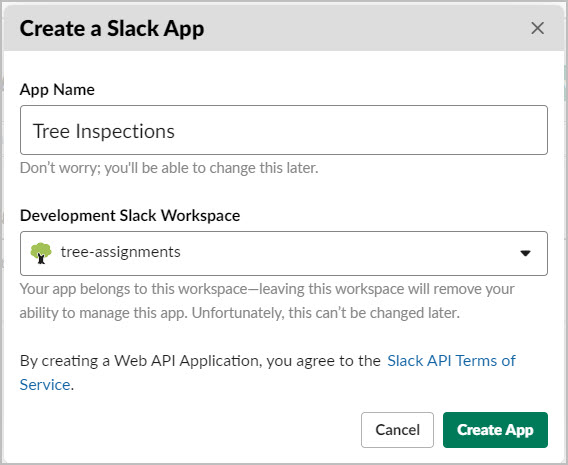
 

Create a Slack App window.


Once your app is created, you can create a webhook. Go to the Basic Information page for your app and click Incoming Webhooks.
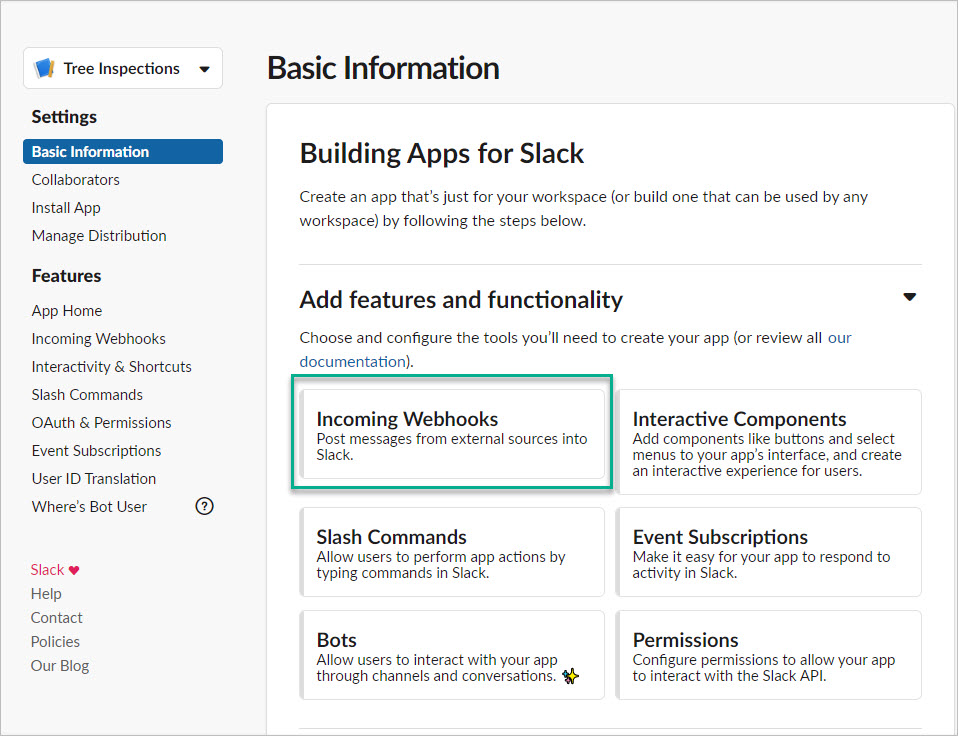
 

Basic Information page for Building Apps for Slack.


Make sure that Activate Incoming Webhooks is toggled on. Then click Add new Webhook to Workspace.


Note: If you aren’t the manager for your workspace, you will need to request permission to add a webhook.
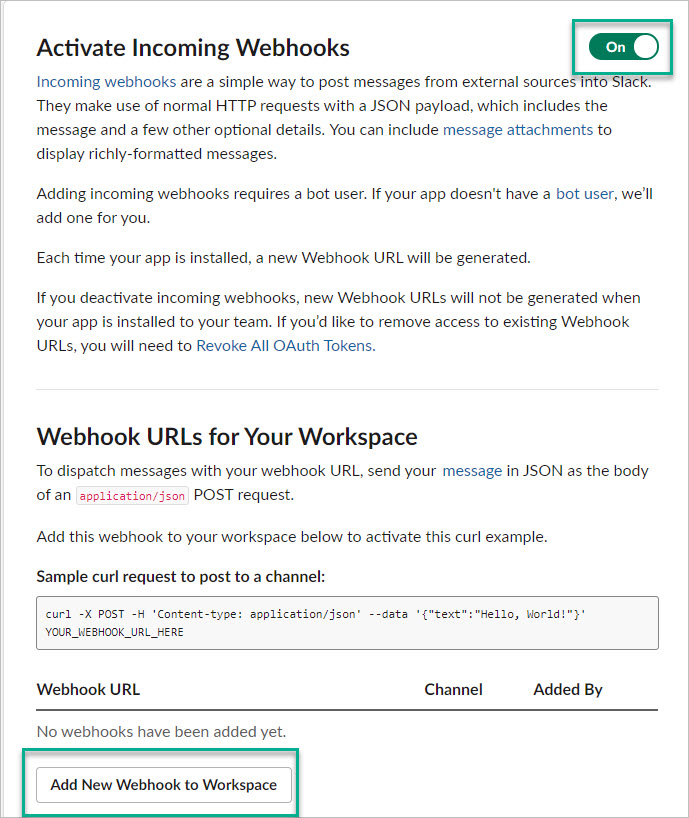
 

Web page for activating incoming webhooks.


A window appears requesting permission for the app to access your workspace. Select the channel you want your app to post to and click Allow.


Tip: Since this webhook will send a message every time an assignment is completed, you may want to create a channel specifically for it.
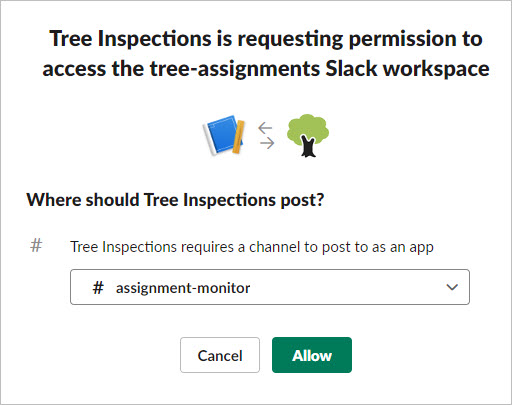
 

Window requesting permission for the app to access your workspace.


You have successfully created a new web hook. Copy the Webhook URL, shown below, and paste it somewhere you can easily access. You will need it for running the Python script.
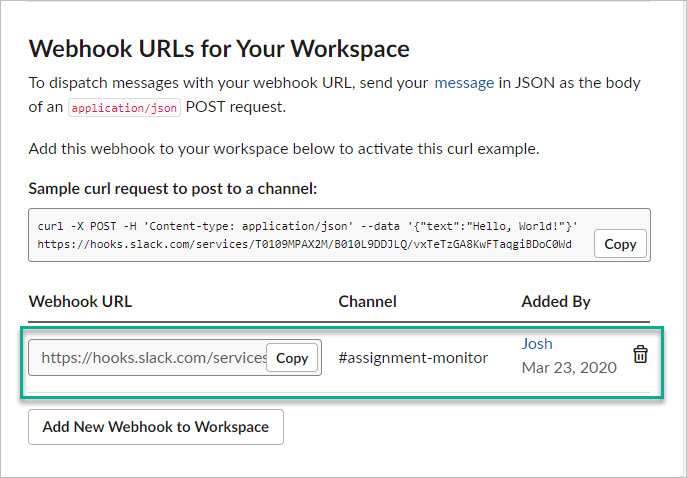
 

Incoming Webhooks page where the Webhook URL is located.


If you go to the Slack channel you connected the webhook to, there will be a message saying a new app was integrated.
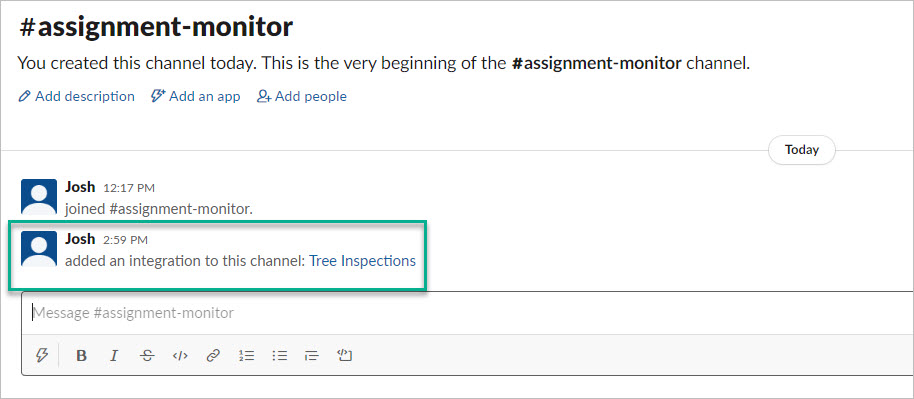
 

Assignment monitor channel in Slack.

Now that you have created a Slack webhook and connected it to your workspace, you are ready to run the Python script.


First, in the Assignment Monitor folder, edit the config file. Edit the file to include your project ID, slack webhook URL, organization, and log-in credentials.
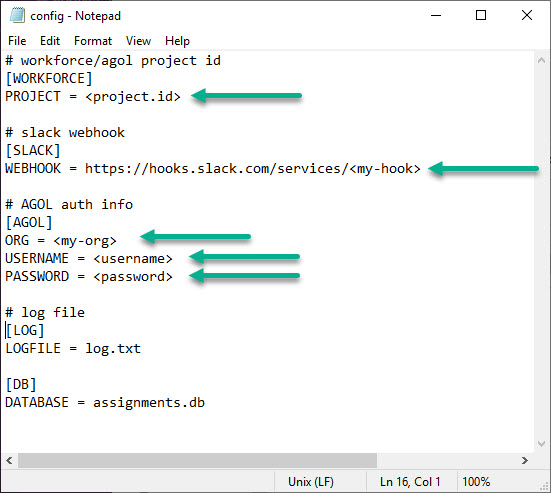
 

Config file opened in Notepad.

Once you’re done editing the file, save it. You are now ready to run the Python script. Open the terminal or command prompt and make sure your file path points to the scripts folder:


cd C:\Users\user\Desktop\workforce-scripts\scripts


Then run the assignment monitor script:


python assignment_monitor.py


The script will check for newly completed assignments, and a message will be sent to your assignment monitor channel on Slack when one is found. To test this, log in as one of your workers on the Workforce mobile app and complete an assignment.


A message will appear in Slack that looks like this:
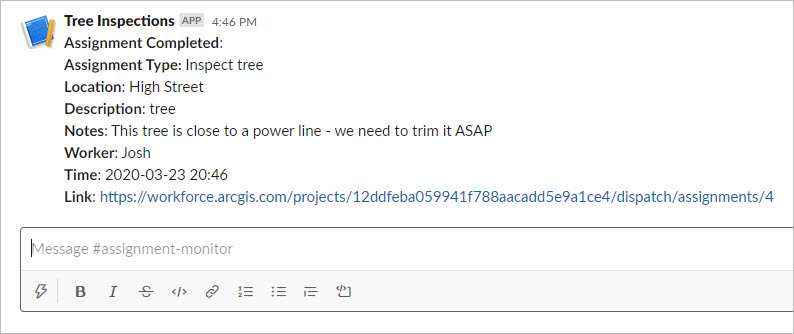
 

Assignment completion message in Slack.


This message shows who completed what assignment and where it is located. It also shows that the worker left a note saying the assignment needs attention right away.


The script will continue checking for completed assignments every 5 seconds. To stop the script, press Ctrl+c while in the terminal or command prompt.


Tip: This script can be modified to run once as opposed to looping infinitely. It can be called every so often (i.e. once per minute) using a task scheduler such as Windows Task Scheduler or Cron.


For more information, see the assignment_monitor readme.


Check completion location 


The check_edit_location script uses data from Tracker for ArcGIS to see if a worker edited a feature without visiting its location. Assignments in Workforce, features in Collector, and surveys in Survey123 can all be checked using this script.


If you want to follow along with this exercise, find a Workforce project that has workers who have enabled location tracking.


Note: Location Tracking must be enabled for your organization to use this script. You must either be an administrator or a track viewer who can view the tracks of each worker whose work you'd like to verify.


For example, Sharon, a tree inspector, completed three assignments this morning (shown below).
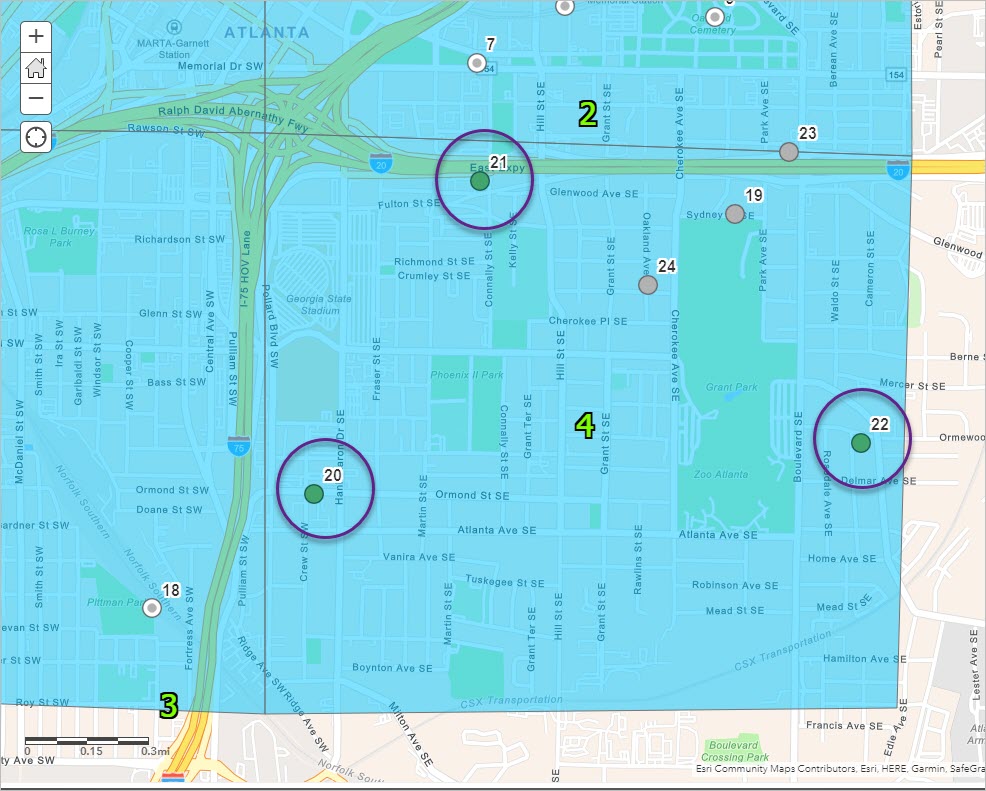
 

Assignments that Sharon completed shown on a map.


The check_edit_location  script is used to verify that Sharon visited the location of each completed assignment.


First, clone or download the Github repository that contains the Python scripts for Tracker.


Next, open the terminal or command prompt and navigate to the scripts folder:


cd C:\Users\user\Desktop\tracker-scripts\scripts


Create the virtual environment with the correct dependencies:


conda env create --file environment.yml


Activate the environment:


conda activate tracker-scripts


Here is the check_edit_location script:


python check_edit_location.py -u username -p password -org https://arcgis.com -workers <worker1>, <worker2> -field-name completedDate -time-tolerance 10 -distance-tolerance 100 -layer-url <layer-url> -tracks-layer-url <tracks-layer-url>


Before you run it, you will want to make sure you edit the parameters as follows:


  • Provide your username, password, and AGOL organization to connect to your content.
  • List the username for each worker whose assignment and location you want to check.
  • Set the field name to the date field within the feature layer you want to verify. To check for assignment completion, use completedDate as input for this parameter.
  • Set a time tolerance that provides a range around the time when the assignment was completed. The script defaults to 10 minutes.
  • Set a distance tolerance that provides a buffer around the location where the assignment was completed. The script defaults to 100 meters.
  • Set the minimum accuracy required when querying worker locations. The script defaults to 50 meters.
  • Provide the complete feature service URL for the assignments layer. For example:
    • https://services.arcgis.com/a910db6b36ff4066a9d4131fccc3da9b/arcgis/rest/services/assignments_ad9af2fc00314fa49ce79ec7d7317acc/FeatureServer/0
  • Enter the complete tracks layer URL if there is a specific track view you want to utilize. The script defaults to the tracks layer in your location tracking service. For example:
    • https://locationservicesdev.arcgis.com/US6xjA1Nd8bW1aoAarcgis/rest/services/5bfd7a01b6d4b698df17af205b8dbef_Track_View/FeatureServer/0


Once the parameters are set, run the script.


For this example, the script was run with the default parameters to see if Sharon was within 100 meters of the tree inspection assignments at the time they were completed. The script returned the following message:


The user sharon_user who last edited the feature with OBJECTID 22 was potentially not within the distance tolerance when updating the field completedDate


The script only returns assignments that are invalid. This means that Sharon did visit the location of two of the assignments she completed. However, there is one tree inspection that she may not have visited.


Next, Sharon’s tracks were added to the assignments layer to see if the script’s output made sense.
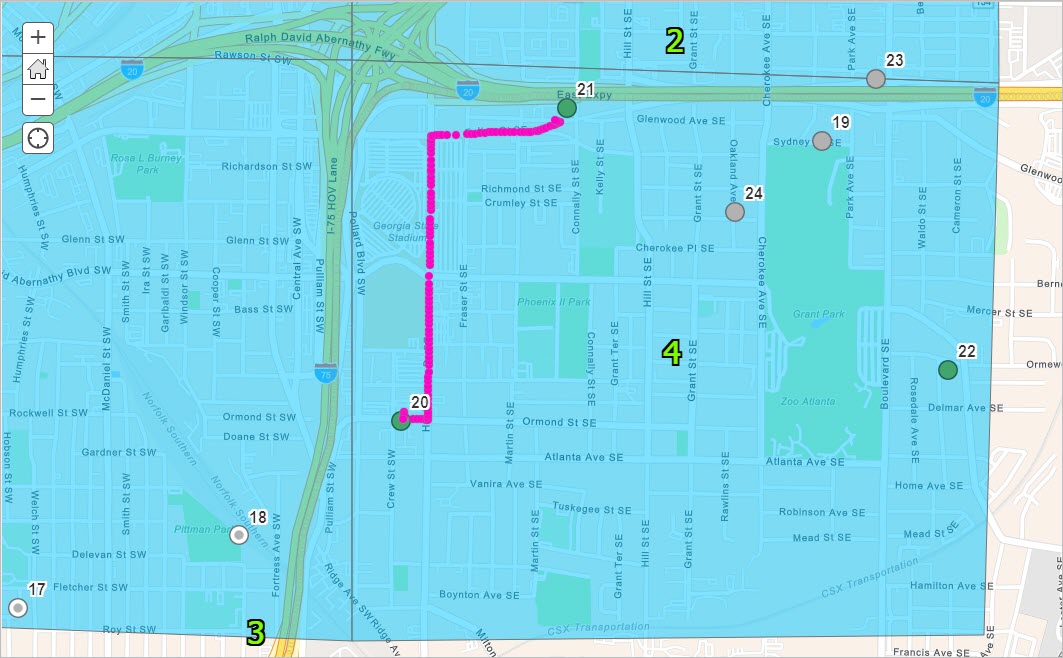
 

Sharon’s tracks and completed assignments displayed on a map.


Sharon’s tracks, shown in pink above, show that she visited assignments 21 and 20, but did not visit assignment 22. The script successfully reported that, though assignment 22 was completed, Sharon potentially did not visit the site of the tree inspection.


For more information about this script, see the check_edit_location readme.


Additional resources

This blog post taught you how to use ArcGIS API for Python to monitor your Workforce projects. See the following blog posts to learn about other ways to automate tasks for Workforce:

Feel free to test out all of the Workforce scripts in the Github repoTo learn more about the Workforce module within the Python API, see Managing Workforce for ArcGIS Projects.
more
3 0 3,989
96 Subscribers