- Home
- :
- All Communities
- :
- Products
- :
- ArcGIS Workforce
- :
- ArcGIS Workforce Blog
- :
- Automate Workforce with ArcGIS API for Python: Con...
Automate Workforce with ArcGIS API for Python: Configure and Assign
- Subscribe to RSS Feed
- Mark as New
- Mark as Read
- Bookmark
- Subscribe
- Printer Friendly Page
- Report Inappropriate Content
Welcome to the first in a series of blog posts that will teach you how to automate key workflows for Workforce for ArcGIS.
The Workforce module within ArcGIS API for Python makes managing Workforce projects a simple and efficient task. We are constantly creating new scripts that simplify app-based workflows into just a few lines of code.
Whether you are setting up your first Workforce project, cleaning out a project with hundreds of old assignments, or trying to find new ways to improve your organization’s efficiency – the Python API will be a powerful addition to your geospatial arsenal.
This first blog is a step-by-step tutorial that will teach you how to configure a Workforce project and create assignments.
Overview
- Getting started
- Scenario
- Download Workforce Scripts
- Install ArcGIS API for Python
- Import workers from a CSV file
- Add assignment types
- Create assignments based on an existing feature layer
- Assign work based on location
- Additional resources
Getting started
If you would like to complete each task alongside this exercise, first do the following:
- Review the requirements for installing ArcGIS API for Python
- Download the attached Jupyter Notebook - tree_inspections.ipynb
- Download the attached CSV file - tree_inspectors.csv
- Create a blank Workforce project
Note: If you don't have an ArcGIS account, you can sign up for a free trial.
Scenario
In this scenario, the city of Atlanta has identified 24 trees that are at risk of falling. These trees are in heavily developed areas, so it’s crucial that they be professionally inspected. The city has hired a tree risk assessment company to perform these inspections.
You will use ArcGIS API for Python to configure a Workforce project for the company. You will import the company’s workers, create assignments based on a feature layer containing the trees, and assign inspections to workers based on the zone that each worker oversees.
Download Workforce scripts
First, clone or download the workforce-scripts GitHub repository This contains the Python scripts for Workforce as well as the version of the Python API needed to automate Workforce projects. Once it's downloaded, navigate to the “workforce-scripts” folder in either the terminal or the command prompt. A Windows operating system is used for this example.
cd C:\Users\user\Desktop\workforce-scripts
Install ArcGIS API for Python
Run the following command in either a Python script or Python console to create the virtual environment with the correct dependencies and to install ArcGIS API for Python 1.8.3:
conda env create --file environment.ymlNote: To automate Workforce projects, you must use ArcGIS API for Python 1.8.3 or later.
Next, activate the environment:
conda activate workforce-scripts
Once you've created and activated the environment, you are ready to use the Workforce scripts.
Import workers from a CSV
The import_workers Python script allows you to import workers directly from a CSV file. This script is especially useful for importing a large number of workers into a project. Rather than input your workers one by one in the Workforce app, you can run this single line of code instead.
We will use the import_workers script to import a CSV file of tree inspectors into this scenario's Workforce project. This is the CSV file that you downloaded earlier:

There are 5 tree inspectors that will be imported into the project. Their name, working status, title, contact number, and user ID will all be passed through the script.
Open this file and edit the name and userID columns with the information of at least four workers within your organization. Save your changes.
Note: This script has many options allowing the user to specify the names of each column within the CSV. Check out the import_workers readme for more information.
In the terminal or command prompt, run the import workers script:
python import_workers.py -u <username> -p <password> -org https://<org>.maps.arcgis.com -name-field name -status-field status -user-id-field userId -log-file log.txt -csv-file ../sample_data/tree_inspectors.csv -project-id <project id> -title-field title -contact-number-field contactNumber
Make sure you update the following fields with your own information:
- Username and password
- Organization
- CSV file
- Project ID (from the blank project you created)
Note: If you are working with a Classic project (a v1 project), the Project ID is the item ID of the project item. If you are working with projects enabled for offline use (a v2 project), the Project ID is the item ID of the Workforce feature service. Regardless of what version you are working with, the Project ID can be found in the URL of your project.
- For example, if the project URL is: https://workforce.arcgis.com/projects/a0f297f949f549f0ade07eer562d9934/configure/overview
- The project-id is: a0f297f949f549f0ade07eer562d9934
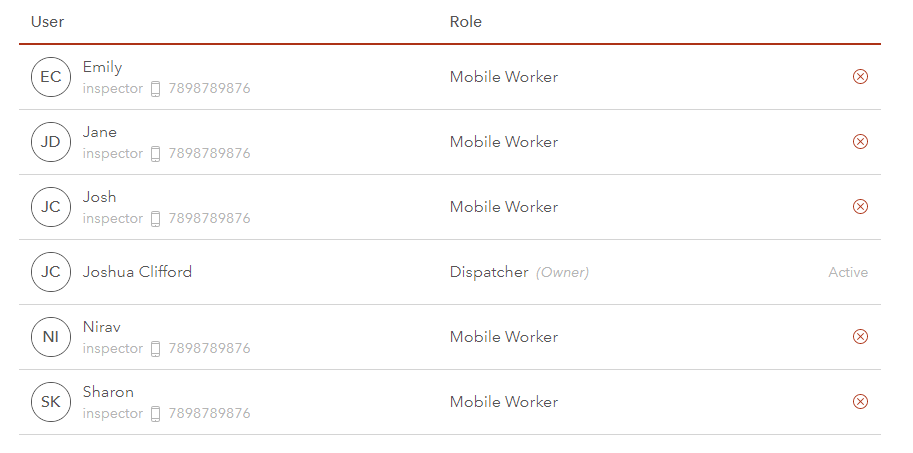
Once this script has been run, check that your tree inspectors have been successfully added to your project (shown below).
Add assignment types
Note: We will be using Jupyter notebooks to complete the remaining tasks within this workflow. Notebooks are useful for visualizing data and running code step by step. Either open a blank Jupyter Notebook or follow along with the notebook you downloaded earlier.
First, import the ArcGIS API for Python library.

Next, connect to your GIS and fetch the project using its feature service item ID or project ID.

Once this set-up is complete, you can start performing tasks specific to your project. You’ll first want to add assignment types to the project that are relevant to tree inspections.

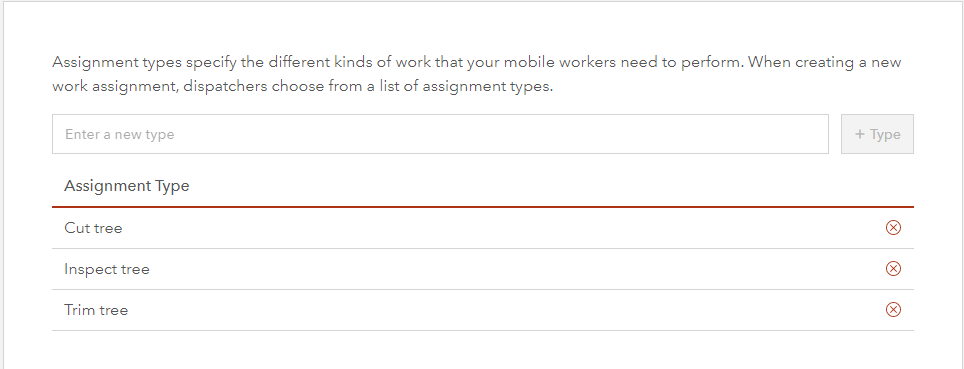
After you run this code, you can check that the assignment types have been successfully added to the project (shown below).
Create assignments based on an existing feature layer
The city of Atlanta has provided a feature layer containing the trees that are at risk of falling. Using the Python API, you can create an inspection assignment for each feature within this layer.
First, import the datetime library. Datetime allows us to pass the current time into the assigned date field.

Then you can fetch the layer containing the trees, query it, and display it on a map.
Workforce stores assignments in the WGS84 Web Mercator projected coordinate system, so let’s ensure that the returned geometries are using this spatial reference.
Here is the item ID for the trees feature layer: 88495d3b613a41f4a70b9d61ef979b34
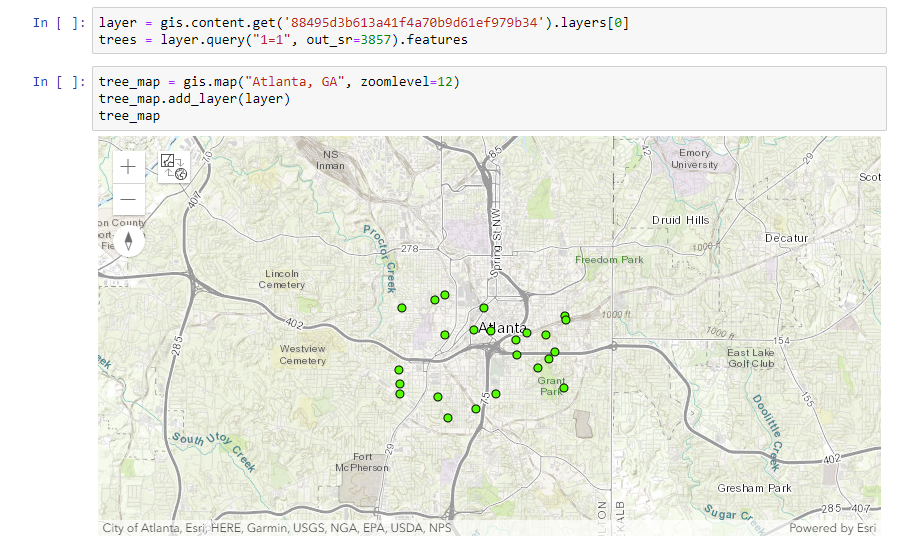
The Atlanta Trees layer is displayed.
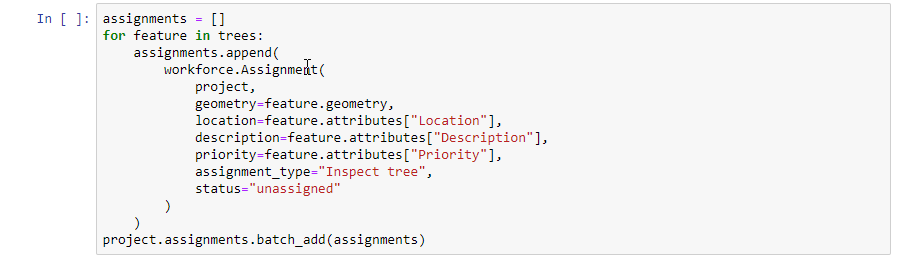
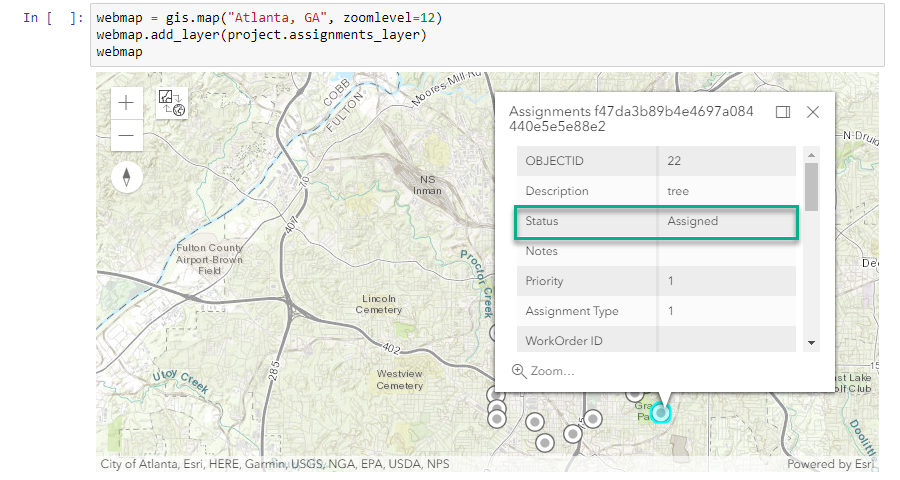
Now you will create 24 “Inspect tree” assignments: one for each tree. You will loop through the trees feature layer to batch add assignments using the “Inspect tree” type we created in the previous section.
To ensure that a new assignment was created for each tree, display the assignments layer on a map.
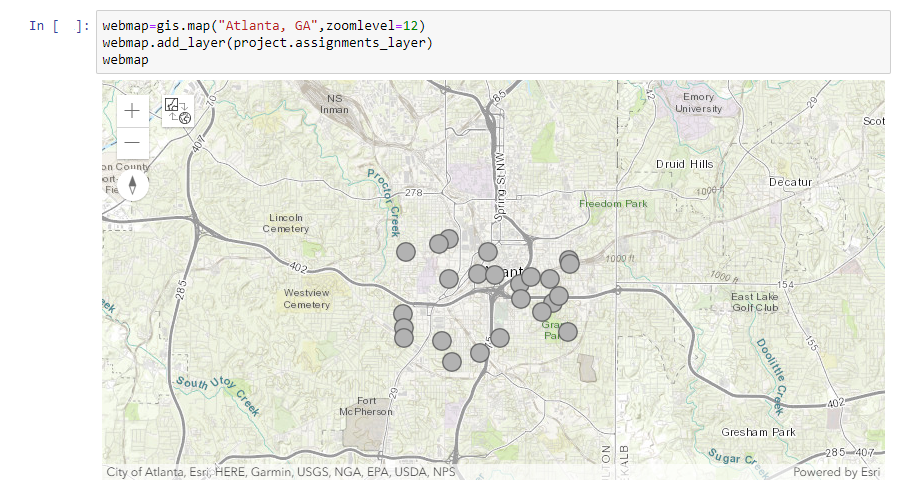
Your project now has 24 tree inspection assignments.
Assign work based on location
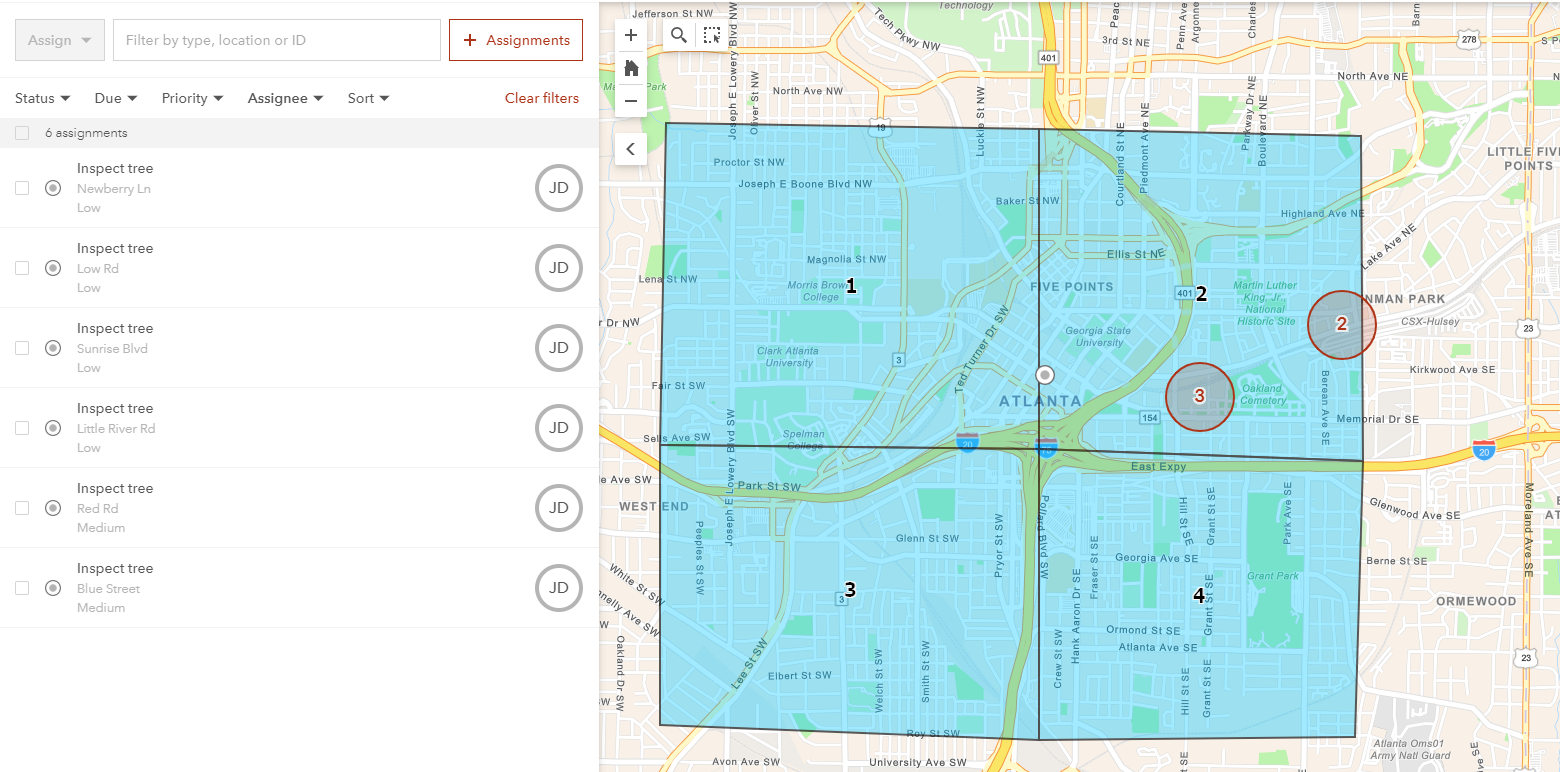
You have your tree inspectors and your assignments. Now it’s time to assign work. You will assign the inspections to four workers. Each inspector oversees a specific work zone in Atlanta, so they will only inspect trees that fall within their respective zone. You will use the work zone feature layer to assign each of the 24 tree inspections to a set of four zones.
We’ll import some modules from within the arcgis library to make typing these classes easier.

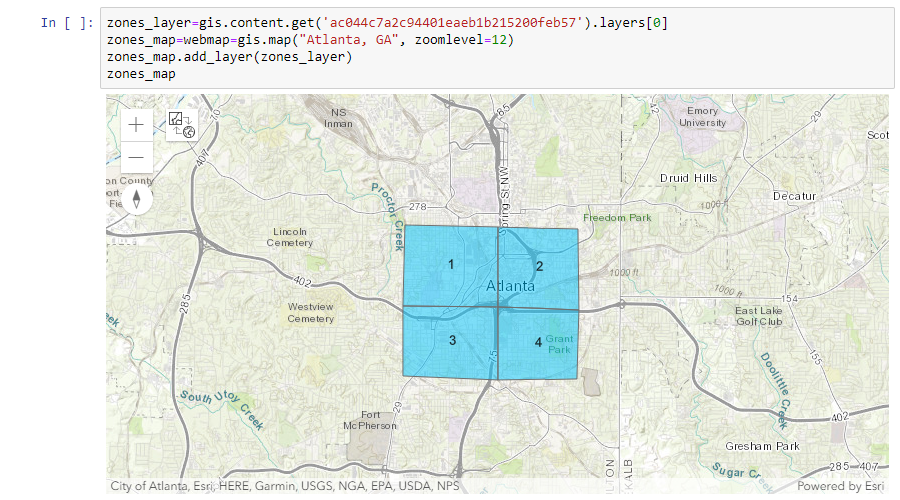
Next, let’s get the Inspection Zones feature layer and display it on a map.
Here is the item ID for the Inspection Zones feature layer: ac044c7a2c94401eaeb1b215200feb57
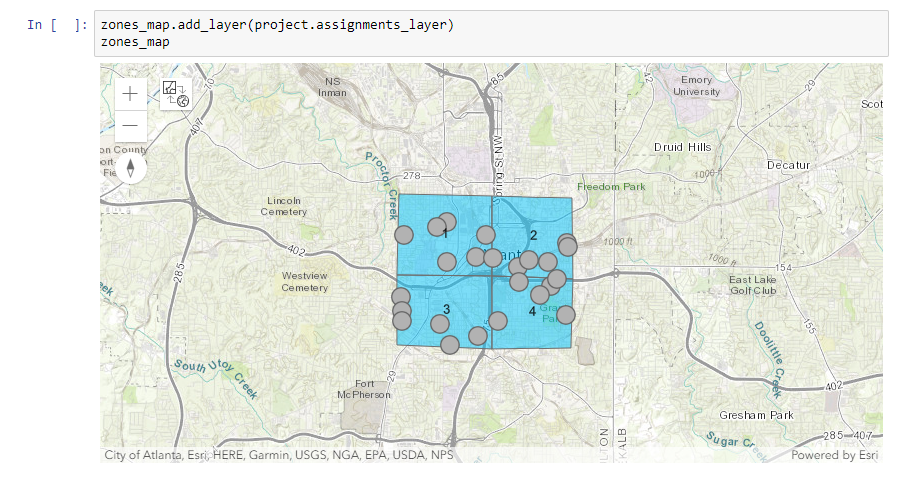
Add your assignments layer to the map so you can visualize how the assignments are distributed within the zones.
Next, you’ll create a spatially enabled data frame from the zones layer and grab all of the unassigned assignments.

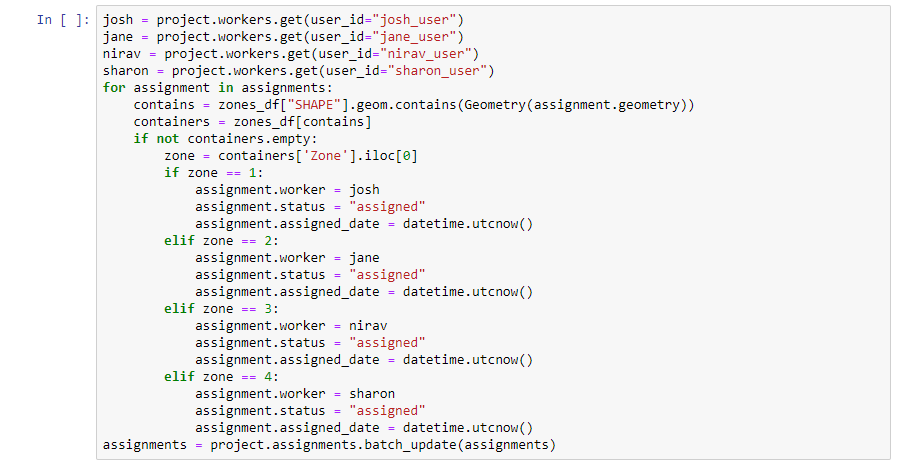
Assign tree inspections to workers within each of their respective zones.
- Trees in Zone 1 should be assigned to Josh
- Trees in Zone 2 should be assigned to Jane
- Trees in Zone 3 should be assigned to Nirav
- Trees in Zone 4 should be assigned to Sharon
The following code will assign each worker to the trees that fall within the work zone they are responsible for.
Run this code and then create a map with the updated assignments layer to make sure everything was assigned properly. If you click on any of the features, the status should read “Assigned”.
Now, if you open your Workforce project, you can view all of your updated assignments. If you sort by assignee, you’ll see that inspectors were only assigned to work for their specific zone. You’ll see that only inspections in Zone 2 were assigned to Jane.
You have successfully set up a Workforce project and assigned work using ArcGIS API for Python!
Additional resources
This blog post taught you how to use ArcGIS API for Python to configure your Workforce projects and assign work. See the following blog posts to learn about other ways to automate tasks for Workforce:
- Automate Workforce with ArcGIS API for Python: Monitor
- Automate Workforce with ArcGIS API for Python: Clean and Maintain
Feel free to test out all of the Workforce scripts in the Github repo. To learn more about the Workforce module within the Python API, see Managing Workforce for ArcGIS Projects.
You must be a registered user to add a comment. If you've already registered, sign in. Otherwise, register and sign in.