- Home
- :
- All Communities
- :
- Products
- :
- ArcGIS Survey123
- :
- ArcGIS Survey123 Blog
- :
- Direct GNSS external receiver support in Survey123...
Direct GNSS external receiver support in Survey123 3.3
- Subscribe to RSS Feed
- Mark as New
- Mark as Read
- Bookmark
- Subscribe
- Printer Friendly Page
- Report Inappropriate Content
To date, many users who require high accuracy location capture have found ways to do so with Survey123 – typically by using additional software to make the position from their external receiver output data through to their device’s internal position source. From version 3.3 onward, Survey123 can directly communicate with many external GNSS receivers, significantly improving both the connection experience and the quality of data captured.
The most common type of receiver available for Survey123 users is a Bluetooth GNSS receiver, but you can also connect to USB receivers and receivers that are available over a network connection. The key requirement is that the receiver outputs NMEA sentences.
In general, direct GNSS support is the same in Survey123 on all platforms (Windows, Android, iOS, Mac, Ubuntu) but for iOS we also need to liaise with each hardware manufacturer individually. So far we have worked with our friends at Bad Elf, Eos, Leica and SXBlue to ensure that Survey123 on iOS will work with their receivers. If you have other receivers that you need to use with Survey123 on iOS please let us know, but in the meantime, please get started by using your receiver with Windows or Android.
Prepare for high-accuracy data collection
Before choosing to use an external receiver with your survey, think about what additional metadata you need to display or collect. In some cases, it might be enough to incorporate accuracy into a constraint so that data cannot be captured unless a certain level of accuracy is met.
In other cases, you may want to show the accuracy on the survey so the user can decide what to do, and in others, you might want to just capture all the data behind the scenes showing nothing to the user and keeping it for someone to analyze at a later data.
You can use note, decimal or hidden questions to show or store metadata values in a survey. For more information see https://doc.arcgis.com/en/survey123/desktop/create-surveys/high-accuracy-prep.htm
Connect your receiver to your device
Steps to connect:
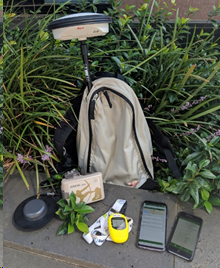
- Turn on your receiver and place it near your device.
- Go to your devices Bluetooth settings, and wait for your receiver’s name to appear in the list.
- Tap the receiver to pair it with your device.
Warning: During our testing, we have found the biggest contributor to success (or failure) when using an external receiver, is connection to your device. Whilst you’re testing you may be tempted to try connection on a few devices, possibly swapping receivers around. If you have having any trouble connecting within Survey123 – we strongly recommend checking the Bluetooth connection in your device settings. Most receivers will only connect to one device at a time – take a look around your office and be sure no one else is trying to connect to your receiver!
Of course, in the real world these issues shouldn’t arise – typically you will have one receiver that you connect to one device - but it’s hard not to tinker with new toys in the office before going out in the field and I wouldn’t want experimentation to be your downfall!
Configure Survey123 to use the receiver
Steps to configure:
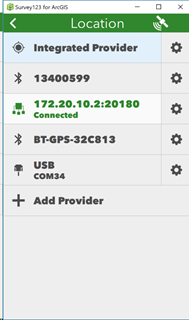
- Open Survey123 and on the main menu choose Settings
- Choose Location
- Choose Add Provider, and wait for your connected receiver’s name to appear in the list
- Tap the receiver to add it
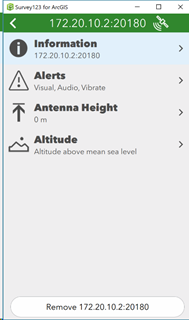
Once the receiver is selected you are shown the settings for that receiver. You can give it a recognizable name, change how you are alerted when a connection is poor or is lost, and configure antenna height and preferred altitude measurements. We have found changing the name very useful, we all have our preferred alerts and once you set up your hardware on a pole, the antenna height is great to set and forget. Altitude is a tricky one – frankly - only touch this if you really know what your doing. In most cases, the external receiver will sort this out for you.
Go back to the location page and see that your receiver is now connected.
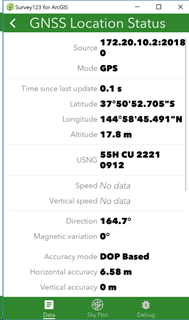
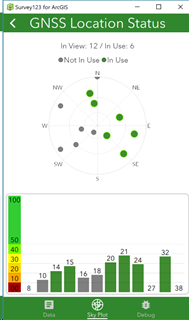
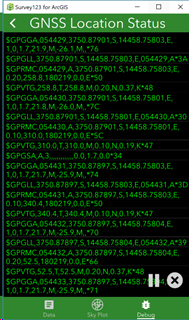
If you want to see more information about the data being received, press the satellite icon in the title bar. This icon is also visible whilst you’re in the survey. Here you get three pages: location data, skyplot and the NMEA data stream.
Use external receiver to capture location in a survey
This is the easy part. Once your receiver is connected, location is captured in exactly the same way in a survey as before. Only now you might notice the satellite icon flashing in the title bar. The satellite icon changes based on it the connectivity state. This icon initially only displays a satellite, adding three beams when searching for a position.

When positions are being received, the satellite periodically blinks.

We have had feedback where users have captured data and their location was unexpectedly captured at location 0,0. Waiting just a brief moment longer – until the satellite icon is blinking - will ensure you get a reasonable location recorded even when you don’t have a geopoint question in your survey.
Accuracy reporting
Some organizations require reporting of the accuracy of location data to specific standards. You can use Survey123 to report whatever metadata (and subsequent accuracy calculations) you like. The attached sample survey demonstrates how to not only record the 95% confidence interval of a location, but also to constrain location capture to only when a minimum accuracy is achieved. The calculations in this survey are based upon conversion factors from the National Standard for Spatial Data Accuracy (pages 3-10 and 3-11).
RTK and post processing
This section is intended to point you right back to the GNSS hardware supplier of your choice. In some cases, hardware suppliers will direct you to use an app on your device to process the positions before they are passed through to Survey123. In these cases, you will need to continue using the internal location provider setting in Survey123. The GNSS hardware suppliers’ app will pass the corrected location information through to Survey123 where you would record the corrected information. In these cases, there may be limited metadata you can record in the survey.
Some GNSS hardware outputs all available information through their NMEA data stream and you can extract the metadata into your survey for analysis at a later data.
For post-processing, you may also need to save additional files from your receiver along with the metadata that you can record in Survey123. Please check your post processing solution of choice for what data will be required.
- « Previous
-
- 1
- 2
- Next »
You must be a registered user to add a comment. If you've already registered, sign in. Otherwise, register and sign in.