- Home
- :
- All Communities
- :
- Products
- :
- ArcGIS Pro
- :
- ArcGIS Pro Questions
- :
- How to control time duration of animation keyframe...
- Subscribe to RSS Feed
- Mark Topic as New
- Mark Topic as Read
- Float this Topic for Current User
- Bookmark
- Subscribe
- Mute
- Printer Friendly Page
How to control time duration of animation keyframes in Arc GIS Pro 2.5.
- Mark as New
- Bookmark
- Subscribe
- Mute
- Subscribe to RSS Feed
- Permalink
- Report Inappropriate Content
I am trying to create a through time animation of earthquake data points. I have a data set of quakes with location, date/time, and magnitude that goes back to 1855. I have set 33 Keyframes in the Gallery covering each 5 year period to the present. I have symbology set to magnitude. Step interval is 5 years. Start is 1/1/1855, End is 1/1/2017. Duration is 1:36. Overlays include a <dyn "endtime"/> that depict the 5th year of each 5 year interval.
When I run the playback it appears to increment through each data point within each 5 year interval. I want it to only increment for the whole of each 5 year interval as it shows in each Keyframe. How does one get a setting correct for this?
Dave
- Mark as New
- Bookmark
- Subscribe
- Mute
- Subscribe to RSS Feed
- Permalink
- Report Inappropriate Content
Anybody?
- Mark as New
- Bookmark
- Subscribe
- Mute
- Subscribe to RSS Feed
- Permalink
- Report Inappropriate Content
Hi Dave,
If I understand correctly, you want to see 5 years of earthquake data (displayed in a static way, for a few seconds), and then step forward in one step to the next 5 years (for a few seconds), for all your data? If so, there are two ways that come to mind.
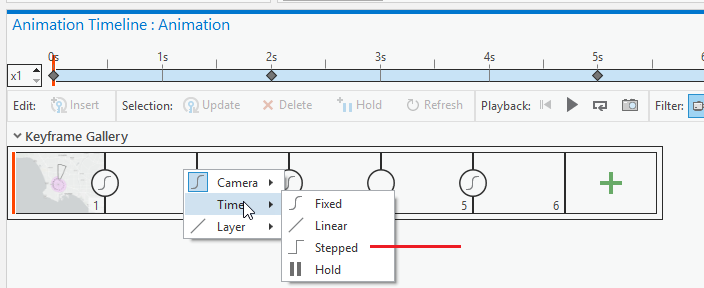
[1] Set the time transition type to "Stepped" (screenshot below) for each of your keyframes. This will move the time component for the map immediately to the time of the end keyframe. One extra tip - this means that the time duration for Keyframe 1 will show for 1/30th of a second before it moves to the duration time of Keyframe 2. You can add a 'hold' to the first keyframe (or just duplicate it using Append Front) to ensure it gets included properly in the video.
[2] Export the video with a very slow frame-rate that matches your keyframe interval. For example, if you want to show each 5-year span for 2 seconds (and the spacing for all keyframes are the same), then you can export a video at 0.5 frames/second and it will only capture the images for your actual keyframes. It also has the advantage of making smaller video files. This technique won't work if the camera / view extent is moving.

Hope one of the above techniques works for you!
-Nathan.
- Mark as New
- Bookmark
- Subscribe
- Mute
- Subscribe to RSS Feed
- Permalink
- Report Inappropriate Content
Hi Nathan; Sorry to be a little bit late on the reply, but; Thanks much for the suggestions, they are already a big help. This is looking a whole lot better. Your initial summary of what it is I am trying to do is exactly correct. It is performing as I hoped. I haven't exported to any format yet as there are some little details I am still struggling with.
Detail 1: I set all the frames to stepped as you suggested. However I had to do it with the keyframe list. Clicking on the stepped selection in the keyframe as you illustrated just would not take, i.e. change the selection. Don't know what is going on there, but the pulldown keyframe list in the ribbon worked. Except for the first two keyframes. Somehow they are set to mixed and apparently can't be changed. I have attached a screen capture (hope it can be read) to try and illustrate. I would try your suggestion as to the "hold" on Keyframe 1, but not sure how to change it, and also not sure then on Keyframe 2.
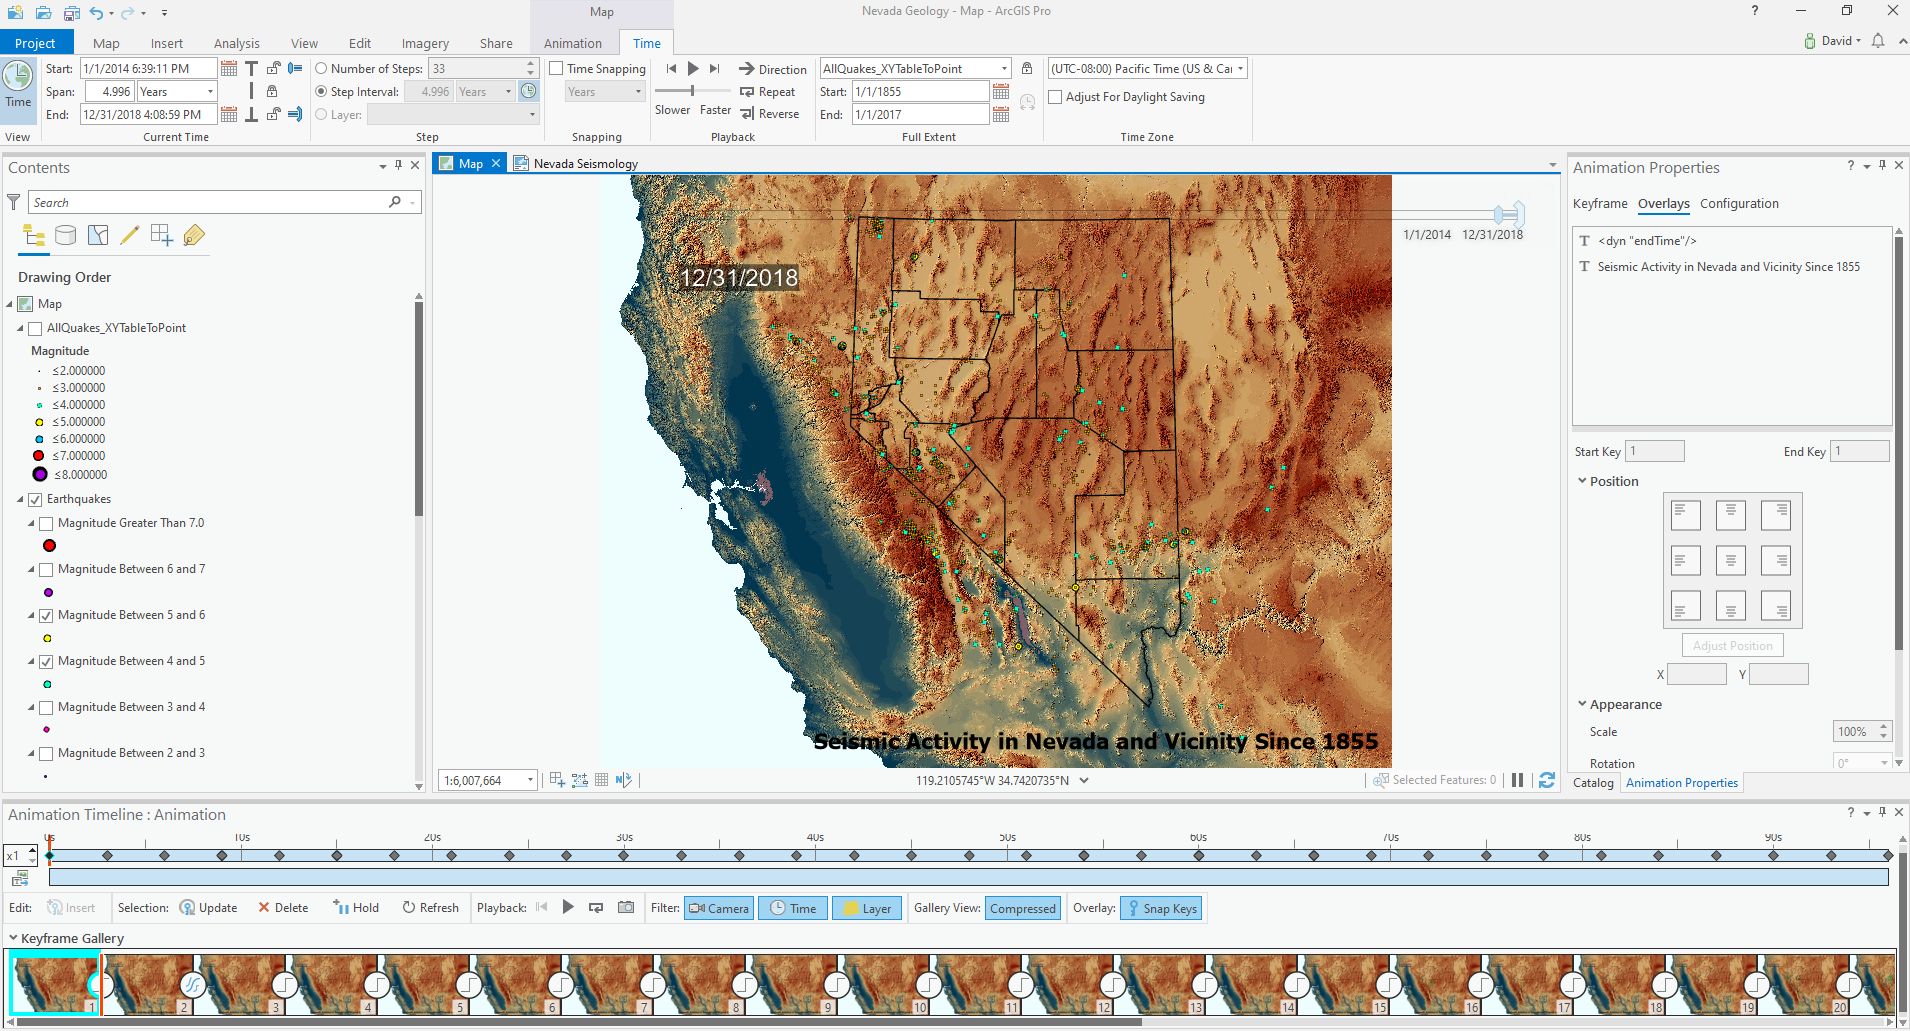
Detail 2: Not really pertaining to my original inquiry, I know. But, getting the overlay features to behave is quite cantankerous. I have a function for the "endTime" of each Keyframe, but it pretty much does what it wants. In pic #2, you can see it got set to 12/31/2018. Where that is coming from is unknown as the last datapoint in the XYTable is 1/1/2017 as is shown in the ribbon above. 
This is a cool project. I am doing this to continue familiarity with Pro after doing the MOOC course.
Thanks; Dave
- Mark as New
- Bookmark
- Subscribe
- Mute
- Subscribe to RSS Feed
- Permalink
- Report Inappropriate Content
Hi Dave,
Glad you're working through this project (and thanks for doing the MOOC). 
Here is some general info that might help explain what you're seeing regarding Detail 1:
- 'Transitions' are stored in the 'To-Keyframe' (think of them as "how do I get to this end state")
- This means that Keyframe-1 doesn't have a transition at all (per your top screenshot)
- Which is why 'Transition' is grayed out in the UI (for that selected keyframe)
- Extra mini-note - animations don't run in Layout views (unless you activate the frame)
- I would recommend staying in the Map view exclusively when making an animation
- Transitions have sub-components: camera; time; range; layer
- Camera -> how the camera moves; Time -> how the time-slider moves; etc
- Transition sub-components can use different types of math for calculating how the value/s change
- EG: The camera-movement-transition can be 'Linear' (for straight line flight path)
- EG: The time-transition can be 'Stepped' (for a 'leap' to the next time)
- The top screenshot in my previous post shows how to change just the time sub-component
- The icon for the 'circle' shows in the Timeline Pane is for the camera transition subtype (only)
- And if your extent never changes, it won't matter what the transition type is for this component
- That is, don't worry about the displayed transition type for your animation
- The 'mixed mode' you're seeing is an advanced option, where you can change individual properties within a sub-component (eg: the 'X' coordinate of the camera can transition using 'Linear', while the 'Y' and 'Z' coordinates could transition using 'Fixed curve'). I'll expand a bit on how you (probably) got to this state a bit further down. It's pretty advanced animating, and not something you're likely to need to do on purpose.
- And if your extent never changes, it won't matter what the transition type is for this component
So... on a practical level... the only transition sub-component you need to ensure is Stepped is 'Time'.
And the best way to do that for all the keyframes is to: select all keyframes in the Timeline pane (the one at the bottom of the view); click on one of the...
Regarding the 'mixed mode' result -> this was probably the result of changing the 'Transition' type in the Animation Properties pane (the one that appears on the side of the view) without selecting an entire section of properties. It's easiest to understand visually (per below) - for your use case, you want to select an entire section (per the right side) before you set the Transition type. I suspect you accidentally selected-and-edited a sub-component of the camera (per the left side).
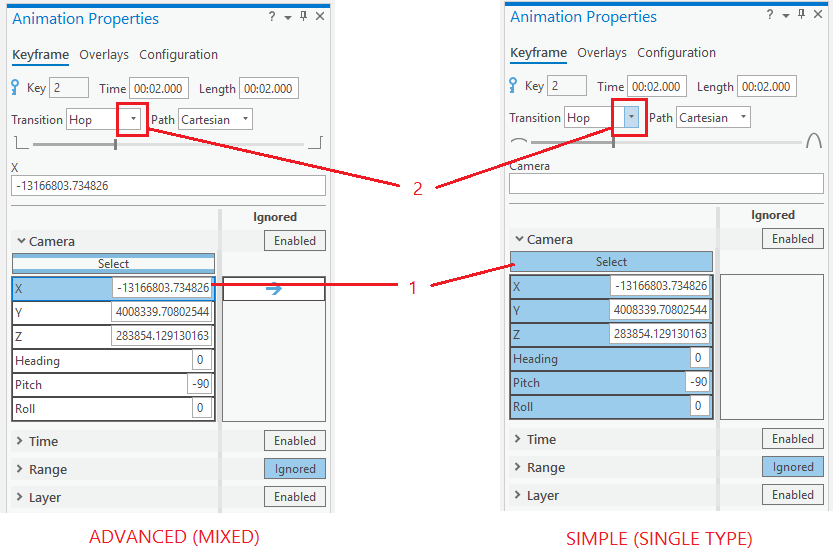
The above info on mixed-mode just an FYI. None of this matters for an animation where the camera doesn't move. To get all the icons back to a single type (if you wanted to), select all the keyframes in the Timeline pane, click one of the icons, expand Camera, and pick a transition type (eg: Stepped).
Phew. Well, that was more info than I expected to put in for detail 1. Hopefully it's helpful for general knowledge.
Regarding Detail 2, I think you just need to update the Time extent for the last keyframe. It's possible / likely that the time-slider state was just captured incorrectly -> eg: with the std 5-year span, instead of the custom span needed for the final (non-5-yr) extent of the data.
Steps:
- Select the last keyframe (in the Animation Timeline pane)
- In the Time ribbon, update the 'Current Time' extent of the time-slider (screenshot below) as needed
- Note that the 'Full Extent' properties are basically data metadata, and are not used in the animation

- In the Animation ribbon, update the selected keyframe by clicking the 'Update' button in the Edit group
Tip: double-click on the second-last keyframe, and then again on the last-keyframe to zoom to a refreshed view of it -> the dynamic text should be updated to the new 'end' time value.
Hope this gets you to where you need to be!
Thanks, Nathan.
- Mark as New
- Bookmark
- Subscribe
- Mute
- Subscribe to RSS Feed
- Permalink
- Report Inappropriate Content
Hi Nathan; Once again, sorry to take so long in reply. Interestingly, in the title of this whole post, I was in Pro 2.5, now it is Pro 2.6. Thanks very much for taking the time to respond to the details with detail.
The project is now looking pretty good. The keyframes are all set to Time/Stepped as I want them, the first keyframe is set to hold, and the last keyframe is correctly set to the last datapoint in the XYTable for a final and shorter than normal keyframe duration. The animation now progresses nicely through each 5 year time interval for the 3 second duration allowing the viewer some time to study the data in each keyframe. This is cool.
So next is exporting this to a movie of some kind. I hope to be able to create something that can be sent to others, so I am studying your earlier recommendations on setting time frames for each keyframe for export. It is highly likely I will be back with questions! And hopefully this discussion helps others doing similar projects.
Thanks;
Dave
- Mark as New
- Bookmark
- Subscribe
- Mute
- Subscribe to RSS Feed
- Permalink
- Report Inappropriate Content
Hi Nathan; Once again, it has taken me awhile to play with this further and try to refine. Can only get to it once in awhile.
So, I have been playing with exporting the animation to various formats. The best one that has worked so far is to a gif. Not too bad, but I wish to further refine it.
-Is there a way to set the exported animation with a pause capability for a viewer?
-If you will note on my second uploaded image above in layout view, I was setting up a legend, north arrow and title, scale etc. But I have so far been from exporting from Map tab to get the gif. Is there anyway to get the desired legend, etc, into the exported animation?
-In your notes in detail section above you mentioned "Extra mini-note - animations don't run in Layout views (unless you activate the frame)". Can you elaborate some on this particularly pertaining to exporting? Possible? Or no.
I tried to export to the mp4 format. No go. Export failed. Also tried to jpg (image seq). It runs but each frame is exported individually. Are all the image sequence formats like this?
Also tried to a .avi, that is pretty cool, but the images are really fuzzy. So far, gif format has gotten the best results, but with the above questions which I suspect would apply to all export formats.
At some point I'd like to upload the final product, so that others can see what this has been all about. The dataset is downloadable from the Nevada Bureau of Mines and Geology.
Dave