- Home
- :
- All Communities
- :
- Products
- :
- ArcGIS Monitor
- :
- ArcGIS Monitor Blog
- :
- A crash course in extending ArcGIS Monitor with no...
A crash course in extending ArcGIS Monitor with node.JS
- Subscribe to RSS Feed
- Mark as New
- Mark as Read
- Bookmark
- Subscribe
- Printer Friendly Page
- Report Inappropriate Content
Out of the box, ArcGIS Monitor comes equipped with some excellent general purpose counters that can be useful for maintaining your Enterprise GIS. But what happens when you want to monitor something that's not covered by any of the general purpose counters? Your first port of call may be to check the ArcGIS Monitor Gallery. Here you'll find some more specialized extensions that can be plugged straight into your Monitor deployment in a few simple steps. However if you can't find what you're looking for there, then your next step may be to start thinking about developing your own extension.
I recently found myself at this juncture, and when I went looking for documentation on writing extensions for ArcGIS Monitor - I discovered there wasn't much to be found. No matter though, I was just going to have to figure it out for myself. As a starting point I downloaded a few extensions and started reading through their code contained get a feel for how they work. What follows is a summary of my learnings from subsequent analysis and experimentation, for the purposes of this article I'm assuming that you have at least basic familiarity with node.JS development.
File Structure of an ArcGIS Monitor extension
If you've imported an ArcGIS Monitor extension before, you may have noticed that what you're importing is a zip file containing at least
- A folder that matches the intended name of the extension
- An index.js file within the named folder, that contains code to be executed by the ArcGIS Monitor service in a node.JS runtime
Often there will also be additional files included within this structure, this may include
- A node_modules sub-directory containing node.JS modules required code used in the extension
- Powershell scripts or windows executables to be executed by the index.js code
- A testCmd.js which can be used during development to test the behaviour of the extension code without going through the process of loading the extension into ArcGIS Monitor
Out of all the possible files that may make up an ArcGIS Monitor extension, the named folder containing the index.js are our essential components. If we want to write our own extension for Monitor, our chief concern should be what goes into this index.js file, and how ArcGIS Monitor interacts with this code. This file follows a specific structure which allows the ArcGIS Monitor service to feed information into the script and run the code.
Extensions Inputs
First of all we have module.exports.inputs which is a JavaScript object defining the information we expect the user to provide when configuring a counter using our extension. This will shape the UI presented ot the user when configuring a counter using your extension. Each individual input is an object that needs to have at least a 'type' property, and can optionally have a 'value' and 'help' property. The type property will determine the UI control presented to the user in which to provide their input. The value property provides allows a default value to be set within the UI control presented to the user. And the 'help' property allows us to provide context sensitive help to the user, explaining what information they are expected to provide for each input.
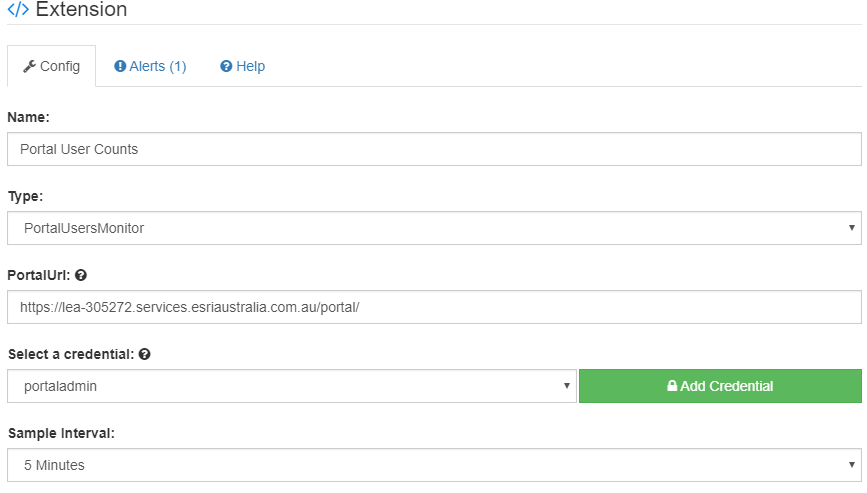
As an example, I created an extension for ArcGIS Monitor that checks how many creator and view user type licenses are available in a 10.7.x/10.8.x Portal. The use-case for such an extensions would be to allow for an alert to be raised when we're starting to run out of either Creator or Viewer usertypes, so you as an administrator go look at freeing up inactive users or authorise additional licenses.
For our extension to interact with the Portal, it's going to need two key pieces of information:
- The URL of the Portal; and
- Credentials to facilitate authenticated access to the Portal
module.exports.inputs = {
portalUrl: {
type: 'string',
value: '<< https://portal.example.com/portal >>',
help: 'Portal URL'
},
adminCredentials: {
type: 'credentialMap',
value: '<< portaladmin >>',
help: 'Portal Administrator credentials'
},
min_resolution: {
type: 'minimum_resolution',
value: 300
}
};When loaded by ArcGIS Monitor this code will provide a field in which the user can enter a string of text specifying the Portal URL to connect to, along with the ability to add and/or select credentials saved with ArcGIS Monitor Administrator to for the purpose of authenticating with the Portal. The third input here 'min_resolution' is the minimum allowable sampling interval in seconds, which controls what options will be available to the user in the Sample Interval dropdown.
For more information on what types of inputs are available for ArcGIS Monitor extensions to use, you may be interested to check out my quick reference on ArcGIS Monitor Extension Input Types
Execute and Extension Functions
In the index.js script we need to export a function named execute that will server as an entry-point for the ArcGIS Monitor Service to run your extension's code. In the examples from the ArcGIS Monitor Gallery, the execute function makes use of the q library to return the Extension function as deferred promise. Given that the q library is no longer maintained and the Node runtime that ships in the current version of ArcGIS Monitor supports async/await language features that can be used to much the same effect - I chose to drop use of the q library in favour of modern syntax and more readable code. This involved making Extension an async function, and having the execute function return the promise implicly created by invoking the async Extension function. Techincally, this approach means the promise that gets returned the ArcGIS Monitor Service lacks the publicly accessible resolve/reject methods that would otherwise come with a q defferred - but in my testing this did not appear to have any impact on functionality or performance.
module.exports.execute = function (inputOptions) {
return Extension(inputOptions);
};
async function Extension(options) {
/* Here the Extension function will gather metrics to report back to Monitor Service */
var results = []; // Array of result to report back to the Monitor Service
//Each item in the result array will be an object containing 'name' and 'value' properties
results.push({name: "<metric name>", value: <metric value>}); 'value
//The monitor service expects the exentsion to report an exit code - in the event of an error, exit code should be non-zero
results.push({name: "Code", value: 0});
// Return the array containing the results
return results;
}The Extension function called by execute is the one that's responsible for performing the business logic of the extension - that is to say it gathers whatever metrics or information we're interested in, and reports this back to the ArcGIS Monitor Service. The way in which you gather the information to report back can vary - in my Portal User Licenses example (attached at the end of this post), this was done in JavaScript using the axios http library to make REST API calls to the Portal. However other examples in the ArcGIS Monitor Gallery can also be seen using other techniques such as calling powershell and exe files and capturing the information they return.
Either way, once your script has gathered the metrics your extension is reporting on, this information needs to be formatted in a particular way so that it can be interpreted by the Monitor Service. We do this using an array of objects, where each metric is represented by a separate object, and each object has a 'name' and 'value' property. The name property defines the name of the counter as it will appear in ArcGIS Monitor Administrator, and the value property represents the data associated with your counter.
Finally, once we have the information formatted correctly this needs to be reported back to the Monitor Service by resolving the Extension promise. If using a q.deffered you would invoke the defferred's .resolve() method, however if like me you make Extension an async function - simply returning from the function will resolve the promise.
That's about all you need to know to get started with writing extensions for ArcGIS Monitor. If you want to dive deeper into the topic, check out the complete code for my example Portal User License monitoring extension attached below, and stop the ArcGIS Monitor Gallery for more examples.
You must be a registered user to add a comment. If you've already registered, sign in. Otherwise, register and sign in.