- Home
- :
- All Communities
- :
- Products
- :
- ArcGIS Data Interoperability
- :
- ArcGIS Data Interoperability Blog
- :
- Synchronize <non-Esri tech goes here> to ArcGIS On...
Synchronize <non-Esri tech goes here> to ArcGIS Online or Portal
- Subscribe to RSS Feed
- Mark as New
- Mark as Read
- Bookmark
- Subscribe
- Printer Friendly Page
- Report Inappropriate Content
Agencies around the world publish their data on the web using a great variety of technologies, and while standards exist to make them accessible within ArcGIS, nothing performs within ArcGIS like our own services. Sometimes it just makes sense to regularly synchronize data from its system of record to ArcGIS Online or Portal. This blog is about how to do that efficiently.
To see if you should read further, download the blog attachment NZ_Street_Address.lyrx and add it to a new map in Pro, then using the Locate pane and the ArcGIS World Geocoding Service zoom to Wellington, NZL (or your favorite other New Zealand locality). Zoom in to 1:5000 or larger scale, pan around, turn on the label classes Standard Number, Suffix Number and Range Number and inspect the address point house numbers. Identify features. Select features. You are accessing a feature layer in an ArcGIS Online standard feature data store. Here are links to the item and service. If you have a reasonable internet connection you will have a good map exploration experience. The layer you are looking at has over 2 million features. You can download the data. You can use it in geoprocessing. The data is maintained weekly and the synchronization process averaging thousands of updates each week takes under 2 minutes. The approach uses no coding. If you want to do this for data accessible to you then read on (click on images to enlarge them).
Firstly, what data sources are candidates for this treatment? Anything accessible to ArcGIS Data Interoperability extension, which is all these formats and feeds in many storage repositories. My specific example happens to use data available by WFS service but that is not critical to the discussion, the approach is generic.
Lets dig a little deeper. To look at the layer a little more closely, with ArcGIS Online as your active portal, Add Data from All Portal with search tags 'LDS' and 'ETL'.

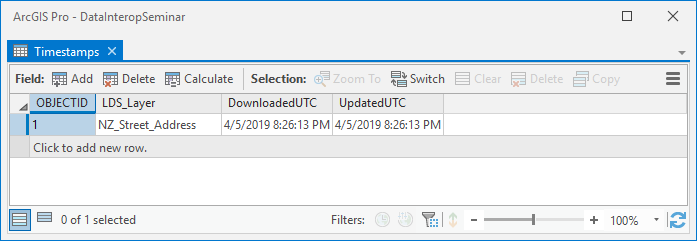
You'll see the same point features (with default symbology) but also in your table of contents there is a standalone table 'Timestamps' with one row:
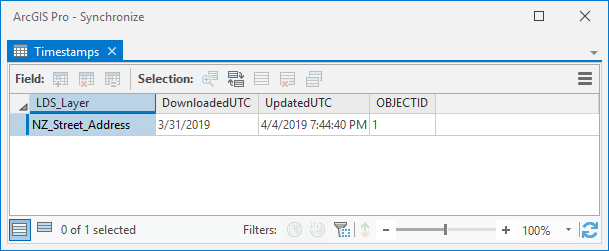
The value in UpdatedUTC is refreshed at each synchronization so will differ from the graphic but its the key to synchronization. It lives within the feature service as a layer. The UTC time of synchronization is the final step of the process that also writes feature updates.
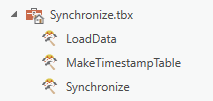
So what are all the steps? To follow you'll need ArcGIS Pro 2.3+ with Data Interoperability extension installed and enabled, and to have downloaded the toolbox and ETL tool source .fmw files in the blog download Synchronize.zip. Add the toolbox to your project, you'll see these ETL tools in it:
Right click each ETL tool and repair the source path to its .fmw file.
My target data is available as a bulk download, which i took as a file geodatabase. I copied the address point feature class into my project home geodatabase. In any event get your target data into your project home geodatabase, using ETL processes if necessary.
Next I made the Timestamp table using MakeTimestampTable, which looks like this:
See note below its not a great idea to use the table name 'Timestamps' but we'll let it go for now
Repair the destination file geodatabase path to be the same as your features of interest. If you run MakeTimestampTable in edit mode you can pick your own initial timestamp value with a useful date picker. I used UTC time but didn't have to get it exact, if you do and live in Greenwich UK then look at your watch and ignore any current daylight savings adjustment, otherwise use a little Python after making the table with any value:
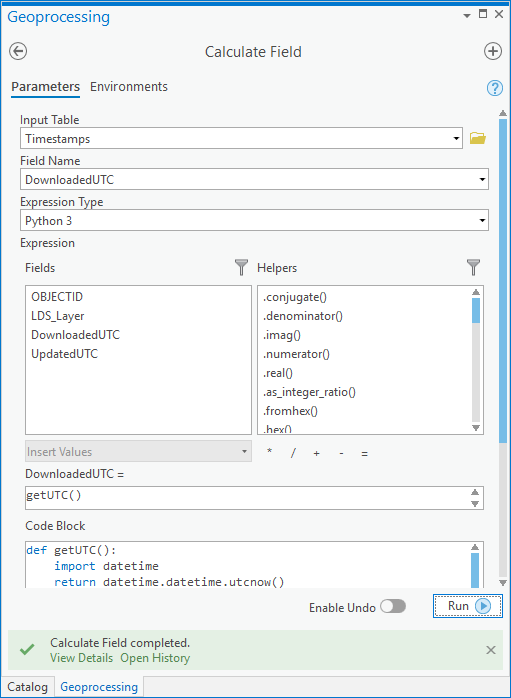
Then calculate UpdatedUTC to equal DownloadedUTC and you'll have it:
Its at this point in blog writing you find out its a really bad idea to use a table name 'Timestamps' as it is too close to a reserved word in many database technologies including file geodatabase, but as it doesn't affect my goal here I'll leave it, but if you go into production use another name!
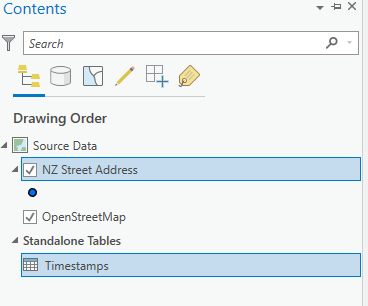
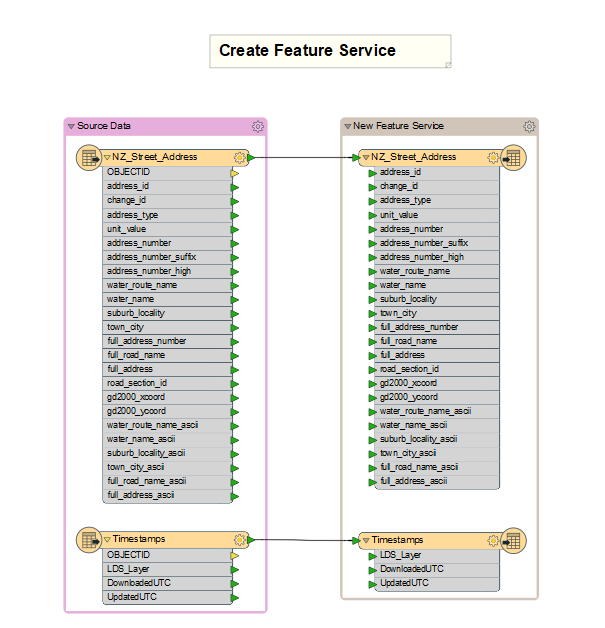
Now stand up a feature service. Add your target data and the timestamp table to a map, then select both objects in the table of contents:
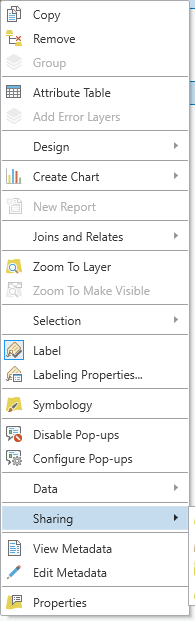
Then right click and choose Share as Web Layer:

Configure the service to be a feature layer in the folder you want and let it load.
Included in Synchronize.tbx is an ETL tool LoadData that creates a feature service too if you want to go that way.
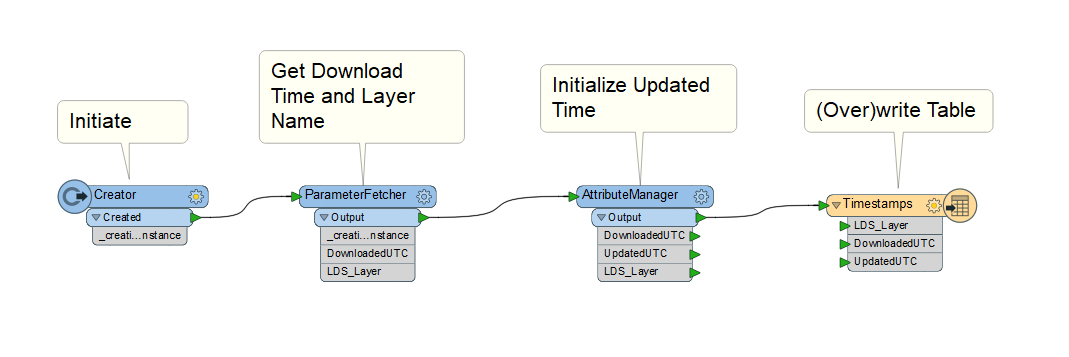
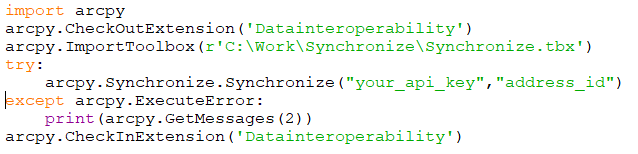
Now for the synchronization stuff in the ETL tool Synchronize:

The design of your version will depend on your target data, but in broad strokes:
- The current UTC time at the beginning of processing is captured
- The timestamps layer (table) is read from the Esri web layer
- Your target data is read from its system of record
- Inserts, Updates and Deletes are derived between the target source and Esri web layer
- Inserts, Updates and Deletes are validated by unique identifier comparison with the Esri layer
- Deletes are committed
- Updates are written
- Inserts are written
- The timestamps layer (table) is updated with the UTC time captured when processing began
For my target data the curator provides a changeset API that let me build from/to times into a WFS call which gave exact insert, update and delete sets. If your data has timestamps for created, edited and retired values you can do this yourself. If you have nothing to go on you can derive changesets by reading all data from both sources and doing brute force change detection with the UpdateDetector transformer, although this of course may take time.
In the Synchronize ETL tool there are some less obvious features. The sequence of feature writing is determined by writer order in the Navigator pane, top down. Writing the timestamp update is therefore enforced to be last, so if anything fails it will not be falsely updated. ArcGIS Online and Portal feature writers in Delete and Update mode require the ObjectID value in the Esri service to be sent with the feature, so the values are picked up mid stream with a FeatureReader and joined on a layer unique identifier. Similarly, the Inserts stream looks for existing unique identifiers before writing, only features known to not exist pass.
In the opening paragraph I said the approach uses no coding. There is a math function used (floor) to calculate a batch number in modulo 20 chunks to obtain target service ObjectIDs. That's as close to writing code you need to get, although you are free to use Python if you like.
While I mention coding, in a production environment you would want to run synchronization as a scheduled task. This begins as a Python script. I stub one out here that assumes things like ETL web connections are available to the process owner, which is easily done by sharing the connection file in a well known directory.
Another approach I'll blog about separately is calling the FME engine executable directly in a scheduled task.
Do explore the ETL tools supplied and send questions to this forum.
I hope this gives you confidence to build your own synchronizations. Enjoy!
You must be a registered user to add a comment. If you've already registered, sign in. Otherwise, register and sign in.