Introduction
At ESRI Japan,GIS Community Forumand other opportunities,we hold sessions for ArcPy beginners.In surveys from these sessions, we sometimes receive feedback like "I want to know how to look up the reference."How to look up the reference To address this feedback, this article introduces tips for reading the ArcPy reference after getting started with ArcPy.
This article focuses on theArcPyreferencepages.
If you want to learn the basics of ArcPy comprehensively, please seethis material.If you want to learn from expert instructors from basics to advanced topics, please consider using ourtraining.
Why You Need to Look at the Reference
ArcPy is a library that allows you to perform and automate ArcGIS Pro operations using Python. Because you can refer directly to geoprocessing tools from scripts, there are many sample codes provided, and training courses exist, there are cases where you can write scripts without looking at the reference. However, when you want to combine several samples to create a workflow, customize processing or design in detail, or when you cannot use the method of creating scripts fromArcGIS Pro,you might find it insufficient. In such cases, being able to read the reference can solve these problems and allow you to process exactly as you intend.
Explanation of Screen Layout
The following image is the top page of the ArcGIS Pro Python reference, that is, theArcPy reference main screen.
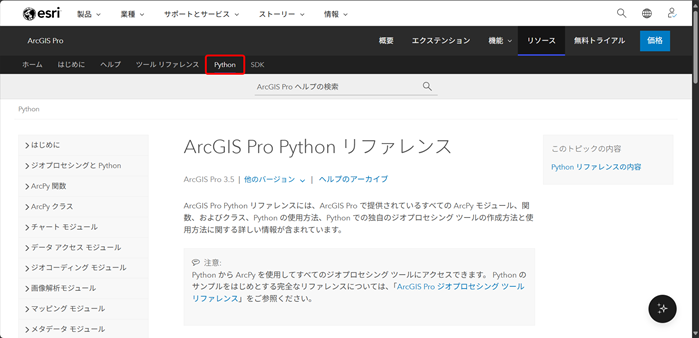
You can access content related to ArcPy from this page. For geoprocessing tools, access is available from the Tool Reference tab next to the Python tab.
On the left side of the page, modules classified by function are displayed along with "ArcPy Functions" and "ArcPy Classes." Here are some commonly used ones.
Data Access Module
Contains classes and functions for accessing data.Typical examples include the Describe functionand cursors.
Mapping Module
Used for manipulating project files (.aprx), maps, and layers. It is often used in automating map creation and export processes. This module is probably the most familiar to many users.The tutorialexplains the entire flow from obtaining a project file to exporting a created map.
Sharing Module
Used for uploading content from ArcGIS Pro to ArcGIS Online or ArcGIS Enterprise using ArcPy. You can share not only maps and layers but also publish tools and services.
Besides modules and geoprocessing tools, various classes and functions are provided. For details, please refer toArcPy ClassesandArcPy Functions.From the next section, let's look at how to read reference pages for ArcPy tools, functions, and classes respectively.
How to Read Tool, Class, and Function References
How to Read Tool References
Here, let's take a look at theSelect Layer By Attributepage as an example.
Tool reference pages are structured with headings like these:
- Summary
- Usage
- Parameters
- Dialog
- Python
- Environment Settings
- License Information
- Related Topics
You can check tool descriptions in Summary and Usage sections. When using ArcPy, check the Python section under Parameters. For example, for feature export handled here, it looks like in the figure below.
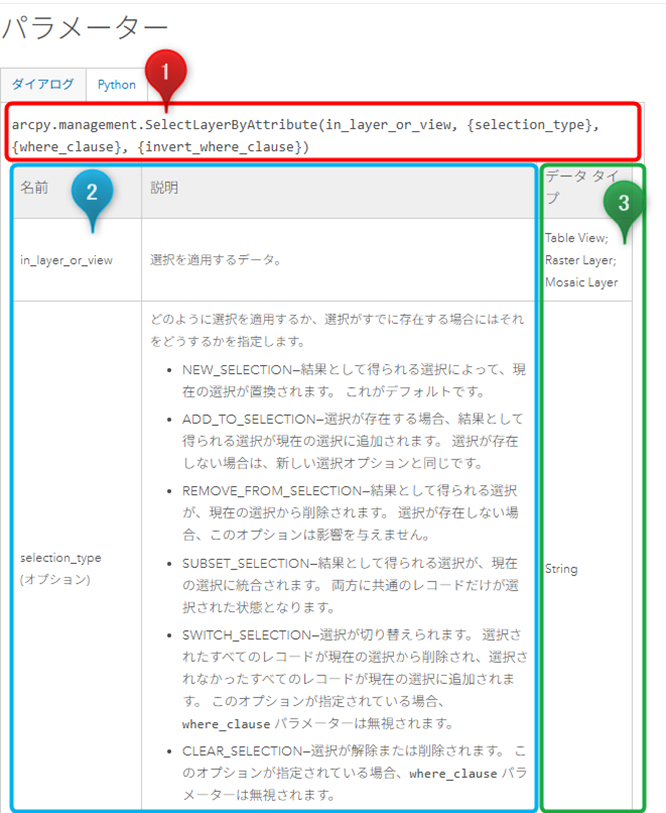
Let's look at them in order by number in the figure. First, number 1 shows usage syntax. For tools, it basically takes the form "arcpy.ToolboxAlias.ToolName(parameters)".
Next, number 2 shows each parameter's name and description. Parameters enclosed in "{}" are marked as "(optional)." These parameters can be added if needed; if not necessary, they can be omitted to reduce code length and make scripts simpler.
Finally, number 3 indicates data types required. When searching for variable data types during scripting, you can use thetype function.
When a tool runs, it returns a Result object as a return value.Result objects allow you to obtain information about tool operations. You can get operation-related info such as outputs or messages and use them as parameters elsewhere.
Column -Reducing Unnecessary Parameters-
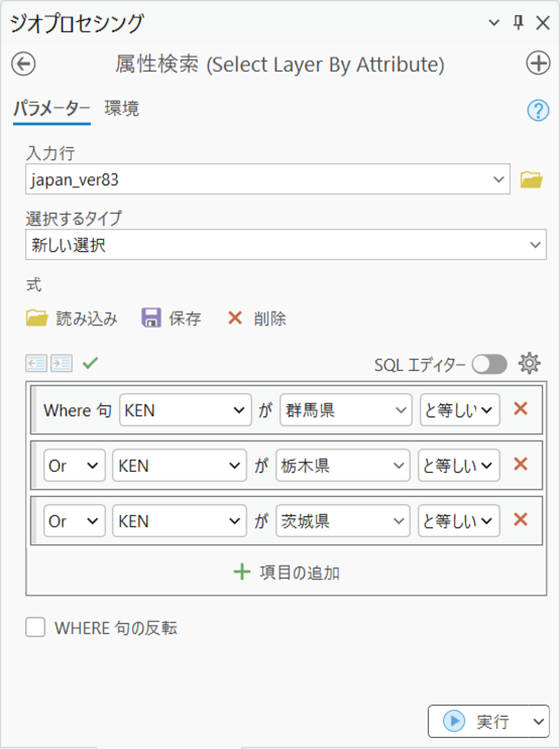
For example, suppose you run the Select Layer By Attribute geoprocessing tool and send results to the Python window as follows.
The following image shows what was sent to the Python window after running the tool.
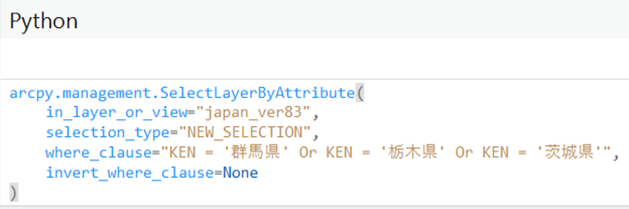
'Select Layer By Attribute' used here has only one required parameter: in_layer_or_view. For optional parameters except for 'where_clause', all are set to None or default values. Using None or default values does not affect operation even if omitted. Omitting unnecessary parameters makes it look cleaner as shown in the next figure.

Sample Code
Opening the Python tab displays sample code below parameters. There are scripts mainly for running in Python window and standalone scripts. The former excludes unnecessary parameters and serves as a clue for creating simple code.
How to Read Class and Function References
Class pages have headings like these:
- Summary
- Description
- Properties
- Method Overview
- Methods
- Syntax
・戻り値
・コードのサンプル
関数の場合は以下のようになります。
・サマリー
・説明
・構文
・戻り値
・コードのサンプル
前述のツールの場合でも紹介していますが、「{}」がついているものは任意となるのでパラメーターやメソッドを入力する時に自分で調整します。
ここでは最もよく目にするクラスの 1 つである ArcGISProject クラスを見てみましょう。
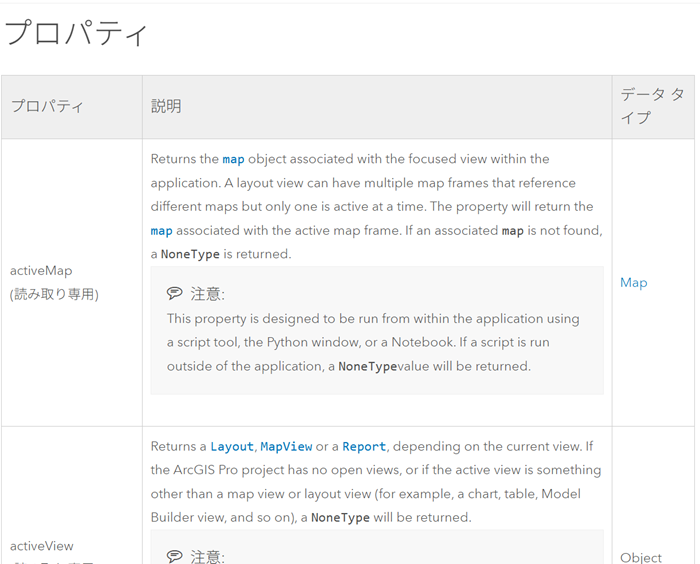
冒頭からサマリーや説明が書かれていますが、その次にプロパティが現れます。このセクションでは各クラスに含まれるプロパティ、その説明とデータ タイプが書かれています。プロパティが別のクラスになる場合はリンクから辿ることもできます。
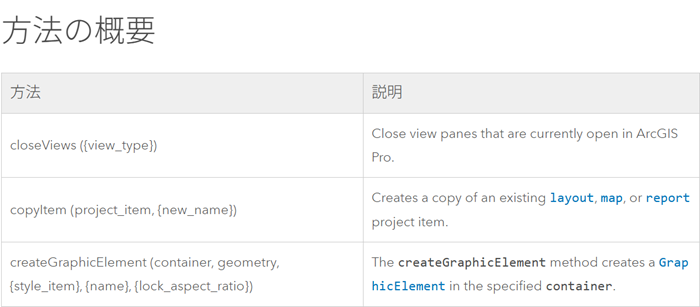
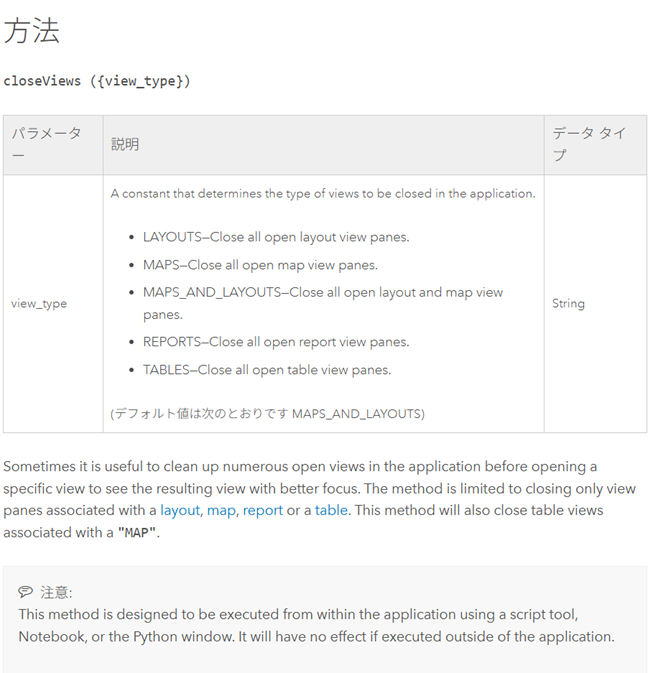
その次はクラスに含まれるメソッドの説明が現れます。メソッドについてはまず、「方法の概要」セクションで各メソッドの名前と短い概要が列挙され、その次の「方法」セクションで個別に詳しくメソッドの説明が書かれています。
サンプル コードはクラスや関数により数が異なります。例えば、ArcGISProject クラスでは 8 つのサンプル コードがあります。
リファレンスを見たい場面 -Python に送信機能が使えないとき-
ここまで ArcPy リファレンスの構成についてツールと「クラス・関数」に分けて確認しました。ArcPy でスクリプトを作成する際にはリファレンスを見ながら書いていくと思いますが、ArcGIS Pro を使用する場合はツールの履歴画面から「Python ウィンドウに送信」や「ノートブックに送信」を使用してスクリプトの一部を作る方もいると思います。
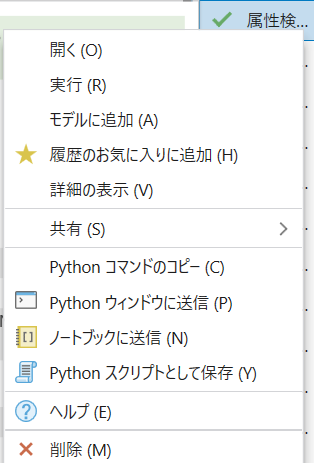
この手法はツールのみが対象で、ツールにないシンボル設定やエクスポートなどのコマンドはリファレンスを参照し自作する必要があります。例えば ArcPy を利用して ArcGIS Pro 上のフィーチャ レイヤーを ArcGIS Online にフィーチャ サービスとして公開する流れは一部の過程のみツールが対応しているのでリファレンスを見ながらスクリプトを自作する必要があります。次の章ではコマンドの一例としてシンボル変更のスクリプトを見ていきます。
リファレンスを見ながら短いスクリプトを作成してみよう
今回はレイヤーの見た目を変更したいと思います。色分けをするレンダラーと色を設定するシンボルを使って変更を行います。
# lyrs はレイヤーのリスト、lyr は一つ一つのレイヤーのオブジェクト
for lyr in lyrs:
    if lyr.name == "放置車両":
        sym = lyr.symbology
        sym.updateRenderer("GraduatedColorsRenderer") # 等級色
        sym.renderer.classificationField = "total"  #分類するフィールド名
        sym.renderer.classificationMethod = "Quantile" # Quantile classification
        sym.renderer.breakCount = 5 # Classes
        lyr.symbology = sym
First, access the renderer.Layer class's symbology property to access the renderer.
sym = lyr.symbology
Since we are changing the symbol this time,symbology class's updateRenderer method will be executed. Let's check the reference here. This time, there is one required parameter, which you select from a set list of strings. Since we want graduated colors, enter "GraduatedColorsRenderer". For the five parameter items, please refer to the list below the figure.
sym.updateRenderer("GraduatedColorsRenderer")
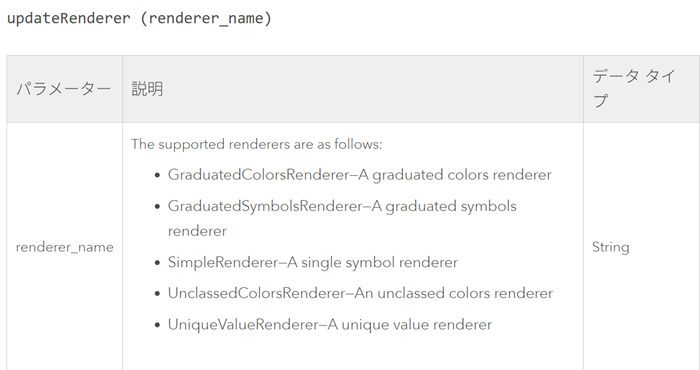
- GraduatedColorsRenderer→ Graduated Colors
- GraduatedSymbolsRenderer→ Graduated Symbols
- SimpleRenderer→ Single Symbol
- UnClassedColorRenderer →Stretch
- UniqueValueRenderer→ Unique Values
Next, to specify the contents of the renderer, access the renderer property of the symbology class.
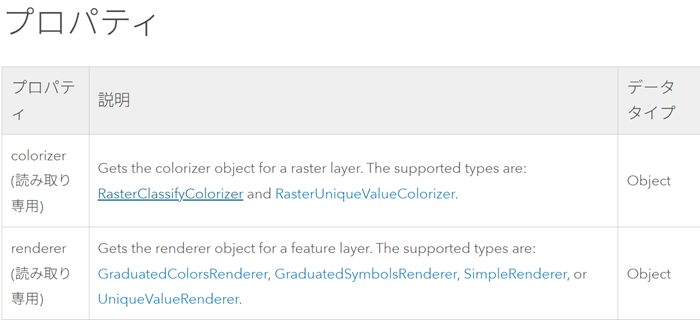
sym.renderer
Here, you can find the object specified by updateRenderer . Next, let's look at the reference for the GraduatedColorsRenderer class. There are many properties you can set, but here let's specify the field used for color coding, the classification method, and the number of classes. To specify these three, set the properties "classificationField", "classificationMethod", and "classBreaks". Since we want to classify by quantile classification, specify Quantile for "classificationMethod". For classification methods, please refer to the data classification methods.
sym.renderer.classificationField = "total"
sym.renderer.classificationMethod = "Quantile"
sym.renderer.breakCount = 5
Finally, assign the configured symbology object back to the Layer class's symbology property.
lyr.symbology = sym
This way, we created a script showing the series of steps to change symbols by setting methods and properties. Here we specified "GraduatedColorsRenderer" and changed symbols using a renderer, but you can also arrange it by specifying "SimpleRenderer" and using the symbol property to set a single symbol.SimpleRenderer.
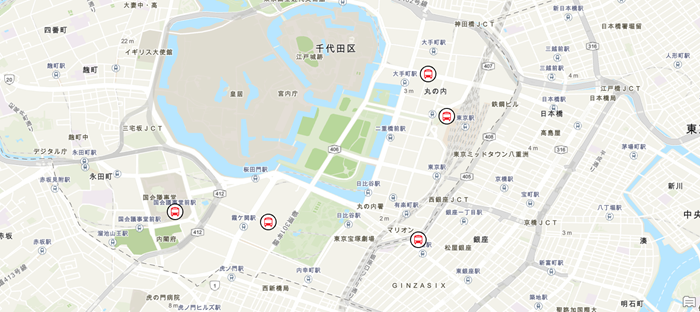
for lyr in lyrs:
    if lyr.name == "<Layer Name>":
        sym = lyr.symbology
        sym.updateRenderer("SimpleRenderer")
        sym.renderer.symbol.applySymbolFromGallery("Bus Terminal")
        sym.renderer.symbol.color = {"RGB" : [243,32,41,100]}
        sym.renderer.symbol.outlineColor = {"RGB" : [0,0,0,100]}
        sym.renderer.symbol.size = 21
        lyr.symbology = sym
If you want to create a symbol like above in a script, you need to check the symbol reference while creating it.
In conclusion,
this article explained how to look up ArcPy references by describing the structure and how to read reference pages. It may be useful when customizing sample code for your environment or creating new scripts. I hope this article lowers the barrier to ArcPy even a little.
ArcPy Introductory Hands-on
For those who want to learn ArcPy comprehensively, please see here.
ArcPy blog articles are here