- Home
- :
- All Communities
- :
- Products
- :
- Data Management
- :
- Data Management Blog
- :
- Using Subdivision and Lot Descriptions to Correct ...
Using Subdivision and Lot Descriptions to Correct Land Management System Case Shapes
- Subscribe to RSS Feed
- Mark as New
- Mark as Read
- Bookmark
- Subscribe
- Printer Friendly Page
- Report Inappropriate Content
I work for an agency that maintains a Land Management System (LMS) for tracking land use cases, like subdivisions and permits, processed by our Planning and Building and Safety Departments. For 20 years our LMS system has been integrated with GIS based on the Assessor’s Parcel numbers entered by our users. The parcel shapes associated with these parcel numbers are used to transfer information from GIS into our LMS and to create GIS features representing our LMS cases. However, our reliance on Assessor’s Parcel Numbers alone has produced far from perfect results due to many factors. We recently replaced our LMS and now have a system that also integrates the Address Points feature class that my agency maintains. This will help us solve many problems for our new cases as we go forward, but we did not attempt to create a direct association of our historic LMS address data with our GIS address points during conversion. Fortunately I have found that there is third integration option for solving these historic LMS/GIS problems: Subdivision and Lot descriptions.
When it applies, the Assessors of my jurisdiction enters subdivision and lot information that describes each parcel and normally my agency’s LMS users have entered the subdivision and lot number descriptions of the cases that fall on these parcels. I have been discovering ways I can efficiently apply this data relationship to dramatically improve my agency’s historic LMS case shapes on a large scale. This Blog will provide an overview of one of the processes I have developed for leveraging this data relationship where it exists to significantly transform my LMS case shapes in GIS.
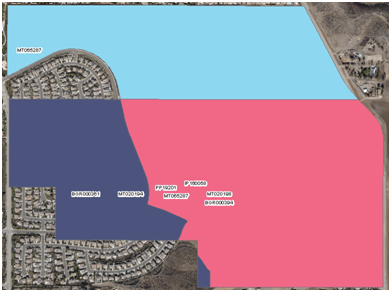
An example of what can be accomplished in an afternoon using my techniques is shown below.
Case shapes based on original parcel numbers - 26,105 parcels countywide

Case shapes based on subdivision and lot description parcels - 124,643 parcels countywide

A Basic Overview of the Process
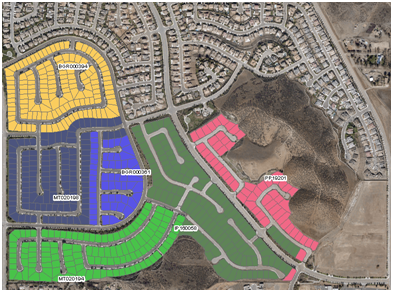
Without going into a lot of detail, here are the broad steps I followed to transform the case shapes below that were created from parcels that existed at the time of application before the property was subdivided. None of the shapes below represent the true boundaries of the case applications.
1. For the Assessor’s parcel feature class, which must be within a geodatabase, I concatenated the separate fields that make up the subdivision and lot description or each parcel into a single field using a standardized description format
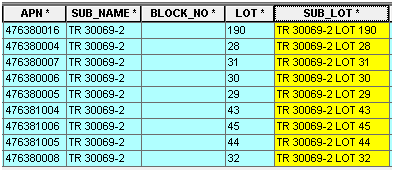
2. Extract the LMS case number and field(s) containing each case’s subdivision and lot descriptions into a file geodatabase table
3. For the LMS data select the sets of records that contain the most common forms of a subdivision and lot description from within a field that may contain one.
4. Calculate the subdivision and lot portions of the description into separate fields using Python parsing methods.

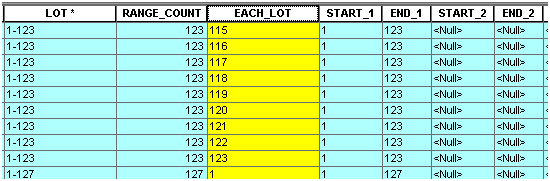
5. Summarize all unique values in the field containing the lot portions of the description into a new summary table in the geodatabase containing the LMS data.

6. Add the set of pairs of fields required to store all of the lot ranges that can be parsed from the original lot description and parse the range values into them. This is probably the hardest step, depending on the number of lot descriptions you have and the format variations you encounter.

7. Run a script (see the end of this post for the script code) that populates a new table stored within the LMS geodatabase with the expanded set of records required to populate a new field with each individual lot number defined in the ranges of every lot description field pair in the summary table. This step makes all of the time spend doing the previous step well worth the effort.
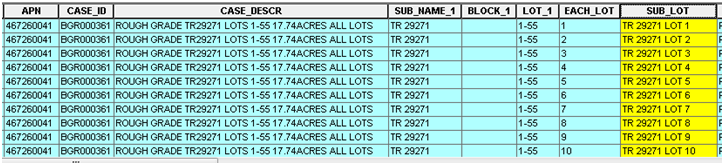
8. Summarize the original LMS case data into a new table using the Summary Statistics tool so that it only has one record per case containing the case number and the legal description fields added in step 4 at minimum, although you can include as many fields in the output that you want so long as they do not cause more than one record per case to be created in the output.
9. Make the summarized LMS case data created in step 8 into a Table view and join its lot description field populated in step 4 with same field contained in the expanded table populated by the script in step 7.

10. Export the joined LMS case data table into a new table stored in the same geodatabase as the parcel feature class. With ArcGIS 10.3.1 and above this will cause the case records to expand to cover all of the records required to describe each individual lot for all of the case subdivision and lot descriptions.
11. Add a new field to the export output of step 10 and calculate the concatenation of the subdivision name with the field containing the individual lot values of each record into a new subdivision and lot concatenation field. These concatenated descriptions must match the format of the Assessors subdivision and lot concatenation field populated in step 1.
12. Make the Assessor’s parcel feature class into a layer and join its concatenated subdivision and lot field to the new concatenated subdivision and lot field of the expanded case record calculated in step 11.
13. Export the joined Parcel features to a new feature class to expand the set of parcel features to cover every individual lot in every joined case.
14. Here is the final result. This is a true representation of the parcels and property each case actually should have covered.
The outcome is an LMS case feature class that has features in the shape of each and every parcel that matched the lots described in the case’s original overall subdivision and lot description. The more cases I need to be process, the more efficient this process becomes. I have applied it to nearly 1 million LMS cases in an afternoon and created a parcel output that would have required approximately 5 years of man hours to manually enter all of them individually into the LMS system.
Based on questions and requests posted to this Blog I will add sections to this post to give further details that explain how I approached any step I have listed . There is a great deal more I could say about each aspect of this process, but for now I will post these general steps as a template that can at least help me make the process even more efficient or automated in the future.
Below is the script I use in step 7.
from time import strftime
print( "Start script: " + strftime("%Y-%m-%d %H:%M:%S") )
import arcpy
sourceFC = r"\\agency\AgencyDFS\Tran\FILES\GISData\rfairhur\Layers\Plus_Conversion_Data\Plus_Conversion_Data.gdb\PLUS_LOT_FIELD"
sourceFieldsList = ["LOT","START_1","END_1","START_2","END_2","START_3","END_3","START_4","END_4","START_5","END_5","START_6","END_6","START_7","END_7","START_8","END_8","START_9","END_9","START_10","END_10","START_11","END_11"]
insertFC = r"\\agency\AgencyDFS\Tran\FILES\GISData\rfairhur\Layers\Plus_Conversion_Data\Plus_Conversion_Data.gdb\PLUS_LOT_RANGES_FULL"
insertFieldsList = ["LOT","RANGE_COUNT","EACH_LOT","START_1","END_1","START_2","END_2","START_3","END_3","START_4","END_4","START_5","END_5","START_6","END_6","START_7","END_7","START_8","END_8","START_9","END_9","START_10","END_10","START_11","END_11"]
arcpy.TruncateTable_management(insertFC)
icursor = arcpy.da.InsertCursor(insertFC, insertFieldsList)
countDict = {}
with arcpy.da.SearchCursor(sourceFC, sourceFieldsList) as sourceRows:
for sourceRow in sourceRows:
for j in range(0,22,2):
if j == 0 and sourceRow[1] == None:
# print(sourceRow[j+1])
l1 = [sourceRow[0],0,sourceRow[0]]
l = l1 + list(sourceRow[1:])
# print(l)
icursor.insertRow(l)
del l1
del l
if sourceRow[0] in countDict:
countDict[sourceRow[0]] += 1
else:
countDict[sourceRow[0]] = 1
elif sourceRow[j+1] != None:
# print(sourceRow[j+1])
for i in range(int(sourceRow[j+1]),int(sourceRow[j+2])+1):
l1 = [sourceRow[0],0,str(i)]
l = l1 + list(sourceRow[1:])
# print(l)
icursor.insertRow(l)
del l1
del l
if sourceRow[0] in countDict:
countDict[sourceRow[0]] += 1
else:
countDict[sourceRow[0]] = 1
del icursor
print( "Expanded Lot Records: " + strftime("%Y-%m-%d %H:%M:%S") )
with arcpy.da.UpdateCursor(insertFC, insertFieldsList) as updateRows:
for updateRow in updateRows:
updateRow[1] = countDict[updateRow[0]]
updateRows.updateRow(updateRow)
sourceFieldsList = ["LOT","RANGE_COUNT"]
with arcpy.da.UpdateCursor(sourceFC, sourceFieldsList) as updateRows:
for updateRow in updateRows:
updateRow[1] = countDict[updateRow[0]]
updateRows.updateRow(updateRow)
print( "Set Range_Count field: " + strftime("%Y-%m-%d %H:%M:%S") )
print( "Finish script: " + strftime("%Y-%m-%d %H:%M:%S") )
You must be a registered user to add a comment. If you've already registered, sign in. Otherwise, register and sign in.