- Home
- :
- All Communities
- :
- Products
- :
- ArcGIS GeoEvent Server
- :
- ArcGIS GeoEvent Server Blog
- :
- GeoEvent: Consuming an ArcGIS Enterprise Webhook
GeoEvent: Consuming an ArcGIS Enterprise Webhook
- Subscribe to RSS Feed
- Mark as New
- Mark as Read
- Bookmark
- Subscribe
- Printer Friendly Page
- Report Inappropriate Content
Webhooks for ArcGIS for Enterprise were released a while ago so this post will describe how to subscribe to a Webhook from Enterprise (Portal for ArcGIS). I will leave it up to you to decide what to do with them... Please note that the payload data contained within a webhook can be variable. You may need to complete this exercise several times, once for each type of webhook payload you wish to consume.
- Webhooks
- GeoEvent Webhook Input
- Create the Webhook
- Testing the Webhook
- NOTES:Consuming New Data in GeoEvent
- * JSON Object Name
- ** Create GeoEvent Definition
- ** Auto-Created GeoEvent Definitions
- **** Learning Mode
Webhooks
Webhooks allow you to register your "payload processor" application [AppA] with another application [AppB]. During the registration process, you tell AppB to send webhook payloads to AppA at a specific URL. When AppB has some sort of trigger event that it needs to send to AppA, it creates a payload with information about that event (typically in JSON format) and sends that payload to AppA via HTTP to the URL registered above (typically a POST).

In ArcGIS for Enterprise there are a number of webhooks you can register for including item creation/deletion, sharing events, and group events. More information on creating a webhook and what kind of trigger events you can register a webhook for can be found in the Enterprise documentation.
GeoEvent Webhook Input
As I mentioned above, a webhook URL is simply an address that an application listens on to receive payload data. Since that data is most likely JSON, we have a GeoEvent input ready to go OOTB.
NOTE: In GeoEvent Manager, set the Log Level to TRACE for the logger com.esri.ges.adapter.genericJson.JsonInboundAdapter while you go through this post so you can see the GeoEvent logs indicating things are working. Don’t forget to reset the Log Level back to WARN after you are done testing.
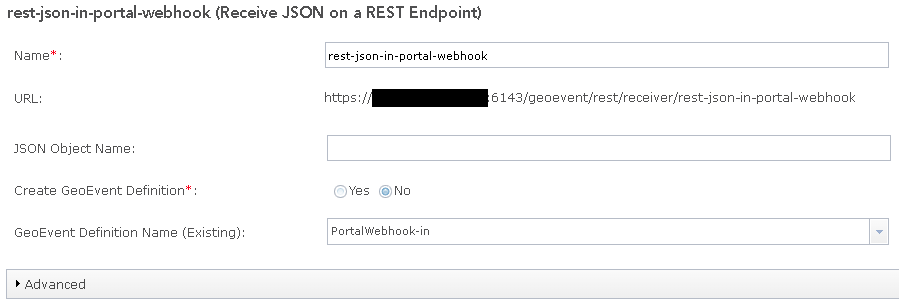
- In GeoEvent Manager, navigate to Services > Inputs and press the Add Input button.
- Search for "Receive JSON” and select Receive JSON on a REST Endpoint.
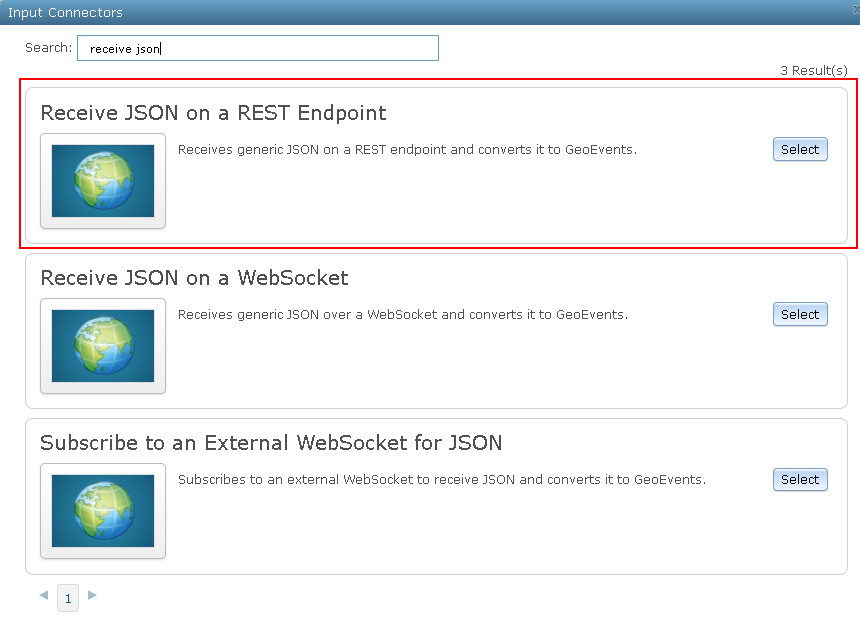
- On the Creating Input – Receive JSON on a REST Endpoint page, modify the properties as needed and press the Save button.
- Name: [Unique name of this webhook listener]
- JSON Object Name: [The payload json object name you are looking to monitor; leave empty if you don't know]*
- Create GeoEvent Definition: Yes**
- GeoEvent Definition Name (New): [MyWebhookName-auto]***
- Advanced:
- Acceptable MIME Types (Server Mode): application/json
- Learning Mode: No****

- After you save the input, re-open it. It now will display a URL parameter. This URL parameter is the “Payload URL” that the Webhook will need for it to POST data to.
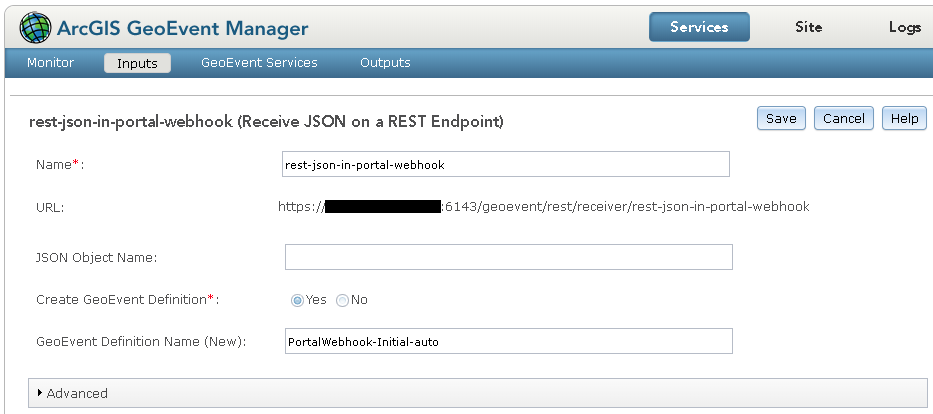
- Copy that URL property value and save it.
Create the Webhook
- In a browser, go to your Portal for ArcGIS sharing URL and log in as an administrator: https://<yourServer>/portal/sharing/rest/login
- Navigate back to the home directory https://<yourServer>/portal/sharing/rest and Navigate to Portals > Self > Webhooks.
- The webhooks link appears at the very bottom of a very long page.
- If you don’t see webhooks at the bottom, then you are not logged in or not logged in as an administrator.
- Press the Create Webhook link, modify the properties, and press the Create Webhook button
- Name: [Give it a name similar to the input name in GeoEvent]
- Payload URL: Paste the input URL you copied from GeoEvent above.
- A list of Supported trigger events can be found here
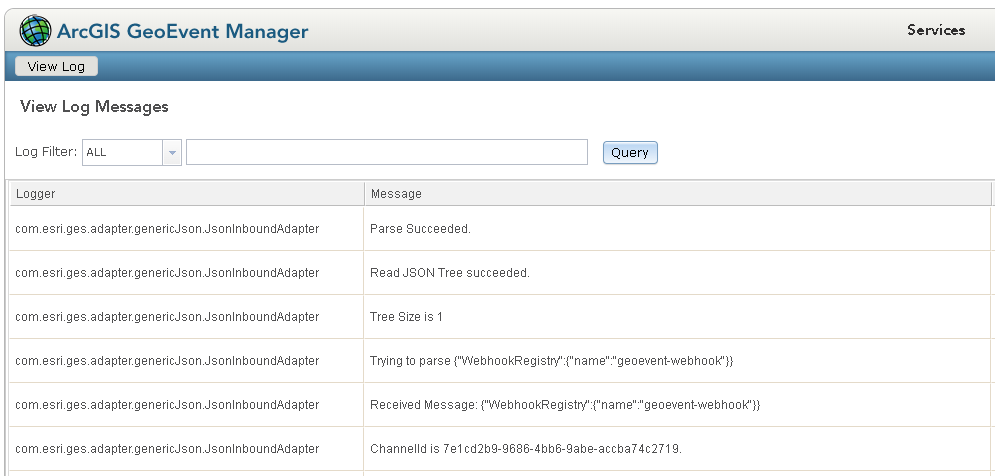
- Back on your GeoEvent Manager > Logs page you should notice some log messages indicating the webhook properly registered:
- On your input, if you told GeoEvent to create the GeoEvent Definition for you and you set Learning Mode to No then you will need to delete the event it created because the schema for the webhook registration is not going to be correct.
- Navigate to GeoEvent > Site > GeoEvent > GeoEvent Definitions and delete the definition your webhook input created.
Testing the Webhook
For the test run below, it assumes you selected ‘Send me everything’ or configured the events to be /items or /items/add. If you selected another event, use that to test your webhook.
- In a Browser, log into your Portal Home and navigate to your Portal’s Content directory.
- Press the Create button and select Feature Layer.
- Choose a feature layer template from the list (it doesn't matter which one) and press the Create button.
- Press the Next button until you get to the properties page. Enter a Title, Tags, and a Summary then press the Done button.
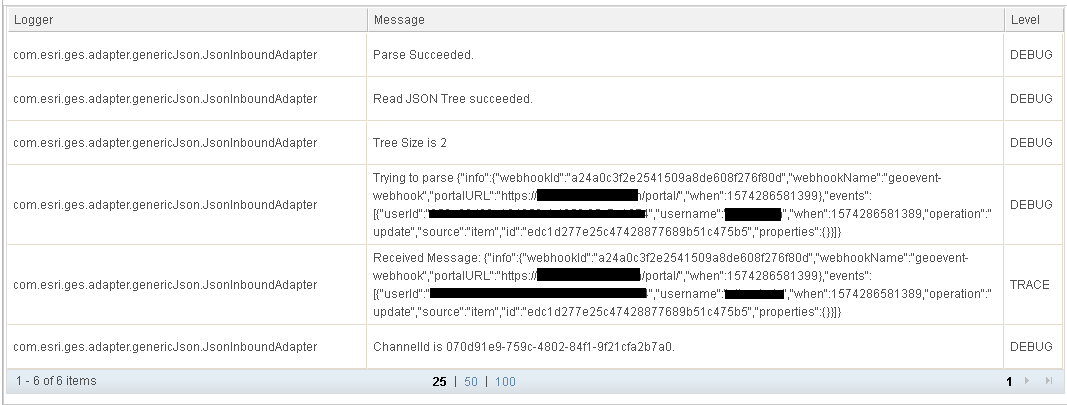
- After you press the Done button, go back to GeoEvent Manager > Logs and verify the Create Item webhook was received.
NOTE: Don't forget to reset the Log Level to WARN for the logger com.esri.ges.adapter.genericJson.JsonInboundAdapter after you are done testing.
NOTES: Consuming New Data in GeoEvent
This section deserves its own blog, but I will put a little detail here until I can get to a full blog on it.
* JSON Object Name
Usually you don't know what kind of data to expect and just need to receive some data before deciding how to parse it. In that case I usually leave the JSON Object Name empty and let GeoEvent try to parse the entire JSON message. Once you know what the data schema looks like, you can come back and modify this property to target the specific section of JSON you want to turn into events.
Also note that you may end up identifying one or more sections of the incoming JSON you want to parse into separate/different events. In that case I would create a second GeoEvent Input and register a second webhook to have data sent to it.
** Create GeoEvent Definition
Once you receive some data and GeoEvent has helped you determine the schema, you can lock down that schema so it doesn't change and the GeoEvent definition is not transient.
When you have the Create GeoEvent Definition set to Yes, the definition it creates is transient and owned by the input. This means the event can change or even disappear if the input is stopped. Those are things we don't want to happen without us. To get around this:
- After the definition is created by the input, make a copy of it.
- Name the copy something like "MyWebhookName-in" (take the auto off)
- Back in your input, change Create GeoEvent Definition to No and select the new definition you just created.
** Auto-Created GeoEvent Definitions
I have a habit of making copies of any GeoEvent Definitions that are auto-created for me by GeoEvent modifying the item that auto-created the definition to point to my copy. This allows me to know the exact schema of the data at all times and avoid missing or changing definitions. Because of this, any time I use an item that is automatically going to create the GeoEvent Definition for me, I add a postfix "-auto" to the end of the definition name. This allows me to do two things:
- Identify any GeoEvent Definition that was automatically created (and hence may disappear or change)
- Copy it and rename it without the -auto on the end, so I own that schema and it will be permanent.
**** Learning Mode
Learning mode can be very useful, but dangerous if left on. In this case where the webhook you are listening to could be capturing different schemas, it might be useful to leave learning mode on for a bit to capture the schema of all the data you might receive via the webhook payloads. For example, if you had turned learning mode on, you would not have had to delete the first GeoEvent Definition created when the webhook sent the first "webhook registered" payload.
Once you are confident that you've received a webhook for each event you are listening for, turn learning mode off. Not turning learning mode off has bit me hard several times so DON'T FORGET TO TURN OFF LEARNING MODE (yelling at myself).
After you have used learning mode to discover your data schema, make sure you go back and change Create GeoEvent Definition to No (as discussed above).
You must be a registered user to add a comment. If you've already registered, sign in. Otherwise, register and sign in.