- Home
- :
- All Communities
- :
- User Groups
- :
- New to GIS
- :
- Questions
- :
- Re: How to convert numeric field to text?
- Subscribe to RSS Feed
- Mark Topic as New
- Mark Topic as Read
- Float this Topic for Current User
- Bookmark
- Subscribe
- Mute
- Printer Friendly Page
How to convert numeric field to text?
- Mark as New
- Bookmark
- Subscribe
- Mute
- Subscribe to RSS Feed
- Permalink
- Report Inappropriate Content
Hello again! ArcGIS Pro converted the IDs in my data file to numeric format. To execute a join I need to convert them back to strings. Can someone advise on how to do this?
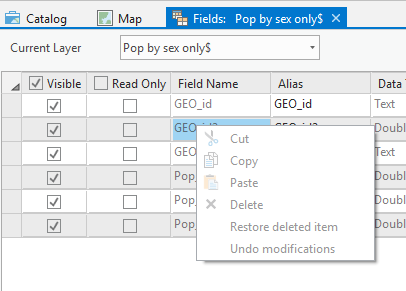
I found 2 suggestions online that haven't worked for me: 1) Right-click the data table in Contents, click Design-Fields, then right-click the field name and you'll see an ellipsis allowing you options for editing field types. I'm not seeing an ellipsis (see screenshot). 2) Export the data table to a dbf file. I see no option for exporting the table within the application.
I do hope I get better at this ...
- Mark as New
- Bookmark
- Subscribe
- Mute
- Subscribe to RSS Feed
- Permalink
- Report Inappropriate Content
Back again with better news. I followed Dan's instructions and converted the table to gdb format. All went well after that, with the app behaving much more predictably. (I followed the instructions here for calculating a text field based upon the existing numeric field values.)
In terms of understanding the basic plumbing:
- Can someone tell me where exactly the new gba table resides? Is it an independent file, visible to Windows?
- Also, I thought I'd set my default file path to a specific work subfolder, but ArcGIS seemed revert it's default path back to Documents\ArcGIS. Can I move all the project folders elsewhere without breaking anything?
- Do people find that it makes sense to create each of their projects in independent locations with multiple copies of tables and layer files? Given the number of folders/files created for each project, this would seem to generate a lot of clutter.
Thanks again, Dan Patterson and Tim Ormsby
- Mark as New
- Bookmark
- Subscribe
- Mute
- Subscribe to RSS Feed
- Permalink
- Report Inappropriate Content
I PRO, you can set up the properties for your current project or projects in general (Top left... Click on Project to get to the main project setup)
I prefer to work on my projects in one of 2 or 3 folders, one for testing and one for final (and one junk).
I have a default toolbox that I use with tools I have developed and I know are working.
I have a default data folder which can be reached by all projects since I keep my *.aprx 's one level up.
For example...
all_folders(r"c:\git_dan\arraytools")
Folder listing for....
|--c:\git_dan\arraytools
|-- \.spyproject
|-- \analysis
- \__pycache__
|-- \Data
- \numpy_demos.gdb
- \terrain
|-- \geomtools
- \__pycache__
|-- \graphing
- \__pycache__
|-- \rasters
|-- \stats
- \Extras
- \__pycache__
|-- \__pycache__
Here is part of the structure that I have for one project that I am working on that has multiple parts
- I have one big folder off c:
- my major project is arraytools
- All my aprx files associated with that project are in ...\arraytools
- I have one Data folder... that contains common data (anything *.gdb's shapefiles, images etc)
- for specific sub projects (like geomtools...), I can have sub data folders or geodatabases placed there.
Now as for a geodatabase... windows will show the 'name' but it is essentially a folder with incomprehensible file names inside... get used to it, just use Catalog in PRO to view the featureclasses etc that are contained there in.
There is no fixed rule! Work with works for you. In fact, I have a 'junk' machine and I never move/copy stuff from it to the main machine until the final throws of a project. Just back everything up... save to multiple locations and keep a record of where what is and why it is there... a paper and pen is the best for this  since human-ware is ultimately better than software
- Mark as New
- Bookmark
- Subscribe
- Mute
- Subscribe to RSS Feed
- Permalink
- Report Inappropriate Content
Kathy.. these sorts of questions should be place in Managing Data to get a wider audience.
The Geonet community structure is a good reference to keep handy
- Mark as New
- Bookmark
- Subscribe
- Mute
- Subscribe to RSS Feed
- Permalink
- Report Inappropriate Content
I been trying to do the exact same thing yesterday. Here's an easy way I found out about by using the Table to Table tool:
1. Import the table
2. Open the Table to Table tool
3. Input rows = Table just imported
4. Under Field Map, choose the output field(s) to convert to text.
5. Click Properties. Under Type, choose Text. Change the precision as needed.
6. Click Run
- « Previous
- Next »
- « Previous
- Next »