- Home
- :
- All Communities
- :
- Products
- :
- Imagery and Remote Sensing
- :
- Imagery Questions
- :
- Re: Scanned map make white invisible
- Subscribe to RSS Feed
- Mark Topic as New
- Mark Topic as Read
- Float this Topic for Current User
- Bookmark
- Subscribe
- Mute
- Printer Friendly Page
Scanned map make white invisible
- Mark as New
- Bookmark
- Subscribe
- Mute
- Subscribe to RSS Feed
- Permalink
- Report Inappropriate Content
I have a scanned black and white map I've georeferenced and now I'd like to make the white in the image invisible so only the black ink shows up over a base map. How do I do this with arcgis pro 2.3? Thank you
- Mark as New
- Bookmark
- Subscribe
- Mute
- Subscribe to RSS Feed
- Permalink
- Report Inappropriate Content
Simplest is to use Remap Function. You can define a min/max range, the output value and if this should be NoData. Assuming your input is 8bit you may want to select the white pixels (eg range 200-255) and set them as 255 and flag as NoData. NoData becomes transparent and you can see the data beneath. This can be done to an individual image or a collection of image can be added to a mosaic dataset and the function applied to each of the images. Note also that in a mosaic datasets you also define footprints (or seamlines) that can be be used to clip out the borders without modifying the original files. .
- Mark as New
- Bookmark
- Subscribe
- Mute
- Subscribe to RSS Feed
- Permalink
- Report Inappropriate Content
Thank you for the help. I experimented with the remap command but I can't to get it to work. I'm new to GIS so am probably missing something. I don't know how to determine if it's an 8-bit image (signed or unsigned) so I used "Unknown" in the general tab. After creating the new layer, the output looks identical. I'm attaching a screenshot with the settings I used to create the new layer. Any idea on what I'm missing?
thank you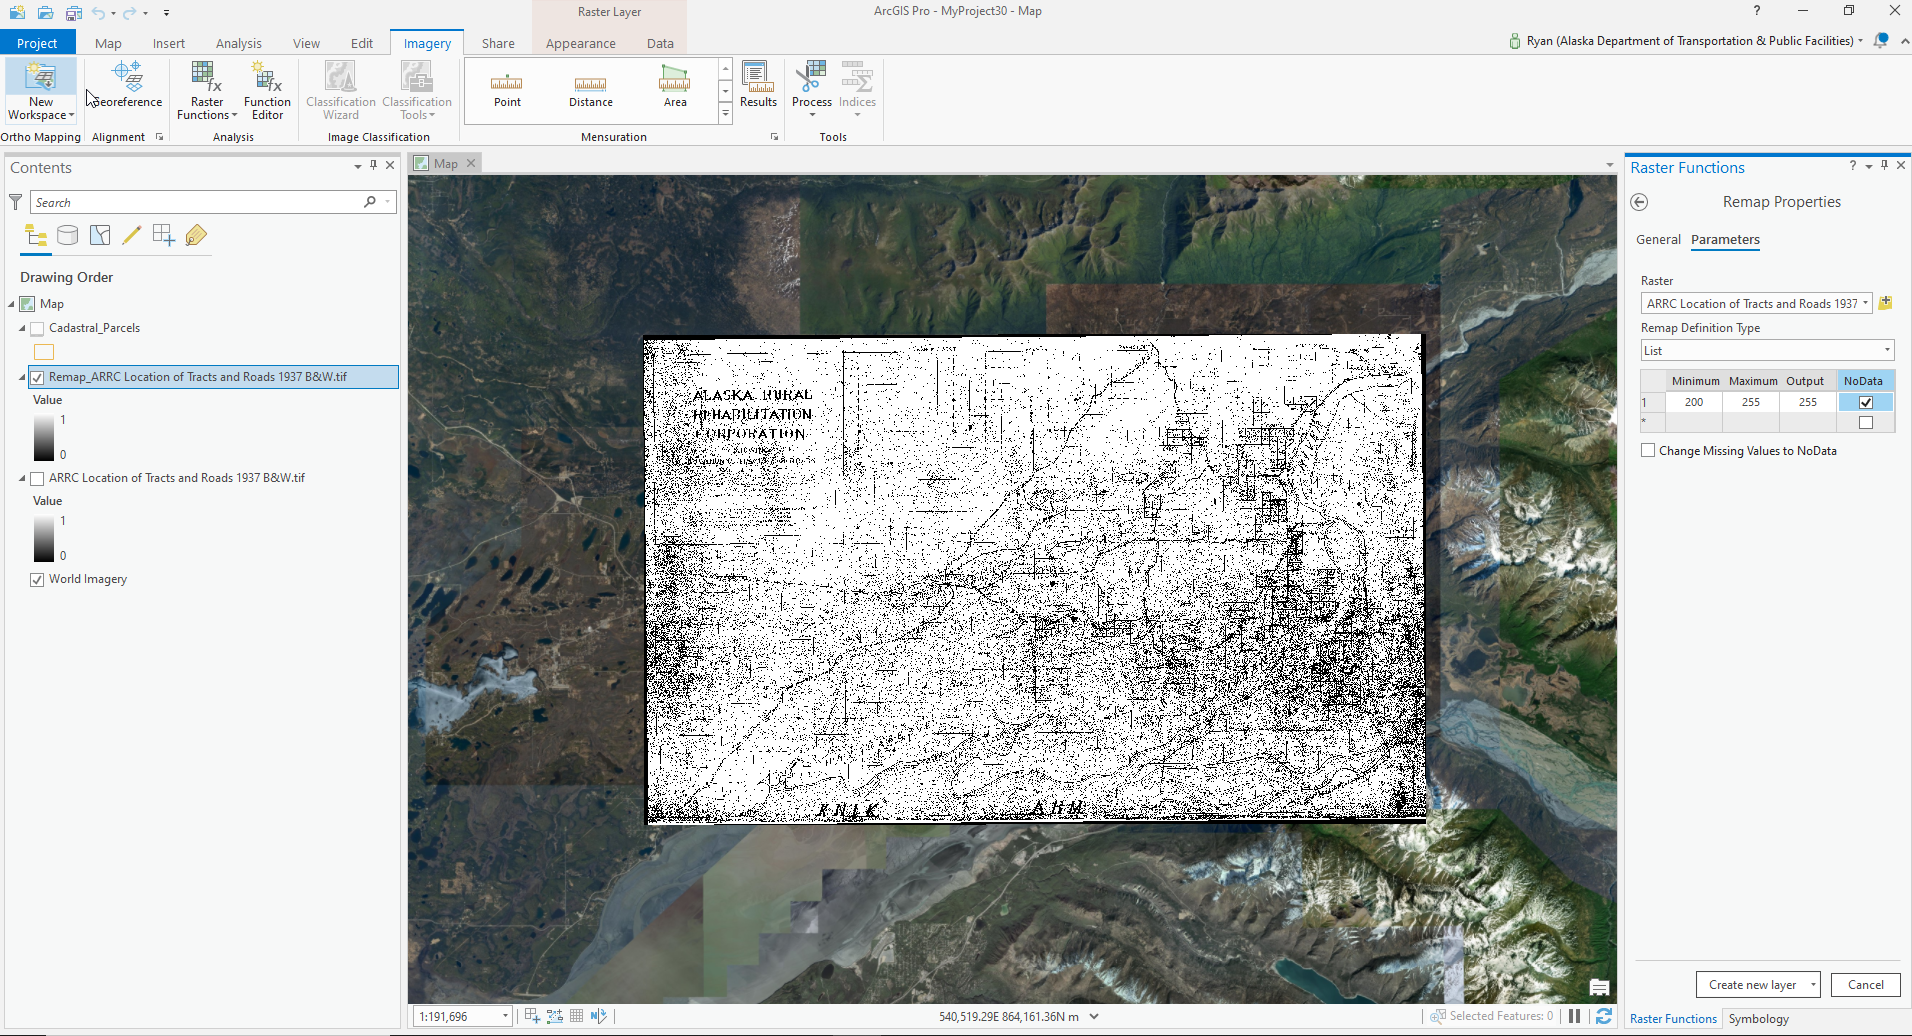
- Mark as New
- Bookmark
- Subscribe
- Mute
- Subscribe to RSS Feed
- Permalink
- Report Inappropriate Content
Hello Ryan,
In Pro you can change your color scheme to include transparency:
1) Right click on your scanned image in the Table of Contents and select "Symbology"
2) In the Symbology pane, open the drop-down menu for the color scheme
3) Click "Format color scheme" in the drop-down menu
You'll see a black to white color gradient. This is how colors are assigned to your raster.
This is something very useful that you'll likely be using a lot later on, so it's worth giving a bit of background: raster images consist of a set of numerical values. The bit depth determines what type and set of numbers the raster can contain; the most common are whole numbers from 0-255 (8 bit), whole numbers from -32,768 to 32,767 (16 bit signed), whole numbers from 0 to 65,535 (16 bit unsigned), or some low decimal number to some higher decimal number (32 bit float).
What the color scheme does is treat the left side of this gradient as the low end of whatever range of numbers you have, and the right as the high end, and assigns colors depending on where each value falls in that range. So if you were using an 8 bit image, 0 would be black, 255 would be white, and 127 would be gray. Of course, Pro will change the way this assignment works depending on which values your image contains. If your image is 8 bit but only uses 0s and 1s, it will simply set 0 to black and 1 to white instead of using the entire allowed range of 0 to 255. You can customize this in the raster strech settings back in the primary symbology pane.
In any case, according to your legend and the appearance of your scanned image, it looks like your image contains only 0s or 1s. If so, what you want is simpler to get. The markers on either end of the gradient's underside are color stops, which set the colors that the gradient blends to make the gradient.
4) Click on the white color stop.
5) Change the transparency setting to 100%. This will make the white pixels transparent.
6) Since you have a dark base map, you may also wish to set the left color stop to something brighter. Since this looks like mostly roads, a red or orange might work best.
If you follow this procedure with data of higher bit depth, values in the middle of the gradient will be partially transparent pale versions of whatever the left color is, because they are midway between the left color and the right color. This can look bad if you're trying to make it look like the "paper" is transparent; it'll look like someone tried to cut away all the un-inked paper but didn't cut close enough. In such cases, you can get better results by setting both stops to the same color, and just making sure that the right color stop is set to 100% transparency. Note that if you change the color for a stop, its transparency will reset to 0%, so you'll need to change the right stop back to 100% every time you change the color.
If you want to know what bit depth the raster has, you can right-click the raster in the Table of Contents, select "Source", and expand the "Raster Information" section. There should be two entries there called "Pixel Type" and "Pixel Depth".
The following pages have more info on things you can do with this feature:
Color schemes—ArcGIS Pro | ArcGIS Desktop
Custom color ramps for rasters in ArcGIS pro
Map the stars with size, transparency, and color
Hope this helps,
-Charles
- Mark as New
- Bookmark
- Subscribe
- Mute
- Subscribe to RSS Feed
- Permalink
- Report Inappropriate Content
Wow, thank you for taking the time to provide such a thorough explanation!
- Mark as New
- Bookmark
- Subscribe
- Mute
- Subscribe to RSS Feed
- Permalink
- Report Inappropriate Content
Ryan
it appears you have 1 bit data. white background = pixel value 1, black = 0. If you remap 1 through 255 --> 255, and set 255 to NoData, the white should be transparent. (The prior remap didn't work because you don't have any pixel values from 200 to 255)
You've got a lot of black noise, though. Is there any chance you can go back and get better quality scans? Or an 8 bit file with gray values, not just pure black and white?
Cody
- Mark as New
- Bookmark
- Subscribe
- Mute
- Subscribe to RSS Feed
- Permalink
- Report Inappropriate Content
Yeah, i would like to clean it up but I'm not sure how. The scan is representative of the condition of the copy we have. I think it's a multi generation copy (copy of a copy of a copy) of a blueline copy. I experimented with some automated Adobe clean up techniques but it seems to be complicated by more noise in some locations than others so I while i cleaned up the "noisy" areas I was losing important data (text and linework) in other "cleaner" areas. I'd welcome any suggestions for automated clean up.