- Home
- :
- All Communities
- :
- Services
- :
- Esri Technical Support
- :
- Esri Technical Support Blog
- :
- Replication Revealed: Disconnected Synchronizatio...
Replication Revealed: Disconnected Synchronization
- Subscribe to RSS Feed
- Mark as New
- Mark as Read
- Bookmark
- Subscribe
- Printer Friendly Page
- Report Inappropriate Content
What is it?
The synchronization process is made up of multiple tasks involving sending and receiving data and acknowledgements between the two geodatabases that participate in the replica. The Disconnected Synchronization process allows the user to manually complete each of these individual tasks.
One way to think of synchronization can be to compare it to a phone conversation between two people, speaking and listening to each other.
Why use it?
To provide a method of synchronization for customers with replication between geodatabases that are in a disconnected environment.
To troubleshoot issues with replicas in a connected environment.
To get a deeper understanding of the synchronization process.
How to use it?
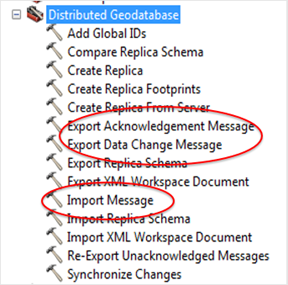
There are three ways you can access the tools needed to perform a disconnected synchronization.
ArcCatalog Context Menu: ArcToolbox Geoprocessing tools: 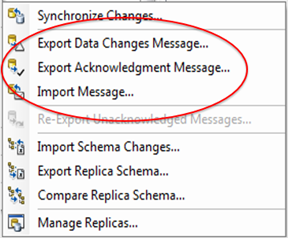
ArcMap Distributed Geodatabase toolbar:

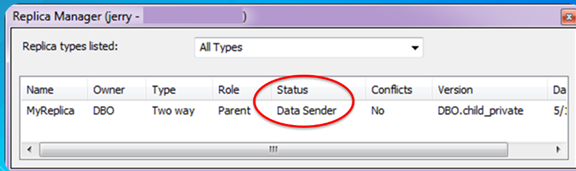
Before running any tools, use the replica manager to confirm which geodatabase in your replica is the data sender. *Always check this status from both the parent and the child.
Step 1: Export Data Changes from the Data Sender.
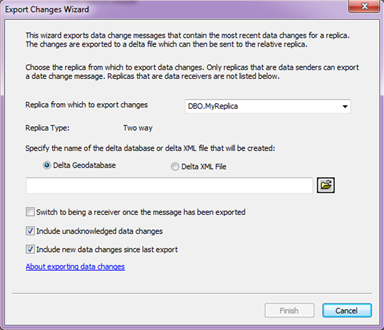
If you are using a two way replica, and need to synchronize data in both direction, check the 'Switch to being a receiver once the message has been exported' so this workflow can be done in the opposite direction later.
Exporting the changes to Delta Geodatabase allows you to see the records with updates, inserts, and deletes that are being synchronized. If features have not been updated, inserted or deleted since the last synchronization then you will not see those records in your Delta Geodatabase.
Esri Support insight: If other synchronization methods fail, this is my go-to option for troubleshooting that failure.


This step can be compared to saying “Hello” to start a conversation.
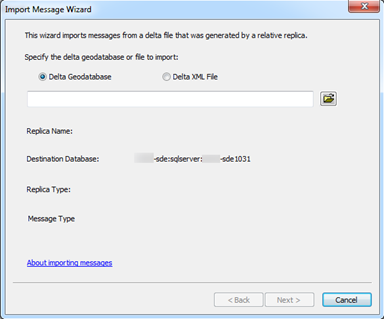
Step 2: Import those data changes into the Data Receiver using the Import Messages Wizard. Since our output in step 1 was a file geodatabase, we will choose to import a delta file geodatabase here.
This step can be compared to hearing someone say “hello” to you to start a converstaion.
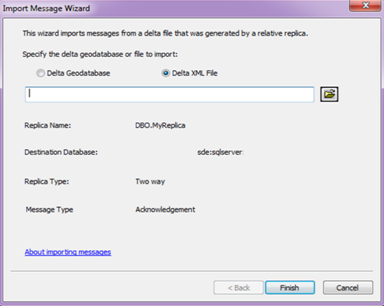
Step 3: Export an Acknowledgement Message from the Data Receiver. This output will be an XML document.

This step can be compared to saying “hello” back to someone who just greeted you.
Step 4: Import that Acknowledgement Message into the Data Sender.
This step can be compared to someone hearing your “hello” reply.
The four steps are needed in order to perform a synchronization in one direction of a single replica. If you are using a two way replica, and need to send data in both directions, then you will need to repeat these four steps again in the opposite direction.
*Use the Advanced tab in the Replica Properties to see the history of your replica geodatabases conversations.
Parent geodatabase Replica Properties Child geodatabase Replica Properties 
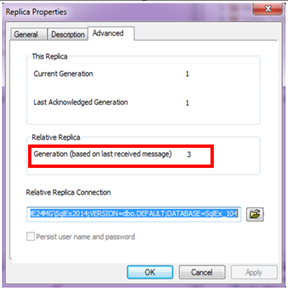
- The Current Generation of the Data Sender increases when data changes are exported from the sender geodatabase.
- From the Data Receiver, The relative replica generation increases when new data changes are imported into the receiver geodatabase.
- The Last Acknowledged Generation of the Data Sender increases when this geodatabase imports the acknowledgement message
For Fun!
*Always check this status from both the parent and the child.
Now that you have completed the disconnected synchronization workflow, let’s look at the statement above.
- Can you now think of WHY it is important to check the status from both the parent and the child?
- If you see both the parent and the child have the same status, what would you do to reconcile that so that only one geodatabase is the sender, and the other is the receiver?
*Use the Advanced tab in the Replica Properties to see the history of your replica geodatabases conversations.
This blog uses images to show the generations of a parent and child geodatabase. In the images, the generations are "in sync", meaning that the conversation between the two geodatabases is completed...one said hello, and the other said hello back.
- The generation numbers are 3-3-1 in the parent, and 1-1-3 in the child. Can you determine how many times the parent has sent data to the child? Can you determine how many times the child has sent data to the parent?
- Can you determine what needs to be done if those numbers were 3-2-1 and 1-1-3?
esrisupport
You must be a registered user to add a comment. If you've already registered, sign in. Otherwise, register and sign in.
-
Announcements
70 -
ArcGIS Desktop
87 -
ArcGIS Enterprise
43 -
ArcGIS Mobile
7 -
ArcGIS Online
22 -
ArcGIS Pro
14 -
ArcPad
4 -
ArcSDE
16 -
CityEngine
9 -
Geodatabase
25 -
High Priority
9 -
Location Analytics
4 -
People
3 -
Raster
17 -
SDK
29 -
Support
3 -
Support.Esri.com
60
- « Previous
- Next »