- Home
- :
- All Communities
- :
- Services
- :
- Esri Technical Support
- :
- Esri Technical Support Blog
- :
- Installation for ArcGIS Runtime SDK for iOS with C...
Installation for ArcGIS Runtime SDK for iOS with CocoaPods
- Subscribe to RSS Feed
- Mark as New
- Mark as Read
- Bookmark
- Subscribe
- Printer Friendly Page
- Report Inappropriate Content
Are you tired of implementing and managing different third-party libraries when creating your own applications? This blog shows you how to implement CocoaPods with Xcode 6.1 and use CocoaPods to download ArcGIS Runtime SDK for iOS.
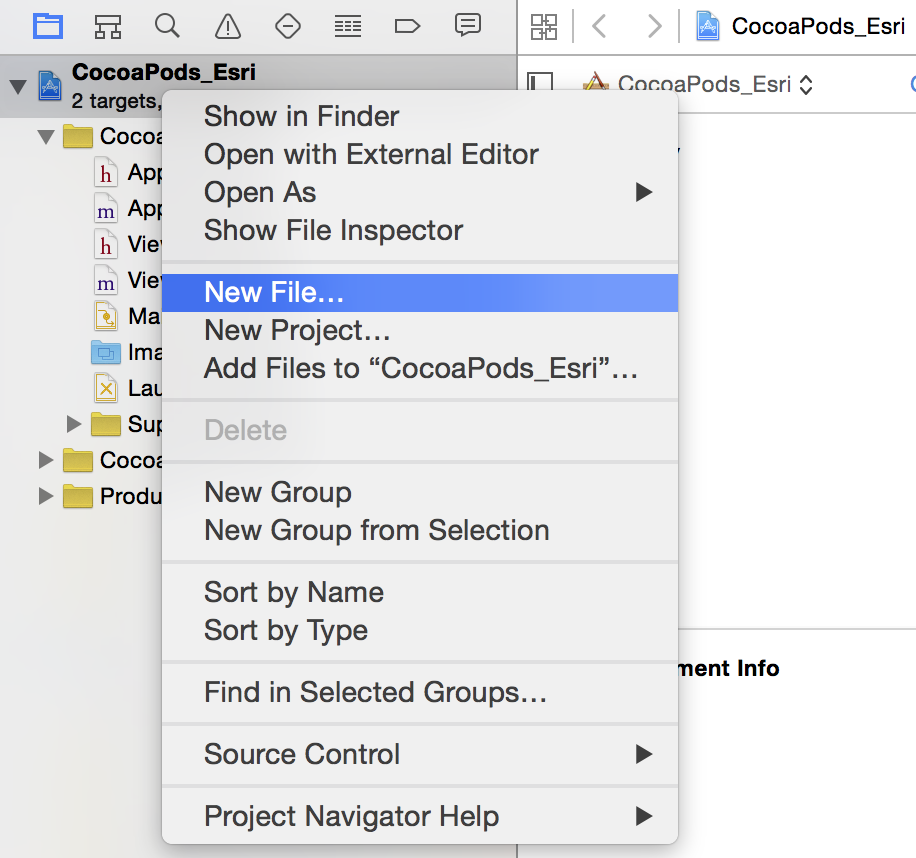
CocoaPods is the dependency manager for Cocoa projects. CocoaPods has thousands of libraries and can help you elegantly scale your projects. As we all know, configuring OSX and iOS projects can be a challenging process. With CocoaPods, you can easily organize dependencies (a.k.a. pods) for the various third-party libraries used in your projects. For more information about installing CocoaPods, use this Getting Started guide as a reference. First, let’s create a new project and add a new file into your project by using the following steps. Right-click the project name, and click New File.
Select the Empty template file, and name the file "Podfile". Note: We need a file named “Podfile” because it is a specification that describes the dependencies of the targets of one or more Xcode projects. “Podfile” always creates an implicit target, which is named by default, and links to the first target of the user's project.  Tip: CocoaPods provides a pod init command to create a "Podfile" with smart defaults, which you can run in a terminal as an alternative. Add the lines below into the “Podfile”, and save the file.
source 'https://github.com/CocoaPods/Specs.git' platform :ios, '8.1' pod 'ArcGIS-Runtime-SDK-iOS', '10.2.4'
For more information about how to write a “Podfile”, please use the information listed here. After creating the "Podfile", open 'terminal.app' on the OSX machine. Navigate to the project's root folder by using the syntax below.
cd /Users/yourUsername/yourProjectFolder/
Note: As an alternative to the step above, you may also directly drag your project's main folder to the terminal. It will automatically generate the path of the folder; then, under your project folder, use the following command.
$pod setup
A successful installation displays a message similar to the screenshot below. 
After the setup, we need to install the dependencies in your project. This downloads the ArcGIS framework to your machine and moves the framework into your project's Pod directory. This installation also makes the necessary changes to your project's build settings to correctly reference the ArcGIS framework.
$pod installWe can now go back to the project folder, but open the Xcode workspace instead of the project file when building your project.

Nathan W. & Rachel G. - SDK Support Analysts
You must be a registered user to add a comment. If you've already registered, sign in. Otherwise, register and sign in.
-
Announcements
70 -
ArcGIS Desktop
87 -
ArcGIS Enterprise
43 -
ArcGIS Mobile
7 -
ArcGIS Online
22 -
ArcGIS Pro
14 -
ArcPad
4 -
ArcSDE
16 -
CityEngine
9 -
Geodatabase
25 -
High Priority
9 -
Location Analytics
4 -
People
3 -
Raster
17 -
SDK
29 -
Support
3 -
Support.Esri.com
60
- « Previous
- Next »


