- Home
- :
- All Communities
- :
- Products
- :
- ArcGIS Survey123
- :
- ArcGIS Survey123 Blog
- :
- Survey123 Tricks of the Trade: Photos
Survey123 Tricks of the Trade: Photos
- Subscribe to RSS Feed
- Mark as New
- Mark as Read
- Bookmark
- Subscribe
- Printer Friendly Page
- Report Inappropriate Content
Updated December 2, 2022 (setFileName property to rename photo file names)
Survey123 includes great capabilities to help you specify how photos should be captured from your smart form. The 3.10 release, introduces even more: multiline appearance and the method setting in the body::esri:style column. This blog highlights these new features and a few other techniques so you can get the best out of photos in your smart forms. Most of what is described in this article involves the use of Survey123 Connect and requires familiarity with XLSForms. Check out the Survey123 XLSForm tutorials in YouTube or our documentation if you need to get started.
As with many other Tricks of the Trade articles, we will start easy, and progressively explore more sophisticated techniques one step at a time.
The Basics: One question, one photo.
If you want your users to submit a photo through your smart form, you will include a question of type image. Here is an XLForm example:
| type | name | label |
| geopoint | location | Incident location |
| image | photo | Photo of the incident |
Like any other question type, you can use the required column to define if the end user must submit data for your question or not. In the next XLSForm example, an expression is used in the required column to determine if a photo must be submitted. If the severity of the incident is high, then a photo must be submitted. Otherwise, the photo question will be presented to the user as optional.
| type | name | label | required |
| geopoint | location | Incident location | |
| select_one severity | severity | Severity | |
| image | photo | Photo of the incident | selected(${severity},"high") |
Controlling the source of the photo: Camera versus browse
By default, the Survey123 web and field apps will let end users either take a new photo using the camera or browse for an existing photo in the device. Sometimes, you want to have control over the source of the photo. If you are designing a survey for inspectors to document code violations, for example, you may want them always to take a new photo with the camera, and not allow browsing of existing photos in the device.
The method parameter in the body::esri:style XLSForm column lets you specify if both methods are allowed, or just one. If the method parameter is set to camera, users will need to capture a photo using the camera. If method is set to browse, users will need to browse for an existing photo. If you want to give users a choice, leave the the body::esri:style column empty or set the method parameter to camera,browse.
Here is a visual representation of what the user experience looks like using the different method parameter options:
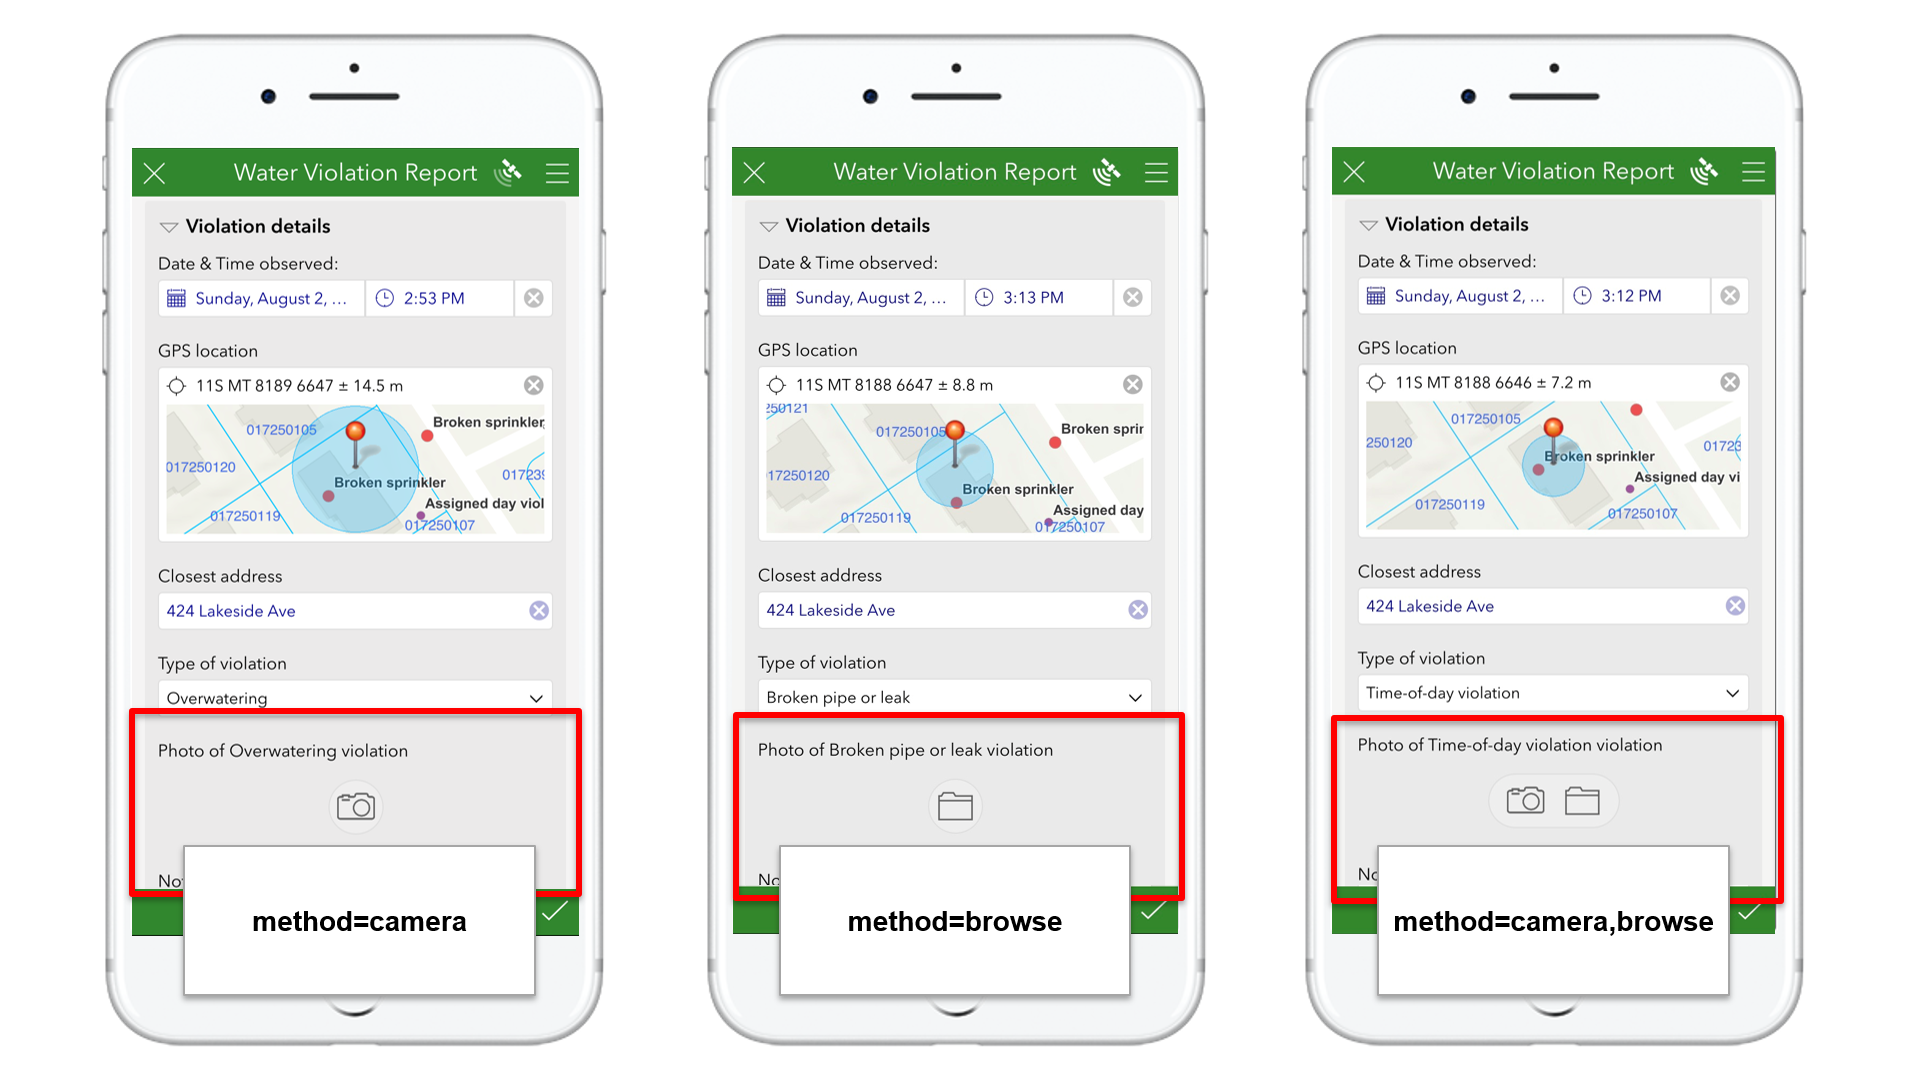
And here is what an XLSForm looks like if you want to force users to submit a new photo from the camera:
| type | name | label | body::esri:style |
| geopoint | location | Location | |
| image | image | Photo | method=camera |
One question, multiple photos
If you want users to submit more than one photo with your survey, you can either add multiple image questions or alternatively use the multiline appearance on an image question. There are good cases for both approaches. For now, lets start with the multiline appearance:
| type | name | label | appearance |
| geopoint | location | Incident location | |
| image | photo | Incident photos | multiline |
Support for the multiline appearance for image questions was added in version 3.10. When using the multiline appearance you will initially not see much of a difference in your form. However, after you take the first photo, you will see that new options appear for you to take additional photos and navigate through all the photos you have taken.
Counting photos submitted, and limiting how many photos can be submitted
The XLSForm count-selected() function can be used to get the number of photos a user has added to an image question. Two common uses for this function are calculations and constraints.
The following example shows how you can store as a feature attribute the total number of photos submitted through an image question. Once you have this attribute, you can use it to filter, label or simply set the symbology of features in a web map. For example, you may want to create a filter to hide features with no associated photos.
| type | name | label | appearance | calculation |
| geopoint | location | Incident location | ||
| image | photo | Incident photos | multiline | |
| integer | photo_count | Photos submitted | count-selected(${photo}) |
Using count-selected(), you can also also control how many photos can be submitted with a question. For example, you can setup a constraint to limit photos submitted with your image question to less than 5:
| type | name | label | appearance | constraint |
| geopoint | location | Incident location | ||
| image | photo | Incident photos | multiline | count-selected(${photo})<5 |
You can use count-selected() against an image question with and without the multiline appearance.
Image questions and repeats
Support for the multiline appearance in image questions was added with version 3.10. Before that, if you wanted users to upload more than one photo you had to either add multiple image questions to your survey or include the image question within a repeat. Adding multiple image questions in a survey is still a valid pattern, as we will describe later. Creating a repeat block simply to include a single image question is never a good idea, because the repeat will create a new related table and your attachments will link to that table. It will be extremely difficult for you to later explore the attachments in ArcGIS that way. Instead of using a repeat for that, use the multiline appearance as described above.
| type | name | label | hint |
| geopoint | location | Location | |
| begin repeat | photos | Photos | Do not create a repeat just to add a single image question in it. Use the multiline appearance instead on the image question (as shown above) |
| image | photo | Photo | |
| end repeat |
For clarity, this is not to say that you should not include image questions within a repeat. For example, If you want to have a repeat and then add an image question along with a text question for a description or something else, that is all good. It is adding a repeat containing just an image question that should be avoided.
Here is an example where having an image question within a repeat is justified. In this case, the repeat makes sense because we want to associate multiple attributes (Direction, Latitude, Longitude as well as a user entered description) with every photo.
| type | name | label | calculation | bind::esri:fieldType |
| geopoint | location | Location | ||
| begin repeat | photos | Photos | ||
| image | photo | Photo | ||
| text | des | Description | ||
| calculate | dir | Dir | pulldata("@exif", ${photo}, "GpsImgDirection") | esriFieldTypeDouble |
| calculate | lat | Lat | pulldata("@exif", ${photo}, "GpsLatitude") | esriFieldTypeDouble |
| calculate | lon | Lon | pulldata("@exif", ${photo}, "GpsLongitude") | esriFieldTypeDouble |
| end repeat |
Note that photos in the repeat table have attributes to extract their direction, latitude, longitude and even a user-entered description of the photo. Storing all these attributes for every one of the photos would not be possible using the multiline appearance in the image question. This is what justifies the use of the repeat.
If you are not familiar with the pulldata("@exif") function check the https://community.esri.com/groups/survey123/blog/2017/12/12/working-with-exif-image-metadata-in-surv... blog post.
One survey, multiple photos
It is possible to include multiple image questions within a single form. Note that adding multiple image questions to a form is very different from enabling multiple photos in a single question.
The Virginia Department of Agriculture and Consumer Services (VDACS) was notified in early 2020 that many residents in the State had received unsolicited packages containing seeds from an unknown source. To better understand the extent of the problem, a survey was put together for Virginia residents to submit reports of unsolicited seed packages. In this survey, one question was added to capture a photo of the front of the envelope, and a separate question for the back of the envelope.
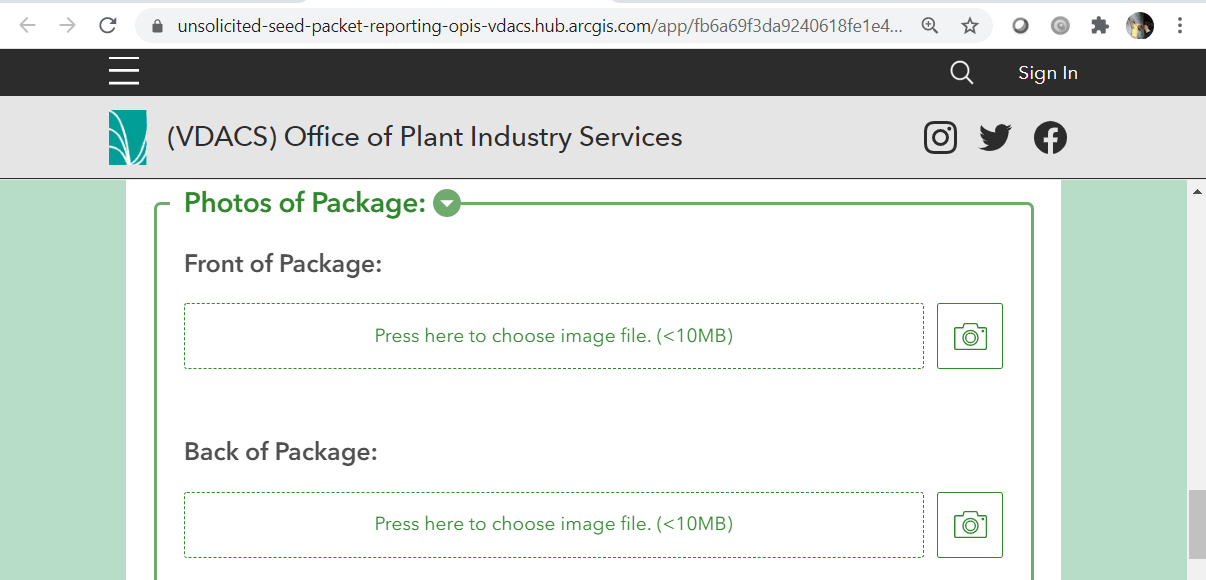
Rather than asking users to take one or more photos of the envelope in a single question with multiline appearance, this survey uses two separate image questions. This gives more explicit direction to the user, which generally is going to yield better data.
| type | name | label |
| image | photoFront | Front of package |
| image | photoBack | Back of package |
An additional advantage of using multiple image questions is that each of the photos will be automatically tagged by Survey123 with the name of the corresponding image question. This later on will be an advantage when you want to put your photos into a Survey123 report. Since the front and back photos are tagged differently, you will be able to specify where exactly each of the photos should go.
Using multiple image questions within a form is a good practice when you want to explicitly tell users what each photo should contain. In the Virginia seeds use case above, you are telling users to take a photo of the front of the envelope first, and then a photo of the back. This is a good use case. If you want to simply want to open up the possibility of submitting multiple photos of something, then the multiline appearance is the way to go. For example, say you want people to submit multiple photos of an issue in an asset. You do not know in advance what exactly the end user will report, but you want that user to be able to submit a few photos; that is a perfect example for multiline.
Since the multiline appearance was not available in the past, some of you created surveys with multiple image questions as follows:
| type | name | label | hint |
| geopoint | location | Location | |
| image | photo1 | Photo | |
| image | photo2 | Photo | Don't do this. Use mutliline appearance in photo1 instead |
| image | photo3 | Photo | Don't do this. Use mutliline appearance in photo1 instead |
Now that the multiline appearance has been added, it is time to adjust the XLSForm design accordingly. Remember you can also use the count-selected() function to limit the number of photos that you want people to submit. Removing the extra image questions in your form will not cause data loss, however, keep in mind that the multiline appearance is only supported in Survey123 3.10 or newer, so you will want end users to be up to date with their app version or otherwise the appearance will be ignored.
Controlling the size of photos
Using Survey123 Connect, you can control the size of photos sent to ArcGIS. There are a number of devices out there and each of them may send photos of different sizes. You can bring consistency by properly configuring your survey from Survey123 Connect.
In Survey123 Connect, go to the Options tab of your survey and scroll down until you see the Images section. Use that setting to control how big you want images to be when sent to ArcGIS. The default value is 1280 pixels on the largest edge, which generally works well for most workflows, the quality is good and the size of the photo is manageable. However, you can reduce images down to 320 pixels or leave them in their original size.

The Survey123 Connect setting above applies to all image questions in your form, unless you overwrite this value with the max-pixels parameter. As you can likely already tell, the max-pixels parameter controls the image size on the longest edge at the question level.
| type | name | label | parameters |
| geopoint | location | Incident location | |
| image | photo | Incident photos | max-pixels=600 |
Photo filenames
Survey123 automatically assigns a unique filename to photos. The filename includes as a prefix the name of the image question and it is followed by a unique number. If you want to persist the name of your photos as a GIS attribute, use a calculation as shown below.
| type | name | label | appearance | calculation |
| image | photo | Photo of the incident | ||
| text | photo_filename | Photo filename | hidden | ${photo} |
If you want to set the name of the photo file yourself, you can. You will use the fileName property in the bind::esri: parameters column for that.
| type | name | label | body::esri:parameters |
| image | photo | Photo | filename=concat("Photo_",format_date(now(),"%y%m%d%H%M%S")) |
Check this help topic or this blog, for more details on how to set the fileName property.
Photos in reports
Survey123 includes a powerful report service which you can use to create high quality reports in MS Word and PDF format. Check https://community.esri.com/groups/survey123/blog/2019/07/23/understanding-survey123-feature-reports for an introduction to this service.
Survey123 reports require you to create a template specifying the content and look and feel of your report. These templates are authored as Microsoft Word documents where you insert placeholders to fetch data from your survey records. The full syntax for report templates is described at Feature report templates—Survey123 for ArcGIS | Documentation
In regards to photos, you can control the size of the photos in your report and even where to put each of the photos from your survey. This is where using mutliple image questions can really pay off.
For example, the following syntax in a report template will insert into your report the photo corresponding to the incident_photo question in your form. The photo will be added to the document with a width of 300 pixels and the height will grow proportionally to preserve the original aspect ratio.
${incident_photo | size:300:0}
If you used the multiline appearance in your survey, you will want to use the following syntax to arrange all photos vertically within your report:
${#incident_photos}
${$file | size:300:0}
${/}
This syntax will arrange the photos horizontally (note that I adjusted the width to 200px to have images fit within the width of the page).
${#incident_photos}${$file | size:300:0}${/}
Unfortunately, as of the time I write this, it is not possible to arrange photos in a table (each photo in its own cell). Mike Onzay figured that adding a space right before the closing tag would add a nice separation between photos. That is pretty clever! Thanks Mike for the tip! Here is the same expression with the space added:
${#incident_photos}${$file | size:300:0} ${/}
Photo Watermarks
Photo watermarks is a neat feature in Survey123. Since this article is about photos, I thought I would bring it up, although there is a separate blog covering this topic https://community.esri.com/groups/survey123/blog/2019/08/08/survey123-tricks-of-the-trade-photo-wate...
- « Previous
-
- 1
- 2
- Next »
You must be a registered user to add a comment. If you've already registered, sign in. Otherwise, register and sign in.