- Home
- :
- All Communities
- :
- Products
- :
- ArcGIS Survey123
- :
- ArcGIS Survey123 Blog
- :
- Automating Service Applications with Integromat an...
Automating Service Applications with Integromat and Dashboards
- Subscribe to RSS Feed
- Mark as New
- Mark as Read
- Bookmark
- Subscribe
- Printer Friendly Page
- Report Inappropriate Content
I am writing this blog post because I wanted to document a useful workflow that I developed for using Integromat to automate the creation of Feature Reports for Survey123 after editing the survey data. As someone who had never used Integromat before, I spent a great deal of time researching the different intricacies of the Integromat modules and how to make them work for what I needed, as I couldn't find any examples that were quite the same as mine. A lot of this workflow was accomplished by trial and error, so I'm posting this here in the event that someone else may find this example useful. My particular difficulty in this project came when I attempted to process the automation differently when the survey was initially submitted (addData event type) vs. when it was edited (editData event type.)
My scenario is this:
I work in local government (city level) and we have continually been making services and applications available online as a convenience to our citizens. As such, one item on our agenda was to make our Application for New Sewer Service available on the internet. I created a survey in Survey123 for the purpose of allowing citizens to apply to our Sanitary Board for new sewer service (when you move to a new house and need to put the service in your name, or when you build a new house and need brand new service). I also needed an easy way for our Sanitary Board staff to process these requests. Creating an automated workflow with Integromat seemed like it would provide the perfect solution for automation, and paired with the power of Dashboards for ArcGIS, I think it did!
The Simple Workflow:
1) Citizen submits an application for new sewer service.
2) Sanitary Board staff receives the request.
3) Sanitary Board staff processes the request (they need to add some information to the form, such as new account number, deposit cost, date paid, etc.)
4) Microsoft Word application form is filled out with applicant’s information and filed in archive.
The Solution:
Workflow Item # 1 – Submitting the Application
To allow citizens to submit an application, I created a new survey in Survey123 Connect with all pertinent information included and published to our ArcGIS Online Organization. This was the easy part.
Workflow Item # 2 – Receiving the Application
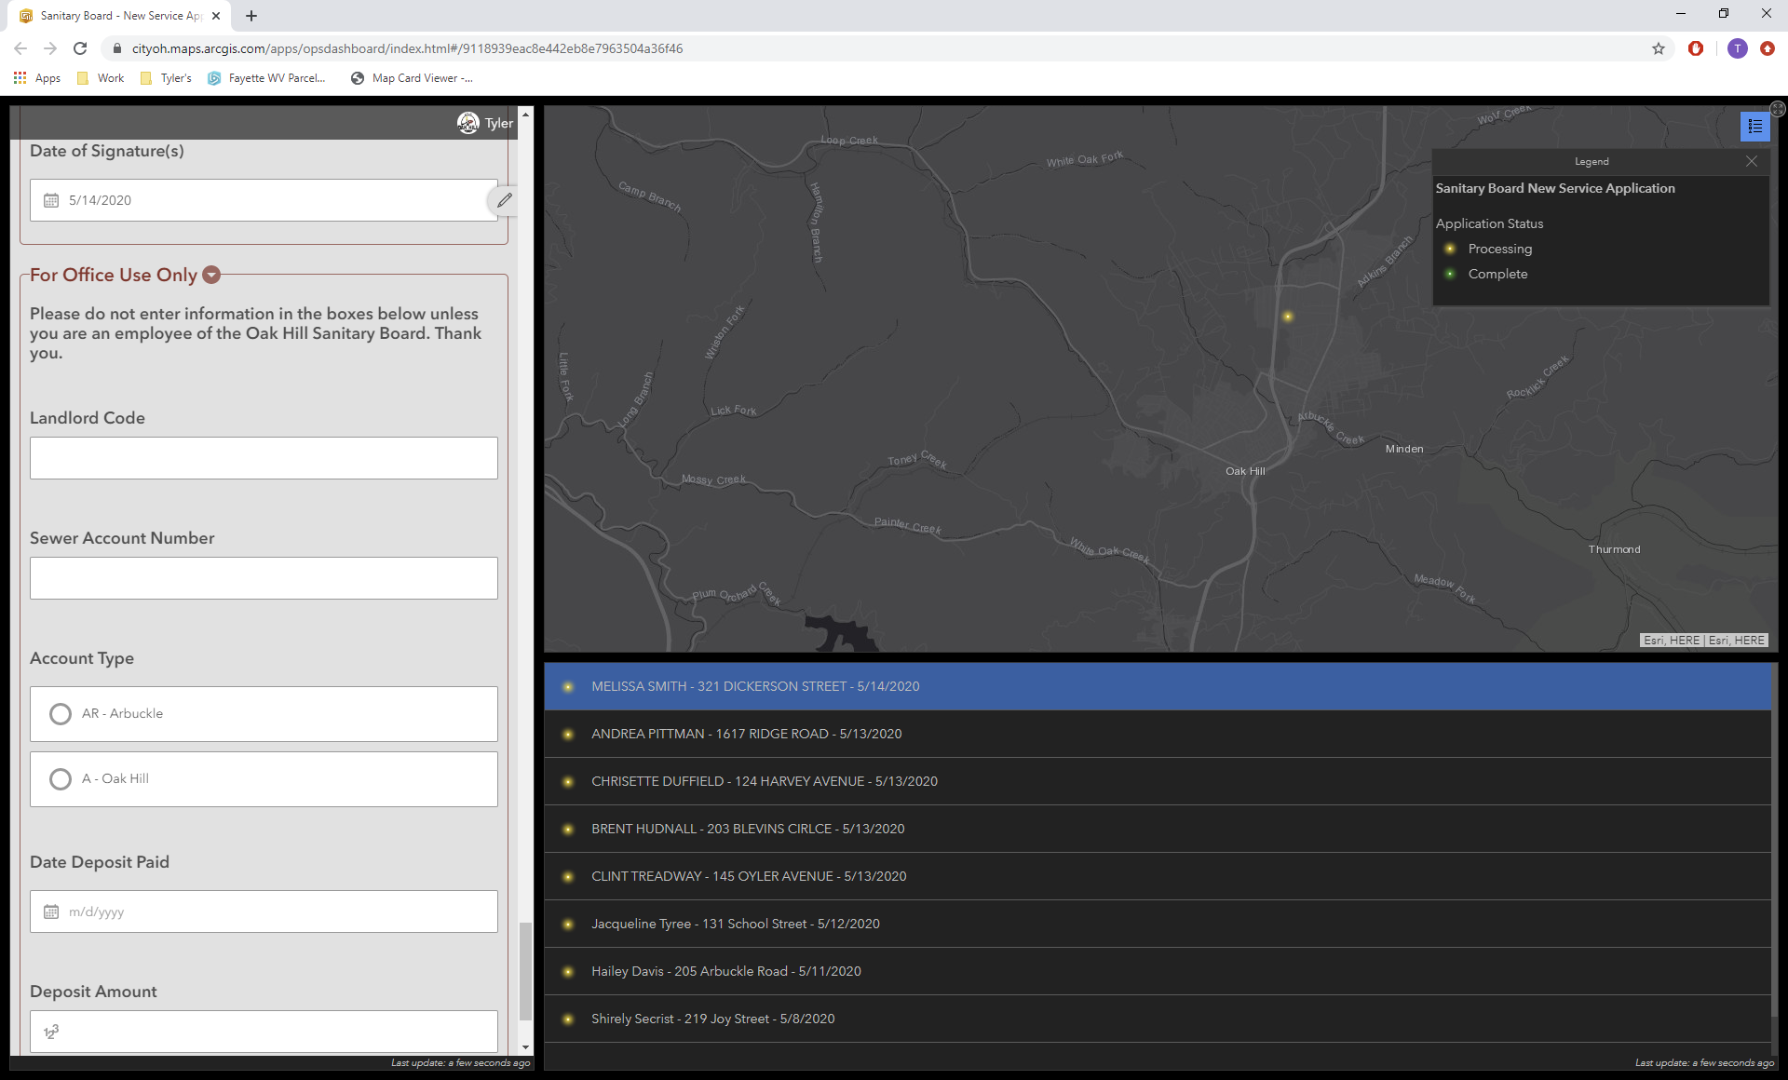
In order for the staff to access the information, I was going to train them on how to use the Survey123 online interface. The problem with doing this is that they also need to have the ability to edit the data, which at the present time is only available to the survey owner or the individual survey submitter. This was not going to work. This is where I found out about embedding surveys in a dashboard https://community.esri.com/groups/survey123/blog/2020/04/27/survey123-tricks-of-the-trade-embedding-.... Even more importantly, embedding that survey into a dashboard in edit mode using URL parameters https://community.esri.com/groups/survey123/blog/2019/02/06/survey123-tricks-of-the-trade-web-form-u... (both great blog posts by Ismael Chivite). This gave our staff the ability to go into the survey record and add data to the “office use only” fields (or change any other field that may have been entered incorrectly in the initial survey), including account number, deposit cost, date paid, etc. Below is a screenshot of the dashboard with the editable survey form included:
I also wanted the staff to receive an email when a new record was submitted to avoid missing one or prevent a delay in processing, and this is the first use case for Integromat (I could have used Microsoft Power Automate (MS Flow), but I needed to run a feature report later, which at this time was not available in MS Power Automate). I’ll post a screenshot of the Integromat Scenario a litte farther down. I will also attach the blueprint exported from Integromat for those who might want to take a look. That takes care of workflow item #2 – the actual receipt of the application. Moving on to processing.
Workflow Item #3 – Processing the Application
Using the dashboard with the editable survey form embedded, staff can now select the survey record (newest submissions come in on top of the list), review all the submitted information, add the new account number and other “office use only” information, then re-submit the now-complete survey form. Now we need to get all this information onto the Microsoft Word Template that is the actual application form. This is done using the “Create Feature Report” module in Integromat. There was a little problem with this step, which I’ll explain a little further down when you can see the Integromat Scenario screenshot.
Workflow Item # 4 – Getting the Information onto the “paper” application
This item is accomplished using the Integromat “Create Feature Report” for Survey123 module https://support.integromat.com/hc/en-us/articles/360020842234-Survey123. I then used the "Microsoft Office 365" module to send the Sanitary Board staff an email with the completed Feature Report attached.
Integromat Scenario
Here is a screenshot of the Integromat Scenario:
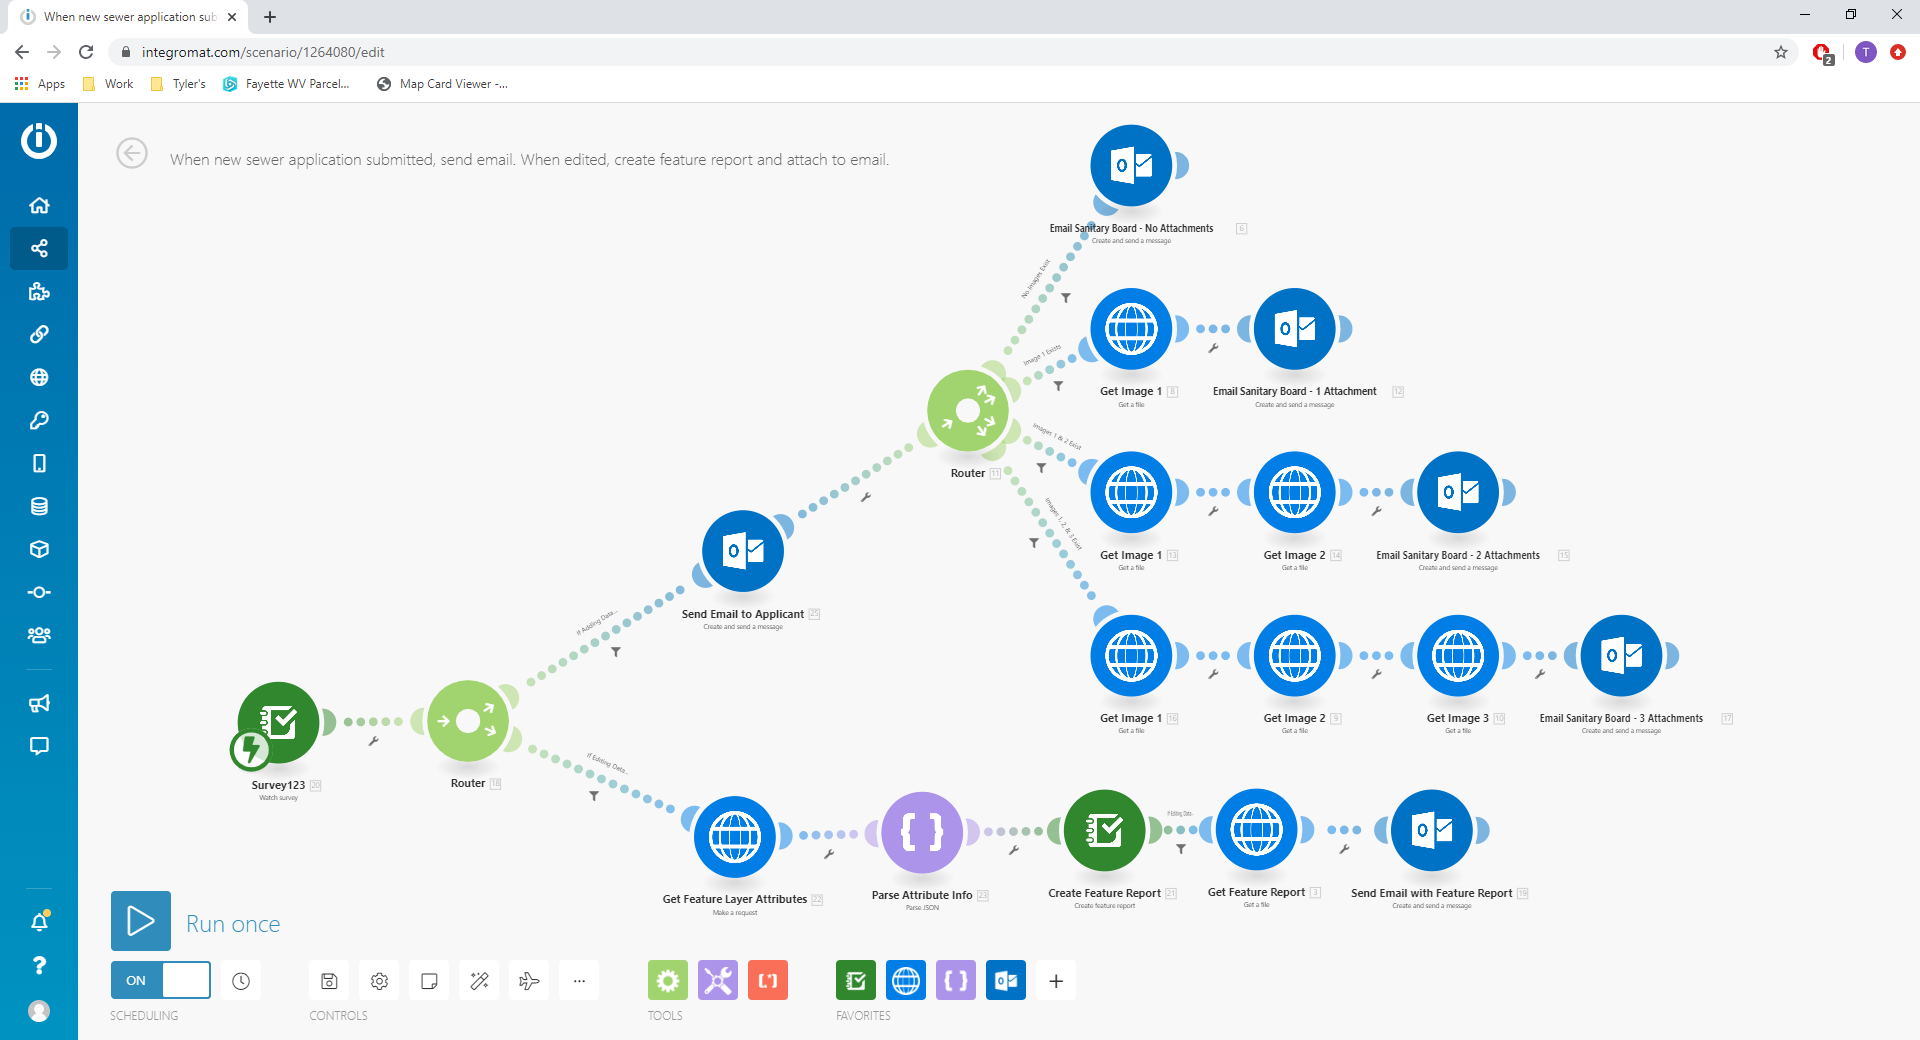
Here’s an explanation of the scenario, step-by-step:
- Watch the survey for a submission using the “Survey 123 – Watch Survey” module
- The first router will send the workflow one way when a new record is submitted (using the addData condition) and the other way when a record is updated (using the editData condition). The top branch is the new submission and the bottom branch is the update (when the staff makes their edits).
- When a new survey record is submitted (again, top branch), the first module sends a confirmation email to the person who submitted the survey based upon the email they provided in the survey.
- Then the next router looks at the survey record and sends the workflow to one of four paths, depending on how many images were attached to the survey. This part was a bit tricky at first. I initially had the “add photo” option set as a repeat in the survey, but it seems that repeats are difficult to handle in every aspect (and not supported by many ESRI tools and applications at this time, based on my research), so I simply removed the image repeat and modified the survey to only allow up to 3 images (3 separate “image” fields in the survey). This router looks at the three image fields to determine if an image either exists for each field. Based on what it finds, it continues along the appropriate path. In my setup, the very top path is for surveys with no images, the second one down is for those with only 1 image, the third one down is for 2 images, and the fourth one down is for 3 images.
- The images are retrieved using the “HTTP/Get a File” module. In the event that there is more than one file to retrieve, you can string multiple “Get a File” modules in line to accomplish this task, as you can see that I’ve done for those situations where more than 1 file is submitted with the survey.
- Last in this branch, I’ve attached the image(s) to an email that is sent to the Sanitary Board staff. This email serves 2 purposes – First, this is the initial notification that a citizen has submitted an application, and second, it provides the staff with the image attachments they will need to process the application. This completes the initial submission of the application and concludes the automation of the first branch. Now the staff processes the application.
- With all the information provided with the survey submission, the staff process the application (most of which is done is another computer system, which is where the account number is generated). Once they get all the information needed to complete the application, they open the dashboard I discussed previously and add the “office use only” information into the survey form. When they hit “Submit”, the bottom branch of the scenario is triggered by the first router in the scenario (again, using the “editData” event type, which is accessed by clicking on the connector AFTER the router and applying the filter to look for “editData”.)
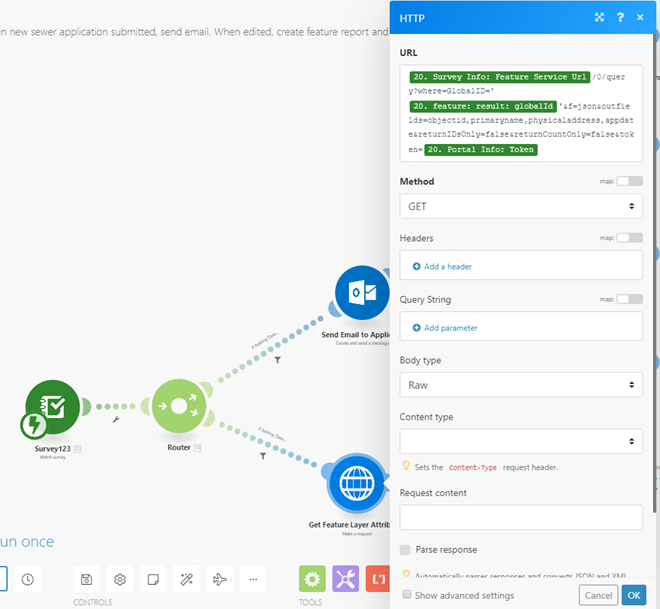
- (*Edit - read the comments below from Ismael Chivite - there is an easier way to set up for the Feature Report. This is how I did it, but he describes a better way that I had not discovered at the time of writing this post.) The first module on the bottom branch is the “HTTP/Make a Request” module. Theoretically, the next step would be the “Create Feature Report” module, but presently you cannot run the “Create Feature Report” module directly from the “editData” condition. This has not been built into the tools yet, and it will not work. I encountered most of my problems in this phase. Based on the research I conducted, only the edited attribute information will be included in the payload after the editData condition (not ALL of the attribute information for the feature; i.e. – only the field that was edited is available in the payload). In order to make the feature report work after an edit, you must first use the “HTTP/Make a Request” module to look up the hosted feature layer in AGOL, queried for the globalid of the current survey record (I also grabbed a few other fields that I used later in the process to assign a document name to my feature report). Here is a screenshot of my HTTP request module:
- Then I used the “Parse JSON” tool. This effectively separates the data returned from the HTTP Request module into separate field names. This tutorial helped me a lot: https://youtu.be/QEUSzMadHdE
- Next is the “Create Feature Report” module (finally!!). This uses the globalId field that was parsed out from the JSON in the previous step. Basically, this provides the module the globalID for the feature it will use to generate the Feature Report.
- Next is the “HTTP/Get a file” module to grab the completed Feature Report URL.
- Finally, I sent the email to the Sanitary Board staff email with the finalized Feature Report attached.
- (*Edit - read the comments below from Ismael Chivite - there is an easier way to set up for the Feature Report. This is how I did it, but he describes a better way that I had not discovered at the time of writing this post.) The first module on the bottom branch is the “HTTP/Make a Request” module. Theoretically, the next step would be the “Create Feature Report” module, but presently you cannot run the “Create Feature Report” module directly from the “editData” condition. This has not been built into the tools yet, and it will not work. I encountered most of my problems in this phase. Based on the research I conducted, only the edited attribute information will be included in the payload after the editData condition (not ALL of the attribute information for the feature; i.e. – only the field that was edited is available in the payload). In order to make the feature report work after an edit, you must first use the “HTTP/Make a Request” module to look up the hosted feature layer in AGOL, queried for the globalid of the current survey record (I also grabbed a few other fields that I used later in the process to assign a document name to my feature report). Here is a screenshot of my HTTP request module:
Now, here is the logical explanation: When a new survey is submitted, a confirmation email is sent to the submitter, then an email is sent to the office staff to notify them of the new submission, including any image attachments submitted with the survey. The office staff then processes the application and uses the custom Dashboard to edit the survey record to include additional information. When they submit their edits, a Feature Report is created from the survey record and it attaches to an email and sends to the office staff.
.
I’m sure there are other ways to go about doing what I have done, but this is the way worked for me. I could not find a good resource that explained how to run the “Create Feature Report” module after an “editData” condition, so if nothing else, I hope this helps to explain that process. I’m no programming master (by a long shot!). Shoot, I’m not really even a novice. But I do have to say that this Integromat integration is pretty easy to use. Good stuff ESRI!
I've exported the blueprint for the scenario from Integromat and attached it to this post for reference.
You should also check out https://community.esri.com/groups/survey123/blog/2019/06/02/getting-started-with-survey123-and-integ... and https://community.esri.com/groups/survey123/blog/2019/06/04/survey123-tricks-of-the-trade-integromat. There is great information in both of these links. Thanks!
You must be a registered user to add a comment. If you've already registered, sign in. Otherwise, register and sign in.