- Home
- :
- All Communities
- :
- Developers
- :
- Developers - General
- :
- Developers Blog
- :
- How to Implement OAuth 2.0 for ArcGIS
How to Implement OAuth 2.0 for ArcGIS
- Subscribe to RSS Feed
- Mark as New
- Mark as Read
- Bookmark
- Subscribe
- Printer Friendly Page
- Report Inappropriate Content
While OAuth 2.0 is Esri’s recommended methodology for handling security and authentication for their ArcGIS platform, not everyone using it understands what it does or how to implement it. Here at GEO Jobe, we’ve had to explain it to more than a few of the people we’ve worked with. As such, we thought we’d lay out a quick guide to what OAuth is and how it works.
 OAuth 2.0 handles security and authentication for the ArcGIS platform. Image Source
What is OAuth 2.0?
OAuth 2.0 is the protocol that ensures only users you give permission to can access your ArcGIS content. Esri chooses to use OAuth 2.0 for a number of reasons, including this list they’ve provided:
- OAuth 2.0 meets the needs of both users and applications.
- There are strong security practices around OAuth 2.0.
- OAuth 2.0 is designed to function at Internet-scale across domains, networks, cloud services, and applications.
- As a widely accepted standard OAuth 2.0 has many libraries and helpers for a variety of languages and platforms.
This is an important part of security for controlling who can access or edit content, as well as managing credit usage. By using OAuth 2.0 in your applications, you can make a map of company assets available to anyone in your company while still keeping it hidden from the public. A company working on building a new neighborhood could create a map to track the progress of the homes being built, while ensuring only supervisors can edit the status of the houses.
Perhaps the most important way OAuth 2.0 manages security is controlling access to premium content and services. Since interacting with these resources consumes credits, and credits cost real money, OAuth 2.0 is an important part of making sure that only the people you want accessing those resources are able to do so.
(Bonus: For additional control over security while reducing the overhead in your in your org, check out security.manager)
 You’re not getting that data without valid credentials. Image Source
How does OAuth 2.0 work?
Here at GEO Jobe, we’ve found the best way to explain how OAuth 2.0 is with an analogy. Say your friend, Chris, got access to some exclusive event – a networking opportunity, a party, or something like that. There is a private guest list for the event, and the doormen are checking everyone. Your friend tells you all you need to do is tell the doorman you’re there with Chris, and the doorman will let you in.
When you get to the event and check in with the doorman, one of three things can happen. We’ve outlined them each below, and explained what they mean in the context of OAuth 2.0.
The Doorman Finds Your Friend; You Get a Wristband and Go In
This is what happens when OAuth 2.0 works. You’re able to get in and see your friend. In the case of ArcGIS, this means you requested access to content that you have permission to see. After OAuth checks your credentials, they give you a token (the wristband) that’s added to all your requests for content after that. Then, you get whatever you need (that you have permission to view), and everything is good.
The Doorman Finds Your Friend and You Don’t Get In
This is when the doorman comes back and tells you they found Chris, but Chris says they don’t know you. While this may be an awkward social situation, in OAuth 2.0, it’s pretty simple. It means you tried to access content, and OAuth 2.0 doesn’t think you are supposed to be able to see it. This will often result in an “Invalid Redirect URI” error.
In terms of development, this happens because the request is coming from a URL the app doesn’t recognize. To fix it, go to the app in your ArcGIS used to register for OAuth 2.0. Then, in the Settings menu, view the “Registered Info”. The domain sending the request will need to be included in the Redirect URIs.
The Doorman Can’t Find Your Friend
Maybe your friend left the party. Maybe the doorman thought the “Chris” they were looking for was a “Christopher” instead of a “Christine”. Regardless of the reason, the doorman can’t find your friend, and they’re not letting you into the party. When this happens, OAuth 2.0 will return an error stating that there is an “Invalid Client ID”. This is also easy for a developer to fix.
This situation occurs because there isn’t an app in the ArcGIS Organization in question with an App ID that matches what OAuth 2.0 was told to look for. This can happen if the app was deleted from your ArcGIS Org, or if the code where the App ID was specified was altered. In order to fix it, check where the App ID is specified in the code for the OAuth 2.0 call. Also, check the application in ArcGIS Org used to register for OAuth 2.0. If the application was deleted, you will need to create and register a new application, then use that App ID. If the application exists, check under the “Settings” menu and the “Registered Info” to find the App ID. This should match the value for the App ID in the code. If it doesn’t, recopy the App ID from the application in the ArcGIS, then paste the value into the code where the OAuth 2.0 information is initialized.
How to Implement an OAuth 2.0 Application
Setting up an OAuth 2.0 application in your ArcGIS Organization is fairly simple. In fact, it only takes five steps! It’s so easy, we’ve outlined the process below.
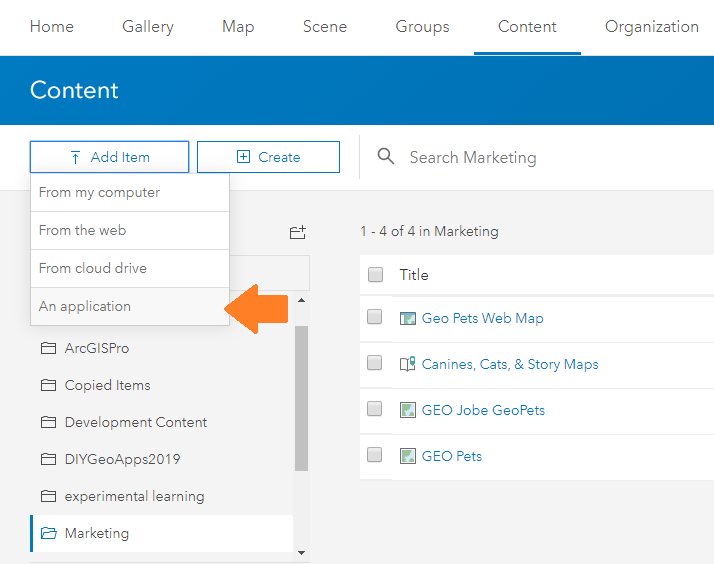
1. To start, sign into your ArcGIS Org and go to the Content menu. From there, click on “Add Item” and choose the option for “An Application”.
2. Next, you’ll select the type “Application” and fill out some basic information.

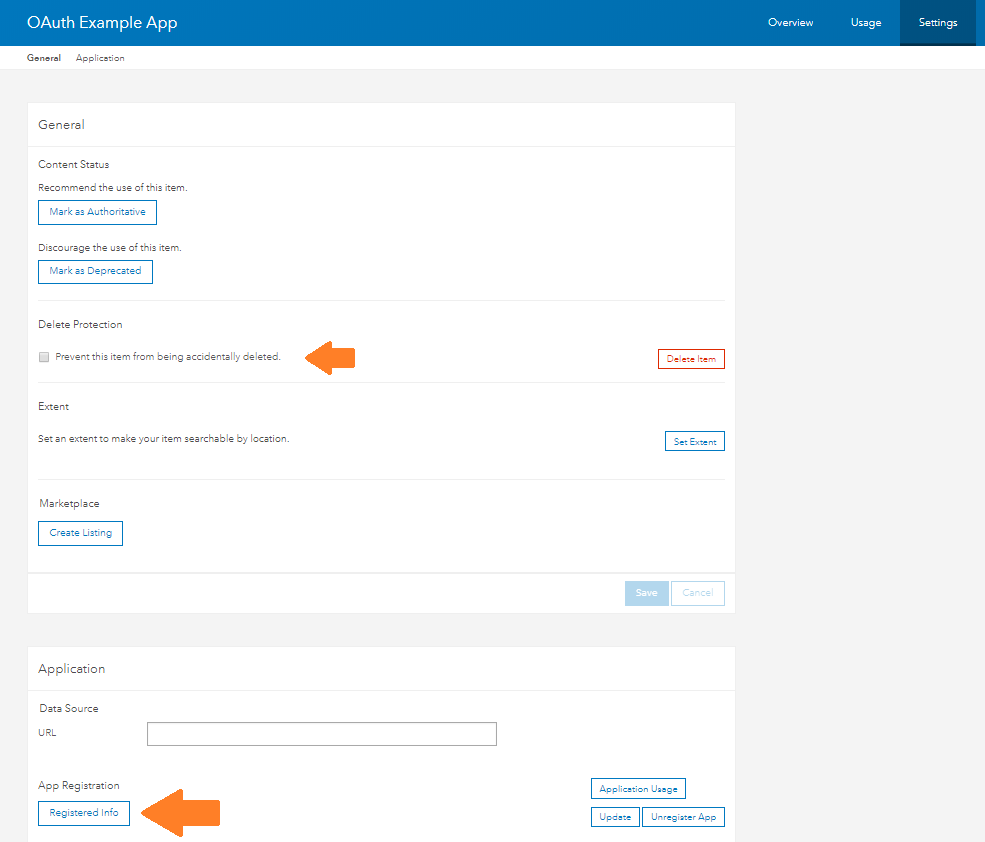
3. After you add the item, go to the Settings page and click the “Registered Info” button. Note: While on the settings page, you may want to select the option for “Prevent this item from being accidentally deleted.“
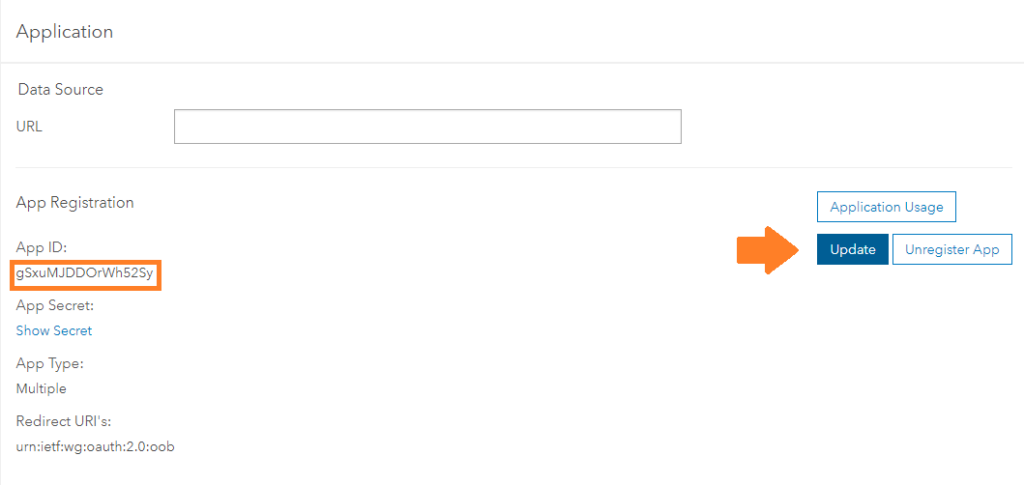
4. After clicking the “Registered Info” button, the App ID you will need should be visible on the left. The final step will be to update the Rediret URIs for the application. Click the “Update” button on the right side of the screen.
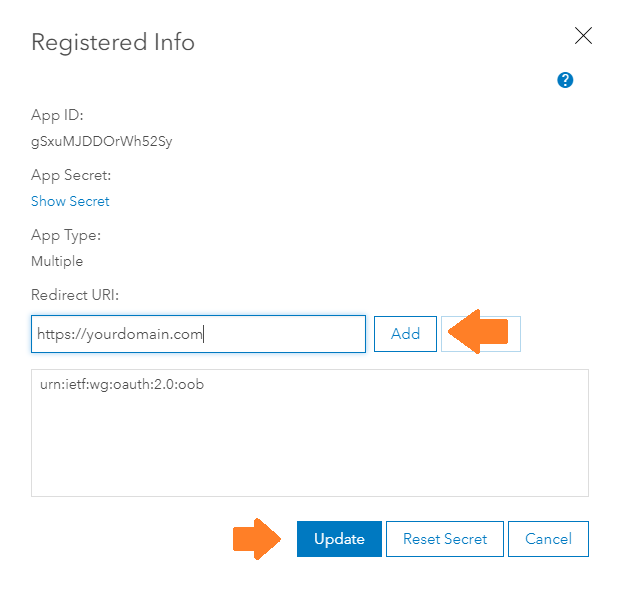
5. A popup with the Registered Info should appear. Any applications a developer builds that will need to OAuth into your ArcGIS organization will need to have their domains added to the approved Redirect URIs of an OAuth application. Add the appropriate domains in the textbox, then click “Add”. After your domains are all added, click the “Update” button at the bottom of the popup.
And there you have it! Five easy steps and you’re ready to use OAuth 2.0 in your ArcGIS Organization.
 You can relax, knowing your ArcGIS content is safe and only accessible by who you choose. Image Source
Conclusion
Securing your ArcGIS data is important. OAuth 2.0 can make it simple. If you need any assistance setting up OAuth for your ArcGIS Organization, or need some custom applications built while keeping your data secure, reach out to us at connect@geo-jobe.com. We’ll be glad to help!
Liked this article? Here’s more cool stuff
You must be a registered user to add a comment. If you've already registered, sign in. Otherwise, register and sign in.