- Home
- :
- All Communities
- :
- Industries
- :
- Public Safety
- :
- Public Safety Blog
- :
- Setting up first-time Users for Mobile Data Collec...
Setting up first-time Users for Mobile Data Collection
- Subscribe to RSS Feed
- Mark as New
- Mark as Read
- Bookmark
- Subscribe
- Printer Friendly Page
- Report Inappropriate Content
As organizations transition from disaster response to recovery, moving from the office to the field for data collection is critical. During recovery, communities will begin conducting formal damage assessments, assessing debris management needs, inspecting infrastructure and assets, and collecting general surveys of needs moving forward. Each of these efforts are ideal use cases for mobile GIS, and at Esri we want to provide you with a quick and easy way to get your field crews up and running today. There are two options for you to consider:
Option 1: Rapid Deployment Solution – the easy button!
The first, and possibly the quickest way to get started is to take advantage of Esri’s rapidly deployable solution. Within a matter of minutes Esri can deploy a solution directly to you that is based on ArcGIS Online. This provides you with named users and ready-to-use apps for damage assessment, debris management, and general field surveys. You do not have to configure a thing. Esri will set usernames and passwords (based on the number of users you need), configure all apps, and then turn over the solution to you to get started collecting data. With this rapid deployment solution, you will get access to mobile apps including Collector for ArcGIS, Survey123 for ArcGIS and Explorer for ArcGIS. We’ll work together to get you up and running in no time.
For those facing a disaster, you can request this solution through the Esri Disaster Response Program (DRP). To get started collecting field data quickly, submit a request for technical support here t the DRP: http://www.esri.com/services/disaster-response/form. Simply add ‘interested in Esri’s Field Collection system’ in the notes and our team will contact you with to start deploying the solution.
Option 2: Self Deployment using your own ArcGIS Organization
There are two methods to get started adding users and configuring your own ArcGIS Online org. Both are very similar and are based on if you have email addresses of the users ahead of time and how your users will access the application for the first time.
In our first scenario, the Administrator sets up users without an initial notification to their email address. Field Users are manually given their Username and Password, they log into the mobile application, and the mobile application asks them to reset their Password. The Field User is then set to go out and collect data. This is the best option if you don't have the email addresses of your Field Users before setting up.
In our second scenario, the Administrator triggers ArcGIS Online or Enterprise to email Field Users with a link that Field Users will use to change their Password and fill out their security question. The security question enables Field Users to more easily reset their Password w/o the need for admin intervention.
Self Deployment Method: Add members without sending invitations
Directions for the Administrator
If you don't have the email addresses of your Field Users, the quickest way to get your field users collecting data in the field securely is to invite them without sending an email. Keep in mind, Field Users will be unable to request a Password reset from ArcGIS Online/Enterprise (after the initial Password reset) automatically without administrator involvement.
1. Establish your Group(s) and information products
When setting up a large group of users for field collection, it's important to first set up the environment that they'll be invited to collaborate in. It's best to share relevant web maps with editable features and/or Survey123 Forms (damage assessment, field assets, etc) to the ArcGIS Online/Enterprise Group when they are ready for the field. You are able to add new configurations for collection after members have been invited to the group, but it's best to have some of the priority information products in the group before inviting new members.
2. Invite Members
With Administrator privileges, the "Organization" tab at the top will give you the dialog to "Invite Members."

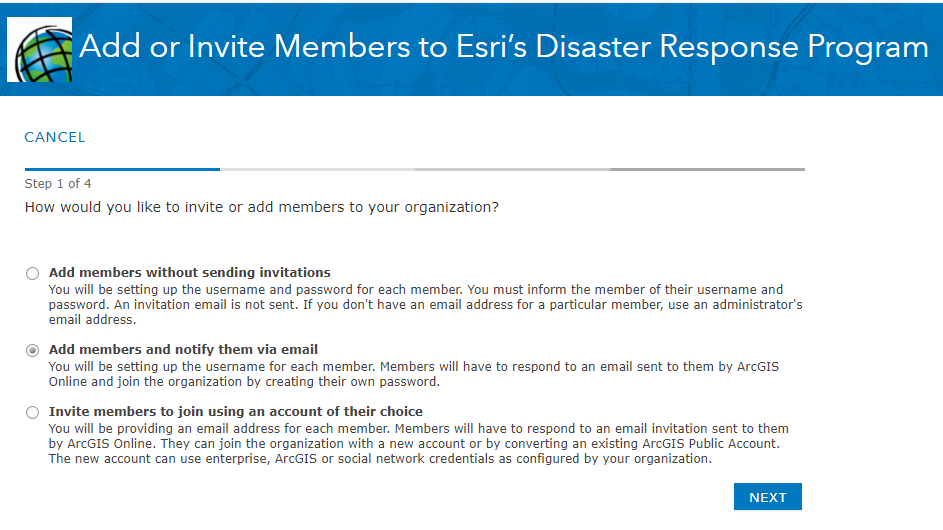
3. Add members without sending invitation
While there are many options for inviting new users, this workflow grants user permissions without sending an email. This saves a few steps for the field users so they won't need to verify and accept their invitation. If you've enabled enterprise logins in your ArcGIS Online/Enterprise Organization, you'll have an additional option in this list.

4. Enter Users "One at a time" or "From a File"
A great new capability that saves time for the administrator is to add users in a bulk upload of a CSV file that contain Email, First Name, Last Name, Username, Password, Level and Role. Field Users will be required to reset their Password at first login, so pick something easy to remember and communicate. Your Field Users will need a Level 2 license in order to edit data in the field, and the default role should be set as User. If you have Custom Roles established, ensure that they are Level 2 and have edit privileges enabled.
The CSV will look like this:

The Field User will reset their Password as soon as they log in, so it's best to use simple and easily-communicated Passwords.

5. Specify Groups and Add Members
Specify groups that contain the web maps and features for field collection to ensure that field users will have web maps to open and begin their work as soon as they can.

6. Give your Field Users their Username and Password
Distribute Usernames and Passwords to your Field Users however you choose.
Directions for the Field User
1. Download the App
Survey123, Collector, Explorer and Workforce are all available on Apple and Android app stores and are free to download. Download the application on your mobile device.
2. Sign in on a Mobile App
Using the username and Password that were given to you by your Administrator, sign in to your mobile application (Survey123, Collector or Explorer) and sign in for the first time.

3. Reset your Password
You'll be asked to reset your Password at your first login. Remember this Password, as you would need to contact the Administrator for a Password reset.

4. Begin using your Field App
Quick Reference Instructions for:
Self Deployment Method: Add Member and Notify them via email
Directions for the Administrator
This is a quick way to set up Field Users that have email registered on their devices. The process for the Field User's first login will be slightly longer, but they will be able to request their Username or Password reset if either are forgotten later.
1. Establish your Group(s) and information products
When setting up a large group of users for field collection, it's important to first set up the environment that they'll be invited to collaborate in. It's best to share relevant web maps with editable features and/or Survey123 Forms (damage assessment, field assets, etc) to the ArcGIS Online/Enterprise Group when they are ready for the field. You are able to add new configurations for collection after members have been invited to the group, but it's best to have some of the priority information products in the group before inviting new members.
2. Invite Members
With Administrator privileges, the "Organization" tab at the top will give you the dialog to "Invite Members."
3. Add members and notify them via email
This workflow grants user permissions and verifies user identity via email. If you've enabled enterprise logins in your ArcGIS Online/Enterprise Organization, you'll have an additional option in this list.
4. Enter Users "One at a time" or "From a File"
A great new capability that saves time for the administrator is to add users in a bulk upload of a CSV file that contain Email, First Name, Last Name, Username, Level and Role. Field Users will be required to reset their Password at first login, so pick something easy to remember and communicate. Your Field Users will need a Level 2 User or Publisher Role in order to edit data in the field. If you have Custom Roles established, ensure that they are Level 2 and have edit privileges.
The CSV will look like this:
The Field User will reset their Password and set security questions as soon as they verify their identity by clicking the link that ArcGIS emails them.
5. Specify Groups and Send Invitation
Specify groups that contain the web maps and features for field collection to ensure that field users will have web maps to open and begin their work as soon as they can.

When you click "Send Invitation", the Field Users will be emailed a link that will activate the Username, Request a Password Change and set a Security Question. Field Users will be unable to log in with their mobile devices without completing this step.
Directions for the Field User
1. Download the App
Survey123, Collector, Explorer and Workforce are all available on Apple and Android app stores and are free to download. Download the application on your mobile device.
2. Click Link emailed to you from "ArcGIS Notifications" (notifications@arcgis.com)

3. Set your Password and Security Question
The link will take you to a browser to enter your Password and set a security question. Enter this information and click 'Sign in'. You'll be directed to your profile information, but you are not required to edit information.

4. Open the Field App and log in
Exit your email and open the field app that you've been directed to use. Enter your username and Password.
5. Begin using your Field App
Quick Reference Instructions for:
You must be a registered user to add a comment. If you've already registered, sign in. Otherwise, register and sign in.