- Home
- :
- All Communities
- :
- Products
- :
- ArcGIS Online
- :
- ArcGIS Online Blog
- :
- ArcGIS Blog: Get to the Point (On Your Map)
ArcGIS Blog: Get to the Point (On Your Map)
- Subscribe to RSS Feed
- Mark as New
- Mark as Read
- Bookmark
- Subscribe
- Printer Friendly Page
- Report Inappropriate Content
Check out this ArcGIS Blog by Scott Sandusky about adding links to Navigator and Trek2There , released in the September 2017 update!
Have dots on your map? Need to travel to them? No worries. Web map pop-ups are here!
Web maps are central to communicating across an organization. They are shared across core ArcGIS apps, web app templates, and custom apps. Pop-ups are a critical tool for providing useful information to web map users. That’s what makes attribute expressions (Arcadeexpressions within pop-ups) so powerful.
Today you can author your pop-up to contain a link to Navigator and Trek2There. This link uses a predefined app link specification, for example the Navigator URL scheme. So, anyone can click a point on your map, then send that point location to those apps, and then navigate to it!
Here’s an example. Try it out.
- Copy the below URL and email it to yourself. Then open this link on your phone.http://esriurl.com/applinkpopups
- Within the map, click any point to see the pop-up. Notice that the pop-up has hyperlinks for Navigator and Trek2There.
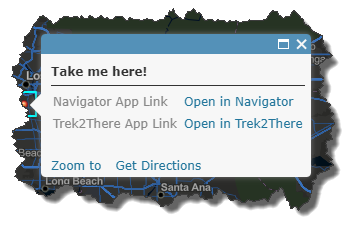
- Presuming you have these two applications on your phone, when you click the “Open in Navigator” link or “Open in Trek2There” link, the x,y point location will be sent to that app. Note: For Navigator, you need to have downloaded a map containing the area you are trying to reach, and that map must be open.
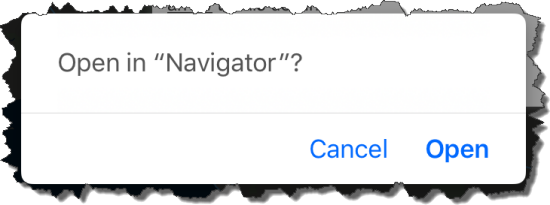
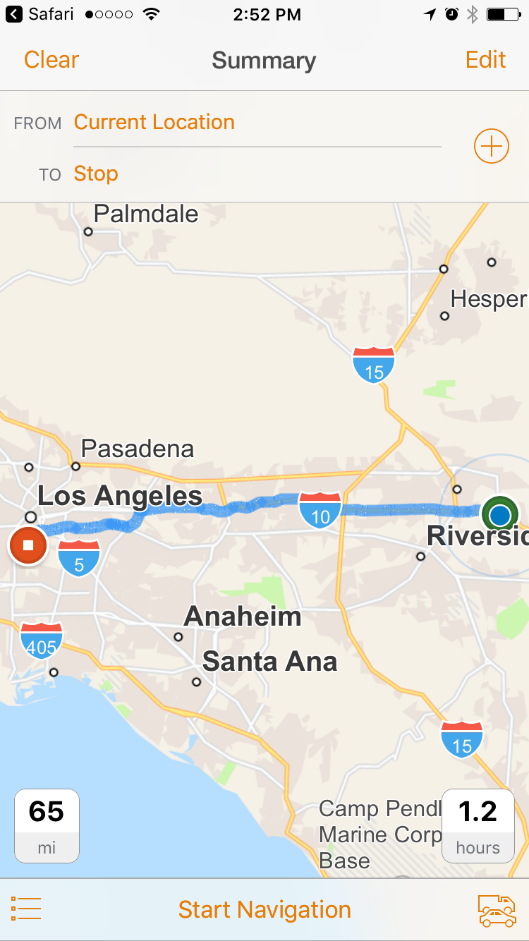
- Navigator (or Trek2There) will automatically open, and have the destination loaded into it.
Next, how can you do this with your own point data? Here’s a step-by-step…
- First, sign into ArcGIS Online and add your point layer to your web map.
- Note: Your point layer must be a feature service, not a feature collection.
- Note: Your basemap must be in WGS 84 projection, for example, World Street Map (WGS84), World Street Map (Night-WGS84), or World Imagery (WGS84)
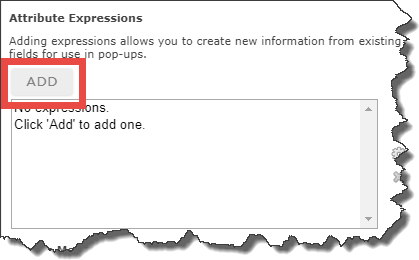
- Next, on your point layer, select “Configure Pop-up”.
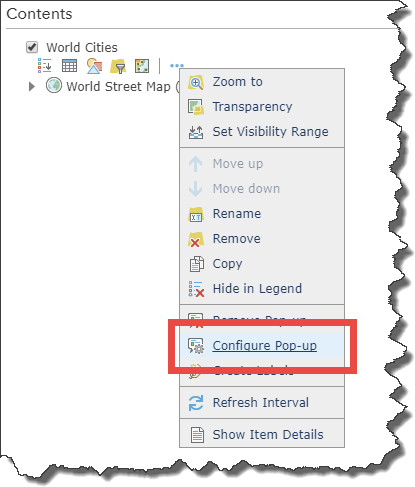
- Choose to add an attribute expression.
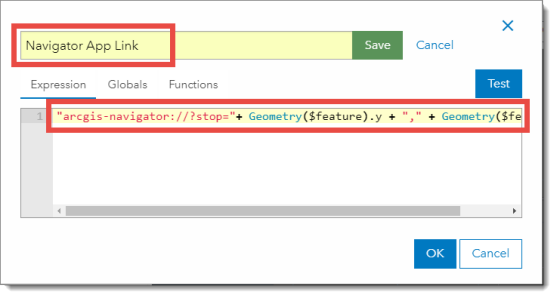
- Edit the name of the expression, and give it a name, for example, “Navigator App Link”. Save the expression name.
- Within the expression, delete any existing sample text, and paste in the below expression.
- For Navigator: “arcgis-navigator://?stop=”+ Geometry($feature).y + “,” + Geometry($feature).x
- For Trek2There: “arcgis-trek2there://?stop=”+ Geometry($feature).y + “,” + Geometry($feature).x
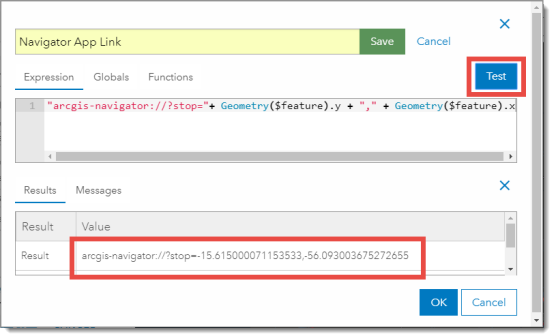
- Test the expression and verify that the result looks like the result below. Once verified, click OK.
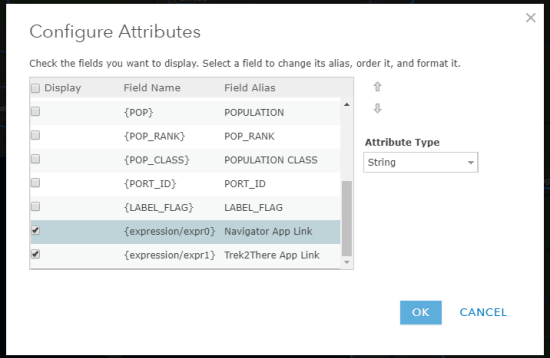
- Next, set the display to “A list of field attributes”. Then choose “Configure Attributes”.
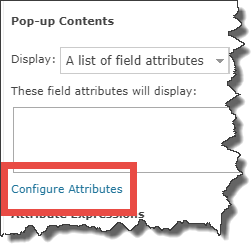
- Scroll down to the bottom of the attribute list to see the two attribute expressions you created above. Check these two attributes, and uncheck the rest. When done, click OK.
- That should be it! On the Configure Pop-up dialog you may want to add a title. Once completed, click OK.
Now give your web map a try! Remember that you need to have Navigator or Trek2There installed on the device where you are viewing the web map. Also, not all ArcGIS apps (like Explorer or Collector) support these web map pop-ups today. Enjoy!
You must be a registered user to add a comment. If you've already registered, sign in. Otherwise, register and sign in.