- Home
- :
- All Communities
- :
- Industries
- :
- Education
- :
- Education Blog
- :
- Fun with GIS 229: Presentation Power
Fun with GIS 229: Presentation Power
- Subscribe to RSS Feed
- Mark as New
- Mark as Read
- Bookmark
- Subscribe
- Printer Friendly Page
- Report Inappropriate Content
ArcGIS Online presentations rock! They present viewers with an interactive set of content, in a linear fashion, all in a single map or scene, with minimal tools. Story Maps have taken the world by storm, but anything beyond the very simplest take significant time and "another app" to build. Presentations, however, are just customized views of a single map or scene, and a total novice with a saved map can build a reasonable presentation in just a few minutes.

See this simple 2D presentation about earthquakes (from Row 5 of the ArcGIS Online Skillbuilder). Note the navigation tools, top left and bottom center: pan/zoom or choose your slide, and that's it ("identify feature" works too). Header text doubles as slide name. The creator gets to emphasize his/her info, sequencing the exposed and highlighted content, and the viewer gets to follow or explore but only as the creator permits.
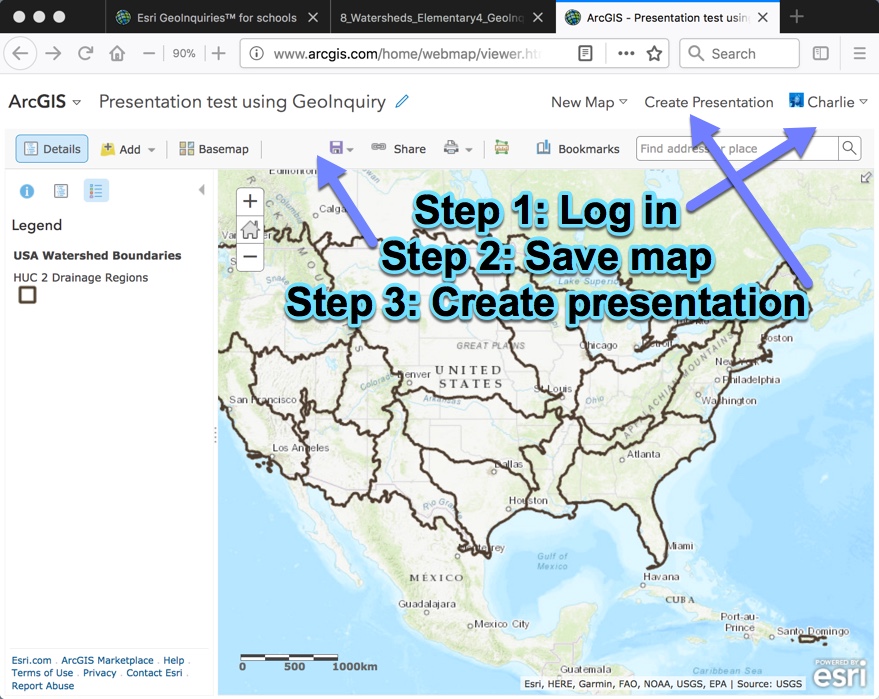
To build a presentation, one must be logged in (both Organization-based and public logins work) and have a saved map to work with. Let's try an example, using a specific GeoInquiry.
- Go to http://www.esri.com/geoinquiries and click the "Elementary" icon.
- Scroll down to "08 - Where does the water go?" and click the lesson icon.
- Open the Map URL: http://esriurl.com/fourgeoinquiry8. (it's OK to use the current tab.)
- Notice that you cannot create a presentation until you own the map. Sign in, and then immediately choose to save the map in your contents.
- Once signed in and with map saved, "Create Presentation" appears next to your login. Click it.
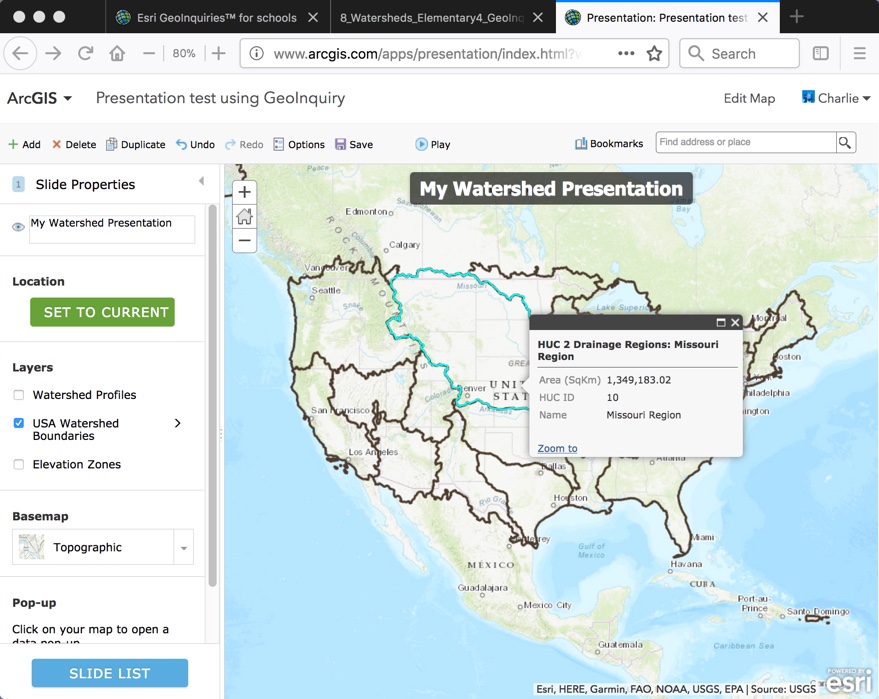
- Click the green "+" button to begin creating a slide. From here on, it just takes deciding what you want to show, in what sequence.
- In the title box near the top, type some text, such as "My Watershed Presentation;" it shows atop the map.
- Pan & zoom to adjust the map extent as desired, then click the green "SET TO CURRENT" button to lock in the current map extent as the starting point for this slide.
- Turn layers on/off, and/or change the basemap as desired.
- Open a popup, and click the checkbox if you want it to open with the slide.
- You've completed a slide! Now just repeat steps 6-10 as desired. You can shuffle the slide sequence, and edit existing slides. Remember to SAVE your presentation, and hit the PLAY button to test it.
It takes some experience to get good at building just the right presentation in the 2D Map Viewer, and the 3D Scene Viewer takes more, but they are very powerful for instruction. Using just a single map, a presentation forces the map creator to think critically about the design of their map, and about the user experience. There's no option for external media to complicate things. This is crucial, focusing the learner on the contents, how they are represented, and what are the most significant lessons … making presentations a nice little performance task for teachers who crave these.
Consider having your students build presentations using a GeoInquiry. In a 40-minute period, you could spend 15 minutes going through the lesson, then ask students to spend 15 minutes creating a 3-slide presentation, then have them spend 10 minutes sharing their creation with someone else, before wrapping up. The "tedious and time-consuming part" (creating the map) is already done, so teachers and students can focus on the most critical part -- what does it all mean? -- in the precious few minutes available in class.
You must be a registered user to add a comment. If you've already registered, sign in. Otherwise, register and sign in.
-
Administration
38 -
Announcements
44 -
Career & Tech Ed
1 -
Curriculum-Learning Resources
178 -
Education Facilities
24 -
Events
47 -
GeoInquiries
1 -
Higher Education
518 -
Informal Education
265 -
Licensing Best Practices
46 -
National Geographic MapMaker
10 -
Pedagogy and Education Theory
187 -
Schools (K - 12)
282 -
Schools (K-12)
184 -
Spatial data
24 -
STEM
3 -
Students - Higher Education
231 -
Students - K-12 Schools
85 -
Success Stories
22 -
TeacherDesk
1 -
Tech Tips
83
- « Previous
- Next »